
Service Manual

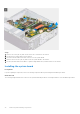
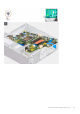
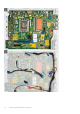

Table Of Contents
- Precision 3460 Small Form Factor Service Manual
- Contents
- Working inside your computer
- Removing and installing components
- Recommended tools
- Screw list
- Major components of Precision 3460 Small Form Factor
- Side cover
- Front bezel
- Hard drive
- Hard-drive and optical-drive bracket
- M.2 solid-state drive
- Removing the M.2 2230 solid-state drive (slot-1)
- Installing the M.2 2230 solid-state drive (slot-1)
- Removing the M.2 2230 solid-state drive (slot-2)
- Installing the M.2 2230 solid-state drive (slot-2)
- Removing the M.2 2280 solid-state drive (slot-1)
- Installing the M.2 2280 solid-state drive (slot-1)
- Removing the M.2 2280 solid-state drive (slot-3)
- Installing the M.2 2280 solid-state drive (slot-3)
- WLAN card
- WLAN antenna
- Coin-cell battery
- Memory
- Hard-drive and optical-drive supporting bracket
- Expansion card
- Optical drive
- Speakers
- Processor fan and heat-sink assembly
- Processor
- Power-supply unit
- Fan
- Power button
- Intrusion switch
- SD-card reader
- Optional I/O modules (PS2/Serial)
- System board
- Software
- System setup
- Troubleshooting
- Getting help and contacting Dell

Steps
1. Align and lower the system board into the system until the stand-off points at the back of the system board align with those
on the chassis.
2. Replace the five screws (#6-32) to secure the system board to the chassis.
3. Connect all the cables to the respective connectors on the system board.
4. Align and place the I/O panel into the slot on the chassis.
5. Replace the screw (#6-32) to secure the I/O panel to the chassis.
Next steps
1. Install the processor.
2. Install the heat-sink and fan assembly.
3. Install the expansion card.
4. Install the WLAN card.
5. Install the solid-state drive.
6. Install the memory modules.
7. Install the hard-drive and optical-drive cage.
8. Install the 3.5-inch hard-drive.
9. Install the 2.5-inch hard-drive.
10. Install the front bezel.
11. Install the side cover.
12. Follow the procedure in after working inside your computer.
Removing and installing components
77