User’s Guide Dell P2314T Dell P2714T Regulatory model: P2314Tt / P2714Tt
NOTE: A NOTE indicates important information that helps you make better use of your computer. CAUTION: A CAUTION indicates potential damage to hardware or loss of data if instructions are not followed. WARNING: A WARNING indicates a potential for property damage, personal injury, or death. © 2013 Dell Inc. All rights reserved. Information in this document is subject to change without notice. Reproduction of these materials in any manner whatsoever without the written permission of Dell Inc.
Contents About Your Monitor . . . . . . . . . . . . . . . . . . . . . . . . . . . . . . . . . . . . . 5 Package Contents . . . . . . . . . . . . . . . . . . . . . . . . . . . . . . . . 5 Features . . . . . . . . . . . . . . . . . . . . . . . . . . . . . . . . . . . . . . 6 Parts and Controls . . . . . . . . . . . . . . . . . . . . . . . . . . . . . . . . 7 Specifications . . . . . . . . . . . .
Troubleshooting . . . . . . . . . . . . . . . . . . . . . . . . . . . . . . . . . . . . . . . . 35 Self-Test . . . . . . . . . . . . . . . . . . . . . . . . . . . . . . . . . . . . . .35 Built-in Diagnostics . . . . . . . . . . . . . . . . . . . . . . . . . . . . . . .36 Common Problems . . . . . . . . . . . . . . . . . . . . . . . . . . . . . . .37 Touchscreen Problems . . . . . . . . . . . . . .
About Your Monitor Package Contents Your monitor ships with the components shown below. Make sure that you have received all the components and contact Dell if something is missing. NOTE: Some items may be optional and may not ship with your monitor. Some features or media may not be available in certain countries. NOTE: To set up with any other stand, see the documentation for the stand. Monitor with stand Power cable (varies by country) Power adapter HDMI cable USB 3.
Screen cleaning cloth Velcro strap • Quick Setup Guide • Drivers and Documentation media • Product and Safety Information Guide Features The Dell P2314T and P2714T flat panel displays have an active matrix, thin-film transistor (TFT), liquid crystal display (LCD), and LED backlight. The monitor features include: • P2314T: 58.42 cm (23-inch) active area display (measured diagonally) 1920 X 1080 resolution (with full-screen support for lower resolutions). • P2714T: 68.
Parts and Controls Front view Side-panel controls 1 2 Label 1 2 Description Function buttons (For more information, see Operating the Monitor) Power On/Off button (with indicator light) Back View 1 2 5 3 4 Label Description Use 1 100 mm x 100 mm VESA mounting Wall mount monitor using holes (under VESA cover) 100 mm x 100 mm VESA‑compatible wall‑mount kit. 2 Regulatory label Lists the regulatory approvals.
Bottom View 10 1 2 4 Label 1 2 3 Description Power-cable connector DisplayPort connector HDMI (MHL) 1 port 4 HDMI (MHL) 2 port 5 VGA port 6 Audio line-out port 7 USB upstream port 8 USB 2.0 downstream ports 9 Security-cable slot 10 USB 3.0 downstream ports 8 About Your Monitor 3 5 6 7 8 9 Use Connect the power cable. Connect the DisplayPort cable. Connect your computer with HDMI cable or portable device with MHL cable (optional).
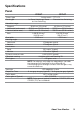
Specifications Panel P2314T Screen type Panel type Viewable image: Diagonal Horizontal (active area) Vertical (active area) Area Pixel pitch Viewing angle: Horizontal Vertical Luminance: Panel Monitor Dynamic contrast ratio Faceplate coating Glass gloss Backlight Response Time Color depth Color gamut (Typical) P2714T Active matrix - TFT LCD In-Plane Switching / Plane Plane to Line Switching to Line Switching 58.42 cm (23 inches) 509.18 mm (20.05 inches) 286.42 mm (11.28 inches) 145839.34 mm2 (226.
Touch P2314T Type Panel Diagonal Panel Thickness Active Area Sensor Stack thickness Cover Glass Thickness Input Method Touch point Response time Output position resolution Touch method Operating system P2714T Projected Capacitive System 23.1 inch 27.1 inch 2.4 mm 3.1 mm Extended beyond Viewing Area 0.5 mm 1.1 mm 1.
Environmental Characteristics Temperature: Operating Non-operating Humidity: Operating Non-operating Altitude Operating Non-operating Thermal dissipation: P2314T P2714T 0°C to 40°C (32°F to 104°F) –20°C to 60°C (–4°F to 140°F) 10% to 80% (non-condensing) 5% to 90% (non-condensing) 5,000 m (16,400 ft) max 12,191 m (40,000 ft) max 88.7 BTU/hour (maximum) 58.0 BTU/hour (typical) 95.9 BTU/hour (maximum) 64.
P2714T Display Mode Horizontal Frequency (kHz) Vertical Frequency (Hz) Pixel Clock (MHz) Sync Polarity (Horizontal/ Vertical) 720 x 400 640 x 480 640 x 480 800 x 600 800 x 600 1024 x 768 1024 x 768 1152 x 864 1280 x 1024 1280 x 1024 1600 x 900 1920 X 1080 31.5 31.5 37.5 37.9 46.9 48.4 60.0 67.5 64.0 80.0 60.0 67.5 70.0 60.0 75.0 60.0 75.0 60.0 75.0 75.0 60.0 75.0 60.0 60.0 28.3 25.2 31.5 40.0 49.5 65.0 78.8 108.0 108.0 135.0 108.0 148.
Stand dimensions Height Width Depth 298.4 mm (11.75 inches) 352.0 mm (13.86 inches) 77.4 mm (3.05 inches) 298.4 mm (11.75 inches) 352.0 mm (13.86 inches) 77.4 mm (3.05 inches) 8.98 kg (19.76 lb) 11.49 kg (25.28 lb) 7.10 kg (15.62 lb) 9.39 kg (20.66 lb) 4.82 kg (10.60 lb) 7.11 kg (15.64 lb) 1.46 kg (3.21 lb) 1.46 kg (3.
The OSD only function in the normal operation mode. If you press any button in Active‑off mode, the following message is displayed: Pin Assignments VGA Pin number 15-pin side of the cable Pin number 15-pin side of the cable 1 2 3 4 5 6 7 8 Video-Red Video-Green Video-Blue GND Self-test GND-R GND-G GND-B 9 10 11 12 13 14 15 Computer 5 V/3.
HDMI Pin number 19-pin side of the port Pin number 19-pin side of the port 1 TMDS DATA 2+ 11 TMDS CLOCK SHIELD 2 TMDS DATA 2 SHIELD 12 TMDS CLOCK- 3 TMDS DATA 2- 13 Floating 4 TMDS DATA 1+ 14 Floating 5 TMDS DATA 1 SHIELD 15 DDC CLOCK (SDA) 6 TMDS DATA 1- 16 DDC DATA (SDA) 7 TMDS DATA 0+ 17 GROUND 8 TMDS DATA 0 SHIELD 18 +5 V POWER 9 TMDS DATA 0- 19 HOT PLUG DETECT 10 TMDS CLOCK DisplayPort (DP) Pin Number 20-pin side of the port Pin Number 20-pin side of the po
USB This section gives you information about the USB ports available on your monitor. Your computer has the following USB ports: • One USB 3.0 upstream port — back • Two USB 2.0 downstream ports — back • Two USB 3.0 downstream ports — left side NOTE: USB 3.0 functionality requires a USB 3.0 compatible computer. NOTE: The monitor’s USB ports work only when the monitor is on or in the power save mode.
Plug-and-Play You can install the monitor in any Plug-and-Play-compatible computer. The monitor automatically provides its Extended Display Identification Data (EDID) to the computer using Display Data Channel (DDC) protocols so the computer can configure itself and optimize the monitor settings. Most monitor installations are automatic; you can select different settings if desired. For Setting Up the Monitor more information about changing the monitor settings, see Operating the Monitor.
Setting Up the Monitor Preparing the Stand NOTE: The stand is attached when the monitor is shipped from the factory. 1. Place the monitor on a soft cloth or cushion. 2. Pull the monitor stand arm upwards clear of the monitor. 3. Place the monitor upright. Connecting Your Monitor WARNING: Follow the safety instructions before you perform any of the procedures in this section. To connect your monitor to the computer: 1. Turn off your computer and disconnect the power cable from the wall outlet. 2.
Connecting the VGA cable (cable sold separately) Connecting the DisplayPort (or miniDP) cable (cable sold separately) Connecting the HDMI cable Connecting the USB cable NOTE: The graphics used are for illustration purpose only. Appearance of the computer may vary.
Organizing Cables After you connect all necessary cables to your monitor and computer, use the cablemanagement slot to organize the cables. Wall Mounting (Optional) NOTE: Use M4 x 10 mm screws to mount your display. For more details, see the instructions that came with the VESA-compatible wall‑mounting kit. 1. Place the monitor on a soft cloth or cushion on a stable flat table. 2. Remove the stand. 3. Use a screwdriver to remove the four screws that secure the back cover. 4.
Operating the Monitor Side‑Panel Controls Use the control buttons on the front of the monitor to adjust monitor and image settings. Pressing these buttons displays the OSD with the details of the settings that you can change. 1 2 3 4 5 The following table describes the front panel buttons: Front‑panel button Description 1 Use this button to choose from a list of preset color modes. Shortcut key: Preset Modes Use this button to directly access the “Brightness/ Contrast” menu.
Front‑panel button Description 4 Use this button to go back to the main menu or exit the OSD main menu. Exit 5 Power (with power light indicator) Use this button to turn the monitor turn-on or turnoff the monitor. A solid white light on this button indicates the monitor is on and fully functional. A blinking/breathing white light indicates DPMS power save mode. Front‑Panel Button 1 2 3 Use the buttons on the front of the monitor to adjust the image settings.
Using the On-Screen Display (OSD) Menu Accessing the Menu System NOTE: Any changes you make using the OSD menu are automatically saved if you move to another OSD menu, exit the OSD menu, or wait for the OSD menu to disappear. 1. Press the button to launch the OSD menu and display the main menu. NOTE: Auto Adjust feature is only available when you use the VGA connector. 2. Press the and buttons to move between options. As you move from one icon to another, the option name is highlighted. 3.
OSD Options Menu and Submenus Energy Use Description This meter shows, in real time, the energy level being consumed by the monitor. Use this menu to activate Brightness/Contrast adjustment. Brightness/Contrast Brightness Brightness adjusts the luminance of the backlight (minimum 0; maximum 100). Press the button to increase brightness. Press the button to decrease brightness. NOTE: Brightness control is disabled during “Screen dim” in PowerNap option when screen saver is activated.
Menu and Submenus Description The Auto Adjust feature optimizes the display settings for use with your setup. Auto Adjust feature allows the monitor to automatically adjust to the incoming video signal. After using Auto Adjust feature, you can further tune your monitor by using the Pixel Clock and Phase controls under Displays Settings.
Menu and Submenus Description HDMI(MHL)1 Select HDMI(MHL)1 and press when your computer and monitor are connecting using the HDMI(MHL)1 cable. HDMI(MHL)2 Select HDMI(MHL)2 and press when your computer and monitor are connecting using the HDMI(MHL)2 cable. Use the Color Settings menu to adjust the monitor’s color settings Color Settings Input Color Format Allows you to set the video input mode to.
Menu and Submenus Preset Mode Image Enhance Hue Description Standard: Default color settings. This is the default preset mode. Multimedia: Ideal for multimedia applications. Movie: Ideal for movies. Game: Ideal for most gaming applications. Text: Ideal for office Warm: Increases the color temperature. The screen appears warmer with a red/yellow tint. Cool: Decreases the color temperature. The screen appears cooler with a blue tint. Custom Color: Allows you to manually adjust the color settings.
Menu and Submenus Saturation Reset Color Settings Description This feature adjusts the color saturation of the video image. Use or to adjust the saturation from 0 to 100. Press to increase the monochrome appearance. Press to increase the colorful appearance. NOTE: Saturation adjustment is available only for video input. Resets your monitor’s color settings to the factory defaults. Display Settings Aspect Ratio Horizontal Position Vertical Position Adjust the image ratio to Wide 16:9, 4:3, or 5:4.
Menu and Submenus Description Energy Settings Energy Smart Turn-on or turn-off dynamic dimming. Turning on Energy Smart activates dynamic dimming. With Energy Smart turned on, the monitor consumes overall less power compared to when Energy Smart is turned off. NOTE: Under Energy Smart mode and with dark scenes the monitor consumes less power and the Energy Use bar decreases. For bright scenes the monitor will consume more power and the energy level increases.
Menu and Submenus Description Menu Settings Language Transparency Timer Lock Reset Menu Settings Set the OSD display to one of eight languages. English, Espanol, Francais, Deutsch, Brazilian Portuguese, Russian, Simplified Chinese, or Japanese. This function is used to change the OSD background from opaque to transparent. OSD Hold Time: Sets the length of time the OSD remains active after you press a button. Use the and buttons to adjust the slider in 1-second increments, from 5 to 60 seconds.
Menu and Submenus Description Other Settings Select this option to adjust the OSD settings, such as the DDC/CI, LCD Conditioning, and so on. DDC/CI DDC/CI (Display Data Channel/Command Interface) allows you to adjust the monitor settings using software on your computer. Enable this feature for best user experience and optimum performance of your monitor. Select Disable to turn off this feature. LCD Conditioning Helps reduce minor cases of image retention.
Menu and Submenus Description Factory Reset Restores all OSD settings to the factory defaults. Personalize Reset Personalization Select from Preset Modes, Brightness/Contrast, Auto Adjust, Input Source, Aspect Ratio and set as shortcut key. Restores shortcut keys to factory defaults. OSD Warning Messages When the monitor does not support a display resolution, the following message appears: This means that the monitor cannot synchronize with the signal that it is receiving from the computer.
The following message is displayed when monitor enters Power Save mode. Activate the computer and wake up the monitor to gain access to the OSD If you press any button other than the power button, the following message appears: If you set the input to a particular mode but the cable for that mode (VGA, DP, or HDMI) is disconnected, one of the following messages appears, depending on the selected input. or or For help on resolving errors, see Troubleshooting.
Setting the Maximum Resolution Windows Vista, Windows 7, or Windows 8/Windows 8.1 1. For Windows 8/Windows 8.1 only, select the Desktop tile to switch to classic desktop. 2. Right-click on the desktop and click Screen resolution. 3. Click the drop-down list of the screen resolution and select 1920 X 1080. 4. Click OK. If you do not see 1920 X 1080 as an option, you may need to update your video driver. For more information on updating video drivers, see Appendix.
Troubleshooting CAUTION: Follow the safety instructions before you perform any of the procedures in this section. Self-Test Your monitor features a self-test feature that allows you to check whether your monitor is functioning properly. If your monitor and computer are properly connected but the monitor screen remains dark, run the monitor self-test by performing the following steps: 1. Turn off your computer and the monitor. 2. Unplug the display cable from the back of the computer.
Built-in Diagnostics Your monitor has a built-in diagnostic tool that helps you determine if the problems is with your monitor or with your computer and video card. NOTE: You can run the built-in diagnostics only when no display cables are connected and the monitor is in self-test mode. 1 2 3 4 To run the built-in diagnostics: 1. Make sure the screen is clean. 2. Unplug the display cable(s) from the computer or the monitor. The monitor enters the self-test mode. 3.
Common Problems The following table contains information about resolving common monitor problems. Common Symptoms What You Experience No Video No picture (Power light off) Possible Solutions • Make sure the display cable connecting the monitor and the computer is properly connected and secure. • Make sure the power outlet is functioning properly using any other electrical equipment. • Make sure the power button is not pressed-in.
Common Symptoms What You Experience Possible Solutions • Reset the monitor to factory settings. • Auto Adjust using OSD. • Adjust brightness and contrast using the OSD. • Reset the monitor to factory settings. Screen not Geometric • Auto Adjust using OSD. centered Distortion • Adjust horizontal and vertical positions using correctly OSD. • Reset the monitor to factory settings. • Perform Auto Adjust using OSD. • Adjust Phase and Pixel Clock using OSD.
Common Symptoms Wrong Color Image retention from a static image left on the monitor for a long period of time Safety Related Issues What You Experience Possible Solutions Picture color not good • Change the Color Setting Mode in the Color Settings OSD to Graphics or Video depending on the application. • Try different Color Preset Settings in Color Settings OSD. Adjust R/G/B value in Color Settings OSD if the Color Management is turned off.
Specific Symptoms What You Experience Possible Solutions Windows 7 and Windows 8/ Windows 8.1 Calibration Cursor does not accurately follow your finger when you touch the screen 1. Open Control Panel, open Hardware and Sound, and then open Tablet PC Settings. 2. Select Calibration. 3.
Appendix Safety Instructions WARNING: Use of controls, adjustments, or procedures other than those specified in this documentation may result in exposure to shock, electrical hazards, and/or mechanical hazards. For information on safety instructions, see the Product Information Guide. FCC Notices (U.S. only) and Other Regulatory Information For FCC notices and other regulatory information, see the regulatory compliance website located at dell.com/regulatory_compliance.
Setting Display Resolution to 1920 X 1080 (maximum) For maximum display performance while using the Microsoft Windows operating systems, set the display resolution to 1920 X 1080 pixels by performing the following steps: Windows XP 1. Right-click on the desktop and click Properties. 2. Select the Settings tab. 3. Move the slider-bar to the right by pressing and holding the left-mouse button and adjust the screen resolution to 1920 X 1080. 4. Click OK. Windows Vista, Windows 7, or Windows 8/Windows 8.1 1.
Windows Vista, Windows 7, or Windows 8/Windows 8.1 1. 2. 3. 4. Right-click on the desktop and click Personalization. Click Change Display Settings. Click Advanced Settings. Identify your video card manufacturer (such as NVIDIA, ATI, Intel, and so on) from the description at the top of the window. 5. See the computer or video‑card manufacturer’s website for updated drivers. After installing the updated drivers for your video card, try setting the resolution to 1920 X 1080 again.
Using display settings Windows Vista 1. Right-click on the desktop and click Personalize. 2. Click Display Settings. 3. Click Identify Monitors and select the appropriate options. NOTE: If your computer does not detect the second monitor, restart your computer and repeat step 1 to step 3.
Windows 7 1. Right-click on the desktop and click Screen resolution. 2. Click Multiple displays to choose a display selection. If you do not see the additional monitor listed, click Detect. NOTE: If your computer does not detect the second monitor, restart your computer and repeat step 1 to step 3.
Windows 8/Windows 8.1 1. From the Start screen, select Desktop tile to switch to the classic Windows desktop. 2. Right-click on the desktop and click Screen resolution.
3. Click Multiple displays to choose a display selection. If you do not see the additional monitor listed, click Detect. NOTE: If your computer does not detect the second monitor, restart your computer and repeat step 1 to step 3.
Display Styles For Multiple Monitors After connecting external monitors, you can choose to duplicate, extend, or use only one of the monitors. Duplicate displays This option shows the same content on all monitors. The resolution of all monitors is set to match the monitor with the minimum resolution. Windows Vista [DUPLICATE NOT AVAILABLE] Windows 7 Windows 8/Windows 8.
Extend displays This option shows separate content on the selected monitors. The resolution of each monitor can be set independently. You can set the relative position of the displays. you can match the location of the screen relative to the physical placement of the monitors, such as left, right, top, bottom, and so on. To set the position, drag the monitor icons to the desired position.
Windows 8/Windows 8.1 Show desktop only on… This option allows you to select the monitor to display content. You can choose to use any one of the monitors connected to your computer—or in case of laptop, the built-in display or the external display. This option is generally used when a laptop with a lowerresolution display is connected to a higher-resolution external display and you want to see the content only on the external monitor.
Windows 7 Appendix 51
Windows 8/Windows 8.