
User manual


202
Scanning
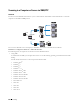
Scanning Using the TWAIN Driver
Your printer supports the TWAIN driver for scanning images. TWAIN is one of the standard components provided
by Windows Vista
®
, Windows
®
7, Windows
®
8, Windows
®
8.1, Windows Server
®
2003, Windows Server
®
2008,
Windows Server
®
2008 R2, Windows Server
®
2012, Windows Server
®
2012 R2, Mac OS X 10.6, OS X 10.7, OS X
10.8, OS X 10.9, and OS X 10.10, and works with various scanners.
NOTE:
Ensure that the printer is connected to the computer using the Ethernet or USB cable.
1
Load the document(s) face up into the ADF with the top edge of the document(s) in first.
OR
Place a single document face down on the document glass, and close the document cover.
For details about loading a document, see "Making Copies From the ADF" on page 191 or "Making Copies From
the Document Glass" on page 189.
2
Start the graphic software such as Adobe
®
Photoshop
®
.
3
From the software, select the command that starts the scanning, and then select the printer as a scanner.
The procedure for selecting the scan start command varies depending on the software. For details, see the manual
supplied with the software.
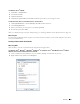
4
Select your scanning preferences and click
Preview
to display the preview image.
NOTE:
Preview is available only when you place a document on the document glass.
NOTE:
The illustration may vary for different operating systems.
5
Select the desired properties from the
Image Quality
and
Image Options
tabs.
6
Click
Scan
to start scanning.
7
Follow the on-screen instructions to edit the picture after it is copied to your computer.