Dell-skjerm for spill - S2522HG Brukerhåndbok Modell: S2522HG Reguleringsmodell: S2522HGb
MERKNAD: Et MERKNAD angir viktig informasjon som vil hjelpe deg dra bedre nytte av din datamaskin. FORSIKTIGHET: FORSIKTIGHET angir potensiell skade på maskinvaren eller tap av data hvis du ikke følger instruksjonene. ADVARSEL: En ADVARSEL angir et potensial for skade på eiendom, personskade eller død. Copyright © 2021 Dell Inc. eller dets datterselskaper. Alle rettigheter reservert. Dell, EMC og andre varemerker er varemerker for Dell Inc. eller dets datterselskaper.
Innhold Sikkerhetsinstruksjoner . . . . . . . . . . . . . . . . . . . . . . 6 Om skjermen . . . . . . . . . . . . . . . . . . . . . . . . . . . . . . . 7 Pakkeinnhold . . . . . . . . . . . . . . . . . . . . . . . . . . . . . . . . . . . 7 Produktfunksjoner . . . . . . . . . . . . . . . . . . . . . . . . . . . . . . . 8 Identifisering av deler og kontroller . . . . . . . . . . . . . . . . . 10 Sett forfra. . . . . . . . . . . . . . . . . . . . . . . . . . . . . . . . . . . . . . . . . . . .
Retningslinjer for vedlikehold . . . . . . . . . . . . . . . . . . . . . 27 Rengjøring av skjermen . . . . . . . . . . . . . . . . . . . . . . . . . . . . . . . . . 27 Konfigurering av skjermen . . . . . . . . . . . . . . . . . . . 28 Konfigurering av stativet . . . . . . . . . . . . . . . . . . . . . . . . . 28 Koble til skjermen . . . . . . . . . . . . . . . . . . . . . . . . . . . . . . . 31 Koble DisplayPort (DP til DP)-kabelen og strømkabelen. . . . . . . . 31 Koble HDMI-kabelen og strømkabelen. . . .
Justere innstillingene for skjermens rotasjon for ditt system . . . . . . . . . . . . . . . . . . . . . . . . . . . . . . . . . . . . . . . 57 Feilsøking . . . . . . . . . . . . . . . . . . . . . . . . . . . . . . . . 58 Selvtest . . . . . . . . . . . . . . . . . . . . . . . . . . . . . . . . . . . . . . Innebygd diagnostikk . . . . . . . . . . . . . . . . . . . . . . . . . . . . Vanlige problemer . . . . . . . . . . . . . . . . . . . . . . . . . . . . . . Produktspesifikke problemer . . . . . . . . . . .
Sikkerhetsinstruksjoner FORSIKTIGHET: Hvis andre kontroller, justeringer eller prosedyrer enn de som nevnes i denne dokumentasjonen brukes, kan dette føre til eksponering for støt, elektriske farer og/eller mekaniske farer. • Sett skjermen på en solid overflate og sørg for at du håndterer den forsiktig. Skjermen er skjør og kan skades hvis den tappes eller treffes kraftig. • Bekreft alltid at skjermen er elektrisk klassifisert for å kunne fungere med vekselstrøm som er tilgjengelig der du er.
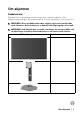
Om skjermen Pakkeinnhold Skjermen leveres med komponentene som vises i tabellen nedenfor. Hvis komponentene mangler, ta kontakt med Dell. For mer informasjon, se Kontakt Dell. MERKNAD: Noen produkter kan være valgfrie og leveres kanskje ikke med skjermen. Noen funksjoner er kanskje ikke tilgjengelig i visse land. MERKNAD: Ved tilkobling av et stativ som kjøpes fra en annen kilde, må du alltid følge installasjonsinstruksjonene som leveres med stativet.
Strømkabel (varierer fra land til land) DisplayPort til DisplayPort 1.2-kabel HDMI 2.0-kabel SuperSpeed USB 5 Gbps (USB 3.2 Gen1) oppstrømskabel (aktiverer USB-porter på skjermen) • Hurtigstartguide • Sikkerhets-, miljø- og forskriftsinformasjon Produktfunksjoner Dell S2522HG-skjermen kommer med en aktiv matrise, tynnfilmstransistor (TFT), liquid crystal display (LCD) og LED-bakgrunnslys. Monitorens funksjoner inkluderer: • 62,20 cm (24,50 tommer) synlig område (målt diagonalt).
• Støtter en høy oppdateringsfrekvens på 240 Hz og en rask responstid på 1 ms grå til grå i Extreme (Ekstrem)-modusen* • Fargespekter på 99% sRGB • Funksjoner for justering av vippe, svinge, spindel og rotasjon • Digital tilkobling med DisplayPort og HDMI • Utstyrt med en SuperSpeed USB 5 Gbps (USB 3.2 Gen1) Type-B oppstrømsport, en SuperSpeed USB 5 Gbps (USB 3.2 Gen1) Type-A nedstrøms ladeport og tre SuperSpeed USB 5 Gbps (USB 3.2 Gen1) Type-A nedstrømsporter. • Aktivert med støtte for VRR-spillkonsoll.
Identifisering av deler og kontroller Sett forfra Etikett 1 2 Beskrivelse Bruk Strøm på/av-knapp (med LED-indikator) For å slå skjermen på eller av. Nedlys Når skjermoppsettet er fullført, må du trykke på berøringssensoren som finnes nederst på skjermen for å slå nedlysene på eller av (se Nedlys og Downlight (Nedlys)). Sett fra siden 10 │ Om skjermen Fast hvitt lys er en indikasjon på at skjermen er slått på og fungerer normalt.
Sett bakfra Sett bakfra uten skjermstativ Etikett Beskrivelse Sett bakfra med skjermstativ Bruk 1 Styrespak Vil brukes for å navigere OSDmenyen. 2 Funksjonsknapper For mer informasjon, se Betjening av skjermen. 3 VESA-monteringshull Monter skjermen på veggen ved å (100 mm x 100 mm - bak VESA- bruke VESA-kompatibelt veggmonteringssett (100 mm x deksel) 100 mm). 4 Forskriftsetikett Inneholder informasjon om forskrifter som gjelder skjermen.
Sett nedenfra Sett nedenfra uten skjermstativ Etikett Beskrivelse Bruk 1 Strømkontakt Koble til strømkabelen (følger med skjermen). 2 Sikkerhetslåsespor Sikrer skjermen med en sikkerhetslås (sikkerhetslås er ikke inkludert). 3 HDMI-port (HDMI 1) Koble til datamaskinen med HDMI-kabelen (følger med skjermen). 4 HDMI-port (HDMI 2) Koble til datamaskinen med HDMI-kabelen (følger med skjermen).
SuperSpeed USB 5 Gbps (USB 3.2 Gen1) Type-Anedstrømsport (3) Koble USB 3.2 Gen1 (5 Gbps)-enheten.* 9 Nedlys Når skjermoppsettet er fullført, må du trykke på berøringssensoren som finnes nederst på skjermen for å slå nedlysene på eller av. Fabrikkinnstillingen er på, så nedlysene er aktive hvis strømkabelen er koblet til (se Downlight (Nedlys)). 10 SuperSpeed USB 5 Gbps (USB 3.2 Gen1) Type-Anedstrømsport med strømlading Koble til datamaskinen for å lade din USBenhet.
Spesifikasjoner for skjermen Modell S2522HG Skjermtype Aktiv matrise - TFT LCD Paneleteknologi Rask IPS Sideforhold 16:9 Visning Diagonal 622 mm (24,50 tommer) Bredde (aktivt område) 543,74 mm (21,40 tommer) Høyde (aktivt område) 302,62 mm (11,91 tommer) Totalt 164545,63 mm2 (255,04 tommer2) Pikselhøyde 0,2832 x 0,2802 mm Pixel per tomme (PPI) 90 Visningsvinkel Vertikal 178° (typisk) Horisontal 178° (typisk) Lystetthet 400 cd/m² (vanlig) Kontrastforhold 1000 til 1 (vanlig) Frontb
Fargedybde 16,78 millioner farger (8 bit) Fargespekter sRGB 99% (vanlig) Tilkobling • 1 x DisplayPort, versjon 1.2 • 2 x HDMIporter, versjon 2.0 • 1 x Hodetelefoner-utgangsport • 1 x USB 3.2 Gen1 (5 Gbps) oppstrømsport • 4 x USB 3.2 Gen1 (5 Gbps)-nedstrømsporter med BC1.2 lading ved 2 A (maks.
Støttede videomoduser Modell S2522HG Videovisningsfunksjoner (HDMI og DisplayPort) 480i, 480p, 576i, 576p, 720p, 1080i, 1080p, FHD Forhåndsinnstilte skjermmodus Visningsmodus Horisontal frekvens (kHz) Vertikal frekvens (Hz) Pikselklokke (MHz) Synk polaritet (horisontal/ vertikal) 720 x 400 31,50 70,10 28,30 -/+ VESA, 640 x 480 31,50 59,90 25,20 -/- VESA, 640 x 480 37,50 75,00 31,50 -/- VESA, 800 x 600 37,90 60,30 40,00 +/+ VESA, 800 x 600 46,90 75,00 49,50 +/+ VESA, 1024 x
Elektriske spesifikasjoner Modell S2522HG Inngangssignaler for video HDMI 2.0/DisplayPort 1.2, 600 mV for hver differensiell linje, 100 Ω-inngangsimpedans per differensialpar AC inngangsspenning/ frekvens/strøm 100 VAC til 240 VAC / 50 Hz eller 60 Hz ± 3 Hz / 1,50 A (typisk) Innkoblingsstrøm • 120 V: 30 A (Maks.) ved 0°C (kald start) • 240 V: 60 A (Maks.) ved 0°C (kald start) Strømforbruk • 0,3 W (Av-modus)1 • 0,3 W (Standby-modus)1 • 16,8 W (På-modus)1 • 72 W (Maks.
Fysiske egenskaper Modell S2522HG Signalkabeltype • Digital: DisplayPort, 20 pinner • Digital: HDMI, 19 pinner • Universell seriebuss: USB, 9 pinner MERKNAD: Dell-skjermer er utviklet for å kunne fungere optimalt med videokablene som leveres med skjermen. Dell har ingen kontroll over de forskjellige kabelleverandørene i markedet, typen materiale, kontakten og prosessen til produksjon av disse kablene, og som en konsekvens garanterer Dell ikke videoytelse på kabler som ikke leveres med Dell-skjermen.
Miljøegenskaper Modell S2522HG Overholdelsesstandarder • RoHS-kompatibel • BFR/PVC-fri skjerm (unntatt eksterne kabler) • Arsenfritt glass og kvikksølvfritt kun for panelet Temperatur I drift 0°C til 40°C (32°F til 104°F) Ikke i drift • Lagring: -20°C til 60°C (-4°F til 140°F) • Frakt: -20°C til 60°C (-4°F til 140°F) Luftfuktighet I drift 10% til 80% (ikke-kondenserende) Ikke i drift • Lagring: 5% til 90% (ikke-kondenserende) • Frakt: 5% til 90% (ikke-kondenserende) Høyde I drift 5000 m (16404 fo
Pinnetilordning DisplayPort-kontakt Pinnenummer 20-pinners side av den tilkoblede signalkabelen 1 ML3 (n) 2 GND 3 ML3 (p) 4 ML2 (n) 5 GND 6 ML2 (p) 7 ML1 (n) 8 GND 9 ML1 (p) 10 ML0 (n) 11 GND 12 ML0 (p) 13 GND 14 GND 15 AUX (p) 16 GND 17 AUX (n) 18 Hot Plug-deteksjon 19 Re-PWR 20 +3,3 V DP_PWR 20 │ Om skjermen
HDMI-kontakt Pinnenummer 19-pinners side av den tilkoblede signalkabelen 1 TMDS DATA 2+ 2 TMDS DATA 2 SHIELD 3 TMDS DATA 2- 4 TMDS DATA 1+ 5 TMDS DATA 1 SHIELD 6 TMDS DATA 1- 7 TMDS DATA 0+ 8 TMDS DATA 0 SHIELD 9 TMDS DATA 0- 10 TMDS CLOCK+ 11 TMDS CLOCK SHIELD 12 TMDS CLOCK- 13 CEC 14 Reservert (N.C.
Plug and play-funksjonalitet Skjermen kan tilkobles i ethvert system som er kompatibelt med Plug and Play. Skjermen vil automatisk gi datamaskinsystemet Extended Display Identification Data (EDID)-signalet ved å bruke DDC-protokoller (Display Data Channel) for selvkonfigurasjon av systemet og optimalisering av skjerminnstillingene. De fleste installasjoner er automatiske. Du kan imidlertid velge forskjellige innstillinger hvis du vil ha dette.
5 SSTX- 6 SSTX+ 7 GND 8 SSRX- 9 SSRX+ USB 3.2 Gen1 (5 Gbps)-nedstrømskontakt Pinnenummer 9-pinners side av kontakten 1 VCC 2 D- 3 D+ 4 GND 5 SSRX- 6 SSRX+ 7 GND 8 SSTX- 9 SSTX+ USB-porter • 1 x oppstrøms - bak • 2 x nedstrøms - bak • 2 x nedstrøms - nederst Strømladeport - porten med -ikon; støtter opptil 2 A-hurtiglading hvis enheten er kompatibel med BC1.2. MERKNAD: SuperSpeed USB 5 Gbps (USB 3.
MERKNAD: USB-portene på skjermen fungerer kun når skjermen er slått på eller når den er i standby-modus. Hvis skjermen er slått av og på, kan eksterne enheter (periferiutstyr) trenge noen sekunder å koble til før normal funksjonalitet gjenopptas. LCD-skjermkvalitet og pikselretningslinjer Under produksjonsprosessen er det vanlig at en eller flere piksler blir fast i en uforanderlig tilstand. Dette er vanskelig å se og ikke påvirker skjermkvaliteten eller brukervennligheten.
• Juster lysforholdene rundt deg (for eksempel taklys, skrivebordslamper og gardiner eller persienner for vinduer i nærheten) slik at refleksen og gjenskinnet på skjermen skal bli minst mulig. • Bruk en stol med god ryggstøtte. • Hold underarmene horisontalt med håndleddene i en nøytral, behagelig stilling mens du bruker tastaturet eller musen. • Avsett alltid plass for å hvile hendene ved bruk av tastaturet eller musen. • La overarmene henge naturlig ved siden.
Håndtering og flytting av skjermen Bekreft at skjermen håndteres trygt når den løftes eller flyttes ved å følge retningslinjene som nevnes nedenfor: • Før skjermen flyttes eller løftes, må datamaskinen og skjermen slås av. • Alle kabler må kobles fra skjermen. • Plasser skjermen i originalboksen med originalemballasjen. • Underkanten og siden av skjermen må holdes fast uten å bruke for høyt trykk når du løfter eller flytter skjermen.
• Når skjermen løftes eller flyttes, unngå å snu skjermen opp ned mens du holder stativfoten eller stigerøret. Dette kan resultere i utilsiktet skade på skjermen eller forårsake personskade. Retningslinjer for vedlikehold Rengjøring av skjermen FORSIKTIGHET: Les og følg Sikkerhetsinstruksjoner før rengjøring av skjermen. ADVARSEL: Før du rengjør skjermen, skal du trekke strømledningen fra stikkontakten.
Konfigurering av skjermen Konfigurering av stativet MERKNAD: Stativet er ikke installert fra fabrikken. MERKNAD: Følgende trinn gjelder for konfigurering av stativet som leveres med skjermen. Ved festing av et stativ som kjøpes fra en annen kilde, må du alltid følge installasjonsinstruksjonene som leveres med stativet. Slik konfigurer du skjermstativet: 1. Følg instruksjonene på kartongklaffene for fjerning av stativet fra puten som sikrer den. 2. Fjern stativet og stigningen fra emballasjeputen. 3.
6. Åpne beskyttelsesdekselet som finnes på skjermen for å kunne få tilgang til VESA-sporet som finnes på skjermen. MERKNAD: Før stativenheten festes på skjermen, må du bekrefte at frontklaffen åpnes for montering. 7. Sett inn tappene som finnes på stativet i sporene på skjermens bakdeksel, og senk stativet for å kunne feste den på plass.
8. Hold stativet og løft monitoren forsiktig, og legg den på en flatt overflate. MERKNAD: Hold stativet godt mens skjermen løftes for å unngå utilsiktet skade. 9. Løft beskyttelsesdekselet fra skjermen.
Koble til skjermen ADVARSEL: Før noen av prosedyrene i denne delen startes, se Sikkerhetsinstruksjoner. MERKNAD: Dell-skjermer er utviklet for optimal drift med kabler fra Dell. Dell vil aldri garantere videokvaliteten og ytelsen ved anvendelse av kabler som ikke er fra Dell. MERKNAD: Før kablene gjennom åpning for kabelhåndtering før de kobles til. MERKNAD: Kablene må aldri kobles til datamaskinen på same tid. MERKNAD: Bildene brukes kun til illustrasjon. Utseendet til datamaskinen kan variere.
Koble til SuperSpeed USB 5 Gbps (USB 3.2 Gen1)-kabelen og strømkabelen Etter tilkobling av DisplayPort/HDMI-kabelen, må du alltid følge fremgangsmåten som nevnes nedenfor for tilkobling av USB-kabelen til datamaskinen og for å kunne fullføre konfigurering av skjermen: 1. Koble USB 3.2 Gen1-oppstrømsporten (kabel som følger) til en USB 3.2 Gen1port som finnes på datamaskinen (se Sett nedenfra for detaljer.). 2. Koble USB 3.2 Gen1-ekterne utstyr til USB 3.2 Gen1-nedstrømsporter som finnes på skjermen. 3.
Organisering av kablene Etter at alle nødvendige kabler er festet til skjermen og datamaskinen, (se Koble til skjermen for kabelfeste) må du organiserer alle kablene som vist ovenfor. Sikre skjermen ved å bruke en Kensington-lås (valgfritt) Sikkerhetslåssporet finnes nederst på skjermen (se Sikkerhetslåsespor). Hvis du vil ha mer informasjon om bruk av Kensington-låsen (som kjøpes separat), se dokumentasjonen som følger med låsen. Skjermen må festes til et bord ved å bruke Kensington-sikkerhetslås.
Slik fjerner du skjermstativet MERKNAD: Unngå riper på LCD-skjermen ved å ta ut stativet og bekrefte at skjermen legges på en myk, ren overflate. MERKNAD: Følgende trinn gjelder for fjerning av stativet som leveres med skjermen. Ved fjerning av et stativ som kjøpes fra en annen kilde, må du alltid følge installasjonsinstruksjonene som leveres med stativet. Slik fjerner du stativet: 1. Legg skjermen på en myk klut eller pute. 2. Trykk og hold inne utløserknappen på stativet. 3.
VESA-veggmontering (valgfritt) (Skruedimensjon: M4 x 10 mm). Se instruksjonene som følger med veggmonteringssettet som er kompatibelt med VESA. 1. Legg skjermpanelet på en myk klut eller pute på et stabilt flatt bord. 2. Slik fjerner du skjermens stativ (se Slik fjerner du skjermstativet). 3. Bruk en stjerneskrutrekker fra Phillips og ta ut de fire skruene som fester plastdekselet. 4. Fest monteringsbraketten fra veggmonteringssettet til skjermen. 5. Monter skjermen på veggen.
Betjening av skjermen Slå på skjermen Trykk på strømknappen for å slå på skjermen. Bruke styrespakkontroll Bruk styrespakkontrollen som finnes på baksiden av skjermen og gjør OSDjusteringer. 1. Trykk på styrespak-knappen og start OSD-hovedmenyen. 2. Flytt styrespaken opp/ned/venstre/høyre for å veksle mellom alternativer. 3. Trykk på styrespak-knappen på nytt og bekreft innstillinger og avslutt.
• For navigasjon i to retninger (høyre og venstre). • Flytt til høyre for å gå til undermenyen. • Flytt til venstre for å gå ut av undermenyen. • Øker (høyre) eller reduserer (venstre) parametrene for valgt menyelement. • For navigasjon i to retninger (opp og ned). • Veksler mellom menyalternativene. • Øker (opp) eller reduserer (ned) parametrene for valgt menyelement. Bruk kontrollene på bakpanelet Bruk kontrollknappene som finnes på baksiden av skjermen og få tilgang til OSDmenyen og hurtigtaster.
For å starte Dark Stabilizer (Mørk stabilisator)-menyen. 4 Hurtigtast/ Dark Stabilizer (Mørk stabilisator) 5 Hurtigtast/ Brightness/Contrast (Lysstyrke/Kontrast) For å få direkte tilgang til glidebryterne for justering av Brightness/Contrast (Lysstyrke/ Kontrast). Når du trykker på noen av disse knappene (unntatt styrespak-knappen), vil OSDstatuslinjen vises og indikerer gjeldende innstillinger for noen OSD-funksjoner.
Preset Modes Du kan velge fra en liste over forhåndsinnstilte (Forhåndsinn- fargemoduser. stilte moduser) • Standard: Laster inn standard fargeinnstillinger på skjermen. Dette er standard forhåndsinnstilt modus. • FPS: Laster inn farger som anses å være ideelle for FPS-spill. • MOBA/RTS: Laster inn farger som anses å være ideelle for MOBA- (Multiplayer Online Battle Arena) og sanntidsstrategispill (RTS). • RPG: Laster inn fargerinnstillinger som er ideelle for rollespill (RPG).
Preset Modes (Forhåndsinnstilte moduser) ADVARSEL: De mulige effektene av blått lys på lang sikt fra skjermen kan føre til personskade, slik som digital øyebelastning, tretthet i øynene og skade på øynene. Bruk av skjermen i lengre perioder kan føre til smerter i kroppsdeler, slik som nakke, arm, rygg og skulder. For mer informasjon, se Ergonomi. • Warm (Varm): Presenterer farger ved lavere fargetemperaturer. Skjermen ser varmere ut med en rød/gul-fargetone.
Game Enhance Mode (Spillforbedring) • Timer (Tidsur) Aktiver eller deaktiver tidsuret som finnes øverst til venstre på skjermen. Timeren viser tiden som har gått. Et alternativ kan velges fra tidsintervalllisten som vil holde deg oppmerksom på gjenværende tid. • Frame Rate (Bildefrekvens) Velg On (På) og vis gjeldende bilder per sekund når du spiller spill. Hvis hastigheten er høyere, ser bevegelsen jevnere ut.
Hue (Fargetone) Funksjonen skifter fargen på videobildet til grønn eller lilla. Denne brukes for justering av ønsket hudfarge. Bruk styrespaken og juster fargenivået fra 0 til 100. Øk den grønne fargen på videobildet ved å flytte styreskapen oppover. Øk den lilla fargen på videobildet ved å flytte styreskapen nedover. MERKNAD: Justering av Hue (Fargetone) vil kun være tilgjengelig ved valg av FPS, MOBA/RTS, SPORTS (SPORT), eller RPG-forhåndsinnstilt modus.
Brightness (Lysstyrke) Brightness (Lysstyrke) justerer lysstyrken på bakgrunnsbelysningen. Flytt styrespaken oppover for økning av lysstyrkenivået, eller flytt styrespaken nedover for redusering av lysstyrkenivået (min. 0/maks. 100). Contrast (Kontrast) Juster Brightness (Lysstyrke) og juster deretter Contrast (Kontrast) kun hvis ytterligere justering kreves. Flytt styrespaken oppover for økning av kontrastnivået, eller flytt styrespaken nedover for redusering av kontrastnivået (min. 0/maks. 100).
Display (Skjerm) Bruk Display (Skjerm) og juster bilder. Aspect Ratio (Sideforhold) Justerer bildeforholdet til 16:9, Auto Resize (Automatisk endring av størrelse), 4:3, eller 1:1. Input Color Format (Inngangsfargeformat) Lar deg stille videoinngangsmodus til: • RGB: Velg alternativet hvis skjermen er koblet til en datamaskin eller en mediespiller som støtter RGB-utgang. • YCbCr: Velg alternativet hvis mediespilleren kun støtter YCbCr-utgang.
Reset Audio (Tilbakestill lyd) Tilbakestiller alle innstillinger under Audio (Lyd)menyen til fabrikkstandardene. Menu (Meny) Velg dette for å kunne justere innstillingene til OSDmenyen, for eksempel språk på OSD-menyen, hvor lenge menyen forblir på skjermen, og så videre. Language (Språk) Stiller OSD-menyen til ett av de åtte språkene (engelsk, spansk, fransk, tysk, brasiliansk portugisisk, russisk, forenklet kinesisk eller japansk).
Personalize (Tilpass) Shortcut Key 1 (Hurtigtast 1) Shortcut Key 2 (Hurtigtast 2) Shortcut Key 3 (Hurtigtast 3) Power Button LED (Strømknapp LED) USB Lar deg velge en funksjon fra Preset Modes (Forhåndsinnstilte moduser), Game Enhance Mode (Spillforbedring), AMD FreeSync Premium, Dark Stabilizer (Mørk stabilisator), Brightness/Contrast (Lysstyrke/Kontrast), Input Source (Inndatakilde), Aspect Ratio (Sideforhold), eller Volume (Volum) og angi det som en hurtigtast.
Downlight (Nedlys) Standardinnstillingen for berøringssensoren er på, og nedlys kan trykkes på nederst på skjermen for å kunne slå dem på eller av. Når nedlysene lyser, vil de lyse blått (se Nedlys). Slå av berøringssensoren ved å velge Off (Av). Tilbakestiller alle innstillinger under Personalize Reset Personalization (Tilpass)-menyen til fabrikkinnstillingene.
DDC/CI LCD Conditioning (LCDkonditionering) Firmware (Fastvare) DDC/CI (Display Data Channel/Command Interface) (Vis datakanal/kommandogrensesnitt) kan brukes til å justere skjermens parametrene (lysstyrke, fargebalanse osv.) gjennom programvaren på datamaskinen. Funksjonen kan deaktiveres ved å velge Off (Av). Aktiver funksjonen for best brukeropplevelse og optimal ytelse for skjermen. Bidrar til å redusere mindre situasjoner med bildeforsinkelse.
Reset Others (Tilbakestill andre) Factory Reset (Tilbakestill til fabrikkinnstillinger) Tilbakestiller alle innstillinger under Others (Andre)menyen til fabrikkstandardene. Gjenopprett alle forhåndsinnstilte verdier til fabrikkinnstillingene. Advarsel på OSD-meny Hvis skjermen ikke støtter en bestemt oppløsningsmodus, vil følgende melding vises: Dette betyr at skjermen ikke kan synkronisere med signalet som mottas fra datamaskinen.
Når standardinnstillingene USB endres for første gang, vises følgende melding: MERKNAD: Hvis du velger Yes (Ja), vil meldingen ikke vises ved neste endring av USB-innstillinger. Meldingen vises på nytt ved en ny tilbakestilling til fabrikkinnstillinger. Følgende melding vil sees før DDC/CI -funksjonen deaktiveres: Når skjermen går i Standby-modus, vil følgende melding vises: Aktiver datamaskinen og våkn skjermen for å få tilgang til OSD.
OSD-menyen vil kun fungere i normal driftsmodus. Hvis du trykker på en annen knapp enn av/på-knappen under standby-modus, vil følgende melding vises med dette avhender av valgt inngang: MERKNAD: Meldingen kan variere litt, avhengig av det tilkoblede inngangssignalet. Hvis enten HDMI- eller DP-inngang velges og den tilsvarende kabelen ikke er kobles til, vises en flytende dialogboks som vises nedenfor. MERKNAD: Meldingen kan variere litt, avhengig av det tilkoblede inngangssignalet.
Låse kontrollknappene på bakpanelet Lås kontrollknappene som finnes på bakpanelet for å kunne unngå tilgang til OSD-menyen og/eller av/på-knappen. Slik låser du knappen(e): 1. Trykk og hold inne Knapp 5 i fire sekunder, og en meny vises på skjermen. 2. Velg ett av følgende alternativer: • Menu Buttons (Menyknapper): Velg dette alternativet for å låse alle OSD-menyknappene unntatt strømknappen. • Power Button (Strømknapp): Velg alternativet for å låse av/påknappen.
Innstilling av maksimal oppløsning MERKNAD: Trinnene kan variere litt og avhenger av Windows-versjonen du har. Innstilling av maksimal oppløsning for skjermen: I Windows® 7, Windows® 8, eller Windows® 8.1: 1. Kun for Windows® 8 og Windows® 8.1, velg Desktop for å kunne bytte til klassisk desktop. 2. Høyreklikk på desktop og klikk på Skjermoppløsning. 3. Hvis mer enn 1 skjerm er tilkoblet, bekreft at du velger S2522HG. 4. Klikk på rullegardinlisten for Skjermoppløsning og velg 1920 x 1080. 5. Klikk på OK.
4. Klikk på Egenskaper for skjermkort-lenken. 5. Klikk på Skjerm-fanen. 6. Klikk på rullegardinlisten fra Skjermoppdateringsfrekvens og velg 240 Hz. 7. Klikk på OK. Hvis 1920 x 1080 ikke vises som et alternativ, prøv å oppdatere grafikkdriveren. Avhengig av datamaskinen din, skal du utføre en av følgende prosedyrer: For en stasjonær eller bærbar datamaskin fra Dell: • Besøk https://www.dell.com/support, skriv inn serviceetikett, og last ned den nyeste driveren for grafikkortet.
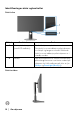
Vertikal forlengelse MERKNAD: Stativet kan strekke seg vertikalt opp til 130 mm. Figuren nedenfor illustrerer den vertikale forlengelsen av stativet. Rotering av skjerm Før skjermen roteres, må skjermen forlenges helt vertikalt og helles helt opp med det formål å unngå å treffe den nederste kanten av skjermen.
Roter med klokken Roter mot klokken MERKNAD: For å kunne bruke Skjermrotasjon-funksjonen (Landskap versus portrettvisning) med Dell-datamaskinen, skal du ha en oppdatert grafikkdriver som ikke leveres med denne skjermen. Last ned grafikkdriveren ved å gå til www.dell.com/support, Last ned-delen for Videodrivere for siste driveroppdateringer. MERKNAD: I Portrettmodus, kan du oppleve dårlig ytelse i grafikkintensive applikasjoner som 3D-spill.
Justere innstillingene for skjermens rotasjon for ditt system Etter at du har rotert skjermen, må du fullføre prosedyren som nevnes nedenfor med det formål å justere innstillingene for skjermens rotasjon på systemet ditt. MERKNAD: Hvis skjermen brukes med en datamaskin som ikke er fra Dell, gå til nettstedet til grafikkdriveren eller datamaskinprodusenten og få informasjon om hvordan du roterer 'innholdet' på skjermen. Slik justerer du innstillingene for skjermens rotasjon: 1.
Feilsøking ADVARSEL: Før noen av prosedyrene i denne delen startes, se Sikkerhetsinstruksjoner. Selvtest Dell-skjermen har en selvtestfunksjon (STFC) som du kan bruke til å kontrollere om Dell-skjermen fungerer som den skal. Hvis skjermen og datamaskinen er koblet til riktig, men skjermen forblir mørk, kjører du selvtesten ved å utføre følgende trinn: 1. Slå av både skjermen og datamaskinen. 2. Koble videokabelen fra baksiden av datamaskinen.
Innebygd diagnostikk Skjermen har et innebygd diagnostikkverktøy som hjelper deg med å finne ut om skjermproblemene skyldes selve skjermen, eller datamaskinen og videokortet. Start av den innebygde diagnostikken: 1. Bekreft at skjermen er ren (det er ingen støvpartikler på skjermoverflaten). 2. Trykk og hold inne Knapp 5 i fire sekunder til en meny vises på skjermen. 3. Bruk styrespaken for utheve Diagnostics (Diagnostikk) -alternativet, og trykk på styrespak-knappen for å starte diagnosen.
Vanlige problemer Tabellen nedenfor inneholder generell informasjon om vanlige skjermproblemer og mulige løsninger: Vanlige symptomer Ingen video/LED av Hva du opplever Ingen bilder Mulige løsninger • Bekreft at videokabelen som kobler til skjermen og datamaskinen er koblet på riktig måte og er sikker. • Sjekk at stikkontakten fungerer på riktig måte ved å bruke et annet elektrisk utstyr. • Bekreft at strømknappen er trykket helt inn.
Video skjelver/ hopper Bølget bilde eller fin bevegelse • Nullstill skjermen til fabrikkinnstillingene. • Kontroller de ytre faktorene. • Flytt skjermen og test den i et annet rom. Manglende piksler LCD-skjermen har flekker • Slå skjermen av og deretter på igjen. • Piksler som er permanent av er en naturlig feil som kan oppstå i LCDteknologi. • For mer informasjon om retningslinjer for kvalitet og piksel for Dellskjermen, se Dells støtteside på: www.dell.
Horisontale/ vertikale linjer Skjermen har en eller flere linjer • Nullstill skjermen til fabrikkinnstillingene. • Aktiver selvtestfunksjonen (se Selvtest) og sjekk om disse linjene er merket i selvtestmodus. • Bekreft at det ikke er noen bøyde eller ødelagte pinner i videokabelkontakten. • Start den innebygde diagnosefunksjonen. Synkroniseringsproblemer Skjermen er forvrengt eller ser revet ut • Nullstill skjermen til fabrikkinnstillingene.
Manglende farge Bildet mangler farge • Utfør en verifisering av skjermens selvtestfunksjon. • Kontroller at skjermkabelen som kobler skjermen til datamaskinen er ordentlig tilkoblet og festet. • Bekreft at det ikke er noen bøyde eller ødelagte pinner i videokabelkontakten. Feil farge Bildefargen er ikke • Endre innstillingene for Preset god Modes (Forhåndsinnstilte moduser) i Game (Spill)-OSDmenyen, avhengig av applikasjonen.
Produktspesifikke problemer Vanlige symptomer Hva du opplever Skjermbildet er for Bildet er plassert lite midt på skjermen, men fyller ikke hele visningsområdet Skjermen kan ikke justeres med knappene på bakpanelet OSD-menyen vises ikke på skjermen Ingen bilder, LED Ikke noe inngangssignal når lyser hvitt brukerkontrollene er trykket inn Mulige løsninger • Sjekk innstillingen Aspect Ratio (Sideforhold) i Display (Skjerm) på OSD-menyen. • Nullstill skjermen til fabrikkinnstillingene.
Problemer knyttet med Universal Serial Bus (USB) Vanlige symptomer USBgrensesnittet fungerer ikke Hva du opplever USB-enheter fungerer ikke Mulige løsninger • Kontroller at skjermen er slått på. • Koble til oppstrømskabelen til datamaskinen på nytt. • Koble til USB-enhetene på nytt (nedstrømskontakt). • Slå skjermen av og deretter på igjen. • Start datamaskinen på nytt. • Noen USB-enheter, f.eks. en ekstern bærbar harddisk, krever høyere elektrisk spenning; koble enheten direkte til datamaskinen.
Vedlegg ADVARSEL: Sikkerhetsinstruksjoner ADVARSEL: Hvis andre kontroller, justeringer eller prosedyrer enn de som nevnes i denne dokumentasjonen brukes, kan dette føre til eksponering for støt, elektriske farer og/eller mekaniske farer. Hvis du ønsker å ha mer informasjon om sikkerhetsinstruksjoner, se Sikkerhet-, miljø- og forskriftsinformasjon. FCC-merknader (kun USA) og annen forskriftsinformasjon For FCC-merknader og annen forskriftsinformasjon, se nettstedet for regelverksoverholdelse på www.dell.