شاشة العاب Dellموديل S2522HG - دليل المستخدم الموديلS2522HG : الموديل التنظيميS2522HGb :
مالحظة :تشير "مالحظة" إلى وجود معلومات ھامة تساعدك على استخدام الكمبيوتر الخاص بك على أفضل نحو ممكن. تنبيه :يشير التنبيه إلى وجود تلف محتمل للجھاز أو فقد للبيانات في حالة عدم اتباع التعليمات. تحذير :يشير "تحذير" إلى احتمال وقوع تلف في الملكية ،جرح شخصي أو وفاة. حقوق الطبع والنشر محفوظة © Dell Inc. 2021أو أحد الشركات التابعة لھا .جميع الحقوق محفوظة Dell .و EMCوعالمات تجارية أخرى عبارة عن عالمات تجارية لشركة Dell Inc.أو الفروع التابعة لھا .
المحتويات تعليمات السالمة 6 . . . . . . . . . . . . . . . . . . . . . . . . . . . . . . . . . . حول الشاشة الخاصة بك 7 . . . . . . . . . . . . . . . . . . . . . . . . . . . . . محتويات العبوة 7 . . . . . . . . . . . . . . . . . . . . . . . . . . . . . . . . . . . . . . . ميزات المنتج 8 . . . . . . . . . . . . . . . . . . . . . . . . . . . . . . . . . . . . . . . . التعرف على األجزاء وعناصر التحكم 10 . . . . . . . . . . . . . . . . . . . . . . . . . . المنظر األمامي 10 . . . . . . . .
تعليمات الصيانة 27 . . . . . . . . . . . . . . . . . . . . . . . . . . . . . . . . . . . . . . تنظيف الشاشة الخاصة بك 27 . . . . . . . . . . . . . . . . . . . . . . . . . . . . . . . . . . . . . . . إعداد الشاشة 28 . . . . . . . . . . . . . . . . . . . . . . . . . . . . . . . . . . . إعداد الحامل 28 . . . . . . . . . . . . . . . . . . . . . . . . . . . . . . . . . . . . . . . . توصيل الشاشة 31 . . . . . . . . . . . . . . . . . . . . . . . . . . . . . . . . . . . . . .
ضبط إعدادات شاشة التدوير لنظامك 57 . . . . . . . . . . . . . . . . . . . . . . . . . . استكشاف األخطاء وإصالحھا 58 . . . . . . . . . . . . . . . . . . . . . . . . . . اختبار ذاتي . . . . . . . . . . . . . . . . . . . . . . . . . . . . . . . . . . . . . . . . تشخيصات مضمنة . . . . . . . . . . . . . . . . . . . . . . . . . . . . . . . . . . . . مشكالت شائعة . . . . . . . . . . . . . . . . . . . . . . . . . . . . . . . . . . . . . . مشكالت خاصة بالمنتج . . . . . . . . . . . . . . . . . .
تعليمات السالمة تنبيه :استخدام أدوات التحكم ،عمليات الضبط ،أو اإلجراءات غير المذكورة في ھذا المستند قد ينتج عنه التعرض لصدمة ،مخاطر كھربية ،و/أو مخاطر ميكانيكية. • ضع الشاشة على سطح صلب وتعامل معھا بحرص .الشاشة مصنوعة من مواد ھشة ويمكن أن تتلف في حالة إسقاطھا أو ضربھا بشدة. • تأكد دائمًا من تصنيف شاشتك للعمل مع مصدر الطاقة المتردد المتاح في منطقتك. • احفظ الشاشة في ظروف درجة حرارة الغرفة .
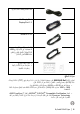
حول الشاشة الخاصة بك محتويات العبوة يتم شحن شاشتك مع المكونات المعروضة في الجدول أدناه .في حالة فقد أي من المكونات ،اتصل على شركة .Dellانظر االتصال بشركة Dellللحصول على مزيد من المعلومات. مالحظة :بعض العناصر تكون اختيارية ومن الممكن أال تكون مرفقة مع شاشتك .قد ال تكون بعض الميزات متوفرة في دول معينة. مالحظة :إذا كنت توصل حامالً اشتريته من أي مصدر آخر ،فاتبع إرشادات اإلعداد التي تم تضمينھا مع الحامل.
كابل الطاقة )يختلف حسب الدولة( DisplayPortبكابل DisplayPort 1.2 كابل HDMI 2.0 كابل SuperSpeedسعة 5جيجابايت في الثانية )النوع USB 3.2الجيل (1للتدفق العلوي )تمكين منافذ USBعلى الشاشة( • دليل اإلعداد السريع • معلومات حول السالمة والبيئة ومعلومات تنظيمية ميزات المنتج تحتوي شاشة S2522HG Dellعلى مصفوفة نشطة ،ترانزستور ذات شريط رفيع ) ،(TFTشاشة كريستال سائل ) (LCDومصباح للضوء الخلفي .وتشتمل ميزات الشاشة على: • مساحة العرض 62.20سم ) 24.
• يدعم معدل تحديث مرتفع بسعة 240ھرتز ووقت استجابة سريع من 1ميللي ثانية إلى رمادي في الوضع " Extremeفائق"* • سلسلة األلوان الكاملة sRGB 99% • إمكانيات على ضبط الدوران ،اإلمالة ،المحول ،االرتفاع • اتصال رقمي مع DisplayPortو HDMI • مجھز بمنفذ للتدفق األعلى 1منفذ SuperSpeed USBسعة 5جيجابايت في الثانية )USB 3.2 الجيل (1النوع Bمنفذ التدفق األعلى 1 ،منفذ SuperSpeed USBسعة 5جيجابايت في الثانية ) USB 3.
التعرف على األجزاء وعناصر التحكم المنظر األمامي اللوحة الوصف 1 زر تشغيل/إيقاف تشغيل الطاقة )مع مؤشر (LED 2 أضواء سفلية منظر جانبي │ 10حول الشاشة الخاصة بك االستخدام لتشغيل أو إيقاف تشغيل الطاقة. تشير اللمبة البيضاء الثابتة إلى أن الشاشة في حالة تشغيل وتعمل بشكل معتاد .تشير اللمبة البيضاء الوامضة إلى أن الشاشة في حالة وضع استعداد.
منظر خلفي منظر خلفي مع حامل شاشة الوصف اللوحة منظر خلفي بدون حامل شاشة االستخدام 1 ذراع التحكم استخدمه للتنقل خالل قائمة .OSD 2 أزرار الوظائف انظر تشغيل الشاشة للحصول على مزيد من المعلومات. 3 VESAفتحات حمل ) 100مم × 100مم -موصلة بالخلف غطاء (VESA شاشة للحمل على الحائط باستخدام مجموعة حمل الحائط VESAالمتوافقة مع ) 100مم × 100مم(. 4 ملصق تنظيمي حصر االعتمادات التنظيمية.
منظر سفلي منظر سفلي بدون حامل شاشة اللوحة الوصف االستخدام 1 موصل الطاقة توصيل كابل الطاقة )المشحون مع شاشتك(. 2 منفذ تأمين للسالمة تأمين الشاشة بقفل أمان )قفل األمان غير مضمن(. 3 منفذ HDMIأي )(HDMI 1 توصيل الكمبيوتر الخاص بك بكابل ) HDMIالمشحون مع شاشتك(. 4 منفذ HDMIأي )(HDMI 2 توصيل الكمبيوتر الخاص بك بكابل ) HDMIالمشحون مع شاشتك(.
توصيل كابل USB 3.2الجيل 5) 1جيجابت في الثانية(*. 8 منفذ التدفق السفلي SuperSpeed USBسعة 5جيجابايت في الثانية ) USB 3.2الجيل (1 النوع Aرقم )(3 9 أضواء سفلية 10 منفذ التدفق السفلي SuperSpeed USBسعة 5جيجابايت في الثانية ) USB 3.2الجيل (1 النوع Aمع شحن الطاقةطاقة قم بالتوصيل بالكمبيوتر لشحن جھاز USBالخاص بك. 11 منفذ مخرج سماع الرأس قم بتوصيل سماعات الرأس بجھاز الكمبيوتر.
مواصفات الشاشة الموديل S2522HG نوع الشاشة مصفوفة نشطة TFT LCD - تقنية اللوحة IPSسريع نسبة العرض على االرتفاع 16:9 صورة قابلة للعرض قطري 622مم ) 24.50بوصة( العرض )منطقة نشطة( 543.74مم ) 21.40بوصة( االرتفاع )منطقة نشطة( 302.62مم ) 11.91بوصة( المنطقة اإلجمالية 164545.63مم ) 255.04بوصة ( قياس البكسل 0.2802 × 0.
• 1إصدار DisplayPortاإلصدار 1.2 االتصال • 2منفذ HDMIاإلصدار 2.0 • 1منفذ مخرج سماع الرأس • 1منفذ USB 3.2الجيل 1للتدفق األعلى ) 5جيجابايت في الثانية( • 4منفذ USB 3.2الجيل 1للتدفق السفلي ) 5جيجابايت في الثانية( مع شحن BC1.2عند 2أمبير )الحد األقصى( عرض الحافة )حافة الشاشة للمنطقة النشطة( أعلى 5.84مم يسار/يمين 5.83مم 5.83/مم أسفل 18.
أوضاع الفيديو المدعمة الموديل S2522HG إمكانيات عرض الفيديو )تشغيل HDMIو (DisplayPort ،1080p ،1080i ،720p ،576p ،576i ،480p ،480i FHD أوضاع جھاز العرض المضبوطة مسبقا ً التردد األفقي )كيلوھرتز( التردد الرأسي )ھرتز( ساعة البكسل )ميجاھرتز( قطبية المزامنة )أفقي/رأسي( وضع العرض 400 × 720 31.50 70.10 28.30 +/- 480 × 640 ،VESA 31.50 59.90 25.20 -/- 480 × 640 ،VESA 37.50 75.00 31.
المواصفات الكھربائية الموديل S2522HG إشارات إدخال الفيديو ،DisplayPort 1.2/HDMI 2.0سعة 600ميجا فولت لكل خط تمييزي ،معاوقة اإلدخال 100أوم لزوج تمييزي فولطية/تردد/تيار اإلدخال المتردد 100إلى 50/VAC 240ھرتز أو 60ھرتز 3 ±ھرتز 1.50/أمبير )نموذجي( التيار المتدفق • 120فولت 30 :أمبير )الحد األقصى( عند 0درجة مئوية )تشغيل بارد( • 240فولت 60 :أمبير )الحد األقصى( عند 0درجة مئوية )تشغيل بارد( استھالك الطاقة • 0.
الخصائص الفيزيائية الموديل S2522HG نوع كابل اإلشارة • رقمي 20 ،DisplayPort :سن • رقمي 19 ،HDMI :سن • الناقل التسلسلي العالمي 9 ،USB :سن مالحظة :تم تصميم شاشات Dellللعمل بشكل أمثل مع كابالت الفيديو التي يتم شحنھا مع شاشتك .نظراً ألن Dellال تتحكم في مختلف موردي الكابالت في السوق ،ونوع المواد والموصل والعملية المستخدمة في تصنيع ھذه الكابالت ،فإن Dellال تضمن أداء الفيديو على الكابالت التي ال يتم شحنھا مع شاشة Dellالخاصة بك.
الخصائص البيئية الموديل S2522HG معايير التوافق • توافق RoHS • شاشة خالية من ) PVC/BFRباستثناء الكابالت الخارجية( • زجاج خالي من الزرنيخ وخالي من الزئبق للوحة فقط درجة الحرارة التشغيل 0°Cإلى 32°F) 40°Cإلى (104°F عدم التشغيل • التخزين -20°C :إلى -4°F) 60°Cإلى (140°F • الشحن -20°C :إلى -4°F) 60°Cإلى (140°F الرطوبة التشغيل 10%إلى ) 80%بدون تكثيف( عدم التشغيل • التخزين 5% :إلى ) 90%بدون تكثيف( • الشحن 5% :إلى ) 90%بدون تكثيف(
تعيينات األسنان موصل DisplayPort رقم السن انب مكون من 20سنا ً من كابل اإلشارة المتصل 1 )ML3 (n 2 أرضي 3 )ML3 (p 4 )ML2 (n 5 أرضي 6 )ML2 (p 7 )ML1 (n 8 أرضي 9 )ML1 (p 10 )ML0 (n 11 أرضي 12 )ML0 (p 13 أرضي 14 أرضي 15 )AUX (p 16 أرضي 17 )AUX (n 18 اكتشاف اتصال نشط 19 Re-PWR 20 PWR_DP V 3.
موصل HDMI رقم السن انب مكون من 19سنا ً من كابل اإلشارة المتصل 1 TMDSتانايب +2 2 TMDSبيانات 2ترس 3 TMDSبيانات -2 4 TMDSبيانات +1 5 TMDSبيانات 1ترس 6 TMDSبيانات -1 7 TMDSبيانات +0 8 TMDSبيانات 0ترس 9 TMDSبيانات -0 10 +TMDS CLOCK 11 TMDSساعة ترس 12 TMDSساعة- 13 CEC 14 محجوز ) .N.
واجھة الناقل التسلسلي العالمي )(USB يوفر لك ھذا القسم معلومات حول منافذ USBالمتوفرة على الشاشة. مالحظة :ھذه الشاشة متوافقة مع SuperSpeed USB 5جيجابايت في الثانية ) USB 3.2الجيل .(1 سرعة النقل استھالك الطاقة* معدل البيانات فائق السرعة 5جيجابت في الثانية 4.50واط )كحد أقصى ،كل منفذ( السرعة العالية 480ميغابت في الثانية 4.50واط )كحد أقصى ،كل منفذ( سرعة كاملة 12ميغابت في الثانية 4.
منفذ USB 3.2الجيل 1للتدفق السفلي ) 5جيجابايت في الثانية( رقم السن جانب من الموصل مكون من 9أسنان 1 VCC 2 D- 3 D+ 4 أرضي 5 SSRX- 6 SSRX+ 7 أرضي 8 SSTX- 9 SSTX+ منافذ USB • 1للتدفق العلوي -خلفي • 2للتدفق السفلي -خلفي • 2للتدفق السفلي -أسفل منفذ شحن الطاقة -المنفذ برمز .BC1.
اقتصاديات تنبيه :قد يؤدي االستخدام غير الصحيح أو المطول للوحة المفاتيح إلى حدوث إصابة. تنبيه :قد يؤدي عرض شاشة الشاشة لفترات زمنية طويلة إلى إجھاد العين. للراحة والكفاءة ،راقب اإلرشادات التالية عند إعداد محطة عمل الكمبيوتر واستخدامھا: • ضع جھاز الكمبيوتر الخاص بك بحيث تكون الشاشة ولوحة المفاتيح أمامك مباشرة أثناء عملك .أرفف خاصة متوفرة تجاريا لمساعدتك في وضع لوحة المفاتيح بشكل صحيح.
رصد الشاشة في أو تحت مستوى العين وضع الشاشة ولوحة المفاتيح مباشرة أمام المستخدم استرخاء المعصمين وووضعھما بشكل مستو أقدام مسطحة على األرض معالجة ونقل العرض الخاص بك لضمان التعامل مع الشاشة بأمان عند رفعھا أو تحريكھا ،اتبع اإلرشادات المذكورة أدناه: • قبل نقل الشاشة أو رفعھا ،أوقف تشغيل الكمبيوتر والشاشة. • افصل كل الكابالت من الشاشة. • ضع الشاشة في المربع األصلي مع مواد التعبئة األصلية.
• عند رفع الشاشة أو تحريكھا ،تأكد من مواجھة الشاشة عنك وال تضغط على منطقة العرض لتجنب أي خدوش أو أضرار. • عند نقل الشاشة ،تجنب أي صدمة مفاجئة أو اھتزاز لھا. • عند رفع الشاشة أو تحريكھا ،ال تحول الشاشة رأسا ً على عقب أثناء الضغط على قاعدة الحامل أو حامل الحامل .قد يؤدي ھذا إلى تلف عرضي على الشاشة أو التسبب في إصابة شخصية.
تعليمات الصيانة تنظيف الشاشة الخاصة بك تنبيه :اقرأ واتبع تعليمات السالمة قبل تنظيف الشاشة. تحذير :قبل تنظيف الشاشة ،افصل كابل طاقة الشاشة عن المنفذ الكھربائي. للحصول على أفضل الممارسات ،اتبع التعليمات الموضحة في القائمة أدناه أثناء فك المكونات ،التنظيف ،أو التعامل مع شاشتك: • لتنظيف شاشتك المقاومة للثبات ،استخدم قطعة قماش نظيفة رطبة قليالً بالماء .ولو أمكن ،استخدم قطعة قماش خاصة بتنظيف الشاشة أو محلول مناسب للتغطية المقاومة للثبات .
إعداد الشاشة إعداد الحامل مالحظة :الحامل غير مثبت في المصنع. مالحظة :يتم تطبيق الخطوات التالية إلعداد الحامل المقدم مع الشاشة الخاصة بك .إذا كنت توصل حامالً اشتريته من أي مصدر آخر ،فاتبع إرشادات اإلعداد التي تم تضمينھا مع الحامل. إلعداد حامل الشاشة: .1اتبع التعليمات على الكرتون لنزع الحامل من الوسادة التي تثبته. .2قم بإزالة قاعدة الحامل ورافع الحامل من وسادة الرغوة. .3قم بمحاذاة ووضع رافع الحامل على قاعدة الحامل. .
.6افتح الغطاء الواقي على الشاشة للوصول إلى فتحة VESAعلى الشاشة. مالحظة :قبل توصيل مجموعة الحامل بالشاشة ،تأكد من فتح غطاء اللوحة األمامية للسماح بمساحة للتجميع. .7أدخل األلسنة الموجودة على الحامل في الفتحات الموجودة على الغطاء الخلفي للعرض وقم بخفض مجموعة الحامل لتثبيتھا في مكانھا.
.8امسك حامل الحامل وارفع الشاشة بعناية ،ثم ضعه على سطح مستو. مالحظة :امسك حامل الرفع بإحكام عند رفع الشاشة لتجنب أي ضرر عرضي. .9ارفع الغطاء الواقي من الشاشة.
توصيل الشاشة تحذير :قبل البدء في أي إجراءات في ھذا القسم ،اتبع تعليمات السالمة. مالحظة :تم تصميم شاشات Dellللعمل بشكل أمثل مع الكابالت الواردة من .Dellال تضمن Dellجودة الفيديو وأدائه عند استخدام الكابالت غير التابعة لشركة .Dell مالحظة :وجه الكابالت خالل منفذ إدارة الكابل قبل توصيلھا. مالحظة :ال تقم بتوصيل كل الكابالت بالكمبيوتر في نفس الوقت. مالحظة :يتم استخدام الصور بقصد التوضيح فقط .قد يختلف شكل الكمبيوتر. لتوصيل شاشتك بالكمبيوتر: .
توصيل كابل SuperSpeed USBسعة 5جيجابت في الثانية ) USB 3.2الجيل (1وكابل الطاقة بعد االنتھاء من توصيل كابل ،HDMI/DisplayPortاتبع اإلجراءات الموضحة أدناه لتوصيل كابل USB بالكمبيوتر وإكمال إعداد الشاشة الخاصة بك: .1قم بتوصيل منفذ USB 3.2الجيل 1للدفق األعلى )الكابل مرفق( بمنفذ USB 3.2الجيل 1مناسب على الكمبيوتر الخاص بك )انظر منظر سفلي للحصول على التفاصيل(. .2قم بتوصيل الوحدات الطرفية لـ USB 3.2الجيل 1بمنافذ USB 3.2الجيل 1للتدفق السفلي على الشاشة.
تنظيم الكابالت بعد توصيل كل الكابالت الضرورية بشاشتك والكمبيوتر الخاص بك) ،انظر توصيل الشاشة لتوصيل الكابل( ،قم بتنظيم كل الكابالت حسبما ھو موضح أعاله. تأمين شاشتك باستخدام قفل ) Kensingtonاختياري( توجد فتحة قفل األمان في أسفل الشاشة )انظر منفذ تأمين للسالمة(. لمزيد من المعلومات حول استخدام قفل ) Kensingtonيتم شراؤه بشكل منفصل( ،راجع الوثائق التي يتم شحنھا مع القفل. قم بتثبيت الشاشة بجدول باستخدام قفل األمان .Kensington مالحظة :الصورة لغرض التوضيح فقط .
إزالة حامل الشاشة مالحظة :لمنع حدوث خدوش بشاشة LCDأثناء إزالة الحامل ،احرص على وضع الشاشة على سطح ناعم ونظيف. مالحظة :يتم تطبيق الخطوات التالية إلزالة الحامل المقدم مع الشاشة الخاصة بك .إذا كنت تزيل حامالً اشتريته من أي مصدر آخر ،فاتبع إرشادات اإلعداد التي تم تضمينھا مع الحامل. إلزالة الحامل: .1ضع الشاشة على قطعة قماش أو وسادة ناعمة. .2اضغط باستمرار على زر تحرير الحامل. .3ارفع الحامل ألعلى وبعيداً عن الشاشة.
التحميل على الحائط ) VESAاختياري( )بُعد القالووظ 10 x M4 :مم(. ارجع إلى التعليمات المرفقة مع مجموعة حامل الجدار المتوافقة مع .VESA .1ضع لوحة الشاشة على قطعة قماش أو وسادة ناعمة على منضدة ثابتة ومسطحة. .2إزالة حامل الشاشة )انظر إزالة حامل الشاشة(. .3استخدم مفك صليبي من فيليبس إلزالة البراغي األربعة التي تثبت الغطاء البالستيكي. .4قم بتوصيل قوس التحميل من مجموعة حامل الجدار بالشاشة. .5قم بتحميل الشاشة على الحائط .
تشغيل الشاشة قم بتشغيل الشاشة اضغط على زر الطاقة لتشغيل الشاشة. استخدام جھاز التحكم عن ُبعد لعصا التحكم استخدم أداة التحكم في ذراع التحكم في الجزء الخلفي من الشاشة إلجراء عمليات الضبط على الشاشة. .1اضغط على زر ذراع التحكم لبدء تشغيل قائمة OSDالرئيسية. .2حرك ذراع التحكم ألعلى/ألسفل/لليسار/لليمين للتبديل بين الخيارات. .3اضغط على زر ذراع التحكم مرة أخرى لتأكيد اإلعدادات والخروج.
• للتنقل في اتجاھين )يمين ويسار(. • تحرك يمينا ً إلدخال القائمة الفرعية. • تحرك إلى اليسار للخروج من القائمة الفرعية. • يزيد )يمين( أو يقلل )يسار( معلمات عنصر القائمة المحدد. • للتنقل في اتجاھين )ألعلى وألسفل(. • للتبديل بين عناصر القائمة. • زيادة )ألعلى( أو تقليل )ألسفل( معامالت عنصر القائمة المحددة. استخدام عناصر التحكم في اللوحة الخلفية استخدم أزرار التحكم في الجزء الخلفي من الشاشة للوصول إلى قائمة OSDومفاتيح االختصار.
لتشغيل قائمة " Dark Stabilizerمثبت الظالم". 4 مفتاح االختصار/ " Dark Stabilizerمثبت الظالم" 5 مفتاح االختصار/ /Brightness " Contrastالسطوع/ التباين" لتحقيق الوصول مباشرة إلى أدوات تمرير ضبط /Brightness " Contrastالسطوع/التباين". عندما تضغط على أي من ھذه األزرار )باستثناء زر عصا التحكم( ،يظھر شريط الحالة OSDإلعالمك باإلعدادات الحالية لبعض وظائف .
Preset Modes "أوضاع الضبط المسبق" يتيح لك اختيار أوضاع األلوان المضبوطة مسبقا ً. • " Standardقياسي" :تحميل إعدادات األلوان االفتراضية للشاشة .وھو وضع الضبط المسبق االفتراضي. • :FPSتحميل إعدادات اللون النموذجية أللعاب مطلق الشخص األول. • :MOBA/RTSيتم تحميل إعدادات األلوان المثالية أللعاب (MOBA) Multiplayer Online Battle Arenaو .(RTS) Real-Time Strategy • :RPGتحميل إعدادات األلوان النموذجية أللعاب تشغيل األدوار ).
Preset Modes "أوضاع الضبط المسبق" • " Warmدافئ" :يعرض األلوان في درجات حرارة اللون المنخفضة .تظھر الشاشة أكثر دفئا ً مع تدرج أحمر/أصفر. • " Coolبارد" :يعرض األلوان في درجات حرارة اللون المرتفعة. تظھر الشاشة أكثر برداً مع تدرج أزرق. • " Custom Colorلون مخصص" :يتيح لك ضبط إعدادات األلوان يدويا ً .حرك عصا التحكم لضبط قيم " Gainكسب" و " Offsetتكافؤ" و " Hueتدرج األلوان" و Saturation "اإلشباع" وإنشاء وضع لون الضبط المسبق.
AMD FreeSync Premium عند تحديد " Onتشغيل" وضبط الشاشة على أعلى معدل إطار ،يمكن التخلص من تأخر اإلدخال وتمزق الشاشة ،مما يوفّر طريقة لعب أكثر سالسة. مالحظة :لتعيين أعلى معدل عرض لإلطارات ،راجع ضبط الحد األقصى لمعدل اإلطارات. Response Timeيسمح لك بضبط " Response Timeوقت االستجابة" على "وقت االستجابة" " Fastسريع" ،أو " Super Fastفائق السرعة" ،أو " Extremeفائق". Dark Stabilizer "مثبت الظالم" تحسين الرؤية في سيناريوھات اللعب في الظالم .
Reset Game "إعادة ضبط اللعبة" /Brightness Contrast "السطوع/التباين" Brightness "السطوع" إعادة ضبط كل اإلعدادات تحت قائمة " Gameاللعبة" على قيم الضبط المسبق للمصنع. يضبط سطوع الشاشة وتباينھا. يقوم " Brightnessالسطوع" بضبط إضاءة ولمعان الضوء الخلفي. حرك عصا التحكم ألعلى لزيادة مستوى السطوع أو حرك عصا التحكم ألسفل لتقليل مستوى السطوع )الحد األدنى /0كحد أقصى .
HDMI 1 HDMI 2 حدد إدخال HDMI 1أو HDMI 2عندما تستخدم موصل .HDMI اضغط على زر ذراع التحكم لتأكيد التحديد. Auto Select "تحديد تلقائي" البحث تلقائيا ً عن مصادر اإلدخال المتوفرة .اضغط على زر ذراع التحكم لتأكيد التحديد. Reset Input " Sourceأعد ضبط مصدر اإلدخال" إعادة ضبط كل اإلعدادات تحت قائمة " Input Sourceمصدر اإلدخال" على قيم الضبط االفتراضي. " Displayالعرض" استخدم قائمة " Displayالعرض" لضبط الصور.
" Audioالصوت" " Volumeمستوى الصوت" يضبط حجم خرج سماعة الرأس. استخدم عصا التحكم لضبط مستوى الصوت من 0إلى .100 إعادة ضبط كل اإلعدادات تحت قائمة " Audioالصوت" على قيم Reset Audio "إعادة ضبط الصوت" الضبط المسبق للمصنع. " Menuالقائمة" حدد ھذا الخيار لضبط إعدادات ،OSDمصل لغات ،OSDالمدة الزمنية التي تظل فيھا القائمة على الشاشة ،وھكذا.
Personalize "تشخيص" Shortcut Key 1 "مفتاح االختصار "1 Shortcut Key 2 "مفتاح االختصار "2 Shortcut Key 3 "مفتاح االختصار "3 يمكن للمستخدمين اختيار ميزة من بين " Preset Modesأوضاع الضبط المسبق"" Game Enhance Mode ،وضع تحسين اللعبة" AMD FreeSync Premium ،أو Dark " Stabilizerمثبت الظالم"Brightness/Contrast ، "السطوع/التباين" ،أو " Input Sourceمصدر اإلدخال"، " Aspect Ratioنسبة العرض إلى االرتفاع" ،أو Volume "مستوى الصوت" وضبطه كمفتاح اختصار.
Downlight "أضواء سفلية" إعداد المصنع االفتراضي لمستشعر اللمس قيد التشغيل ،ويمكنك النقر فوق األضواء السفلية الموجودة أسفل الشاشة لتشغيلھا أو إيقاف تشغيلھا. عند إضاءة المصباح النازل ،يضيء باللون األزرق )انظر أضواء سفلية(. إليقاف تشغيل مستشعر اللمس ،حدد " Offإيقاف تشغيل". مالحظة :على الشاشات التي تم تصنيعھا اعتبارً ا من أغسطس ،2021 يمكن تشغيل أو إيقاف تشغيل أضواء سفلية باستخدام قائمة OSDفقط.
DDC/CI ) DDC/CIقناة بيانات الشاشة/واجھة األوامر( تتيح ضبط معلمات الشاشة )السطوع ،توازن األلوان ،إلخ( عبر البرامج الموجودة على الكمبيوتر لديك .يمكنك تعطيل ھذه الميزة عن طريق تحديد " Offإيقاف تشغيل" .قم بتمكين ھذه الميزة للحصول على أفضل خبرة للمستخدم واألداء األمثل لشاشتك. LCD Conditioning "مواءمة شاشة "LCD يساعد على تقليل الحاالت البسيطة من االحتفاظ بالصورة .حسب درجة االحتفاظ بالصورة ،قد يستغرق البرنامج بعض الوقت للعمل .
رسالة تحذير OSD عندما ال تقوم الشاشة بدعم وضع دقة وضوح معينة ،فسوف ترى الرسالة التالية: يعني ذلك أن الشاشة ال يمكنھا المزامنة مع اإلشارة التي تتلقاھا من الكمبيوتر .راجع مواصفات الشاشة لمعرفة نطاقات الترددات األفقية والعمودية التي يمكن التعامل معھا بواسطة ھذه الشاشة .الوضع الموصى به ھو .1080 × 1920 مالحظة :قد تختلف الرسالة بشكل طفيف ،حسب إشارة اإلدخال المتصل.
عندما تقوم بتغيير إعدادات USBاالفتراضية للمرة األولى ،تظھر الرسالة التالية: مالحظة :إذا اخترت " Yesنعم" ،فلن تظھر الرسالة في المرة القادمة عندما تنوي تغيير إعداد .USB عند إجراء إعادة ضبط المصنع ،ستظھر الرسالة مرة أخرى. سوف ترى الرسالة التالية قبل تعطيل وظيفة :DDC/CI عندما تنتقل الشاشة إلى وضع االستعداد ،تظھر الرسالة التالية: قم بتنشيط الكمبيوتر وإيقاظ الشاشة للحصول على وصول إلى .OSD مالحظة :قد تختلف الرسالة بشكل طفيف ،حسب إشارة اإلدخال المتصل.
سوف تعمل OSDفقط في وضع التشغيل العادي .إذا ضغطت على أي زر غير زر الطاقة أثناء وضع االستعداد ،فسوف تظھر إحدى الرسائل التالية وف ًقا لإلدخال المحدد: مالحظة :قد تختلف الرسالة بشكل طفيف ،حسب إشارة اإلدخال المتصل. إذا تم تحديد إدخال HDMIأو DPوتوصيل الكابل المقابل ،يظھر أدناه مربع حوار متحرك. مالحظة :قد تختلف الرسالة بشكل طفيف ،حسب إشارة اإلدخال المتصل.
قفل أزرار التحكم في اللوحة الخلفية يمكنك قفل أزرار التحكم في اللوحة الخلفية لمنع الوصول إلى قائمة OSDو/أو زر الطاقة. لقفل الزر )األزرار(: .1اضغط باستمرار على الزر 5لمدة أربع ثوان حتى تظھر قائمة على الشاشة. .2حدد أحد الخيارات التالية: • " Menu Buttonsأزرار القائمة" :اختر ھذا الخيار لقفل جميع أزرار قائمة OSDباستثناء زر الطاقة. • " Power Buttonزر الطاقة" :اختر ھذا الخيار لقفل زر الطاقة فقط.
ضبط الحد األقصى لدقة الوضوح مالحظة :قد تختلف الخطوات قليالً حسب إصدار Windowsالذي تستخدمه. لضبط أقصى دقة للشاشة: ® ® نظام التشغيل Windows® 7و Windows 8و:Windows 8.1 .1بالنسبة لنظام التشغيل Windows® 8و ،Windows® 8.1حدد سطح المكتب للتبديل إلى سطح مكتب كالسيكي. .2انقر بزر الماوس األيمن فوق سطح المكتب وانقر فوق مستوى دقة الشاشة. .3إذا كان لديك أكثر من جھاز عرض متصل ،فتأكد من تحديد .S2522HG .4انقر فوق القائمة المنسدلة مستوى دقة الشاشة وحدد .
المحول. .4انقر فوق الرابط عرض خصائص ّ .5انقر فوق عالمة التبويب جھاز العرض. .6انقر فوق القائمة المنسدلة لـ معدل تحديث الشاشة وحدد 240ھرتز. .7انقر فوق موافق. إذا لم تشاھد 1080 × 1920كخيار ،فقد يتعين عليك تحديث برنامج تشغيل الرسومات الخاص بك .ووفقا ً للكمبيوتر الخاص بك ،أكمل أحد اإلجراءات التالية: إذا كان لديك كمبيوتر سطح مكتب أو كمبيوتر محمول من طراز :Dell • انتقل إلى الموقع ،https://www.dell.
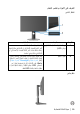
استخدام وظائف اإلمالة والتمديد العمودي مالحظة :يتم تطبيق التعليمات التالية لتوصيل الحامل المقدم مع الشاشة الخاصة بك .إذا كنت توصل حامالً اشتريته من أي مصدر آخر ،فاتبع إرشادات اإلعداد التي تم تضمينھا مع الحامل. ملحقات اإلمالة والدوران باستخدام الحامل المتصل بالشاشة ،يمكنك إمالة وإدارة الشاشة للحصول على زاوية المشاھدة األكثر راحة. مالحظة :الحامل غير مثبت في المصنع. التمديد العمودي مالحظة :يتمدد الحامل بشكل عمودي وصوالً إلى 130مم .
تدوير شاشة العرض قبل تدوير الشاشة ،تأكد من أنھا ممدودة بالكامل بشكل رأسي ومائل تماما ً لتجنب االصطدام بالحافة السفلية للشاشة.
استدارة عكس عقارب الساعة مالحظة :الستخدام وظيفة تدوير الشاشة )منظر أفقي مقابل رأسي( مطلوب برنامج تشغيل محدث للرسومات لكمبيوتر Dellغير المرفق مع ھذه الشاشة .لتنزيل برنامج الرسومات ،انتقل إلى www.dell.com/supportوراجع قسم تنزيل بخصوص برامج تشغيل الفيديو للحصول على أحدث تحديثات برامج التشغيل. مالحظة :في الوضع رأسي ،قد تواجه انخفاضا ً في األداء عند استخدام تطبيقات كثيفة الرسومات ،مثل األلعاب ثالثية األبعاد.
ضبط إعدادات شاشة التدوير لنظامك بعد تدوير شاشتك ،يتعين عليك إكمال اإلجراء أدناه لضبط إعدادات شاشة التدوير لنظامك. مالحظة :إذا كنت تستخدم الشاشة مع كمبيوتر غير ،Dellيتعين عليك االنتقال إلى موقع الويب الخاص ببرنامج تشغيل الرسومات أو موقع الويب الخاص بالشركة المصنعة للكمبيوتر للحصول على معلومات عن تدوير )المحتويات( على شاشتك. لضبط إعدادات شاشة التدوير: .1انقر بزر الماوس األيمن فوق سطح المكتب وانقر فوق خصائص. .2حدد عالمة تبويب اإلعدادات وانقر فوق زر خيارات متقدمة. .
استكشاف األخطاء وإصالحھا تحذير :قبل البدء في أي إجراءات في ھذا القسم ،اتبع تعليمات السالمة. اختبار ذاتي توفر شاشتك ميزة االختبار الذاتي والتي تتيح لك التحقق من عمل شاشتك على نحو صحيح .إذا كانت شاشتك وجھاز الكمبيوتر الخاص بك متصلين ولكن التزال الشاشة مظلمة ،قم بتشغيل االختبار الذاتي للشاشة عن طريق إجراء الخطوات التالية: .1قم بإيقاف تشغيل الكمبيوتر الخاص بك والشاشة. .2افصل كابل الفيديو من الجزء الخلفي من الكمبيوتر .
تشخيصات مضمنة تشتمل الشاشة على أداة تشخيص مضمنة تساعدك في تحديد ما إذا كان عيب الشاشة الذي تواجھه ناتجا ً عن مشكلة داخلية في الشاشة أو في الكمبيوتر أو بطاقة الفيديو. لتشغيل التشخيصات المضمنة: .1تأكد من نظافة الشاشة )ال توجد دقائق غبار على سطح الشاشة(. .2اضغط باستمرار على الزر 5لمدة أربع ثوان حتى تظھر قائمة على الشاشة. .3باستخدام عنصر التحكم في ذراع التحكم ،قم بتمييز خيار " Diagnosticsالتشخيص" على زر ذراع التحكم لبدء التشخيص .يتم عرض شاشة رمادية. واضغط .
مشكالت شائعة يحتوي الجدول التالي على معلومات عامة عن مشكالت الشاشة الشائعة التي قد تواجھھا والحلول الممكنة: األعراض الشائعة ما تواجھه ال يوجد فيديو/لمبة LEDالخاص بالطاقة مطفأة ال توجد صورة ال يوجد فيديو/لمبة LEDالخاص بالطاقة مضيئة ال توجد صورة أو صورة بال سطوع تركيز ضعيف الصورة مشوشة أو ضبابية أو وھمية اھتزاز/ارتعاش الفيديو صورة مموجة أو حركة دقيقة بكسالت ناقصة تشتمل شاشة LCDعلى بقع الحلول الممكنة • تأكد من أن كابل الفيديو الذي يوصل
• أوقف تشغيل الشاشة ثم أعد تشغيلھا. بكسالت ثابتة وملتصقة تشتمل شاشة LCDعلى بقع ساطعة مشكالت السطوع الصورة باھتة جداً أو ساطعة جداً تشويه ھندسي عدم توسيط الشاشة بشكل صحيح أعد ضبط الشاشة على إعدادات المصنع. خطوط أفقية/عمودية تشتمل الشاشة على خط واحد أو أكثر • أعد ضبط الشاشة على إعدادات المصنع.
لون ناقص الصورة ينقصھا لون لون خاطئ لون الصورة ليس جيداً بقاء الصورة من صورة ثابتة متروكة على الشاشة لفترة طويلة ظھور ظل خافت للصورة الثابتة المعروضة على الشاشة • قم بإجراء الفحص بميزة االختبار الذاتي للشاشة. • تأكد من أن كابل الفيديو الذي يوصل الشاشة بالكمبيوتر متصل بشكل صحيح ومحكم. • تحقق من وجود أسنان منثنية أو مكسورة في موصل كابل الفيديو. • قم بتغيير إعدادات " Preset Modesأوضاع الضبط المسبق" في OSDلقائمة Game "اللعبة" اعتماداً على التطبيق.
مشكالت خاصة بالمنتج األعراض الشائعة ما تواجھه صورة الشاشة صغيرة للغاية يتم توسيط الصورة على الشاشة ،ولكنھا ال تمأل مساحة العرض بأكملھا ال يمكن ضبط الشاشة باستخدام األزرار الموجودة باللوحة الخلفية ال تظھر قائمة OSD على الشاشة الحلول الممكنة • افحص إعداد " Aspect Ratioنسبة العرض إلى االرتفاع" في OSDلقائمة Display "العرض". • أعد ضبط الشاشة على إعدادات المصنع. • قد يتم تأمين قائمة .
مشكالت خاصة بالناقل التسلسلي العالمي )(USB األعراض الشائعة واجھة USBال تعمل ما تواجھه الحلول الممكنة أجھزة USBالطرفية ال • تحقق من تشغيل الشاشة. تعمل • أعد توصيل كابل للتدفق العلوي بجھاز الكمبيوتر. • أعد توصيل أجھزة USBالطرفية )موصل للتدفق السفلي(. • أوقف تشغيل الشاشة ثم أعد تشغيلھا. • أعد تمھيد الكمبيوتر. • تتطلب بعض أجھزة USBمثل HDDالمحمول الخارجي تواجد تيار كھربائي أعلى؛ قم بتوصيل الجھاز مباشرة بنظام الكمبيوتر.
الفھرس تحذير :تعليمات السالمة تحذير :استخدام أدوات التحكم ،عمليات الضبط ،أو اإلجراءات غير المذكورة في ھذا المستند قد ينتج عنه التعرض لصدمة ،مخاطر كھربية ،و/أو مخاطر ميكانيكية. لمزيد من المعلومات حول تعليمات السالمة ،انظر المعلومات المتعلقة بالسالمة والبيئة والتنظيم ).