Dell 게임 모니터 - S2522HG 사용 설명서 모델 : S2522HG 규정 모델 : S2522HGb
참고 : 참고는 제품을 더 잘 사용할 수 있도록 돕는 중요한 정보를 나타냅 니다 . 주의 : 지침을 따르지 않을 경우 잠재적인 하드웨어 손상이나 데이터 손실을 알리는 주의가 표시됩니다 . 경고 : 경고는 물적 손해 , 신체 상해 또는 사망 가능성이 있음을 나타냅니다 . Copyright © 2021 Dell Inc. 또는 자회사 . 모든 권리 보유 . Dell, EMC 및 기타 상표는 Dell Inc. 또는 자 회사의 상표입니다 . 그외 상표는 각 소유자의 상표일 수 있습니다 . 2021 - 07 Rev.
차례 안전 지침 . . . . . . . . . . . . . . . . . . . . . . . . . . . . . . . . . . 6 모니터 정보 . . . . . . . . . . . . . . . . . . . . . . . . . . . . . . . . 7 포장 내용물 . . . . . . . . . . . . . . . . . . . . . . . . . . . . . . . . . . . . . 7 제품의 특장점 . . . . . . . . . . . . . . . . . . . . . . . . . . . . . . . . . . . 8 부품과 조절 버튼 식별 . . . . . . . . . . . . . . . . . . . . . . . . . . . . 10 앞면 . . . . . . . . . . . . . . . . . . . . . . . . . . . . . . . . . . . . . . . . . . . . . . . . . 10 측면 모습 . . . . . . . .
유지보수 지침 . . . . . . . . . . . . . . . . . . . . . . . . . . . . . . . . . . 27 모니터 청소. . . . . . . . . . . . . . . . . . . . . . . . . . . . . . . . . . . . . . . . . . . 27 모니터 설치 . . . . . . . . . . . . . . . . . . . . . . . . . . . . . . . 28 스탠드 설치 . . . . . . . . . . . . . . . . . . . . . . . . . . . . . . . . . . . . 28 모니터 연결하기 . . . . . . . . . . . . . . . . . . . . . . . . . . . . . . . . 31 DisplayPort(DP 대 DP) 케이블과 전원 케이블 연결하기 . . . . . . . . . 31 HDMI 케이블과 전원 케이블 연결하기 . . . . . . . . . . . . .
시스템의 회전 디스플레이 설정 조정하기 . . . . . . . . . . . . . . 59 문제 해결 . . . . . . . . . . . . . . . . . . . . . . . . . . . . . . . . . 60 자가 검사. . . . . . . . . . . . . . . . . . . . . . . . . . . . . . . . . . . . . . 내장형 진단 도구 . . . . . . . . . . . . . . . . . . . . . . . . . . . . . . . . 일반적 문제 . . . . . . . . . . . . . . . . . . . . . . . . . . . . . . . . . . . . 제품 고유의 문제 . . . . . . . . . . . . . . . . . . . . . . . . . . . . . . . . 범용 직렬 버스 (USB) 관련 문제 . . . . . . . . . . . . . . . . . . . .
안전 지침 주의 : 본 안내서에서 설명된 것과 다르게 컨트롤 , 조정 또는 절차를 사용하 면 감전 , 전기적 위험 및 / 또는 기계적 위험에 노출될 수 있습니다 . • 모니터를 단단한 표면에 놓고 취급에 주의해하십시오 . 화면은 깨지기 쉬우 며 떨어뜨리거나 날카로운 면에 부딪치면 손상될 수 있습니다 . • 모니터의 전기적 정격이 현지의 AC 전원을 사용해 작동할 수 있도록 되어 있는지 확인하십시오 . • 모니터를 실온에 보관하십시오 . 너무 춥거나 더운 환경은 디스플레이의 액 정 크리스털에 부정적인 영향을 줄 수 있습니다 . • 심한 진동 또는 큰 충격 조건에 모니터를 두지 마십시오 . 예를 들어 , 모니터 를 자동차 트렁크에 두지 마십시오 . • 모니터를 오랜 기간 사용하지 않고 둘 경우에는 모니터 플러그를 빼십시오. • 전기 충격을 피하기 위해 , 커버를 제거하거나 모니터 내부를 만지지 마십 시오 .
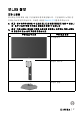
모니터 정보 포장 내용물 모니터는 아래 표에 나온 구성 품목과 함께 제공됩니다 . 구성 품목이 누락된 경 우에는 Dell 에 문의하십시오 . 자세한 내용은 Dell 에 연락를 참조하십시오 . 참고 : 일부 항목은 옵션일 수 있으며 모니터와 함께 제공되지 않을 수 있습니 다 . 일부 기능은 특정 국가에서 제공되지 않을 수 있습니다 . 참고 : 다른 곳에서 별도로 구매한 스탠드를 연결하는 경우에는 해당 스탠드 에 포함되어 있는 설치 지침을 따르십시오 .
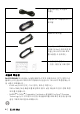
전원 케이블 ( 국가별로 다름 ) DisplayPort - DisplayPort 1.2 케이블 HDMI 2.0 케이블 SuperSpeed USB 5 Gbps (USB 3.2 Gen1) 업스트림 케 이블 ( 모니터의 USB 포트 를 사용할 수 있게 함 ) • 간편 설치 설명서 • 안전 , 환경 및 규제 정보 제품의 특장점 Dell S2522HG 모니터에는 능동형 매트릭스 박막 트랜지스터 (TFT) 액정 디스 플레이 (LCD) 및 LED 백라이트가 탑재되어 있습니다 . 모니터의 특장점에는 다 음 사항이 포함됩니다 : • 62.20 cm (24.50 인치 ) 가시 영역 ( 대각선 측정 시 ). 1920 x 1080 (16:9) 해상도를 제공하며 좀 더 낮은 해상도의 경우 전체 화면 모드를 지원합니다 .
• 240 Hz 라는 높은 재생 빈도와 Extreme( 익스트림 ) 모드 * 에서 1 ms 그레 이 - 그레이의 빠른 응답 시간 제공 • 색역 99% sRGB • 기울이기 , 스위블 , 피벗 및 높이 조정 기능 • DisplayPort 및 HDMI 를 통한 디지털 연결성 • 1 개의 SuperSpeed USB 5 Gbps (USB 3.2 Gen1) Type B 업스트림 포트 , 1 개 의 SuperSpeed USB 5 Gbps (USB 3.2 Gen1) Type-A 다운스트림 충전 포트 및 3 개의 SuperSpeed USB 5 Gbps (USB 3.2 Gen1) Type-A 다운스트림 포트 장착 . • 게이밍 콘솔 VRR 지원 능력과 함께 활성화됨 . • 탈착식 스탠드와 VESA™ 100 mm 설치 구멍을 이용한 유연한 장착 가능 . • 사용자 시스템에 의해 지원될 경우 플러그 - 앤 - 플레이 기능 . • OSD 조정을 통한 간편한 설정과 화면 최적화 .
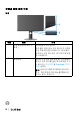
부품과 조절 버튼 식별 앞면 라벨 1 2 설명 전원 버튼 (LED 표시기 포함 ) 하단조명 사용 모니터를 켜거나 끕니다 . 흰색 불이 켜져 있는 것은 모니터가 켜졌고 정상 작동 중임을 나타냅니다 . 흰색 불이 깜박이는 것은 모니터가 대기 모드에 있음 을 나타냅니다 . 모니터가 설정을 완료했을 때 , 디스플레이 하단의 터치 센서를 눌러 하단조명을 켜거 나 끕니다 ( 하단조명 및 Downlight ( 하단 조명 ) 참조 ). 참고 : 2021 년 8 월부터 제조된 모니터의 경우 , 하단조명은 OSD 메뉴를 통해서만 켜거나 끌 수 있습니다 .
측면 모습 뒷면 모니터 스탠드 미장착 상태의 뒷면 설명 모니터 스탠드가 장착된 상태의 뒷면 라벨 1 사용 조이스틱 OSD 메뉴를 탐색하는 데 사용합니다 . 2 기능 버튼 자세한 내용은 모니터 조작를 참조하 십시오 . 3 VESA 설치 구멍 (100 mm x 100 mm - 뒤쪽에 부착된 VESA 덮개 ) VESA 호환형 벽면 설치 키트를 사용 하는 벽걸이형 모니터 (100 mm x 100 mm).
4 규정에 의한 라벨 규정에 의한 승인을 표시합니다 . 5 스탠드 분리 버튼 스탠드를 모니터에서 분리합니다 . 6 바코드 , 일련번호 및 서비스 태그 레이블 Dell 기술 지원 요청용 . 서비스 태그는 고유한 영숫자 식별자이며 , Dell 서비 스 기술자가 이것을 이용해 모니터의 하드웨어 구성 요소를 식별하고 보증 정보에 액세스할 수 있습니다 . 7 케이블 관리 슬롯 케이블이 슬롯을 통과할 때 케이블을 정리합니다 . 아래 모습 아래 모습 ( 모니터 스탠드 없음 ) 라벨 1 설명 사용 전원 커넥터 전원 케이블 ( 모니터에 포함됨 ) 을 연결합 니다 . 2 보안 잠금 슬롯 보안 잠금을 사용하여 모니터를 보호합니다 ( 보안 잠금은 포함되어 있지 않음 ). 3 HDMI 포트 (HDMI 1) HDMI 케이블 ( 모니터에 포함됨 ) 로 컴퓨터 를 연결합니다 .
4 HDMI 포트 (HDMI 2) HDMI 케이블 ( 모니터에 포함됨 ) 로 컴퓨터 를 연결합니다 . 5 스탠드 잠금 기능 M3 x 6 mm 나사를 사용하여 모니터에 스탠드 를 고정합니다 ( 나사는 제공되지 않음 ). 6 DisplayPort DisplayPort 케이블 ( 모니터와 함께 제공됨 ) 로 컴퓨터를 연결합니다 . 7 SuperSpeed USB 5 Gbps (USB 3.2 Gen1) Type-B 업스트 림 포트 USB 케이블 ( 모니터와 함께 제공됨 ) 을 이 포트에서 컴퓨터로 연결하여 모니터의 USB 포트를 사용할 수 있게 합니다 . 8 SuperSpeed USB 5 Gbps (USB 3.2 Gen1) Type-A 다운스 트림 포트 (3) USB 3.2 Gen1 (5 Gbps) 장치를 연결합니다 .* 9 하단조명 참고 : 이러한 포트를 사용하려면 USB 케이블 ( 모니터와 함께 제공됨 ) 을 모니터의 USB 업 스트림 포트와 컴퓨터에 연결해야 합니다 .
10 SuperSpeed USB 컴퓨터에 연결하여 USB 장치를 충전합니다 . 5 Gbps (USB 3.2 Gen1) Type-A 다운스 트림 포트 , 전원 충전 11 헤드폰 출력 포트 헤드폰을 컴퓨터에 연결합니다 . 주의 : 볼륨 컨트롤이나 이퀄라이저에서 오디 오 출력을 50% 이상으로 높이면 헤드폰에서 출력 전압이 증가하여 사운드 압력 수준이 높 아질 수 있습니다 . * 신호 간섭을 피하기 위해 , 무선 USB 장치가 USB 다운스트림 포트에 연결되었 을 때 다른 USB 장치를 인접 포트에 연결하지 않을 것을 권장합니다 . 모니터 규격 모델 S2522HG 화면 유형 능동형 매트릭스 - TFT LCD 패널 기술 빠른 IPS 화면비 16:9 볼 수 있는 이미지 대각 622 mm (24.50 인치 ) 너비 ( 활성 영역 ) 543.74 mm (21.40 인치 ) 높이 ( 활성 영역 ) 302.62 mm (11.91 인치 ) 전체 영역 164545.63 mm2 (255.
백라이트 흰색 LED 에지라이트 시스템 응답 시간 Extreme( 익스트림 ) 모드에서 1 ms 회색에서 회색 으로 * Super Fast( 매우 빠름 ) 모드에서 2 ms 회색에서 회 색으로 Fast( 빠름 ) 모드에서 4 ms 회색에서 회색으로 * 시각적 모션 흐림을 줄이고 증가된 이미지 응답성 을 위해 Extreme( 익스트림 ) 모드에서 1 ms 를 성취 할 수 있습니다 . 그러나 이로 인해 이미지에 약간의 눈에 띄는 시각적 아티팩트가 생길 수 있습니다 . 각 시스템 구성 및 각 게이머마다 요구 사항이 다르기 때문에, 당사에서는 사용자가 다양한 모드를 시험해 보고 자신에게 맞는 설정을 찾을 것을 권장합니다 . 색심도 16.78 백만 컬러 (8 비트 ) 색역 sRGB 99% ( 일반 ) 연결성 • 1 x DisplayPort 버전 1.2 • 2 x HDMI 포트 버전 2.0 • 1 x 헤드폰 출력 포트 • 1 x USB 3.
Dell Display Manager 호 환성 쉬운 배열 및 기타 키 기능 보안 보안 잠금 슬롯 ( 케이블 잠금 별매 ) 해상도 규격 모델 S2522HG 수평 주사 범위 30 kHz ~ 255 kHz ( 자동 ) 수직 주사 범위 48 Hz ~ 240 Hz ( 자동 ) 최고 사전 설정 해상도 1920 x 1080 (240 Hz 일 때 ) 지원되는 비디오 모드 모델 S2522HG 비디오 디스플레이 기능 (HDMI 및 DisplayPort) 480i, 480p, 576i, 576p, 720p, 1080i, 1080p, FHD 사전 설정 디스플레이 모드 디스플레이 모드 수평 주파수 (kHz) 수직주파수 (Hz) 픽셀 클록 (MHz) 720 x 400 31.50 70.10 28.30 동기 극성 ( 수평 / 수직 ) -/+ VESA, 640 x 480 31.50 59.90 25.20 -/- VESA, 640 x 480 37.50 75.00 31.
VESA, 1600 x 900 60.00 60.00 108.00 +/+ VESA, 1920 x 1080 67.50 60.00 148.50 +/+ 1920 x 1080 137.30 120.00 285.50 +/- 1920 x 1080 166.60 144.00 346.50 +/- 1920 x 1080 278.40 240.00 567.40 +/- 전기 규격 모델 S2522HG 비디오 입력 신호 HDMI 2.0/DisplayPort 1.2, 각 라인당 600 mV, 각 쌍당 100 Ω 의 입력 임피던스 AC 입력 전압 / 주파수 / 전류 100 VAC ~ 240 VAC / 50 Hz 또는 60 Hz ± 3 Hz / 1.50 A ( 일반 ) 돌입 전류 • 120 V: 30 A ( 최대 ) 0°C 에서 ( 콜드 스타트 ) • 240 V: 60 A ( 최대 ) 0°C 에서 ( 콜드 스타트 ) 소비 전력 • 0.3 W ( 꺼짐 모드 )1 • 0.
물리적 특성 모델 S2522HG 신호 케이블 유형 • 디지털 : DisplayPort, 20 핀 • 디지털 : HDMI, 19 핀 • 범용 직렬 버스 : USB, 9 핀 참고 : Dell 모니터는 모니터와 함께 제공된 비디오 케이블을 사용할 때 최적으 로 작동하도록 설계되었습니다 . Dell 은 시장의 다양한 케이블 공급업체를 관 리하거나 이러한 케이블의 재료 종류 , 커넥터 , 제조에 사용되는 프로세스 등을 관리 감독할 수 없으므로 , Dell 은 Dell 모니터와 함께 제공되지 않는 케이블의 비디오 성능을 보장하지 않습니다 . 치수 ( 스탠드 포함 ) 높이 ( 연장 시 ) 505.75 mm (19.91 인치 ) 높이 ( 축소했을 때 ) 375.75 mm (14.79 인치 ) 너비 555.40 mm (21.87 인치 ) 깊이 200.30 mm (7.89 인치 ) 치수 ( 스탠드 미포함 ) 높이 327.24 mm (12.88 인치 ) 너비 555.40 mm (21.
스탠드 어셈블리 미포함 중량 ( 벽 설치 또는 VESA 설치를 위한 고려사항의 경 우 - 케이블 없음 ) 3.72 kg (8.20 lb) 스탠드 어셈블리 중량 2.00 kg (4.41 lb) 환경 특성 모델 S2522HG 준수 표준 • RoHS- 규격 • BFR/PVC 비포함 모니터 ( 외부 케이블 제외 ) • 비소 없는 유리와 수은 없는 패널만 해당됩니다 온도 동작 0°C ~ 40°C (32°F ~ 104°F) 비동작 • 보관 : -20°C ~ 60°C (-4°F ~ 140°F) • 운반 : -20°C ~ 60°C (-4°F ~ 140°F) 습도 동작 10% ~ 80% ( 비응축 ) 비동작 • 보관 : 5% ~ 90% ( 비응축 ) • 운반 : 5% ~ 90% ( 비응축 ) 고도 동작 5,000 m (16,404 피트 ) ( 최대 ) 비동작 12,192 m (40,000 피트 ) ( 최대 ) 열 분산 • 245.66 BTU/ 시간 ( 최대 ) • 57.
핀 지정 DisplayPort 커넥터 핀 번호 1 연결된 신호 케이블의 20 핀 면 ML3 (n) 2 GND 3 ML3 (p) 4 ML2 (n) 5 GND 6 ML2 (p) 7 ML1 (n) 8 GND 9 ML1 (p) 10 ML0 (n) 11 GND 12 ML0 (p) 13 GND 14 GND 15 AUX (p) 16 GND 17 AUX (n) 18 핫 플러그 감지 19 Re-PWR 20 +3.
HDMI 커넥터 핀 번호 1 연결된 신호 케이블의 19 핀 면 TMDS 데이터 2+ 2 TMDS 데이터 2 쉴드 3 TMDS 데이터 2- 4 TMDS 데이터 1+ 5 TMDS 데이터 1 쉴드 6 TMDS 데이터 1- 7 TMDS 데이터 0+ 8 TMDS 데이터 0 쉴드 9 TMDS 데이터 0- 10 TMDS 클록 + 11 TMDS 클록 쉴드 12 TMDS 클록 - 13 CEC 14 예약됨 ( 장치의 N.C.
플러그 앤 플레이 기능 이 모니터는 어떠한 플러그 앤 플레이 호환 시스템에나 연결할 수 있습니다 . 모 니터는 디스플레이 데이터 채널 (DDC) 프로토콜을 사용하여 컴퓨터 시스템에 확장 디스플레이 식별 데이터 (EDID) 를 제공함으로써 시스템이 자체적으로 구 성하고 모니터 설정을 최적화도록 합니다 . 대다수 모니터 설치는 자동으로 실행 되므로 원할 경우 다른 설정을 선택할 수 있습니다 . 모니터 설정 변경에 대한 자 세한 내용은 모니터 조작를 참조하십시오 . 범용 직렬 버스 (USB) 인터페이스 이 단원에서는 모니터에 탑재된 USB 포트에 대한 정보를 제공합니다 . 참고 : 이 모니터는 SuperSpeed USB 5 Gbps (USB 3.2 Gen1) 와 호환 가능 합니다 . 전송 속도 초고속 데이터 전송 속도 소비 전력 * 5 Gbps 4.50 W ( 최대 , 각 포트 ) 고속 480 Mbps 4.50 W ( 최대 , 각 포트 ) 완속 12 Mbps 4.
6 SSTX+ 7 GND 8 SSRX- 9 SSRX+ USB 3.2 Gen1 (5 Gbps) 다운스트림 커넥터 핀 번호 1 커넥터의 9 핀 쪽 VCC 2 D- 3 D+ 4 GND 5 SSRX- 6 SSRX+ 7 GND 8 SSTX- 9 SSTX+ USB 포트 • 1 x 업스트림 - 후면 • 2 x 다운스트림 - 후면 • 2 x 다운스트림 - 하단 충전 포트 배터리 아이콘이 있는 포트 ; BC1.2 호환 장치인 경우 최대 2 A 고속 충전 기능을 지원합니다 . 참고 : SuperSpeed USB 5 Gbps (USB 3.2 Gen1) 기능을 사용하려면 SuperSpeed USB 5 Gbps (USB 3.2 Gen1) 을 지원하는 컴퓨터가 있어야 합 니다 . 참고 : 모니터의 USB 포트는 모니터가 켜져 있거나 대기 모드에 있을 때만 동작합니다 . 모니터를 껐다 켜면 연결된 주변장치가 정상 기능을 재작동시 키는 데 몇 초가 걸릴 수 있습니다 .
LCD 모니터 화질 및 픽셀 지침 LCD 모니터 제조 공정 중에 한 개 이상의 픽셀이 불변 상태로 고정되어 제대로 보이지 않는 경우가 있습니다 . 이것은 일반적인 현상이며 디스플레이의 화질 또 는 사용성에 영향을 주지 않습니다. Dell 모니터 품질 및 픽셀 정책에 대한 자세한 내용은 www.dell.com/pixelguidelines 을 참조하십시오 인체 공학 주의 : 키보드를 부적절하게 사용하거나 오래 사용하면 부상을 입을 수 있습 니다 . 주의 : 오랜 시간 모니터 화면을 보면 눈에 경련이 생길 수 있습니다 . 편안하고 효율적인 사용을 위해 , 컴퓨터 워크스테이션을 셋업하고 사용할 때 다 음 지침을 준수하십시오 : • 작업할 때 모니터와 키보드가 바로 앞에 오도록 컴퓨터를 놓으십시오 . 키보 드 위치를 올바르게 놓는 데 도움이 되는 특수한 선반을 시중에서 구입할 수 도 있습니다 .
• 키보드 또는 마우스를 사용하는 동안 손이 쉴 수 있도록 항상 공간을 둡 니다 . • 두 팔 모두에서 상박이 자연스럽게 놓이도록 하십시오 . • 바닥에 발이 평평하게 놓이도록 하십시오 . • 앉아 있을 때 , 다리의 무게를 발이 지지하도록 하고 의자의 전면 부분에 하 중을 싣지 않도록 합니다 . 적절한 자세를 유지하도록 필요한 경우 의자의 높이를 조정하거나 발판을 사용합니다 . • 작업 시 동작을 변화시킵니다 . 오랜 시간 동안 앉아서 일하지 않도록 작업 을 구성하십시오 . 정기적인 간격으로 일어서서 주변을 걷도록 하십시오 . • 책상 밑 공간에서 편안하게 앉아 있을 때 방해가 될 수 있는 장애물 및 발에 걸려서 넘어질 수 있는 케이블 또는 전원 코드를 치웁니다 .
디스플레이 취급과 이동 모니터를 들어올리거나 이동할 때 안전하게 다루려면 아래에 나온 지침을 따르 십시오 . • 모니터를 이동하거나 들어올리기 전에 컴퓨터와 모니터 전원을 끕니다 . • 컴퓨터에서 모든 케이블의 연결을 끊습니다 . • 모니터를 원래의 포장재를 사용해 원래의 상자에 넣으십시오 . • 모니터를 들어올리거나 이동할 때 과도한 압력을 가하지 말고 모니터 하단 가장자리와 옆면을 단단하게 잡으십시오 . • 모니터를 들어올리거나 이동할 때 , 화면을 멀리 떨어지게 하여 디스플레이 영역을 누르지 않도록 함으로써 스크래치나 손상을 방지합니다 . • 모니터를 운반할 때 갑작스런 충격이나 진동을 가하지 마십시오 .
• 모니터를 들어올리거나 이동할 때 , 스탠드 받침대 또는 스탠드 라이저를 잡 고 있는 동안 모니터를 거꾸로 뒤집지 마십시오 . 실수로 모니터가 손상되거 나 부상을 입을 수 있습니다 . 유지보수 지침 모니터 청소 주의 : 모니터를 청소하기 전에 안전 지침을 읽고 따르십시오 . 경고 : 모니터를 청소하기 전에 모니터의 전원 케이블을 전기 콘센트에서 뽑 으십시오 . 모범적으로 관리하려면 모니터를 포장을 풀거나 청소하거나 취급할 때 아래 목 록의 지침을 따르십시오 . • 대전방지 화면을 청소하기 전에 부드럽고 깨끗한 헝겊에 물을 약간 축이십 시오 . 가능하면 대전방지 코팅에 적합한 특수 화면 청소용 티슈나 용액을 사용하십시오 . 벤젠 , 희석제 , 암모니아수 , 연마 세제 또는 압축 공기를 사 용하지 마십시오 . • 모니터를 청소할 때는 따뜻한 물에 약간 적신 헝겊을 사용하십시오 . 일부 세제는 모니터에 유백색의 엷은 막을 형성하므로 어떠한 종류의 세제도 사 용하지 마십시오 .
모니터 설치 스탠드 설치 참고 : 스탠드는 공장 출고시 설치되지 않은 상태입니다 . 참고 : 아래의 단계는 모니터에 포함되어 제공된 스탠드를 설치하는 데에만 적용됩니다 . 다른 곳에서 별도로 구매한 스탠드를 부착하는 경우에는 해당 스탠드에 포함되어 있는 설치 지침을 따르십시오 . 모니터 스탠드 설치하기 : 1. 상자 반대편에 적힌 지침을 따라 스탠드를 고정시키는 쿠션에서 스탠드를 빼냅니다 . 2. 스탠드 받침과 스탠드 라이저를 패키지 쿠션에서 빼냅니다 . 3. 스탠드 받침에 스탠드 라이저를 맞추고 제자리에 넣습니다 . 4. 스탠드 받침 하단에서 나사 핸들을 열고 , 나사를 시계 방향으로 돌려 스탠 드 어셈블리를 고정시킵니다 . 5. 나사 핸들을 닫습니다 .
6. 모니터의 보호 덮개를 열고 모니터의 VESA 슬롯에 접근합니다 . 참고 : 스탠드 어셈블리를 디스플레이에 부착하기 전에 , 어셈블리를 위한 공 간을 만들도록 전면 플레이트 플랩이 열려 있어야 합니다 . 7. 스탠드 라이저의 탭을 디스플레이 후면 덮개에 있는 슬롯 안에 넣고 스탠드 어셈블리를 낮춰 제자리에 들어가도록 합니다 .
8. 스탠드 라이저를 잡고 모니터를 주의해서 들어올린 다음 평평한 표면에 놓 습니다 . 참고 : 모니터를 들어올릴 때 스탠드 라이저를 단단하게 잡아 실수로 손상되 지 않도록 합니다 . 9. 모니터에서 보호 덮개를 들어올립니다 .
모니터 연결하기 경고 : 이 단원에 있는 절차를 시작하기 전에 안전 지침을 따르십시오 . 참고 : Dell 모니터는 Dell 이 제공하는 인박스 케이블과 최적으로 작동하도 록 설계되었습니다 . Dell 은 Dell 에서 제공하지 않은 케이블이 사용되었을 때의 비디오 품질과 성능을 보장하지 않습니다 . 참고 : 케이블을 연결하기 전에 케이블 관리 슬롯 안으로 넣어 정리합니다 . 참고 : 모든 케이블을 컴퓨터에 동시에 연결하지 마십시오 . 참고 : 이미지는 단지 참조용으로 제공된 것입니다 . 컴퓨터의 외관은 다를 수 있습니다 . 모니터를 컴퓨터에 연결하기 : 1. 컴퓨터를 끄고 전원 케이블을 뽑습니다 . 2. DisplayPort 또는 HDMI 케이블로 모니터와 컴퓨터를 연결합니다 .
SuperSpeed USB 5 Gbps (USB 3.2 Gen1) 케이블과 전원 케이블 연결 DisplayPort/HDMI 케이블을 연결한 뒤 아래 절차를 따라 USB 케이블을 컴퓨터에 연결하고 모니터 설치를 완료합니다 : 1. USB 3.2 Gen1 업스트림 포트 ( 케이블 제공됨 ) 를 컴퓨터의 USB 3.2 Gen1 포트에 연결합니다 ( 자세한 내용은 아래 모습 참조 ). 2. USB 3.2 Gen1 주변장치를 모니터의 USB 3.2 Gen1 다운스트림 포트에 연결 합니다 . 3. 컴퓨터와 모니터의 전원 케이블을 근처의 콘센트에 꽂습니다 . 참고 : 모니터 스탠드의 케이블 홀더를 사용하여 케이블을 정리합니다 . 4. 모니터와 컴퓨터를 켭니다 . 모니터에 이미지가 나타나면 설치가 완료된 것입니다 . 이미지가 나타나지 않을 경우 일반적 문제를 참조하십시오 .
케이블 정리하기 필요한 모든 케이블을 모니터와 컴퓨터에 연결한 후 ( 케이블 연결은 모니터 연 결하기 참조 ) 케이블 관리 슬롯을 사용하여 위와 같이 모든 케이블을 깔끔하게 정리합니다 . Kensington 잠금 장치 ( 옵션 ) 를 사용하여 모니터 고정시키기 보안 잠금 슬롯은 모니터 하단에 있습니다 ( 보안 잠금 슬롯 참조 ). Kensington 잠금 장치 ( 별도 구매 ) 사용에 대한 자세한 내용은 잠금 장치 와 함께 제공된 문서를 참조하십시오 . Kensington 보안 잠금 장치를 사용하여 모니터를 테이블에 고정시킵니다 . 참고 : 이미지는 단지 참조용으로 제공된 것입니다 . 잠금 장치의 외관은 다 를 수 있습니다 .
모니터 스탠드 분리하기 참고 : 스탠드를 분리하는 동안 LCD 화면의 긁힘을 방지하기 위해 모니터를 깨끗한 면에 놓습니다 . 참고 : 아래의 단계는 모니터에 포함되어 제공된 스탠드를 제거하는 데 적용 됩니다 . 다른 곳에서 별도로 구매한 스탠드를 분리하는 경우에는 해당 스탠 드에 포함되어 있는 지침을 따르십시오 . 스탠드 분리하기 : 1. 모니터를 부드러운 천이나 쿠션 위에 놓습니다 . 2. 스탠드 분리 버튼을 누른 채로 있습니다 . 3. 스탠드를 위로 들어 올려 모니터에서 분리합니다 .
VESA 벽걸이 ( 옵션 ) ( 나사 치수 : M4 x 10 mm). VESA 호환형 벽걸이 키트와 함께 제공되는 지침을 참조하십시오 . 1. 안정된 평평한 탁자에 부드러운 천 또는 쿠션을 깔고 모니터 패널을 그 위 에 올려 놓습니다 . 2. 모니터 스탠드를 분리하십시오 ( 모니터 스탠드 분리하기 참조 ). 3. Phillips 십자 스크루드라이버를 사용하여 플라스틱 커버를 고정하는 네 개 의 나사를 제거합니다 . 4. 벽걸이 키트의 장착 브래킷을 모니터에 부착합니다 . 5. 모니터를 벽에 설치합니다 . 자세한 내용은 벽걸이 키트에 포함되어 있는 설명서를 참조하십시오 . 참고 : 최소 중량 또는 하중 지지 용량이 14.88 kg 인 UL 또는 CSA 또는 GS 인증 벽걸이 브래킷하고만 사용할 수 있습니다 .
모니터 조작 모니터 켜기 모니터를 켜려면 전원 버튼을 누릅니다 . 조이스틱 컨트롤 사용하기 모니터 후면에 있는 조이스틱 컨트롤을 사용하여 OSD 를 조정합니다 . 1. 조이스틱 버튼을 눌러 OSD 메인 메뉴를 실행합니다 . 2. 조이스틱을 위 / 아래 / 왼쪽 / 오른쪽으로 움직여 옵션 간을 전환합니다 . 3. 조이스틱 버튼을 다시 눌러 설정을 확인하고 종료합니다 . 조이스틱 설명 • OSD 메뉴가 켜졌을 때, 버튼을 눌러 선택을 확인하거나 설정을 저장합니다 . • OSD 메뉴가 꺼졌을 때 , 버튼을 눌러 OSD 메인 메뉴를 실행합 니다 . 메뉴 시스템 액세스하기을 참조하십시오 .
• 2- 방향 ( 오른쪽 및 왼쪽 ) 방향 탐색 . • 오른쪽으로 움직여 하위 메뉴로 들어갑니다 . • 왼쪽으로 움직여 하위 메뉴에서 나옵니다 . • 선택한 메뉴 항목의 매개변수를 증가 ( 오른쪽 ) 또는 감소 ( 왼쪽 ) 시킵니다 . • 2- 방향 ( 위쪽 및 아래쪽 ) 방향 탐색 . • 메뉴 항목 간을 전환합니다 . • 선택한 메뉴 항목의 매개변수를 증가 ( 위쪽 ) 또한 감소 ( 아래쪽 ) 시킵니다 . 후면 패널 컨트롤 사용하기 모니터 후면에 있는 컨트롤 버튼을 사용하여 OSD 메뉴와 바로가기 키에 액세스 합니다 . 다음 표에서는 후면 패널 버튼에 대해 설명합니다 : 후면 패널 버튼 1 메뉴 설명 메뉴 버튼을 사용하여 OSD( 온스크린 디스플레이 ) 를 실행합니다 . 메뉴 시스템 액세스하기을 참조하 십시오 . OSD 메인 메뉴 종료하기 . 2 종료 사전 설정 목록에서 원하는 색상 모드 지정하기 .
Dark Stabilizer( 어두움 안정화 ) 메뉴 실행하기 . 4 바로 가기 키 / Dark Stabilizer( 어 두움 안정화 ) 5 바로 가기 키 / Brightness/ Contrast ( 밝기 / 명암 대비 ) Brightness/Contrast( 밝기 / 명암 대비 ) 조정 슬 라이더에 직접 액세스하기 . 이러한 버튼들을 누르면 ( 조이스틱 버튼 제외 ), 일부 OSD 기능의 현재 설정을 알려주는 OSD 상태 표시줄이 나타납니다 . OSD 메뉴 사용하기 메뉴 시스템 액세스하기 아이콘 메뉴 및 하위 메뉴 Game( 게임 ) 38 │ 모니터 조작 설명 시각적 게임플레이 경험을 개인 맞춤화하려면 이 메뉴를 사용합니다 .
Preset Modes ( 사전 설정 모드 ) 사전 설정 컬러 모드의 목록에서 모드를 선택할 수 있습니다 . • Standard ( 표준 ): 모니터의 기본 색상 설정을 로드합니다 . 이것은 기본 사전 설정 모드입니다 . • FPS: 일인칭 슈팅 게임 (FPS) 에 적합한 색상 설 정을 로드합니다 . • MOBA/RTS: MOBA( 멀티플레이어 온라인 배틀 아레나 ) 및 RTS( 실시간 전략 ) 게임에 적합한 색 상 설정을 로드합니다 . • RPG: RPG( 롤 플레잉 게임 ) 에 적합한 색상 설정 을 로드합니다 . • SPORTS( 스포츠 ): 스포츠 게임에 적합한 색상 설정을 로드합니다 . • Game 1( 게임 1)/Game 2( 게임 2)/Game 3( 게 임 3): 자신의 게임 필요에 맞게 색 , Response Time( 응답 시간 ) 및 Dark Stabilizer( 어두움 안 정화 ) 의 설정을 사용자 지정할 수 있습니다 .
Preset Modes ( 사전 설정 모드 ) • Warm( 따뜻함 ): 더 낮은 색 온도로 색상을 표시 합니다 . 화면이 빨간색 / 노란색조로 더 따뜻하 게 나타납니다 . • Cool( 차가움 ): 더 높은 색 온도로 색상을 표시합 니다 . 화면이 파란색조로 더 차갑게 나타납니다 . • Custom Color( 사용자 지정 색상 ): 이 설정을 이 용하면 색상 설정을 수동으로 설정할 수 있습니 다 . 조이스틱을 움직여서 Gain( 게인 ), Offset ( 오프셋 ), Hue( 색조 ), Saturation( 채도 ) 값을 조정하여 사용자 고유의 사전 설정 색상 모드를 생성합니다 . Game Enhance Mode( 게임 향 상 모드 ) 이 기능은 게임플레이 경험을 향상시키기 위한 세 가지 기능을 제공합니다 . • Off ( 꺼짐 ) Game Enhance Mode( 게임 향상 모드 ) 하에서 기능을 비활성화하려면 Off( 꺼짐 ) 를 선택합 니다 .
Game Enhance Mode( 게임 향 상 모드 ) • Frame Rate( 프레임 속도 ) 게임을 플레이할 때 현재의 초당 프레임 수를 표 시하려면 On( 켜짐 ) 을 선택합니다 . 속도가 높 을수록 동작이 더 부드럽게 나타납니다 . • Display Alignment( 디스플레이 정렬 ) 이 기능을 활성화하면 여러 디스플레이의 비디오 콘텐츠를 완벽하게 정렬하는 데 도움이 됩니다 . AMD FreeSync Premium On( 켜짐 ) 을 선택하고 모니터를 최고 프레임 속도 로 설정했을 때, 입력 지연과 화면 찢김을 제거할 수 있어서 부드러운 게임 플레이를 제공합니다 . 참고 : 최고 프레임 속도를 설정하려면 , 최대 프레 임 속도 설정를 참조하십시오 . Response Time( 응답 시 간) Response Time( 응답 시간 ) 을 Fast( 빠름 ), Super Fast( 매우 빠름 ) 또는 Extreme( 익스트 림 ) 에 설정할 수 있습니다 .
Hue( 색조 ) 이 기능은 비디오 이미지의 색상을 녹색 또는 자주 색으로 변화시킵니다 . 이것은 원하는 살색을 조정 하는 데 사용됩니다 . 조이스틱을 사용하여 색조 수준을 0 ~ 100 사이에서 조정합니다 . 조이스틱을 위로 움직이면 비디오 이미지의 녹색 음영이 증가합니다 . 조이스틱을 아래로 움직이면 비디오 이미지의 자주 색 음영이 증가합니다 . 참고 : Hue( 색조 ) 조정은 FPS, MOBA/RTS, SPORTS( 스포츠 ) 또는 RPG 사전 설정 모드를 선 택한 경우에만 사용 가능합니다 . Saturation ( 채도 ) 이 기능은 비디오 이미지의 채도를 조정할 수 있습 니다 . 조이스틱을 사용하여 채도 수준을 0 ~ 100 사이에서 조정합니다 . 조이스틱을 위로 움직이면 비디오 이미지의 색채 현시가 증가합니다 . 조이스틱을 아래로 움직이면 비디오 이미지의 흑백 현시가 증가합니다 .
Brightness/ Contrast ( 밝기 / 명암 대비 ) Brightness ( 밝기 ) 디스플레이의 밝기와 대비를 조정합니다 . Brightness( 밝기 ) 는 백라이트의 휘도를 조정합 니다 . 조이스틱을 위로 움직이면 밝기 수준이 증가하고 조이스틱을 아래로 움직이면 밝기 수준이 감소합니 다 ( 최소 0 / 최대 100). Contrast ( 명암 대비 ) Brightness( 밝기 ) 를 먼저 조정한 후 추가 조정이 필요한 경우에만 Contrast( 명암 대비 ) 를 조정합 니다 . 조이스틱을 위로 움직이면 명암 대비 수준이 증가 하고 조이스틱을 아래로 움직이면 명암 대비 수준 이 감소합니다 ( 최소 0 / 최대 100). Contrast( 명암 대비 ) 기능은 모니터 화면의 밝고 어두운 정도의 차이를 조정합니다 . Input Source ( 입력 소스 ) 모니터에 연결할 수 있는 서로 다른 비디오 신호 중 에서 선택합니다 .
DP DisplayPort (DP) 커넥터를 사용하고 있을 때는 DP 입력을 선택합니다 . 조이스틱 버튼을 눌러 선택 내 용을 확인합니다 . HDMI 1 HDMI 2 HDMI 커넥터를 사용하고 있을 때 HDMI 1 또는 HDMI 2 입력을 선택합니다 . 조이스틱 버튼을 눌러 선택 내용을 확인합니다 . Auto Select ( 자동 선택 ) 사용 가능한 입력 소스를 자동으로 스캔합니다 . 조 이스틱 버튼을 눌러 선택 내용을 확인합니다 . Reset Input Source( 입력 소 스 재설정 ) Display ( 디스플레이 ) Input Source( 입력 소스 ) 메뉴 아래의 모든 설정 을 공장 기본값으로 초기화합니다 . Display( 디스플레이 ) 메뉴를 사용하여 이미지를 조정합니다 . Aspect Ratio ( 화면비 ) 이미지 비율을 16:9, Auto Resize( 자동 크기 조정 ), 4:3 또는 1:1 로 조정합니다 .
Reset Display Display( 디스플레이 ) 메뉴 아래의 모든 설정을 공 ( 디스플레이 초 장 기본값으로 초기화합니다 . 기화 ) Audio ( 오디오 ) Volume( 볼륨 ) 헤드폰 출력의 볼륨을 조정합니다 . 조이스틱을 사용하여 볼륨을 0 ~ 100 사이에서 조정 합니다 . Reset Audio ( 오디오 초기화 ) Audio( 오디오 ) 메뉴 아래의 모든 설정을 공장 기 본값으로 초기화합니다 . Menu( 메뉴 ) 이 옵션을 선택하여 OSD 언어 , 메뉴가 화면에 머 무르는 시간의 길이 등과 같은 OSD 설정을 조정합 니다 . Language ( 언어 ) OSD 디스플레이를 8 개 언어 ( 영어 , 스페인어 , 프 랑스어 , 독일어 , 브라질 포르투갈어 , 러시아어 , 중 국어 간체 또는 일본어 ) 가운데 하나로 설정할 수 있습니다 .
Transparency ( 투명도 ) 이 옵션을 선택하면 조이스틱을 위 또는 아래로 움 직여 메뉴 투명도를 변경할 수 있습니다 ( 최소 0 / 최대 100). Timer ( 타이머 ) 조이스틱을 움직이거나 버튼을 누른 뒤 OSD 가 활 성 상태에 머물러 있는 시간의 길이를 설정합니다 . 조이스틱을 움직여 5 초에서 60 초까지 1 초 단위로 슬라이더를 조정합니다 . Reset Menu ( 메뉴 초기화 ) Menu( 메뉴 ) 메뉴 아래의 모든 설정을 공장 기본 값으로 초기화합니다 .
USB 모니터 대기 모드 동안 USB 기능을 활성화 또는 비 활성화할 수 있습니다 . 참고 : 대기 모드에서의 USB 켜고 / 끕니다는 USB 업스트림 케이블이 분리되어 있을 때만 사용할 수 있습니다 . USB 업스트림 케이블이 꽂혀 있으면 이 옵션이 사용 불가를 나타내는 회색으로 바뀝니다 . Downlight ( 하단조명 ) 터치 센서의 공장 기본 설정은 켜짐이며 , 디스플레 이 아래쪽에 있는 하단조명을 눌러 하단조명을 켜 거나 끌 수 있습니다 . 하단조명을 켜면 , 파란색으로 켜집니다 ( 하단조명 참조 ). 터치 센서를 끄려면 Off( 꺼짐 ) 를 선택합니다 . 참고 : 2021 년 8 월부터 제조된 모니터의 경우 , 하 단조명은 OSD 메뉴를 통해서만 켜거나 끌 수 있습 니다 . Reset Personalize( 개인 설정 ) 메뉴 아래의 모든 설정을 Personalization 공장 사전 설정값으로 초기화합니다 .
Others( 기타 ) Display Info ( 디스플레이 정보 ) DDC/CI 48 │ 모니터 조작 이 옵션을 선택하여 DDC/CI, LCD Conditioning (LCD 조절 ) 등의 OSD 설정을 조정합니다 . 모니터의 현재 설정을 표시합니다 . DDC/CI( 디스플레이 데이터 채널 / 명령 인터페이 스 ) 는 컴퓨터에 설치된 소프트웨어를 사용하여 모 니터 파라미터 ( 밝기 , 색상 , 밸런스 등 ) 를 조정할 수 있게 합니다 . Off( 꺼짐 ) 을 선택하여 이 기능을 사용 안 할 수 있습니다 . 이 기능을 사용 설정하면 모니터에 대한 최상의 사용자 경험과 최적 성능을 얻을 수 있습니다 .
LCD Conditioning (LCD 조절 ) Firmware ( 펌웨어 ) Service Tag ( 서비스 태그 ) 이 기능은 사소한 잔상을 줄입니다 . 잔상의 정도에 따라 프로그램이 실행되는 데 약간의 시간이 걸릴 수 있습니다 . On( 켜짐 ) 을 선택하여 이 기능을 활 성화할 수 있습니다 . 모니터의 펌웨어 버전을 표시합니다 . 모니터의 서비스 태그를 표시합니다 . 이 문자열은 Dell 의 웹사이트에서 전화 지원을 찾아보고 , 보증 상태를 확인하고 , 드라이버를 업데이트할 때 필요 합니다 . Reset Others ( 기타 재설정 ) Others( 기타 ) 메뉴 아래의 모든 설정을 공장 기본 값으로 초기화합니다 . Factory Reset ( 공장 초기화 ) 모든 사전 설정 값을 공장 기본 설정으로 복원합 니다 .
OSD 경고 메시지 모니터가 특정 해상도를 지원하지 않으면 다음 메시지가 표시됩니다 : 이것은 모니터가 컴퓨터에서 수신 중인 신호와 동기화할 수 없음을 뜻합니다. 이 모니터가 처리할 수 있는 수평 및 수직 주파수 범위에 대해서는 모니터 규격을 참 조하십시오 . 권장하는 모드는 1920 x 1080 입니다 . 참고 : 연결된 입력 신호에 따라 메시지가 약간 다를 수 있습니다 . 처음으로 Brightness( 밝기 ) 수준을 기본값 수준 이상으로 조정할 때 다음 메시 지가 표시됩니다 : 참고 : Yes( 예 ) 를 선택한 경우 , 다음 번에 Brightness( 밝기 ) 설정을 변경 할 때 메시지가 표시되지 않습니다 .
처음으로 USB 설정을 변경할 때 , 다음 메시지가 표시됩니다 : 참고 : Yes( 예 ) 를 선택한 경우 , 다음 번에 USB 설정을 변경할 때 메시지가 표시되지 않습니다 . 공장값 재설정을 수행하면 다시 메시지가 표시됩니다 . DDC/CI 기능이 사용 해제되기 전에 다음 메시지가 표시됩니다 : 모니터가 대기 모드에 들어가면 다음 메시지가 표시됩니다 : OSD 를 이용하려면 컴퓨터를 켜서 모니터를 절전 모드에서 해제하십시오 . 참고 : 연결된 입력 신호에 따라 메시지가 약간 다를 수 있습니다 .
OSD 는 정상 동작 모드에서만 동작합니다 . 대기 모드인 동안 전원 버튼 이외의 아무 버튼이나 누르면 , 선택된 입력에 따라 다음 메시지가 표시됩니다 . 참고 : 연결된 입력 신호에 따라 메시지가 약간 다를 수 있습니다 . HDMI 또는 DP 입력 중에서 하나를 선택했고 해당 케이블을 연결하지 않았다면 아래와 같이 이동하는 대화 상자가 나타납니다 . 참고 : 연결된 입력 신호에 따라 메시지가 약간 다를 수 있습니다 . Factory Reset( 공장 초기화 ) 가 선택되었을 때 아래 메시지가 나타납니다 . 자세한 내용은 문제 해결을 참조하십시오 .
후면 패널 컨트롤 버튼 잠그기 OSD 메뉴 및 / 또는 전원 버튼에 대한 액세스를 방지하기 위해 후면 패널 컨트롤 버튼을 잠글 수 있습니다 . 버튼을 잠그려면 : 1. 화면에 메뉴가 나타날 때까지 버튼 5 를 4 초 동안 누르십시오 . 2. 다음 옵션 중 하나를 선택합니다 : • Menu Buttons( 메뉴 버튼 ): 전원 버튼을 제외하고 모든 OSD 메뉴 버 튼을 잠그려면 이 옵션을 선택합니다 . • Power Button( 전원 버튼 ): 전원 버튼만 잠그려면 이 옵션을 선택합 니다 . • Menu + Power Buttons( 메뉴 + 전원 버튼 ): 후편 패널 컨트롤에 있는 모든 버튼을 잠그려면 이 옵션을 선택합니다 . 버튼을 잠그려면 , 화면에 메뉴가 나타날 때까지 버튼 5 를 4 초 동안 누르십시 오 . 잠금 해제 아이콘 을 선택해 버튼 잠금을 해제합니다 .
최대 해상도 설정하기 참고 : 사용 중인 Windows 버전에 따라 단계가 약간 다를 수 있습니다 . 모니터 최대 해상도 설정하기 : Windows® 7, Windows® 8 및 Windows® 8.1 에서 : 1. Windows® 8 및 Windows® 8.1 에서는 데스크톱 타일을 선택하여 고전적인 데스크톱으로 전환합니다 . 2. 바탕 화면을 오른쪽 클릭한 다음 화면 해상도를 선택합니다 . 3. 모니터를 1 대 이상 연결한 경우 , 반드시 S2522HG 를 선택하십시오 . 4. 화면 해상도의 드롭다운 목록을 클릭하고 1920 x 1080 을 선택합니다 . 5. 확인을 클릭합니다 . Windows® 10 에서 : 1. 바탕 화면을 오른쪽 클릭한 다음 디스플레이 설정을 선택합니다 . 2. 모니터를 1 대 이상 연결한 경우 , 반드시 S2522HG 를 선택하십시오 . 3. 해상도의 드롭다운 목록을 클릭하고 1920 x 1080 을 선택합니다 . 4. 변경한 설정 유지를 클릭합니다 .
3. 모니터를 1 대 이상 연결한 경우 , 반드시 S2522HG 를 선택하십시오 . 4. 어댑터 속성 표시 링크를 클릭합니다 . 5. 모니터 탭을 클릭합니다 . 6. 화면 재생 빈도의 드롭다운 목록을 클릭하고 240 Hz 를 선택합니다 . 7. 확인을 클릭합니다 . 1920 x 1080 옵션이 없는 경우 그래픽 드라이버를 업데이트할 필요가 있을 수 있 습니다 . 사용자의 컴퓨터에 따라서 다음 절차 중의 하나를 완료하십시오 : Dell 데스크톱 또는 휴대용 컴퓨터의 경우 : • https://www.dell.com/support 으로 이동하여 사용자의 서비스 태그를 입 력한 다음 사용자의 그래픽카드에 대한 최근 드라이버를 다운로드합니다 . Dell 컴퓨터 ( 휴대용 또는 데스크톱 ) 가 아닌 다른 컴퓨터를 사용하는 경우 : • 컴퓨터의 지원 사이트를 방문하여 최신 그래픽 드라이버를 다운로드하십 시오 . • 그래픽 카드 웹사이트를 방문하여 최신 그래픽 드라이버를 다운로드하십 시오 .
기울이기 및 수직 확장 사용하기 참고 : 아래의 지침은 모니터에 포함되어 제공된 스탠드를 부착할 때만 적용 됩니다 . 다른 곳에서 별도로 구매한 스탠드를 부착하는 경우에는 해당 스탠 드에 포함되어 있는 설치 지침을 따르십시오 . 기울이기 , 좌우 회전 확장 모니터에 장착된 스탠드를 사용할 때 보기에 가장 알맞은 각도로 모니터를 기울 이거나 회전할 수 있습니다 . 참고 : 스탠드는 공장 출고시 설치되지 않은 상태입니다 . 수직 확장 참고 : 스탠드 높이를 최대 130 mm 높일 수 있습니다 . 아래 그림들은 스탠드 높이를 높이는 방법을 보여줍니다 .
디스플레이 회전 디스플레이를 회전시키기 전에 , 디스플레이를 완전히 수직으로 확장시키거나 완전히 기울여야만 모니터의 하단 가장자리가 부딪치는 것을 피할 수 있습니다 .
반시계 방향으로 회전 참고 : Dell 컴퓨터에서 디스플레이 회전 기능을 사용하려면 ( 가로 보기 대 세로 보기 ) 이모니터에 포함되지 않은 업데이트된 그래픽 드라이버를 설치해야 합니다 . 이 그래픽 드라이버를 다운로드하려면 www.dell.com/support에 접속하여 비디오 드라이버의 다운로드 섹션에서 최신 드라이버 업데이트를 확인하십시오 . 참고 : 세로 보기 모드에서 , 그래픽 중심형 응용 프로그램들 (3D 게임 등 ) 을 사용할 때 성능 저하가 발생할 수 있습니다 .
시스템의 회전 디스플레이 설정 조정하기 모니터를 회전시킨 다음 아래의 절차를 완료하여 시스템의 회전 디스플레이 설 정을 조정해야 합니다 . 참고 : 모니터를 Dell 제품이 아닌 컴퓨터와 사용하는 경우 그래픽 드라이버 웹사이트또는 컴퓨터 제조업체 웹사이트를 방문하여 운영 체제 회전에 관한 정보를 얻어야 합니다 . 회전 디스플레이 설정 조정하기 : 1. 바탕 화면을 오른쪽 클릭한 다음 속성을 클릭합니다 . 2. 설정 탭을 선택한 후 고급을 클릭합니다 . 3. ATI 그래픽 카드를 사용하는 경우 회전 탭을 선택한 다음 원하는 회전각을 설정합니다 . 4. NVIDIA 그래픽 카드를 사용하는 경우 NVIDIA 탭을 클릭하고 , 왼쪽 열에서 NVRotate 를 선택한 다음 원하는 회전을 선택합니다 . 5. Intel® 그래픽 카드를 사용하는 경우 Intel 그래픽 탭을 선택하고 , 그래픽 속 성을 클릭하고 , 회전 탭을 선택한 다음 원하는 회전각을 설정합니다 .
문제 해결 경고 : 이 단원에 있는 절차를 시작하기 전에 안전 지침을 따르십시오 . 자가 검사 사용자는 이 모니터의 자가 시험 기능을 이용하여 모니터가 제대로 동작하는지 점검할 수 있습니다 . 모니터와 컴퓨터가 제대로 연결되어 있는데도 모니터 화면 이 켜지지 않으면 다음 단계를 수행하여 모니터 자가 검사를 실행합니다 : 1. 컴퓨터와 모니터를 모두 끕니다 . 2. 컴퓨터의 후면에서 비디오 케이블을 뽑습니다 . 올바른 자가 검사 작업을 위하여 컴퓨 터의 후면에서 모든 디지털 케이블을 제거합니다 . 3. 모니터를 켭니다 . 참고 : 모니터가 정상적으로 동작하면서도 비디오 신호를 감지할 수 없는 경 우 대화 상자가 화면 ( 흑색 배경 ) 에 표시됩니다 . 자가 검사 모드에서는 전 원 LED 가 흰색 ( 기본 색상 ) 으로 켜지고 하단조명은 파란색 ( 기본 색상 ) 으로 켜집니다 . 참고 : 연결된 입력 신호에 따라 메시지가 약간 다를 수 있습니다 . 4.
내장형 진단 도구 모니터에 내장된 진단 도구는 화면 비정상이 모니터의 고유한 문제인지 아니면 컴퓨터와 비디오 카드의 문제인지 판단하는 데 도움을 줍니다 . 내장된 진단 도구 실행하기 : 1. 화면이 깨끗한지 확인합니다 ( 화면 표면에 먼지 입자가 없는지 확인 ). 2. 화면에 메뉴가 나타날 때까지 버튼 5 를 4 초 동안 누르십시오 . 3. 조이스틱 컨트롤을 사용하여 , Diagnostics( 진단 ) 옵션을 강조표시하 고 조이스틱 버튼을 눌러 진단을 시작합니다 . 회색 화면이 표시됩니다 . 4. 화면에 결함 또는 비정상 증상이 있는지 관찰합니다 . 5. 빨간색 화면이 표시될 때까지 조이스틱을 다시 한번 토글합니다 . 6. 화면에 결함 또는 비정상 증상이 있는지 관찰합니다 . 7. 화면이 녹색 , 청색 , 검정 및 백색을 표시할 때까지 단계 5 및 6 를 반복합니 다 . 비정상 증상 또는 결함을 메모합니다 . 텍스트 화면이 표시되면 검사가 완료됩니다 .
일반적 문제 다음 표에는 일반적인 모니터 문제에 관한 일반 정보와 사용 가능한 해결책이 나 와 있습니다 : 일반 증상 비디오 없음 / 전원 LED 꺼짐 문제 영상 없음 가능한 해결책 • 모니터와 컴퓨터를 연결하는 비디오 케 이블이 올바르게 단단히 연결되어 있는 지 확인합니다 . • 다른 전기 장비를 사용하여 전원 콘세 트가 올바르게 작동하고 있는지 확인합 니다 . • 전원 버튼을 완전히 눌렀는지 확인합 니다 . • Input Source ( 입력 소스 ) 메뉴에서 올 바른 입력 소스가 선택되었는지 확인하 십시오 . 비디오 없음 / 전원 LED 켜 짐짐 영상이 없거나 어두움 • OSD 를 사용하여 밝기와 명암 대비를 증가시킵니다 . • 자가 검사 기능을 호출합니다 ( 자가 검 사 참조 ). • 비디오 케이블 커넥터의 핀이 구부러지 거나 부러졌는지 확인합니다 . • 내장된 진단 도구를 실행합니다 .
픽셀 손실 LCD 화면에 점 이 있음 • 모니터를 껐다가 다시 켭니다 . • 영구적으로 꺼져 있는 픽셀은 LCD 기술 에서 발생할 수 있는 자연적인 결함입 니다 . • Dell 모니터 품질 및 픽셀 정책에 대해서 는 Dell 지원 사이트를 참조하십시오 : www.dell.com/pixelguidelines 고정된 픽셀 LCD 화면에 밝 은 점이 있음 • 모니터를 껐다가 다시 켭니다 . • 영구적으로 꺼져 있는 픽셀은 LCD 기술 에서 발생할 수 있는 자연적인 결함입니 다. • Dell 모니터 품질 및 픽셀 정책에 대해서 는 Dell 지원 사이트를 참조하십시오 : www.dell.com/pixelguidelines 밝기 문제 영상이 너무 어둡거나 너무 밝음 • 모니터를 공장 설정으로 초기화합니다 . • OSD 를 사용하여 밝기와 명암 대비를 조정합니다 . 기하학적인 왜곡 화면이정확하게 가운데 놓이지 않음 모니터를 공장 설정으로 초기화합니다 .
안전 관련 문제 간헐적 문제 연기가 나거나 불꽃이 튀는 가 시적 증상 모니터 켜짐 및 꺼짐 오작동 • 어떠한 문제 해결 단계도 수행하지 마십 시오 . • Dell 즉시 문의하십시오 . • 모니터와 컴퓨터를 연결하는 비디오 케 이블이 올바르게 단단히 연결되어 있는 지 확인합니다 . • 모니터를 공장 설정으로 초기화합니다 . • 자가 검사 기능을 호출하여 ( 자가 검사 참조 ) 자가 검사 모드에서 간헐적 문제 가 나타나는지 확인합니다 . 색 손실 영상 색 손실 • 모니터 자가 검사 기능 점검을 수행합 니다 . • 모니터와 컴퓨터를 연결하는 비디오 케 이블이 올바르게 단단히 연결되어 있는 지 확인합니다 . • 비디오 케이블 커넥터의 핀이 구부러지 거나 부러졌는지 확인합니다 . 색상 오류 영상 색상 불량 • 응용 프로그램에 따라 Game( 게임 ) 메 뉴 OSD 에서 Preset Modes( 사전 설정 모드 ) 의 설정을 변경합니다 .
제품 고유의 문제 일반 증상 문제 가능한 해결책 화면 이미지가 너 이미지가 화면 중 • Display( 디스플레이 ) 메뉴 OSD 에 서 Aspect Ratio( 화면비 ) 설정을 확 무 작음 앙에 있지만 전체 인합니다 . 시청 영역을 채우 • 모니터를 공장 설정으로 초기화합 지 않음 니다 . 후면 패널의 버튼 화면에 OSD 가 나 • 모니터를 끄고 전원 코드를 뽑았다가 다시 꽂고 모니터를 켭니다 . 으로 모니터를 조 타나지 않음 정할 수 없음 • OSD 메뉴가 잠겼을 수 있습니다 . 잠 금을 해제하려면 조이스틱 버튼 아래 의 네 번째 버튼 ( 기본적으로 Brightness/Contrast( 밝기 / 명암 대비 ) 바로가기 키 ) 을 4 초 동안 길 게 누릅니다 . 사용자 조절 버튼 사진이 없을 때 을 눌러도 입력 신 LED 빛이 흰색임 호가 없음 • 신호 소스를 점검합니다 . 마우스를 움직이거나 키보드의 아무 키나 눌러 컴퓨터가 절전 모드에 있지 않은지 확 인합니다 .
범용 직렬 버스 (USB) 관련 문제 일반 증상 USB 인터페이스 가 작동하지 않습니다 문제 가능한 해결책 USB 주변 장치가 • 모니터 전원이 켜져 있는지 확인합 니다 . 작동하지 않습니다 • 업스트림 케이블을 컴퓨터에 다시 연 결합니다 . • USB 주변 장치 ( 다운스트림 커넥터 ) 를 다시 연결합니다 . • 모니터를 껐다가 다시 켭니다 . • 컴퓨터를 다시 부팅합니다 . • 외장형 휴대용 HDD 와 같은 일부 USB 장치들은 더 높은 전류를 요구하므로 , 장치를 컴퓨터 시스템에 직접 연결합 니다 . SuperSpeed USB 5 Gbps (USB 3.2 Gen1) 인터페이 스가 느림 SuperSpeed USB • 컴퓨터가 SuperSpeed USB 5 Gbps 5 Gbps (USB 3.2 (USB 3.2 Gen1) 와 호환 가능한지 확인 합니다 . Gen1) 주변 장치가 느리게작동하거나 • 일부 컴퓨터에는 USB 3.2, USB 2.0 포 작동하지 않음 트와 USB 1.
부록 경고 : 안전 지침 경고 : 본 안내서에서 설명된 것과 다르게 컨트롤 , 조정 또는 절차를 사용하 면 감전 , 전기적 위험 및 / 또는 기계적 위험에 노출될 수 있습니다 . 안전 지침에 대한 정보는 안전 , 환경 및 규제 정보 (SERI) 를 참조하십시오 . FCC 고지 ( 미국만 해당 ) 및 기타 규정 정보 FCC 통지 및 기타 규정 정보는 www.dell.com/regulatory_compliance 에 있는 규 정 준수 웹사이트를 참조하십시오 Dell 에 연락 미국 내 고객은 800-WWW-DELL(800-999-3355) 로 전화하십시오 . 참고 : 활성 인터넷 연결이 없으면 구매 인보이스 , 포장 명세서 , 청구서 또는 Dell 제품 카탈로그에서 연락처 정보를 찾을 수 있습니다 . Dell 은 몇몇 온라인 및 전화 기반 지원과 서비스 옵션을 제공합니다 . 이용 가능 성은 나라와 제품에 따라 다르며 , 사용자의 지역에선 일부 서비스를 이용하지 못할 수도 있습니다 .