Dell™ Color Laser Printer 3010cn User's Guide Notes, Notices, and Cautions Click the links to the left for information on the features, options, and operation of your printer. For information on other documentation included with your printer, see "Finding Information." 1 Optional 250-sheet tray module (A4/Letter cassette) Optional 250-sheet tray module (Legal cassette) Optional 500-sheet tray module NOTE: Your printer can be equipped with a maximum of two trays.
To order replacement toner cartridges or supplies from Dell: 1. Double-click the icon on your desktop. 2. Visit Dell's website, or order Dell printer supplies by phone. www.dell.com/supplies For best service, have your Dell printer Service Tag available. For help locating your Service Tag number, see "Express Service Code and Service Tag number." Notes, Notices, and Cautions NOTE: A NOTE indicates important information that helps you make better use of your printer.
This software and documentation are provided with RESTRICTED RIGHTS. Use, duplication or disclosure by the Government is subject to restrictions as set forth in subparagraph (c)(1)(ii) of the Rights in Technical Data and Computer Software clause at DFARS 252.227-7013 and in applicable FAR provisions: Dell Inc., One Dell Way, Round Rock, Texas, 78682, USA. This equipment has been tested and found to comply with the limits for a Class B digital device, pursuant to Part 15 of the FCC rules. April 2006 Rev.
Finding Information What are you looking for? Find it here · Drivers for my printer · My User's Guide Drivers and Utilities CD The Drivers and Utilities CD contains documentation and drivers for your printer. You can use the CD to uninstall/reinstall drivers or access your documentation. Readme files may be included on your CD to provide last-minute updates about technical changes to your printer or advanced technical reference material for experienced users or technicians.
Express Service Code Express Service Code and Service Tag number. and Service Tag number The Express Service Code and Service Tag numbers are located inside the front door of your printer.
Dell Printer Configuration Web Tool Using the Dell Printer Configuration Web Tool One of the features of the Dell Printer Configuration Web Tool is the E-Mail Alert Setup, which sends you, or the key operator, an email when the printer needs supplies or intervention. If you fill out printer inventory reports requiring the asset tag number of all of the printers in your area, use the Printer Information feature in the Dell Printer Configuration Web Tool .
1. Press Menu . 2. Press until Configure appears, and then press 3. Press until Reports appears, and then press 4. Printer Settings is displayed. Press or or . . . The Printer Settings page is printed. If the IP address shows 0.0.0.0 (the factory default), an IP address has not been assigned. To assign one for your printer, see "Assign an IP Address ." Use the Dell Printer Configuration Web Tool for: Printer Status Get immediate feedback on printer supply status.
Printer Information Get the information you need for service calls, inventory reports, or the status of current memory and engine code levels. Tray Settings Get the information about the paper type and size for each tray. E-Mail Alert Receive an email when the printer needs supplies or intervention. Type your name or the key operator's name in the email list box to be notified.
1. Select Preferences from Edit on the menu bar. 2. Select Languages under the Navigator group. 3. Specify the display language in order of preference in the Language in order of preference list. For example: English [en] or English/United States [en-us] German [de] French [fr] Italian [it] Spanish [es] Setting the Printer's IP Address to Non-proxy 1. Select Preferences from Edit on the menu bar. 2. Select Proxies under Advanced of the Navigator group. 3.
3. Clear the Direct connection to the Internet check box. Click Advanced , and then specify the printer's IP address in the Do not use proxy server for addresses beginning with field under Exceptions . When you have finished setting the language and proxy, type http://nnn.nnn.nnn.nnn/ (the printer's IP address) in the URL entry field of the browser to activate the Dell Printer Configuration Web Tool . For information on the printer's IP address, see "Print and Check the Printer Settings Page .
Printer Status Links to the Printer Status menu. Printer Jobs Links to the Printer Jobs menu. Printer Settings Links to the Printer Settings Report menu. Print Server Settings Links to the Print Server Reports menu. Copy Printer Settings Links to the Copy Printer Settings page. Print Volume Links to the Print Volume page. Printer Information Links to the Printer Information page. Tray Settings Links to the Tray Settings page. E-Mail Alert Links to the E-Mail Alert page.
Changing the Settings of Menu Items Some menus allow you to change the printer settings through the Dell Printer Configuration Web Tool . When you are accessing these menus, the authentication dialog appears on the screen. Type a user name and password for the printer's administrator by following the prompts displayed in the dialog box. The default user name is admin , and the default password is password . You can change only the password in the Set Password page in the Print Server Settings menu.
"SNMP " "Other Features " "Set Password " "Reset Print Server " "Copy Printer Settings " "Copy Printer Settings " "Copy Printer Settings Report " "Tray Settings " * This item is only available when the optional memory card is installed. Printer Status Use the Printer Status menu to check the status of consumables, hardware, and specifications of the printer. The following pages are displayed in the Printer Status menu. Printer Status Purpose: To check the status of remaining consumables and trays.
Covers Status Closed Open Indicates that the cover is closed. Indicates that the cover is open. Printer Type Displays the type of printing for your printer. Color Laser is displayed normally. Printing Speed Displays the printing speed for your printer. Printer Events Purpose: When printer faults occur such as running out of paper or running out of toner , the details of all alerts or indications of faults are displayed in the Printer Events page.
Dell Service Tag Number Displays Dell's service tag number. Asset Tag Number Displays the printer's asset tag number. Printer Serial Number Displays the printer's serial number. Memory Capacity Displays the memory capacity. Processor Speed Displays the processing speed. Printer Revision Levels Firmware Version Displays the revision date (revision level). Network Firmware Version Displays the revision date (revision level).
ID Displays the job id. Job Name Displays the file name of the completed print job. Owner Displays the job owner's name. Host Name Displays the name of the host computer. Output Result Displays the status of completed print jobs. Impression Number Displays the impression number. No. of Sheets Displays the number of pages in the job. Host I/F Displays the status of the host interface. Job Submitted Time Displays the date the print job was submitted.
Banner Sheet Input Tray Displays the tray in which the banner sheet is loaded. RAM Disk Displays whether to allocate memory to the RAM Disk file system for the Secure Print and Proof Print features. This item is only available when the optional memory card is installed. Substitute Tray Displays whether or not to use another size paper when the paper that is loaded in the specified tray does not match the paper size settings for the current job.
Purpose: To print various types of reports and lists. Values: Printer Settings Click Start button to print the Printer Settings page. Panel Settings Click Start button to print the Panel Settings page. Job History Click Start button to print the Job History page. Error Log Click Start button to print the Error Log page. Stored Documents Click Start button to print the Documents page. This item is only available when the optional memory card is installed. RAM Disk ON.
Security Settings Purpose: To set or change the password to limit access to the menus from the operator panel. Set the password of the Dell Printer Configuration Web Tool from Set Password in Print Server Settings . Values: Panel Lock Specifies whether to limit access to the menus. Change Password Sets a password to limit access to the menus. Re-enter Password Type the new password again to confirm. NOTE: This menu sets a password to lock the operator panel.
Plain 1 Sets the value of the reference voltage to the transfer roller for Plain 1. Plain 2 Sets the value of the reference voltage to the transfer roller for Plain 2. Transparency Sets the value of the reference voltage to the transfer roller for Transparency. Covers 1 Sets the value of the reference voltage to the transfer roller for Covers 1. Covers 2 Sets the value of the reference voltage to the transfer roller for Covers 2.
NonDell Toner Overrides factory toner cartridge setting. Non-Dell-brand toner cartridges may disable some printer features, reduce print quality and reduce the reliability of your printer. Dell recommends only new Dell-brand toner cartridges for your printer. Dell does not provide warranty coverage for problems caused by using accessories, parts, or components not supplied by Dell.
Values: Ethernet Ethernet Settings Displays the current settings of Ethernet transmission rate. Current Ethernet Settings Displays the current Ethernet settings. MAC Address Displays the printer's MAC address. Host Name Displays the host name. IP Address Mode Displays the settings for the IP address. IP Address Displays the printer's IP address. Subnet Mask Displays the subnet mask. Gateway Address Displays the gateway address.
Purpose: To verify the current settings of SMTP/POP used for the e-mail feature and E-Mail Alerts feature. In this page, you can only verify the settings of items. If you want to change the settings, go to the pages in the Print Server Settings tab. Values: Port Status Displays the port status. Primary SMTP Gateway Displays the primary SMTP gateway. Reply Address Displays the IP address of servers connected with SMTP protocol when data is incoming.
System Settings EWS Settings Printer Name Specifies the name of the printer up to 31 alphanumeric characters. Location Specifies the location of the printer up to 63 alphanumeric characters. Contact Person Specifies the contact name, number, and other information of the printer administrator and service center up to 63 alphanumeric characters. Administrator Email Address Specifies the contact address of the printer administrator and service center up to 63 alphanumeric characters.
E-Mail Alert Select the check box to enable the E-Mail Alert feature. SNMP Agent Select the check box to enable the SNMP. You can also configure the transport protocol to be used. UDP can be selected as the transport protocol. NOTE: The settings in the Port Settings item are valid only when the printer is rebooted. When you change or set this item, click the Restart printer to apply new settings. button to apply new settings.
HTTP FTP Connection Time-Out Sets the connection timeout period between 1 and 1000 seconds. IP Filter To set the IP Filter settings, click IP Filter . The "IP Filter " page is displayed. Port Number Sets the port number to 80 and 9000 to 9999. Simultaneous Connections Displays the maximum number of connections received simultaneously by the client. Connection Time-Out Sets the connection timeout period from 1 to 255 seconds. Password Sets whether to enable or disable the password.
Purpose: To configure the detailed settings of SNMP. Values: Community Name (Read only) *1 Specifies the community name to access (read only) the data up to 31 alphanumeric characters. The original setting remains valid if no input is made. Characters entered for community Name in previous settings are not displayed on the screen. The default Read Community is public. Community Name (Read/Write) Specifies the community name to access (read and write) the data up to 31 alphanumeric characters.
When you make the settings for the filter, enter the IP address of the IP Filter in the Address field and the Subnet Mask in the Address Mask field. Enter a numeric value between 0 and 255 in each field. "* " is appended to the current value. Setup Procedure You can set up to a maximum of five items and the first item takes priority. Enter the shortest address first before proceeding to the next longer address when setting multiple filters. The following section explains how the IP Filter operates.
Procedures: 1. Click the first column of the Access List row 1 . 2. Enter "192.168.200.10 " in the Address field and "255.255.255.255 " in the Address Mask field. 3. Select Permit . 4. Click the first column of the Access List row 2 . 5. Enter "192.168.200.0 " in the Address field and "255.255.255.0 " in the Address Mask field. 6. Select Reject . 7. Click the first column of the Access List row 3 . 8. Enter "192.168.0.0 " in the Address field and "255.255.0.0 " in the Address Mask field. 9. Select Permit .
Initialize NIC NVRAM and restart printer Click the Start button to initialize NVRAM. Network settings revert to the factory default settings and reboot the network capability. Restart Printer Click the Start button to reboot printer. Tray Settings Use the Tray Settings menu to set the printer media types and sizes for trays respectively. Values: Tray 1 Paper Type Sets the type of paper loaded in the optional 250-sheet tray module.
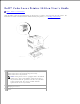
About Your Printer The following illustrations show the standard Dell Color Laser Printer 3010cn, and an optional 250-sheet tray module or 500-sheet tray module. Standard printer Printer with options 1 Center output tray 4 Optional 250-sheet tray module (A4/Letter cassette) Optional 250-sheet tray module (Legal cassette) 2 Operator panel 3 Multipurpose feeder Optional 500-sheet tray module NOTE: Your printer can be equipped with a maximum of two trays.
Installing the Toner and Drum Cartridges Installing the Toner Cartridge Installing the Drum Cartridge CAUTION: Before performing any of the following procedures, read and follow the safety instructions in your Owner's Manual. Installing the Toner Cartridge Install or replace the toner cartridge while the printer is on (if the power is not on, the cartridge carrier does not rotate). 1. After confirming the Insert Yellow Toner(Y) message, open the front door. 2.
3. Make sure the color of the toner cartridge matches the slot on the toner cartridge carrier. The order is Y, M, C, K. Gently shake the cartridge to distribute the toner evenly. 4. Lift the tab up 90 degrees and pull the toner seal straight off, keeping it parallel with the toner cartridge. 5.
5. To insert the toner cartridges, align the arrows on the cartridge with the corresponding arrows on the printer. Guide the cartridge in until it snaps into place and then push down the handhold to lock the cartridge in place. 6. Close the front door. NOTE: Make sure the toner cartridge is installed correctly. Otherwise, the front door cannot close firmly. 7. The toner cartridge carrier rotates to the next empty slot.
8. Installing the Drum Cartridge 1. When the Insert Drum or Insert Drum Cart message appears, open the front door, then lift and push back the top cover. 2. Remove the protective sheet from the drum cartridge. 3. To insert the drum cartridge, push up the lever on the right side of the printer.
4. Pull down the lever on the right to lock the drum cartridge in place. 5. Close the top cover, then the front door.
NOTE: After installing the drum cartridge, the printer makes an adjustment for about one to two minutes. Do not turn off the printer during this time.
Connecting Your Printer Choosing the Right Cable Connecting the Printer Locally Connecting the Printer to the Network Choosing the Right Cable Your Dell Color Laser Printer 3010cn interconnection cable must meet the following requirements: Connection Cable certification USB USB 2.
1 USB port 2 Ethernet port Connecting the Printer Locally A local printer is a printer attached to your computer using a USB cable. If your printer is attached to a network instead of your computer, skip this step and go on to "Connecting the Printer to the Network." Microsoft ® Windows ® 98 SE, Windows Me, Windows 2000, Windows XP, and Windows Server 2003 operating systems support USB connections. See your computer operating system documentation to see if your system supports USB.
1 USB port A USB port requires a USB cable. Be sure to match the USB cable with the USB port on your printer. Plug the other end of the cable into a USB on the back of the computer. For a USB cable, do not plug it into the USB keyboard. Turn On the Printer 1. Plug one end of the printer power cable into the socket at the back of the printer and the other end into a properly grounded outlet. 2. Turn on the computer and the printer.
2. Connecting the Printer to the Network To attach the printer to a network: 1. Make sure the printer, computer, and any other attached devices are turned off and unplugged. 2. Plug one end of a standard category 5 cable into a LAN drop or hub, and the other end into the Ethernet port on the back of the printer. The printer automatically adjusts for the network speed. 1 Ethernet port Turn On the Printer 1.
2. Print and Check the Printer Settings Page Print a Printer Settings page to verify the network connection. This page also provides important information that helps you configure for network printing. 1. Press Menu. 2. Press until Configure appears, and then press 3. Press until Reports appears, and then press 4. Printer Settings is displayed. Press or or . . . The Printer Settings page is printed. 5. If the IP address shows anything other than 0.0.0.0 (the factory default) or 169.254.xx.
NOTE: Do not continue with this procedure until you have the following three addresses: - IP Address - Subnet Mask Address - Gateway Address For more information on using your operator panel, see "Operator Panel." 1. Turn on the printer. The Ready to Print appears. 2. Press Menu. 3. Press until Configure appears, and then press or . 4. Press until Network appears, and then press 5. Press until TCP/IP appears, and then press 6. Press until IP AddressSetup appears, and then press 7.
18. 19. The IP address is assigned to your printer. You can verify the setting by opening the web browser on any computer on the network and enter the IP address into the URL line. If the IP address is set up correctly, the Dell Printer Configuration Web Tool displays in your browser. You can also assign the IP address to the printer when installing the printer drivers with installer.
Installing the Optional Tray Module CAUTION: If you are adding an optional 250-sheet tray module or 500-sheet tray module after setting up the printer, be sure to turn off the printer, unplug the power cable, and disconnect all cables from the back of the printer before completing these tasks. Optional 250-sheet tray modules attach under the printer and up to two additional trays can be added.
5. Remove the printer from the tray. CAUTION: Lift the printer with two people, one facing the front of the printer (operator panel side) and the other facing the back. Never try to lift the printer while facing its right and left side. 6. Attach the trays together by installing the optional tray you just removed on top and inserting the two screws provided. Tighten the screws until they are secure.
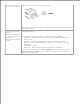
7. Place the printer on top of the tray module(s). 8. Lock the tray(s) into place by removing the top tray from the tray module and rotating the locking mechanism as shown in the graphic.
9. Replace all trays and load the paper. 10. Turn on the printer. NOTE: The printer automatically detects the attached tray(s) but does not detect the paper type. 11. Print a Printer Settings page to verify the optional 250-sheet tray module or 500-sheet tray module is installed correctly. a. Press Menu. b. c.
a. b. Press until Configure appears, and then press c. Press until Reports appears, and then press d. Printer Settings is displayed. Press The Printer Settings page is printed. or or . . . e. Verify 250-Sheet Tray Module or 500-Sheet Tray Module is listed in the printer settings under Printer Options. If the tray modules are not listed, turn off the printer, unplug the power cable, and reinstall the optional 250-sheet tray module or 500-sheet tray module. 12.
4. 5.
Installing a Memory Card Your printer supports 128, 256, and 512 MB additional memory cards. 1. Make sure that the printer is turned off. 2. Remove the control board cover on the left side of the printer by pulling the notch. 3. Hold the memory card so the notch is aligned with the projection on the slot. 4. Push the memory card into the slot firmly.
4. 5. Reattach the control board cover to the printer.
Print Media Guidelines Print media is paper, transparencies, labels, envelopes, coated paper among others. Your printer provides high-quality printing on a variety of print media. Selecting the appropriate print media for your printer helps avoid printing troubles. This section describes how to select print media, how to care for print media, and how to load the print media in the optional 250-sheet tray module or 500-sheet tray module.
printing and cause feeding problems. Smoothness The degree of paper smoothness directly affects print quality. If the paper is too rough, the toner does not fuse to the paper properly, resulting in poor print quality. If the paper is too smooth, it can cause paper feeding problems. Smoothness between 150 and 250 Sheffield points produces the best print quality. Moisture Content The amount of moisture in the paper affects both print quality and the ability of the printer to feed the paper properly.
papers, carbonless copy paper (CCP), or no carbon required (NCR) paper Preprinted papers with chemicals that may contaminate the printer Preprinted papers that can be affected by the temperature in the printer fuser Preprinted papers that require a registration (the precise print location on the page) greater than ±0.09 in., such as optical character recognition (OCR) forms In some cases, you can adjust registration with your software program to successfully print on these forms.
When curl is excessive, with plain paper, turn it over and reset it. Selecting Preprinted Forms and Letterhead When selecting preprinted forms and letterhead paper for the printer: Use long grain paper for best results. Use only forms and letterhead printed using an offset lithographic or engraved printing process. Select papers that absorb ink, but do not bleed. Avoid papers with rough or heavily textured surfaces. Use papers printed with heat-resistant inks designed for use in xerographic copiers.
Print media source Print side Page orientation Optional 250-sheet tray module or 500sheet tray module Face up Back of tray Multipurpose feeder Face up Letterhead enters the printer first. Selecting Pre-punched Paper Pre-punched paper brands can differ in the number and placement of holes and in manufacturing techniques. To select and use pre-punched paper: Test paper from several manufacturers before ordering and using large quantities of pre-punched paper.
Transparencies Before buying large quantities of any print media, Dell recommends trying a sample first. When printing on transparencies: Set the Paper Type to Transparency from the printer driver to avoid damaging your printer. Use transparencies designed specifically for laser printers. Do not use regular transparencies. Transparencies must be able to withstand temperatures of 205°C (401°F) without melting, discoloring, offsetting or releasing hazardous emissions.
Use only new, undamaged envelopes.
Do not print within 1 mm (0.04 in.) of the die cut. Use full label sheets. Partial sheets may cause labels to peel off during printing, resulting in a jam. Partial sheets also contaminate your printer and your cartridge with adhesive, and could void your printer and cartridge warranties. Use labels that can withstand temperatures of 205°C (401°F) without sealing, excessive curling, wrinkling, or releasing hazardous emissions. Do not print within 1 mm (0.04 in.
Multipurpose feeder Optional 250-sheet tray module Optional 500-sheet tray module A4/Letter cassette Legal cassette A4 Y Y Y Y A5 Y Y Y N B5 Y Y Y N Letter Y Y Y Y Folio (8.5 x 13 in.) Y N Y N Legal (8.5 x 14 in.
Labels Y N N Coated 1 (106–163 gsm) Y N N Coated 1-Side2 (106 –163 gsm) Y N N Coated 2 (164–216 gsm) Y N N Coated 2-Side2 (164 –216 gsm) Y N N Envelope Y N N Setup Paper Type Paper type Weight (gsm) Remarks Plain1 60-80 - Plain2 81-105 - Covers1 106-163 - Covers2 164-216 - Coated1 106-163 BJP (Bubble Jet Printer) paper cannot be used. Coated2 164-216 BJP (Bubble Jet Printer) paper cannot be used. Transparency - BJP (Bubble Jet Printer) paper cannot be used.
Loading Print Media Proper print media loading helps prevent jams and ensures trouble-free printing. Before loading print media, identify the recommended print side of the print media. This information is usually on the print media package. Multipurpose Feeder Loading the Multipurpose Feeder Using the Multipurpose Feeder Loading Print Media in Optional Trays Linking Trays Using the Center Output Tray Using the Support Extension Multipurpose Feeder Capacity The maximum stack height is 16 mm (0.6 in.).
1. 2. Slide the width guides to the edge of the tray. The width guides should be fully extended. 3. Insert the print media into the feeder with the recommended print side face up. NOTE: Do not force the print media.
4. Slide the width guides until they rest lightly against the edge of the print media stack. NOTE: Be careful not to bend the print media. 5. Make sure the size and type settings for the multipurpose feeder are set to the correct value for the print media you have loaded. 6. Select print media source, size, and type in your software program and select the print media size and type on the printer operator panel.
To load envelopes that are under 8.66 inches (220 mm) in width, insert the envelopes with the flaps open and toward the front of the printer, with the recommended print side face up. To load envelopes that are over 8.66 inches (220 mm) in width, insert the envelopes with the flaps closed and the short-edge of the envelopes facing into the printer, with the recommended print side face up. You can load envelopes up to the maximum fill line in the tray at one time.
The icons on the multipurpose feeder identify how to load the multipurpose feeder with paper, and how to turn an envelope for printing. Loading Print Media in Optional Trays NOTE: To avoid paper jams, do not remove trays while a job prints. All trays are loaded the same way. 1. Remove the tray. 2. Slide the width guides to the edge of the tray. The width guides should be fully extended.
3. Squeeze the length guide and slide it to the front edge of the tray. 4. Before loading the print media, flex the sheets back and forth, and then fan them. Straighten the edges of the stack on a level surface. 5. Place the print media into the tray with the recommended print side face up. NOTE: Do not exceed the maximum fill line in the tray. Overfilling the tray may cause paper jams. 6.
6. Slide the width guides and length guide until they rest lightly against the edge of the print media stack. 7. Insert the tray. 8. If you load any print media into the tray, configure the Paper Type and Paper Size settings for that tray according to the message. Loading Letterhead Place the printed side face up.
printer first. Linking Trays Tray linking allows you to load the same size and type of print media in multiple sources. The printer automatically links the source/trays and uses the first tray until it runs out, then switch to the linked tray. If you load the same size print media in each tray, make sure the print media is the same type in order to link the trays.
Using the Support Extension The support extension is designed to prevent print media from falling from the printer after the print job is complete. Before printing a document, make sure the paper extender is fully extended.
Operator Panel Using the Operator Panel Buttons Printing a Panel Settings Page Using the Operator Panel Buttons The printer operator panel has a 2-line by 16-character liquid crystal display (LCD), seven buttons, and two indicators that flash when the printer is ready to print, and when a error occurs. 1. LCD display 2. Ready indicator Displays green when the printer is ready. Blinks when data is being received. 3. buttons In the Menu mode, displays menus or items in order. 4.
Cancels current print job. 8. button In the Menu mode, selects the currently displayed menu or item. In the Print mode, outputs data in the printer. Printing a Panel Settings Page The Panel Settings page shows current settings for the operator panel menus. 1. Press Menu. 2. Press until Configure appears, and then press 3. Press until Reports appears, and then press or or 4. Press until Panel Settings appears, and then press The Panel Settings page is printed. . . . 5.
Printer Settings You can change most printer settings from your software program or printer driver. If your printer is attached to the network, you can change settings from the Dell Printer Configuration Web Tool. To launch the Dell Printer Configuration Web Tool, type the printer IP address in your Web browser. Print a Printer Settings page to find your printer's IP address (see "Printing a Printer Settings Page").
This asterisk indicates the factory default menu setting. These settings are the original printer settings. (Factory defaults may vary for different countries.) When you select a new setting from the operator panel, an asterisk appears next to the setting to identify it as the current user default menu setting. These settings are active until new ones are selected or the factory defaults are restored. To select a new value as a setting: 1. Press Menu. 2.
Using the Dell Printer Configuration Web Tool to Change Printer Settings If your printer is connected to the network, you can change the operator panel settings from your Web browser. If you are a network administrator, you can clone the printer settings of one printer to one or all printers on the network. Type your network printer IP address in your Web browser. Choose Printer Settings from the topics list, and then select the printer settings you want to change.
You can initialize IP Address by initializing NVRAM from Network settings. 1. Press Menu. 2. Press until Configure appears, and then press 3. Press until Network appears, and then press 4. Press until Init NVRAM appears, and then press or or . . or . 5. The Init NVRAM Are you sure? message appears on the operator panel. Press 6. Turn off the printer, and then on again. .
Understanding Printer Menus When your printer is configured as a network printer available to a number of users, the access to the Configure menus can be limited. This prevents other users from using the operator panel to inadvertently change a printer user default that has been set by the administrator. In this case, you can access the Stored Print, Tray Settings, and Replace Toner menus only.
Purpose: To print only one copy and check the print result before printing all of the copies. This prevents a large number of misprinted copies from being printed at one time. This requires 320 MB or more of RAM to be enabled. In addition, set the RAM Disk setting to On. Values: Del after Print Save afterPrint Delete Prints the job, and then deletes it from printer memory. Prints the job, and then saves it in printer memory. Deletes the job from printer memory.
Tray 1* 1 Plain 1 Plain 2 Tray 2* 1 Plain 1 Plain 2 MPF Plain 1 Plain 2 Transparency Covers 1 Covers 2 Label Coated 1 Coated 2 Envelope Plain 1 S2 Plain 2 S2 Covers 1 S2 Covers 2 S2 Coated 1 S2 Coated 2 S2 *1 Only displayed when an optional 250-sheet tray module or 500-sheet tray module is installed on the printer. Paper Size Purpose: To specify the paper size for each tray.
Tray 1* 4 Letter* 1 B5 A5 A4* 1 Executive Legal*3 8.5 x 13"*3 Tray 2* 4 Letter* 1 B5* 2 A5* 2 A4* 1 Executive* 2 Legal*2, 3 8.5 x 13"*2, 3 MPF Letter B5 A5 A4 Executive Legal 8.5 x 13" Envelope #10 Monarch DL C5 Free Size * Monarch LEF DL LEF *1 Denotes country-specific factory default values.
*2 Available for the optional 250-sheet tray module only. *3 Available for the optional 250-sheet tray module (Legal Cassette) only. *4 Only displayed when an optional 250-sheet tray module or 500-sheet tray module is installed on the printer. Use this menu item to: Optimize print quality for the specified paper. Select paper source through your software program by selecting type and size. Automatically link trays.
Specifies the amount of time before the printer enters power saver mode after it finishes a print job. 1–60 min 15 min* Enter 1 to put the printer in power saver mode one minute after it finishes a print job. This uses much less energy, but requires more warm-up time for the printer. Enter 1 if your printer shares an electrical circuit with room lighting and you notice lights flickering. Select a high value if your printer is in constant use.
Disables the job timeout. Off 5–300 sec Specifies the amount of time the printer waits for additional data before it cancels the job. 30 sec* Panel Language Purpose: To determine the language of the text on the operator panel screen. Values: English* French Italian German Spanish Auto Log Print Purpose: To specify whether the printer outputs logs automatically. Values: Off* On Does not print the logs. Prints the logs. Print logs can also be printed using the Reports menu.
ID Print Purpose: To specify a location where the user ID is printed. Values: Does not print the user ID. Off* Top Left Top Right Bottom Left Bottom Right Prints the user ID on the top left of the page. Prints the user ID on the top right of the page. Prints the user ID on the bottom left of the page. Prints the user ID on the bottom right of the page. NOTE: When printing on DL size paper, a part of the user ID may not be printed correctly.
Position Off* Top Bottom Top & Bottom Input Tray Tray 1** 1 Tray 2*2 MPF Does not print the banner sheet. Prints on the beginning of document. Prints on the end of document. Prints on both beginning and end of document. The banner sheet is loaded in tray 1. The banner sheet is loaded in tray 2. The banner sheet is loaded in multipurpose feeder. *1 Only displayed when an optional 250-sheet tray module or 500-sheet tray module is installed on the printer.
Specifies whether or not to use another size paper when the paper that is loaded in the specified tray does not match the paper size settings for the current job. Values: No tray size substitute accepted. Off* Substitutes paper of next largest size. When there is no larger paper size, the printer Larger Size substitutes paper of nearest size. Substitutes paper of nearest size. Nearest Size MPF Feed Substitutes paper from the multipurpose feeder.
To specify the value of the reference voltage for the transfer roller.
Init NVRAM Purpose: To initialize the NV (non-volatile) memory. After executing this function and rebooting the printer, all the menu parameters are reset to their default values. Clear Storage Purpose: To clear all files that are stored as Secure and Proof Print in the RAM Disk. NOTE: The Clear Storage menu is only displayed when the RAM Disk is set to Auto. Non-Dell Toner Purpose: To specify whether to use the refilled Toner Cartridge or not.
Panel Settings Purpose: To print a detailed list of all the settings on the operator panel menus. Job History Purpose: To print a detailed list of the processed print jobs. This list contains the latest 20 print jobs. Error Log Purpose: To print an error history. Stored Documents Purpose: To print a list of all files that are stored as Secure and Proof Print in the RAM Disk. Network Use the Network menu to change printer settings affecting jobs sent to the printer through a network port.
Auto* 10Base Half 10Base Full 100Base Half 100Base Full Detects the Ethernet settings automatically. Uses 10base-T half-duplex. Uses 10base-T full-duplex. Uses 100base-TX half-duplex. Uses 100base-TX full-duplex. TCP/IP Purpose: To specify the TCP/IP settings. The change becomes effective after the printer is turned off and then on again. Values: IP AddressSetup AutoIP* BOOTP RARP DHCP Panel IP Address Subnet Mask Gateway Address Protocol Automatically sets the IP address.
Purpose: To enable or disable each item. The change becomes effective after the printer is turned off and then on again. Values: LPD On* Off Port9100 On* Off FTP On* Off SNMP UDP On* Off E-Mail Alert On* Off EWS On* Off Enables the LPD port. Disables the LPD port. Enables the Port9100 port. Disables the Port9100 port. Enables the FTP port. Disables the FTP port. Enables the UDP. Disables the UDP. Enables the E-Mail Alert feature. Disables the E-Mail Alert feature.
Values: Filter n Address (n is 1 to 5.) Sets the IP address for Filter n. Sets the mask for Filter n. Mask Mode Off* Accept Reject Disable the IP Filter feature for Filter n. Accepts an access from specified IP address. Rejects an access from specified IP address. Init NVRAM Purpose: To initialize network data stored in NVRAM. Security Use the Security menu to set a password to limit access to the menus. This prevents items from being change accidentally.
Off* On Does not limit access to the menus. Limits access to the menus. Change Password Purpose: To set a password to limit access to the menus. Values: 0000–9999 0000* Setting of Panel Lock This feature prevents unauthorized personnel from changing settings made by the printer administrator. For regular printing, items can be selected from the menu and printer settings remain unchanged. For regular printing, items can be configured using the printer driver.
8. 9. Enter the new password, and then press . 10. Reenter the password to confirm the password that you entered, and then press The password has been changed. . NOTE: If you forget your password, turn off the printer. Then, while holding Menu, turn on the printer. Continue to hold Menu until the display indicates Ready to Init. Release Menu and press . Press to select Yes, then press . The display briefly indicates Password has been initialized. This recovers the factory default panel password.
Understanding Your Printer Software Use the Drivers and Utilities CD that came with your printer to install a combination of software programs, depending on your operating system. Printing Status Window The Printing Status Window alerts you when an error or warning occurs, for example, when the top cover is open or toner is running low. The Printing Status Window always launches when printing. When an error occurs, the error message appears on the Printing Status Window.
You can order consumables by phone or from the web. 1. Click Start All Programs Management System. Dell Printers Dell Color Laser Printer 3010cn Dell Supplies The Dell Supplies Management System window appears. 2. If ordering from the Web: a. When you cannot get information from the printer automatically by two-way communication, a window that prompts you to type the Service Tag number appears. Type your Dell printer Service Tag number in the field provided.
Printing This chapter covers tips for printing, how to print certain lists of information from your printer, and how to cancel a job. Tips for Successful Printing Sending a Job to Print Canceling a Print Job Printing a Printer Settings Page Using the Print and Hold Function Tips for Successful Printing Tips on Storing Print Media Store your print media properly. For more information, see "Storing Print Media.
You may need to click Properties or Setup from the initial Print box to see all of the available printer settings you can change. If you are not familiar with a feature in the printer driver window, open the online Help for more information. To print a job from a typical Windows application: 1. Open the file you want to print. 2. From the File menu, select Print. 3. Verify that the correct printer is selected in the dialog box.
1. Minimize all programs to reveal the desktop. 2. Click Start Printers and Faxes. A list of available printers appears. 3. Double-click the printer you selected when you sent the job. A list of print jobs appears in the printer window. 4. Select the job you want to cancel. 5. Press on the keyboard. Printing a Printer Settings Page To verify detailed printer settings, print a Printer Settings page.
NOTE: Print and Hold functions require a minimum of 320 MB available printer memory. Also, you need to configure the RAM disk settings on either the operator panel or the printer driver. NOTE: Depending on the documents, its job may be too big for the available memory. In this case, an error occurs. Printing and Deleting Held Jobs Once held jobs are stored in printer memory, you can use the printer operator panel to specify what you want to do with one or more of the jobs.
1. 2. Stored Print is displayed. Press or . 3. Press until Proof Print appears, and then press or . 4. Press until your user name appears, and then press 5. Press until the job you want to print appears, and then press or 6. Press until the way you want to print appears, and then press . or . . 7. Enter the print quantity, and then press . When you select Select All in step 5 and the print quantity has been set on the computer, select Default in Doc, and then press .
If you enter an invalid password, the message Incorrect Password appears. Wait three seconds, or Press or Cancel to return to the screen for user selection. When you enter a valid password, you have access to all print jobs matching the user name and password you entered. The print jobs matching the password you entered appear on the screen. You can then choose to print or delete jobs matching the password you entered. (See "Printing and Deleting Held Jobs" for more information.
Setting Up Shared Printing Point and Print Peer-to-Peer You can share your new printer on the network using the Drivers and Utilities CD that shipped with your printer, or using Microsoft's point and print or peer-to-peer method. However, if you use one of the Microsoft methods, you do not have all of the features, such as the status monitor and other printer utilities, that are installed with the Drivers and Utilities CD.
1. 2. Locate the host name of the server computer, and then double-click the host name. 3. Right-click the shared printer name, and then click Install. Wait for the driver information to copy from the server computer to the client computer, and for a new printer object to be added to the Printers folder. The time this takes varies, based on network traffic and other factors. Close Network Neighborhood. 4. Print a test page to verify print installation. 5. Click Start Settings Printers. 6.
c. d. From the General tab, click Print a Test Page. When a test page prints successfully, printer installation is complete.
Understanding Printer Messages The printer operator panel displays messages describing the current state of the printer and indicates possible printer problems you must resolve. This topic provides a list of all printer messages, explains what they mean, and tells you how to clear the messages.
016-318 Restart Printer Reseat Memory Contact Support The additional memory module is not fully inserted into the slot. Remove the additional memory module from the slot, and then reattach it firmly. If this does not solve the problem, contact Dell. See "Contacting Dell" in the Owner's Manual. NNN-NNN Restart Printer Reseat XXX Contact Support XXX is not fully inserted. Confirm that the unit is securely inserted. If this does not solve the problem, contact Dell.
· Cyan Toner · Magenta Toner · Black Toner Error NNN-NNN relates to printer problems. Insert Drum Cart 091-972 Drum Cartridge Not Installed The drum cartridge is either missing or not fully inserted into the printer. Reinsert the drum cartridge. See "Replacing the Drum Cartridges" Reinsert Drum 091-911 Printer Unable to Detect Drum Replace Toner NNN-NNN Replace XXX The toner cartridge is low on toner.
· Black Toner · DrumCartridge Error NNN-NNN relates to printer problems. Wrong Cartridge NNN-NNN XXX Unsupported A toner cartridge which has a volume that is not supported has been installed. Replace the specified toner cartridge. See "Replacing the Toner Cartridge" XXX indicates one of the following: · Yellow Toner · Cyan Toner · Magenta Toner · Black Toner Error NNN-NNN relates to printer problems.
Load Tray 024-964 Load XXX YYY Load XXX yyy Incorrect paper sizes are loaded in all trays. Load the specified paper in all the trays. YYY indicates a paper size. See "Loading Print Media in Optional Trays" Out of Memory 016-700 Job too Large Press Set The printer memory is full and cannot continue processing the current print job. yyy indicates paper quality. Error NNN-NNN relates to printer problems.
NNN-NNN Insert XXX either missing or not fully inserted into the printer. See "Replacing the Toner Cartridge" XXX is one of the following: · Yellow Toner · Cyan Toner · Magenta Toner · Black Toner Error NNN-NNN relates to printer problems. Replace Toner NNN-NNN Replace XXX The specified toner cartridge needs to be replaced. Replace the specified toner cartridge.
Clearing Jams Careful selection of appropriate print media and proper loading allow you to avoid most jams. See "Print Media Guidelines" for more information.
Identifying the Location of Paper Jams The following illustration shows where paper jams may occur along the print media path. CAUTION: Do not attempt to clear any jams using tools or instruments. This may permanently damage the printer. 1 Paper cover 2 Feeder cover 3 Regi cover 4 Bias Transfer Roll (BTR) cover 5 Fuser cover Removing Print Jams Near the Fuser Unit NOTE: To resolve the message displayed on the operator panel, you must clear all print media from the print media path. 1. Open the BTR cover.
1. CAUTION: The inside of the printer on the back side is hot. 2. Open the paper cover. 3. Press the levers on both sides and remove any jammed print media.
NOTE: Never touch the outer levers located on both sides of the fuser unit, which are used to remove or install the fuser unit. 4. Return the levers to their original positions. 5. Close the paper cover. 6. Close the BTR cover. 7. Close the rear cover. Removing Print Jams Near the Center Output Tray NOTE: To resolve the message displayed on the operator panel, you must clear all print media from the print media path. 1. Open the paper cover. CAUTION: The inside of the printer is hot. 2.
CAUTION: Never touch the outer levers located on both sides of the fuser unit, which are used to remove or install the fuser unit. 3. Open the fuser cover and remove any jammed print media. 4. Push down the levers on the both sides. 5. Close the paper cover.
Removing Print Jams From the Print Media Pickup Area NOTE: To resolve the message displayed on the operator panel, you must clear all print media from the print media path. 1. Remove the print media from the back of the printer. The accessible portion of the print media determines how it should be removed. If the print media is not accessible, go to step 3. 2. Close the rear cover. 3. Grab the feeder cover on the back of the printer and pull down. 4. Remove any accessible print media.
4. 5. Close the cover. Removing Print Jams From the Print Media Source NOTE: To resolve the message displayed on the operator panel, you must clear all print media from the print media path. 1. Pull the tray halfway out. 2. Remove the print media depending on how it has jammed.
2. straight out. If the print media is in the pass-through area across two trays, pull the print media straight up and out. 3. Return the tray to its original position. Removing Print Jams From the Multipurpose Feeder Pull the jammed print media straight out of the multipurpose feeder as shown below.
NOTE: To resolve the message displayed on the operator panel, you must clear all print media from the print media path.
Troubleshooting Troubleshooting Guide This section consists of the following instructions.
Other Problems How to replace the Drum Cartridge How to install the Toner Cartridge Basic toner cleaning instructions The section helps you solve problems with the printer, options, or print quality. Basic Printer Problems Display Problems Printing Problems Print Quality Problems Option Problems Problems Contacting Service Basic Printer Problems Some printer problems can be easy to resolve.
Problem Action Operator panel displays only diamonds or is blank. · Turn off the printer, wait for 10 seconds, and turn on the printer. · Self Test Message appears on the operator panel. When the test is completed, Ready to Print is displayed. Menu settings changed from the operator panel have no effect. Settings in the software program, the printer driver, or the printer utilities are overriding the settings made on the operator panel.
Make sure the print media is loaded correctly. Make sure the width and length guides on the print media sources are adjusted correctly. Do not overfill the print media sources. Do not force print media into the multipurpose feeder when you load it; otherwise, it may skew or buckle. Remove any curled print media from sources. Load the recommended print side correctly for the type of print media you are using. See "Loading Print Media in Optional Trays" for more information.
· If you install a new black cartridge and a ROS cleaning has not been done, this problem may happen. See "Cleaning Inside the Printer". Print is too light. · The toner may be low. Confirm the amount of the toner and change the toner cartridges if necessary. · Set the Draft Mode check box to off in the Advanced in the printer driver. · If you are printing on an uneven print surface, change the Paper Type settings in the Tray Settings menu. See "Paper Type.
page/printing is blurred. · Change the toner cartridge. See "Replacing the Toner Cartridge." Entire page is white. · Make sure the packaging material is removed from the toner cartridge. · Check the toner cartridge to make sure it is installed correctly. · The toner may be low. Change the toner cartridge. See "Replacing the Toner Cartridge." Streaks appear on the page. · The toner may be low. Change the toner cartridge. See "Replacing the Toner Cartridge.
Characters have jagged or uneven edges. · Change the Print Mode in the Graphics tab (or Advanced dialog box) to Standard in the printer driver. · If you are using downloaded fonts, verify that the fonts are supported by the printer, the host computer, and the software program. Part or all of the page prints in black. · Check the toner cartridge to make sure it is installed correctly. The job prints, but the top and side margins are incorrect.
Printing on both ends of the transparencies is faded. · This occurs when the printer is operating in a location where relative humidity reaches 85% or more. Adjust the humidity or relocate the printer to an appropriate environment. Option Problems If an option does not operate correctly following installation or stops working: Turn off the printer, wait for 10 seconds, and then turn on the printer.
Condensation has occurred inside the printer. Using the operator panel, set the time the printer is in the power saver mode to 60 minutes, and then leave the printer turned on. The inside of the printer warms up and condensation evaporates. When the condensation evaporates you can use the printer normally. Contacting Service When you call for printer service, be prepared to describe the problem you are experiencing or the error message on the display.
Setup printing Letter Plain 1 from Multipurpose Feeder 1. 2.
1. On the printer operator panel press MENU. 2. Press to get to Tray Settings. 3. Press to select Tray Settings. 4. Press to get to Paper Size. (ONLY ON 3x00cn) 5. Press to select Paper Size. (ONLY ON 3x00cn) 6. Press to get to MPF. (ONLY ON 3x00cn) 7. Press to select MPF. (ONLY ON 3x00cn) 8. Using and , select the appropriate paper size (Letter). (ONLY ON 3x00cn) 9. Press the middle button, SELECT, once Letter is displayed on the lower line, this puts a * by it. (ONLY ON 3x00cn) 10.
26. Open up Word and create a new document. 27. Go to File Print. 28. Select the Dell Color Laser Printer from the printers list 29. Click the Properties button to the right. 30. This brings up Driver Properties. 31. Click on the Paper Tray Tab. 32. Change the Paper Source to MPF. 33. Click the Paper Tab. 34. Select in paper size, Letter. 35. Select for Output Size, Same as Paper Size. 36. Click OK. 37. Click Close. 38. Now the printer driver is setup correctly. 39. Now go to File Page Setup. 40.
8. 9. Press the middle button, SELECT, once Letter is displayed on the lower line, this puts a * by it. (ONLY ON 3x00cn) 10. Now we have the Tray 1 Size set to Letter. (ONLY ON 3x00cn) 11. Now press MENU to get back to Tray Settings/Paper Size. 12. Press to get to Paper Type. 13. Press to select Paper Type. 14. Press to get to Tray 1. 15. Press to select Tray 1. 16. Using and , select the appropriate paper type (Plain 1). 17. Press SELECT, once Plain 1 is displayed on the lower line. 18.
33. 34. 35. Select for Output Size, Same as Paper Size. 36. Click OK. 37. Click Close. 38. Now the printer driver is setup correctly. 39. Now go to File Page Setup. 40. Click the Paper Tab. 41. Change Paper Size to Legal. 42. Change the Paper source settings BOTH to "DEFAULT TRAY AS PER PRINTER". 43. Click OK. 44. Type in some gibberish in the body of the document and click Print! Setup printing Letter Plain 1 from Tray 2 1. On the printer operator panel press MENU. 2. Press to get to Tray Settings. 3.
15. 16. 17. Press SELECT, once Plain 1 is displayed on the lower line. 18. Now we have the Tray 2 Type set to Plain 1. 19. Now press MENU to get back to Ready to Print 20. Now insert the Letter-sized stack of paper into the Tray 2. 21. On the screen Tray 2/Letter will appear. (ONLY ON 3x00cn) 22. Press SELECT to confirm this. (ONLY ON 3x00cn) 23. Now on the screen Tray 2/Plain 1 will appear. 24. Press SELECT to confirm this. 25.
41. 42. 43. Click OK. 44. Type in some gibberish in the body of the document and click Print! Setup printing Transparency from Multipurpose Feeder 1. On the printer operator panel press MENU. 2. Press to get to Tray Settings. 3. Press to select Tray Settings. 4. Press to get to Paper Size. (ONLY ON 3x00cn) 5. Press to select Paper Size. (ONLY ON 3x00cn) 6. Press to get to MPF. (ONLY ON 3x00cn) 7. Press to select MPF. (ONLY ON 3x00cn) 8.
23. 24. 25. We now have all the hardware settings on the printer correct Now, all software settings screen shots are from WORD, this was done in Word. However if in any application, you go File Print and then click the Properties button, you will get this same driver properties window. 26. Open up Word and create a new document. 27. Go to File Print. 28. Select the Dell Color Laser Printer from the printers list 29. Click the Properties button to the right. 30. This brings up Driver Properties. 31.
3. 4. 5. Press to select Paper Size. (ONLY ON 3x00cn) 6. Press to get to MPF. (ONLY ON 3x00cn) 7. Press to select MPF. (ONLY ON 3x00cn) 8. Using and , select the appropriate paper size (Envelope). (ONLY ON 3x00cn) 9. Press the middle button, SELECT, once Envelope is displayed on the lower line, this puts a * by it. (ONLY ON 3x00cn) 10. Now we have the MPF Size set to Envelope. (ONLY ON 3x00cn) 11. Now press MENU to get back to Tray Settings/Paper Size. 12. Press to get to Paper Type. 13.
28. 29. 30. This brings up Driver Properties. 31. Click on the Paper Tray Tab. 32. Change the Paper Source to MPF. 33. Click the Paper Tab. 34. Select in paper size, Transparency. 35. Select for Output Size, Same as Paper Size. 36. Click OK. 37. Click Close. 38. Now the printer driver is setup correctly. 39. Now go to File Page Setup. 40. Click the Paper Tab. 41. Change Paper Size to Legal. 42. Change the Paper source settings BOTH to "DEFAULT TRAY AS PER PRINTER". 43. Click OK. 44.
11. 12. 13. Press to get to Paper Type. 14. Press to select Paper Type. 15. Press to get to MPF. 16. Press to select MPF. 17. Using and , select the appropriate paper type (Plain 1). 18. Press SELECT, once Plain 1 is displayed on the lower line. 19. Now we have the MPF Type set to Plain 1. 20. Now press MENU to get back to Ready to Print 21. Now insert the Letter-sized stack of paper into the MPF. 22. On the screen MPF/Letter will appear. 23. Press SELECT to confirm this. 24.
37. 38. 39. Select for Output Size, Same as Paper Size. 40. Click OK. 41. Click Close. Setup Paper Type Paper type Weight (gsm) Remarks Plain1 60-80 - Plain2 81-105 - Covers1 106-163 - Covers2 164-216 - Coated1 106-163 BJP (Bubble Jet Printer) paper cannot be used. Coated2 164-216 BJP (Bubble Jet Printer) paper cannot be used. Transparency - BJP (Bubble Jet Printer) paper cannot be used. Label - BJP (Bubble Jet Printer) paper cannot be used.
3. 4. 5. Click Install. The Found New Hardware Wizard appears. 6. Click Next. The wizard automatically finds and installs the corresponding printer driver. 7. When the Complete the Found New Hardware Wizard screen appears, click Finish. 8. Select either the Typical Installation or Custom Installation checkbox, and then click Next. If you select Custom Installation, you can select the specific software you want to install. 9. When the Congratulations! screen appears, click Finish. 10. Click Cancel.
4. For remote installation: a. Select Remote Installation - Install printer on one or more remote computers, and then click Next. b. Enter your Administrator user name, password, and clients or servers and then click Add. c. Click Next. 5. Select the network printer you would like to install. If you do not see your printer listed, click Update to refresh the list or click Add Printer to add a printer to the network. You may update the IP address and port name at this point. Click Next. 6.
1. Launch the Dell Printer Configuration Web Tool. 2. Click E-Mail Alert link. 3. Under Setup E-Mail Lists and Alerts, enter the Primary SMTP Gateway, the Reply Address, and enter your email address or the key operator's email address in the email list box. 4. Click Apply New Settings. Setup Security 1. Press Menu. 2. Press until Printer Settings appears, and then press or . 3. Press until Printer Settings appears, and then press or . 4.
1. 2. Turn on the printer while holding down The Customer Mode menu appears. and . Testing "Print Quality" "Print Quality" is used to diagnose print quality defects. 1. On the Customer Mode menu, go down to Cyan20%, Magenta20%, Yellow20%, or Black20% and press .
Outputs cyan toner at 20% density on the whole area of the paper. Cyan20% Outputs magenta toner at 20% density on the whole area of the paper. Magenta20% Outputs yellow toner at 20% density on the whole area of the paper. Yellow20% Outputs black toner at 20% density on the whole area of the paper. Black20% After you output the test results, contact Dell. Testing "Toner Pallets Check" or "Contamination Check" "Toner Pallet Check" and "Contamination Chk" are used to diagnose machine problems. 1.
How to replace the Drum Cartridge CAUTION: Before performing any of the following procedures, read and follow the safety instructions in your Owner's Manual. Dell cartridges are available only through Dell. You can order more online at http://www.dell.com/supplies or by phone. To order by phone, see your Owner's Manual. Dell recommends Dell drum cartridges for your printer. Dell does not provide warranty coverage for problems caused by using accessories, parts, or components not supplied by Dell.
3. Grab the drum cartridge by the handle, and pull it up and out. CAUTION: Do not touch inside the printer with your hands. Some parts may be hot. Allow time for the printer to cool before attempting to remove parts in this area. Installing the New Drum Cartridge 1. Remove the protective sheet from the drum cartridge. CAUTION: Do not touch the drum at the bottom of the drum cartridge.
2. To insert the drum cartridge, push up the lever on the right side of the printer. With the lever in the upright position, hold the drum cartridge by the handle, align the arrows on the drum cartridge with the corresponding arrows on the printer and guide the cartridge in until it snaps into place. 3. Pull down the lever on the right to lock the drum cartridge in place.
4. Close the top cover. How to install the Toner Cartridge CAUTION: Before performing any of the following procedures, read and follow the safety instructions in your Owner's Manual. In addition to the toner level indicator that appears each time you send a job to print, a message appears on the operator panel to alert you when it's time to order a new toner cartridge. Dell toner cartridges are available only through Dell. You can order more toner online at http://www.dell.com/supplies or by phone.
Dell recommends Dell toner cartridges for your printer. Dell does not provide warranty coverage for problems caused by using accessories, parts, or components not supplied by Dell. Selecting a Replacement Toner Cartridge 1. Press Menu. 2. Press 3. Press until Replace Toner appears, and then press or . until the desired toner to replace appears, and press . NOTE: Each time you replace a black cartridge, you should use the cleaning rod. See "Cleaning Inside the Printer.
3. Hold the toner cartridge and pull out the cartridge. CAUTION: Do not touch inside the printer with your hands. Some parts may be hot. 4. Make sure the color of the toner cartridge matches the slot on the toner cartridge carrier. Gently shake the cartridge to distribute the toner evenly.
5. Lift the tab up 90 degrees and pull the toner seal straight off, keeping it parallel with the toner cartridge. 6. To insert the toner cartridge, face the label on the cartridge to the front and align it with the arrows on the printer. NOTE: Make sure that the printer is turned on.
Inserting the cartridge a. Guide the cartridge until it snaps into place. CAUTION: Do not do not force the cartridge. b. Push down the handhold to lock the cartridge in place.
CAUTION: If you find it difficult to push down the handhold, remove the cartridge and insert the cartridge again. 7. If replacing just one toner cartridge, close the front door and you are finished. NOTE: Make sure the toner cartridge is installed correctly. Otherwise, the front door cannot close firmly. 8. Repeat steps 1 through 4 when inserting the remaining cartridges. Basic toner cleaning instructions A cleaning rod for cleaning inside the printer is installed on your printer. 1.
2. Pull out the slide bar that is inside the printer on the right side until it stops. The access window cover slides open. 3. Hold the cleaning rod and push the rod in and pull out once to clean inside the printer.
4. Push the slide bar back to its original position. 5. Close the front door.
Maintaining Your Printer Periodically your printer requires you to complete certain tasks to maintain optimum print quality. If several people are using the printer, you may want to designate a key operator to maintain your printer. Refer printing problems and maintenance tasks to this key operator.
Supply Setting Function For more information Toner Draft Mode in This check box allows the users to select a print mode that uses the Advanced less toner. When this feature is used, the image quality is lower than when it is not used. Print media Multiple Up The printer prints two or more pages on one side of a sheet. Values for Multiple Up are 2 Up, 4 Up, 8 Up, 16 Up, or 32 Up. Combined with the duplex setting, Multiple Up allows you to print up to 64 pages on one sheet of paper.
Store cartons of print media on a pallet or shelf, rather than directly on the floor. If you store individual packages of print media out of the original carton, make sure they rest on a flat surface so the edges do not buckle or curl. Do not place anything on top of the print media packages. Storing the Drum and Toner Cartridges Store the drum and toner cartridges in their original packaging until you need to use them. Do not store the cartridges in: Temperatures greater than 40°C (104°F).
1. 2. To remove the used drum cartridge, push up the lever on the right side of the printer. 3. Grab the drum cartridge by the handle, and pull it up and out.
CAUTION: Do not touch inside the printer with your hands. Some parts may be hot. Allow time for the printer to cool before attempting to remove parts in this area. Installing the New Drum Cartridge 1. Remove the protective sheet from the drum cartridge. CAUTION: Do not touch the drum at the bottom of the drum cartridge. 2. To insert the drum cartridge, push up the lever on the right side of the printer.
3. Pull down the lever on the right to lock the drum cartridge in place. 4. Close the top cover.
Replacing the Cleaning Pad 1. Pull out the slide bar that is inside the printer on the right side until it stops. The access window cover slides open. 2. Pull the cleaning rod until the cleaning pad comes out of the printer.
3. Push the two tabs on the cleaning pad inward to remove the pad. 4. Hold the new cleaning pad under the cleaning rod and push it in until it clicks.
5. Push the cleaning rod back to its original position until it stops. 6. Push the slide bar back to its original position. 7. Close the front door. Replacing the Toner Cartridge CAUTION: Before performing any of the following procedures, read and follow the safety instructions in your Owner's Manual. In addition to the toner level indicator that appears each time you send a job to print, a message appears on the operator panel to alert you when it's time to order a new toner cartridge.
Dell toner cartridges are available only through Dell. You can order more toner online at http://www.dell.com/supplies or by phone. To order by phone, see "Ordering Toner Cartridges" in your Owner's Manual. Dell recommends Dell toner cartridges for your printer. Dell does not provide warranty coverage for problems caused by using accessories, parts, or components not supplied by Dell. Selecting a Replacement Toner Cartridge 1. Press Menu. 2. Press 3.
3. Hold the toner cartridge and pull out the cartridge. CAUTION: Do not touch inside the printer with your hands. Some parts may be hot. Installing the New Toner Cartridge 1. Make sure the color of the toner cartridge matches the slot on the toner cartridge carrier. Gently shake the cartridge to distribute the toner evenly.
2. Lift the tab up 90 degrees and pull the toner seal straight off, keeping it parallel with the toner cartridge. 3. To insert the toner cartridge, face the label on the cartridge to the front and align it with the arrows on the printer. NOTE: Make sure that the printer is turned on.
Inserting the cartridge a. Guide the cartridge until it snaps into place. CAUTION: Do not do not force the cartridge. b. Push down the handhold to lock the cartridge in place.
CAUTION: If you find it difficult to push down the handhold, remove the cartridge and insert the cartridge again. 4. If replacing just one toner cartridge, close the front door and you are finished. NOTE: Make sure the toner cartridge is installed correctly. Otherwise, the front door cannot close firmly. 5. Repeat steps 1 through 4 when inserting the remaining cartridges. Cleaning Inside the Printer A cleaning rod for cleaning inside the printer is installed on your printer. 1. Open the front door.
2. Pull out the slide bar that is inside the printer on the right side until it stops. The access window cover slides open. 3. Hold the cleaning rod and push the rod in and pull out once to clean inside the printer.
4. Push the slide bar back to its original position. 5. Close the front door.
Removing Options If the printer location needs to change or the printer and print media handling options need to be shipped to a new location, all print media handling options must be removed from the printer. For shipping, pack the printer and print media handling options securely to avoid damage.
3. CAUTION: Lift the printer with two people, one facing the front of the printer (operator panel side) and the other facing the back. Never try to lift the printer while facing its right and left sides. 4. To unlock the trays, loosen the screws and remove them from the inside of the tray. 5. Remove the optional 250-sheet tray module or 500-sheet tray module.
6. Replace the printer. Removing the Optional Memory Card 1. Make sure that the printer is turned off. 2. Remove the control board cover on the left side of the printer by pulling the notch. 3. Push the knobs on both sides of the slot outward. Remove the memory card from the slot.
4. Reattach the control board cover to the printer. For more information, see "Installing a Memory Card".
Printer Specifications OS Compatibility Dimensions Memory Page-description Language (PDL)/Emulation, Operating System, and Interface Cartridge and Printer Life Environmental Cables OS Compatibility Compatible with Windows (XP, Server 2003, XP x64, Server 2003 x64, 2000, NT 4.0) 1 Dell networked Printers are compatible with Microsoft operating systems, but Dell telephone support only supports factory-installed operating systems (Microsoft) for the first 30 days for free. See http://www1.us.dell.
Base memory 64 MB Maximum memory 576 MB Connector 144PIN SO-DIMM Non-ECC DIMM Size 64 MB*, 128 MB, 256 MB, 512 MB Speed PC133, CL=2 or 3 Page-description Language (PDL)/Emulation, Operating System, and Interface PDL/Emulations Windows only OSes Windows XP/XP x64/Server 2003/Server 2003 x64/2000/NT4.
Environmental Operation Temperature 5°C to 32°C Relative humidity (non-condensing) 15% to 85% Storage Temperature range 0 °F to 104 °F (-20°C to 40°C) Storage humidity range 5% RH to 95% RH (non-condensing) Altitude Operating Up to 3,100 m (10,000 feet) Storage 70.9275 Kpa Chemical Emission Concentration of ozone 0.
Connection Cable certification 1 USB USB2.
Appendix Dell Technical Support Policy Contacting Dell Warranty and Return Policy Dell Technical Support Policy Technician-assisted technical support requires the cooperation and participation of the customer in the troubleshooting process and provides for restoration of the operating system, software program and hardware drivers to the original default configuration as shipped from Dell, as well as the verification of appropriate functionality of the printer and all Dell-installed hardware.
Warranty and Return Policy Dell Computer Corporation ("Dell") manufactures its hardware products from parts and components that are new or equivalent to new in accordance with industry-standard practices. For information about the Dell warranty for your printer, see the Owner's Manual.