
User Manual


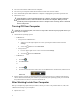


Table Of Contents
- Dell OptiPlex 3020–Small Form Factor Owner's Manual
- Working on Your Computer
- Removing and Installing Components
- Recommended Tools
- System Overview
- Removing the Cover
- Installing the Cover
- Removing the Front Bezel
- Installing the Front Bezel
- Removing The Expansion Card
- Installing The Expansion Card
- Removing the Optical Drive
- Installing the Optical Drive
- Removing the Drive Cage
- Installing the Drive Cage
- Removing the Hard Drive
- Installing the Hard Drive
- Removing the Speaker
- Installing the Speaker
- Memory Module Guidelines
- Removing the Memory
- Installing the Memory
- Removing the System Fan
- Installing the System Fan
- Removing the Power Switch
- Installing the Power Switch
- Removing the I/O Panel
- Installing the I/O Panel
- Removing the Power Supply
- Installing the Power Supply
- Removing the Coin-Cell Battery
- Installing the Coin-Cell Battery
- Removing the Heatsink Assembly
- Installing the Heatsink Assembly
- Removing the Processor
- Installing the Processor
- Removing the Intrusion Switch
- Installing the Intrusion Switch
- System Board Components
- Removing the System Board
- Installing the System Board
- System Setup
- Diagnostics
- Troubleshooting Your Computer
- Technical Specifications
- Contacting Dell

2
Removing and Installing Components
This section provides detailed information on how to remove or install the components from your
computer.
Recommended Tools
The procedures in this document may require the following tools:
• Small flat-blade screwdriver
• Phillips screwdriver
• Small plastic scribe
System Overview
The figure below displays the inside view of the Small Form Factor after the base cover has been
removed. The call outs show the names and the layout of the components inside the computer.
Inside view
1. optical drive
2. front bezel
3. power supply unit
4. expansion card
9