Dell Multifunction Color Laser Printer 3115cn User's Guide Page 1 of 3 Dell™ Multifunction Color Laser Printer 3115cn User's Guide Notes, Notices, and Cautions Click the links to the left for information on the features, options, and operation of your multifunction printer. For information on other documentation included with your multifunction printer, see "Finding Information.
Dell Multifunction Color Laser Printer 3115cn User's Guide Page 2 of 3 (standard 250-sheet tray, optional 550-sheet paper feeder, and multipurpose feeder). 5 Multipurpose feeder 6 Button (right side) 11 Control board cover 12 Automatic Document Feeder (ADF) To order replacement print cartridges or supplies from Dell: 1. Double-click the icon on your desktop. 2. Visit Dell's website, or order Dell printer supplies by phone. www.dell.
Dell Multifunction Color Laser Printer 3115cn User's Guide Page 3 of 3 States; ENERGY STAR is a registered trademark of the U.S. Environmental Protection Agency. As an ENERGY STAR Partner, Dell Inc. has determined that this product meets the ENERGY STAR guidelines for energy efficiency. As for libtiff Copyright © 1988-1997 Sam Leffler Copyright © 1991-1997 Silicon Graphics, Inc.
Finding Information Page 1 of 3 Finding Information What are you looking for? Find it here · Drivers for my multifunction printer · My User's Guide Drivers and Utilities CD The Drivers and Utilities CD contains documentation and drivers for your multifunction printer. You can use the CD to uninstall/reinstall drivers or access your documentation.
Finding Information Troubleshooting Guide Page 2 of 3 Troubleshooting Guide: - User Settings - Configuration - Troubleshooting Instructions - Others Express Service Code and Service Tag number The Express Service Code and Service Tag numbers are located inside the front door of your multifunction printer.
Finding Information printer Page 3 of 3 information · Downloads — Drivers · Reference — Multifunction printer documentation and product specifications You can access Dell Support at support.dell.com. Select your region on the support page, and fill in the requested details to access help tools and information. mk:@MSITStore:C:\Users\14JMIS~1\AppData\Local\Temp\Rar$DIa0.409\UsersGuide.ch...
Dell Printer Configuration Web Tool Page 1 of 40 Dell Printer Configuration Web Tool Using the Dell Printer Configuration Web Tool One of the features of the Dell Printer Configuration Web Tool is the E-Mail Alert Setup, which sends you or the key operator an e-mail when the multifunction printer needs supplies or intervention.
Dell Printer Configuration Web Tool Page 2 of 40 Printer Jobs Use the Printer Jobs menu to contain information on Job List page and Completed Jobs page. These pages show the details of the status regarding each protocol or the print jobs. Printer Settings Use the Printer Settings menu to change printer settigns and view the operator panel remotely. Print Server Settings Using the Print Server Settings menu, you can change the type of printer interface and necessary conditions for communications.
Dell Printer Configuration Web Tool Page 3 of 40 For Internet Explorer 6.0/7.0 Setting Up the Display Language 1. Select Preferences from the Edit menu. 2. Select Languages in the General tab. 3. Specify the display language in order of preference in the Language in order of preference list. For example: Italian (Italy) [it] Spanish (Traditional Sort) [es] German (Germany) [de] French (France) [fr] English [en] or English (United States) [en-us] Setting the Printer's IP Address to Non-proxy 1.
Dell Printer Configuration Web Tool Page 4 of 40 Setting the Printer's IP Address to Non-proxy 1. Select Options from the Tools menu. 2. Click General on the Options dialog box. 3. Click Connection SettingsoConnection Settings. 4. Do one of the following: z "Select the Direct connection to the Internet check box. z "Select the Auto-detect proxy settings for this network check box z "Select the Manual proxy configuration check box, and then enter the printer's IP address in the No Proxy for edit box.
Dell Printer Configuration Web Tool Page 5 of 40 Located at the right side of all pages is the Right Frame. The contents of the Right Frame correspond to the menu that you select in the Left Frame. For details on the items displayed in the Right Frame, see "Details of Menu Items." Buttons on the Right Frame Refresh Button Receives the current printer configuration and updates the latest information in the Right Frame.
Dell Printer Configuration Web Tool Page 6 of 40 "Web Link Customization" "Print Server Settings" "Print Server Reports" "Print Server Setup Page" "NetWare Setup Page"*2 "E-Mail Alert Setup Page" "Print Server Settings" "Basic Information" "Port Settings" "Wireless LAN"*3 "TCP/IP" "NetWare"*2 "SMB"*2 "AppleTalk"*3 "E-Mail Alert" "Bonjour (mDNS)"*2 "SNMP" "Scan to PC" "Other Features" "Set Password" "Security"*3 "IPsec"*2 "Reset Print Server" "Copy Printer Settings" "Copy Printer Settings" "Copy Pri
Dell Printer Configuration Web Tool Page 7 of 40 *5 This item is only available when the optional 550-sheet paper feeder is installed. Printer Status Use the Printer Status menu to check the status of consumables, hardware, and specifications of the multifunction printer. The following pages are displayed in the Printer Status menu. Printer Status Purpose: To check the status of remaining consumables and trays.
Dell Printer Configuration Web Tool Page 8 of 40 print jobs. Job List Purpose: To confirm the print jobs that are being processed. Click the Refresh button to update the screen. Values: ID Displays the job id. Job Name Displays the file name of the job being printed. Owner Displays the job owner's name. Host Name Displays the name of the host computer. Job Status Displays the status of the job being printed. Job Type Displays the type of the job.
Dell Printer Configuration Web Tool Panel Alert Tone Page 9 of 40 Displays the alert tone for the panel. Machine Ready Tone Displays the tone when the machine becomes ready. Copy Job Tone Displays the tone when copying starts. Non-Copy Job Tone Displays the tone when copying is complete. Fault Tone Displays the tone when an error occurs. Alert Tone Displays whether the multifunction printer sounds an alarm when an error occurs. Out of Paper Tone Displays the tone when the paper runs out.
Dell Printer Configuration Web Tool PS Settings Secure Settings Copy Defaults Page 10 of 40 Hex Dump Displays whether the Hex Dump feature is on or off. Draft Mode Displays whether to print in the draft mode. Line Termination Displays whether to set the line termination. Default Color Displays the color mode setting. PS Error Report Displays whether the multifunction printer outputs error contents for a PS (PostScript) error.
Dell Printer Configuration Web Tool Poster Docu. Size Page 11 of 40 3x3 Prints an image onto 9 sheets of paper (3 by 3). 4x4 Prints an image onto 16 sheets of paper (4 by 4). A4 Displays the size of the divided sheets. Letter* B5 A5 Image Repeat Margin Scan Defaults Off* Does not print multiple image copies from the original document on a single page. On Prints multiple image copies from the original document on a single page. Off* Does not specify the margin of the copy.
Dell Printer Configuration Web Tool Page 12 of 40 Lighter2 Lighter1 Sharpness Contrast Auto Exposure Softer Adjusts sharpness of color to make the copy softer than the original. Normal* Does not adjust sharpness of color to make the copy sharper or softer than the original. Sharper Adjusts sharpness of color to make the copy sharper than the original. Normal* Does not adjust the amount of color in a specified hue to make the copy sharper or softer than the original.
Dell Printer Configuration Web Tool Ring Tone Volume Line Type Dialing Type DM Prevention Remote Receive Page 13 of 40 Min Specifies the volume in Min for the incoming faxes. Middle* Specifies the volume in Middle for the incoming faxes. Max Specifies the volume in Max for the incoming faxes. None Turns off the volume for the incoming faxes. Min Specifies the volume in Min for the incoming faxes. Middle Specifies the volume in Middle for the incoming faxes.
Dell Printer Configuration Web Tool Paper Density Off Does not print documents that failed to transfer when Forward Set Print is set to Off. Country*6 United States Sets the country for the fax. Plain Light Displays the paper density in Light for the plain paper. Normal* Displays the paper density in Normal for the plain paper. Light* Displays the paper density in Light for the label. Normal Displays the paper density in Normal for the label.
Dell Printer Configuration Web Tool Display Popup Displays a popup menu when paper is loaded in the multipurpose feeder. MPF Paper Type Displays the type of paper loaded in the multipurpose feeder. MPF Paper Size Displays the size of paper loaded in the multipurpose feeder. Page 15 of 40 MPF Custom Size - Y Displays the length of paper loaded in the multipurpose feeder. MPF Custom Size - X Displays the width of paper loaded in the multipurpose feeder.
Dell Printer Configuration Web Tool Page 16 of 40 Panel Select Tone Displays the selected tone for the panel. Panel Alert Tone Displays the alert tone for the panel. Machine Ready Tone Displays the tone when the machine becomes ready. Copy Job Tone Displays the tone when copying starts. Non-Copy Job Tone Displays the tone when copying is complete. Fault Tone Displays the tone when an error occurs. Alert Tone Specifies whether the multifunction printer sounds an alarm when an error occurs.
Dell Printer Configuration Web Tool Page 17 of 40 Adobe Protocol Specifies PostScript communication protocol for each interface. PCL Settings Purpose: To change printer settings that only affect jobs using the PCL emulation printer language. Values: Paper Tray Specifies the input tray. Paper Size Specifies the default paper size. Custom Size - Y Specifies the length of paper. The available range is from 98 mm (3.89 in.) to 355 mm (13.98 in.). Custom Size - X Specifies the width of paper.
Dell Printer Configuration Web Tool New Password Sets a password for receiving faxes. Re-enter Password Type the new password again to confirm. Page 18 of 40 NOTE: This menu sets a password to lock the operator panel. When changing the password for the Dell Printer Configuration Web Tool, click Set Password on the left frame and set the password. Copy Defaults Purpose: To create your own default Copy settings. Values: Color Prints in the Color or Black&White mode.
Dell Printer Configuration Web Tool Multiple-Up Collated*2 Poster Poster Docu. Size LongEdgeBinding Uses for long-edge binding when you perform duplex printing. ShortEdgeBinding Uses for short-edge binding when you perform duplex printing. Off* Does not perform multiple-up printing. Auto Automatically reduces the original pages to fit onto one sheet of paper. ID Copy Prints the original pages onto one sheet of paper in the original size.
Dell Printer Configuration Web Tool Original Type Document Size Lighter/Darker Text&Photo* Uses for documents with both text and photo/gray tones. Photo Uses for documents with photo or gray tones. Text Uses for documents with text. A4 Sets the document size in A4. Letter Sets the document size in Letter. B5 Sets the document size in B5. A5 Sets the document size in A5. Executive Sets the document size in Executive. 8.5"x13"*1 Sets the document size in 8.5"x13".
Dell Printer Configuration Web Tool Darker1 Page 21 of 40 Works well with light print or faint pencil markings. Darker2 Darker3 Lighter3 Works well with dark print. Lighter2 Lighter1 Delayed Start 21:00* Saves scanned documents for transmission at a specified time in order to take advantage of lower long distance rates. 00:0023:59 Fax Settings Purpose: To confirm the Fax settings. Values: Interval Timer Specifies the interval time (3-255 minutes) of the resend attempts.
Dell Printer Configuration Web Tool Off Does not add the prefix number when you send a fax. Prefix Dial Number Sets a prefix dial number up to five digits. Discard Size On Discards any excess document at the bottom of the page. Off* Does not discard any excess document at the bottom of the page. On Allows color faxes to be sent and received (select color or black and white when sending a fax). Off* Faxes are sent and received in black and white only. Lower Sets Lower in the threshold value.
Dell Printer Configuration Web Tool Page 23 of 40 Transparency Sets the temperature settings for the fuser unit for transparencies. Covers Sets the temperature settings for the fuser unit for cover paper. Covers Thick Sets the temperature settings for the fuser unit for thick cover paper. Label Sets the temperature settings for the fuser unit for labels. Coated Sets the temperature settings for the fuser unit for coated paper.
Dell Printer Configuration Web Tool Page 24 of 40 Clear Storage Click Start to clear all files stored in the RAM disk. Non-Dell Toner Purpose: Specifies whether to use the refilled print cartridge or not. When this setting is on, you can use print cartridges provided by other companies. Values: Non-Dell Toner Overrides factory print cartridge setting. Non-Dell-brand print cartridges may disable some printer features, reduce print quality and reduce the reliability of your multifunction printer.
Dell Printer Configuration Web Tool Wireless Settings*2, *3 TCP/IP Settings MAC Address Displays the printer's MAC (Media Access Control Address) address. SSID Displays SSID (Service Set ID) that identifies the network. Network Type Displays the network type from either the Ad-Hoc or Infrastructure mode. MAC Address Displays the MAC address of the wireless printer adapter. Link Channel Displays the channel number of the connection. Link Quality Displays the quality of the connection.
Dell Printer Configuration Web Tool HTTP FTP SMB*3 AppleTalk*3 3 Bonjour (mDNS)* SNMP Agent Scan to PC IPsec Settings IP Filter (IPv4)* 4 Page 26 of 40 Notification Time-Out Displays the notification timeout period. Maximum Number of TTL Displays the maximum number of TTLs. Maximum Number of Notification Displays the maximum number of notifications. Port Status Displays the HTTP (Hyper Text Transfer Protocol) port status. Port Number Displays the HTTP port number.
Dell Printer Configuration Web Tool Page 27 of 40 Purpose: To verify the current settings of IPX/SPX (Internetwork Packet Exchange/Sequenced Packet Exchange) and Netware. In this page, you can only verify the settings of items. If you want to change the settings, go to the pages in the Print Server Settings tab. Values: IPX/SPX Settings Frame Type Displays the active frame type. Current Frame Type Displays the current frame type. NetWare SLP Network Address Displays the IPX/SPX network address.
Dell Printer Configuration Web Tool Page 28 of 40 Purpose: To configure the printer's basic information. Values: System Settings EWS Settings Printer Name Specifies the name of the multifunction printer up to 31 alphanumeric characters. Location Specifies the location of the multifunction printer up to 63 alphanumeric characters. Contact Person Specifies the contact name, number, and other information of the printer administrator and service center up to 63 alphanumeric characters.
Dell Printer Configuration Web Tool Page 29 of 40 Wireless LAN Purpose: To configure the detailed setting for the wireless network. Wireless Settings Security Settings SSID Specifies the name that identifies the wireless network. Up to 32 alphanumeric characters. Network Type Specifies the network type from either Ad-Hoc or Infrastructure. MAC Address Displays the MAC address of the printer's wireless network adapter. Link Channel Displays the channel number of the printer's wireless connection.
Dell Printer Configuration Web Tool WINS*1 LPD Port9100 IPP*1 WSD HTTP FTP IP Filter (IPv4)*2 Page 30 of 40 WINS Mode Select the check box to get the WINS server address automatically from the DHCP server. WINS Primary Server Sets WINS server address in the nnn.nnn.nnn.nnn format. Each section of nnn.nnn.nnn.nnn is a value between 0 and 254. Note that values 127 and 224-254 are not valid for the first three-digits. WINS Secondary Server Sets a back up WINS server address in the nnn.nnn.nnn.
Dell Printer Configuration Web Tool Bindery: PServer Mode SLP Page 31 of 40 Selects this option when using in Bindery: PServer Mode. Tree Name*1 Specifies the tree name up to 32 alphanumeric characters. Configure this item only when Directory: PServer Mode is selected. Context Name Specifies the context name of the Print Server Object up to 255 alphanumeric characters. Configure this item only when Directory: PServer Mode or Directory: RPrinter Mode is selected.
Dell Printer Configuration Web Tool AppleTalk Printer Page 32 of 40 Specifies the printer name in the AppleTalk network up to 32 alphanumeric characters and symbol sets. AppleTalk Zone Specifies the AppleTalk zone name up to 32 alphanumeric characters and symbol sets. AppleTalk Type Displays the AppleTalk type. Delay Start Time Specifies the delay start time between 1 and 255 seconds. A zero (0) value specifies no delay.
Dell Printer Configuration Web Tool Page 33 of 40 Values: SNMP Agent Community Name (Read only)*1 Specifies the community name to access (read only) the data up to 31 alphanumeric characters. The original setting will remain valid if no input is made. Characters entered for community name in previous settings will not be displayed on the screen. The default Read Community is public.
Dell Printer Configuration Web Tool Page 34 of 40 iii. Select Permit. iv. Click Apply New Settings. b. Disabling Printing From a Specified User The following describes the procedure to disable printing only from the "192.168.100.10" IP address. Procedures: i. Click the first column of Access List row 1. ii. Enter "192.168.100.10" in the Address field and "255.255.255.255" in the Address Mask field. iii. Select Reject. iv. Click the first column of Access List row 2. v. Enter "0.0.0.
Dell Printer Configuration Web Tool Page 35 of 40 IPsec Purpose: To specify the Security Architecture settings for Internet Protocol (IPsec) for encrypted communication to the printer. Values: Protocol Select the check box to enable the protocol. IKE Use a preshared key for IKE authentication. Pre-Shared Key Specifies a shared key. Re-enter Pre-Shared Key Enter the shared key again to confirm it. IKE SA Lifetime Sets the lifetime for IKE SA from 5 to 28800 minutes.
Dell Printer Configuration Web Tool Page 36 of 40 Purpose: To verify the histories of copying. NOTE: The history is cleared by turning off the multifunction printer: Address Book The Address Book menu includes the E-Mail Address, Server Address, and Phone Book pages. E-Mail Address E-Mail Address Registers a new user in E-Mail Address. E-Mail Group Registers a maximum of 10 users in the group. Default Setup Creates your own default settings for E-Mail Address.
Dell Printer Configuration Web Tool Page 37 of 40 To view your own default settings for E-Mail Address. Values: Group ID Displays the group ID. Name Displays names registered in the group. Create Creates the new user in the group. Delete Deletes the registered user. Confirm / Change Edits the registered user. E-Mail Group Purpose: To register the user in E-Mail Group. Values: E-Mail Group ID Automatically specifies the registration number. Name Enter the name for the new e-mail address.
Dell Printer Configuration Web Tool Page 38 of 40 To edit the Server Address list. Values: ID Displays the ID including user names. Name Displays user names registered in each ID. Server Type FTP Uses the FTP protocol to store the scanned image on the server. SMB Uses the SMB protocol to store the scanned image on the computer. Server Address Displays the server address. Server Port Number Displays the server port number. If this option is left black, the default is used.
Dell Printer Configuration Web Tool Restore Settings Press this button to restore the previous settings. Back Press this button to return to the top page where the user belongs. Page 39 of 40 FAX Group - Top Page Purpose: To displays fax groups. Values: ID Displays the IDs registered in the group. Name Displays the user names registered in the group. Delete Deletes the registered fax group. Confirm / Change Edits the registered fax group. Create Creates the new user in the fax group.
Dell Printer Configuration Web Tool Page 40 of 40 Purpose: To edit the user registration number. Values: User Registration No., Edit Type the user registration number to edit the print user settings. Print User Settings Purpose: To specify the user settings for the printer. Values: User Registration No. Displays the user registration number. User Name Edits the user name. Password Registers the password. Color Mode Limitation Selects the color mode.
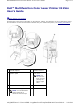
About Your Multifunction Printer Page 1 of 3 About Your Multifunction Printer Automatic Document Feeder (ADF) Operator Panel Power Saver Mode2 The following illustrations show the standard Dell™ Multifunction Color Laser Printer 3115cn, with an optional 550-sheet paper feeder and duplex module. 1 Optional duplexer 5 Optional 550-sheet paper feeder NOTE: Your multifunction printer allows for a maximum of three trays (standard 250-sheet tray, optional 550-sheet paper feeder, and multipurpose feeder).
About Your Multifunction Printer Standard 250-sheet tray Page 2 of 3 Transfer belt unit 9 Automatic Document Feeder (ADF) NOTE: When you use the multifunction printer with the multipurpose feeder opened, do not locate the multifunction printer in direct sunlight. Doing so may cause a malfunction or unnatural screen image. Leave enough room to open the printer trays, covers, and options. It is also important to allow space around the multifunction printer for proper ventilation.
About Your Multifunction Printer 3 Document Feeder Tray 4 Document Feeder Glass Page 3 of 3 Operator Panel For details on the operator panel, see "Operator Panel" Power Saver Mode2 The scan lamp under the document feeder glass automatically turns off when it is not in actual use during a preset period to reduce power consumption and extend the lamp life. The lamp automatically turns on and the warm-up cycle begins whenever any key is pressed or the document cover is opened.
Installing the Print Cartridges Page 1 of 4 Installing the Print Cartridges Installing the Print Cartridges CAUTION: Before performing any of the following procedures, read and follow the safety instructions in your Owner's Manual or Product Information Guide. NOTICE: To protect the drums of the print cartridges against bright light, close the front cover within five minutes. If the front cover remains open for more than five minutes, print quality may deteriorate.
Installing the Print Cartridges Page 2 of 4 3. Remove the seals over the levers at both ends of the fuser unit, and then pull the tag to remove the seal from the fuser unit. NOTE: Ensure to lock both levers at ends of the fuser unit, after removing the seal. 4. Hold one print cartridge firmly and shake it five or six times to distribute the toner evenly. mk:@MSITStore:C:\Users\14JMIS~1\AppData\Local\Temp\Rar$DIa0.409\UsersGuide.ch...
Installing the Print Cartridges Page 3 of 4 5. Remove the print cartridge from its packaging. NOTE: To protect the drum against bright light, do not remove the orange protective cover of the print cartridge before the cartridge is inserted into its slot in the multifunction printer. 6. Completely remove the seal from the print cartridge by pulling the tab on the end of the print cartridge. NOTE: Pull the seal out straight. Pulling the seal diagonally may tear it. 7.
Installing the Print Cartridges Page 4 of 4 8. Repeat steps 4, 5, 6, and 7 to install the other print cartridges. 9. Remove the orange protective covers of the each of the installed print cartridges. 10. After installing all of the print cartridges, close the front cover. mk:@MSITStore:C:\Users\14JMIS~1\AppData\Local\Temp\Rar$DIa0.409\UsersGuide.ch...
Connecting Your Multifunction Printer Page 1 of 9 Connecting Your Multifunction Printer Choosing the Right Cable Connecting the Multifunction Printer Locally Connecting the Multifunction Printer to the Network Connecting the Telephone Line Choosing the Right Cable Your Dell™ Multifunction Color Laser Printer 3115cn interconnection cable must meet the following requirements: Connection type Connection specifications Parallel IEEE (the Institute of Electrical and Electronic Engineers) 1284 USB USB 2.
Connecting Your Multifunction Printer Page 2 of 9 1 Wall jack connector 2 Phone connector 3 Ethernet port 4 Optional wireless printer adapter socket 5 Parallel port 6 USB port Connecting the Multifunction Printer Locally A local printer is a printer attached to your computer using a USB or parallel cable. If your multifunction printer is attached to a network instead of your computer, skip this step and go on to "Connecting the Multifunction Printer to the Network.
Connecting Your Multifunction Printer Page 3 of 9 1 Parallel port 2 USB port A USB/parallel port requires a USB/parallel cable. Be sure to match the USB/parallel symbol on the cable to the USB/parallel symbol on the multifunction printer. Plug the other end of the cable into a USB or parallel port on the back of the computer. For a USB cable, do not plug it into the USB keyboard.
Connecting Your Multifunction Printer Page 4 of 9 other end into a properly grounded outlet. CAUTION: Do not use extension cords or power strips. CAUTION: The multifunction printer should not be plugged into a UPS system. 2. Turn on the computer and the multifunction printer. Connecting the Multifunction Printer to the Network To attach the multifunction printer to a network: 1. Ensure the multifunction printer, computer, and any other attached devices are turned off and unplugged. 2.
Connecting Your Multifunction Printer Page 5 of 9 1 Ethernet port 2 Optional wireless printer adapter socket To connect the multifunction printer to the network, plug one end of an Ethernet cable into the Ethernet port on the back of the multifunction printer, and the other end into a LAN drop or hub. For a wireless connection, insert the wireless printer adapter into the wireless printer socket on the back of the multifunction printer. Turn On the Multifunction Printer 1.
Connecting Your Multifunction Printer Page 6 of 9 2. Turn on the computer and the multifunction printer. Print and Check the System Settings Page Print a system settings page to verify the network connection. This page also provides important information that helps you configure for network printing. NOTE: Depending on the network configuration, the multifunction printer may not be provided an IP address immediately.
Connecting Your Multifunction Printer 6. Press until >IP Address appears, and then press Page 7 of 9 . 7. The cursor is located at the first digit of the IP address. Press address. 8. Press . The cursor moves to the next digit. 9. Repeat steps 7 and 8 to enter all of the digits in the IP address, and then press 10. Press the Back button. 11. Press until >Subnet Mask appears, and then press 12. Repeat steps 7 to 8 to set Subnet Mask, and then press 13. Press the Back button. 14.
Connecting Your Multifunction Printer Page 8 of 9 NOTE: Do not connect your multifunction printer directly to a DSL (digital subscriber line). This may damage the multifunction printer. To use a DSL, you will need to use an appropriate DSL filter. Contact your service provider for the DSL filter. 1. Plug one end of a telephone line cord into the Wall Jack connector and the other end into an active wall jack. 2.
Connecting Your Multifunction Printer Page 9 of 9 mk:@MSITStore:C:\Users\14JMIS~1\AppData\Local\Temp\Rar$DIa0.409\UsersGuide.ch...
Enterprise Console Management Modules Page 1 of 1 Enterprise Console Management Modules The following enterprise console management modules and user's manuals are available on your Drivers and Utilities CD: z IBM Tivoli® NetView® z CA Unicenter® z HP OpenView® To use the modules, go to the following directory on your CD and run each .exe file or .chm file.
Installing Optional Modules Page 1 of 48 Installing Optional Modules You can make the multifunction printer more functional by installing the options. This chapter describes how to install the printer's options such as the duplexer and optional 550-sheet paper feeder.
Installing Optional Modules Page 2 of 48 NOTICE: Be careful not to pinch your fingers when lowering the multifunction printer onto the optional 550-sheet paper feeder. 5. Pull the tray out of the multifunction printer until it stops. Hold the tray with both hands, lift the front slightly, and remove it from the multifunction printer. 6. Join the optional 550-sheet paper feeder and the multifunction printer by tightening the two screws provided with the feeder with a coin or similar object.
Installing Optional Modules Page 3 of 48 7. Insert the tray into the multifunction printer, and push until it stops. 8. Turn on the multifunction printer. NOTE: The multifunction printer will automatically detect the attached tray but will not detect the paper type. 9. Print a system settings page to verify that the optional 550-sheet paper feeder is installed correctly. a. Press until >SETUP appears, and then press b. Press until >Reports appears, and then press c. System Settings is displayed.
Installing Optional Modules Page 4 of 48 d. Press until >Paper Type appears, and then press . e. Press until >Paper Size appears, and then press . f. Confirm that the selected paper type is marked with an asterisk(*), and then press Menu. 11. If you installed the optional 550-sheet paper feeder after installing the printer driver, update your driver by following the instructions for each operating system. If the multifunction printer is on a network, update the driver for each client.
Installing Optional Modules Page 5 of 48 4. Close the Printers and Faxes (or Printers) dialog box. When Using PS Driver Microsoft Windows Vista 1. Click Starto Control Panelo Hardware and Soundo Printers. 2. Right-click the multifunction printer that is using the PS driver, and then select Properties from the displayed list. 3. Click the Device Settings tab, and then select 2-Tray Module for the Paper Tray Configuration item under Installable Options. 4. Click Apply, and then click OK. 5.
Installing Optional Modules Page 6 of 48 Installing a Duplexer NOTICE: To protect the drums of the print cartridges against bright light, close the front cover within five minutes. If the front cover remains open for more than five minutes, print quality may deteriorate. NOTICE: Ensure nothing touches or scratches the surface (black-colored film) of the transfer belt unit. Scratches, dirt, or oil from your hands on the film of the transfer belt unit may reduce print quality. 1.
Installing Optional Modules Page 7 of 48 NOTE: The connector cap in your printer may look different from illustration. 6. With the connector of the duplexer toward the slot, push the duplexer into the slot. NOTE: Ensure that the duplexer is correctly connected to the multifunction printer with connectors and cannot be moved easily. 7. Close the transfer belt unit by pulling it down. mk:@MSITStore:C:\Users\14JMIS~1\AppData\Local\Temp\Rar$DIa0.409\UsersGuide.ch...
Installing Optional Modules Page 8 of 48 8. Close the front cover. 9. Turn on the multifunction printer. 10. Print a system settings page to verify that the optional duplexer is installed correctly. a. Press until >SETUP appears, and then press b. Press until >Reports appears, and then press c. System Settings is displayed. Press . . . The system settings page is printed. d. Verify Duplexer is listed in the system settings under Printer Options.
Installing Optional Modules Page 9 of 48 3. Click the Options tab, and then select Get Information from Printer. 4. Click Apply, and then click OK. 5. Close the Printers dialog box. Windows® XP, Windows XP 64-bit Edition, Windows Server® 2003, Windows Server 2003 Enterprise x64 Edition 1. Click StartoPrinters and Faxes. 2. Right-click the multifunction printer and select Properties. 3. Click the Options tab, and then select Get Information from Printer. 4. Click Apply, and then click OK. 5.
Installing Optional Modules Page 10 of 48 Enterprise x64 Edition 1. Click StartoPrinters and Faxes. 2. Right-click the multifunction printer that is using the PS driver, and then select Properties from the displayed list. 3. Click the Device Settings tab, and then select Available for the Duplexer item under Installable Options. 4. Click Apply, and then click OK. 5. Close the Printers and Faxes dialog box. Windows Server® 2008, Windows Server 2008 Enterprise x64 Edition 1.
Installing Optional Modules Page 11 of 48 3. With the connector of the memory card toward the slot, insert the memory card at an angle into the slot. 4. Push the memory card into the slot firmly. 5. Pivot the memory card downward until it clicks into place. mk:@MSITStore:C:\Users\14JMIS~1\AppData\Local\Temp\Rar$DIa0.409\UsersGuide.ch...
Installing Optional Modules Page 12 of 48 NOTE: Ensure that the memory card is firmly fixed in the slot and cannot be moved easily. 6. Close the control board cover and turn the screw clockwise. 7. Turn on the multifunction printer. 8. Print a system settings page to verify that the additional print memory is installed correctly. a. Press until >SETUP appears, and then press b. Press until >Reports appears, and then press c. System Settings is displayed. Press . . .
Installing Optional Modules Page 13 of 48 4. Click Apply, and then click OK. 5. Close the Printers dialog box Windows® XP, Windows XP 64-bit Edition, Windows Server® 2003, Windows Server 2003 Enterprise x64 Edition 1. Click StartoPrinters and Faxes. 2. Right-click the multifunction printer and select Properties. 3. Click the Options tab, and then select Get Information from Printer. 4. Click Apply, and then click OK. 5. Close the Printers and Faxes dialog box.
Installing Optional Modules Page 14 of 48 1. Click StartoPrinters and Faxes. 2. Right-click the multifunction printer that is using the PS driver, and then select Properties from the displayed list. 3. Click the Device Settings tab, and then select the total amount of the installed print memory for the Memory Capacity item under Installable Options. 4. Click Apply, and then click OK. 5. Close the Printers dialog box. Windows Server® 2008, Windows Server 2008 Enterprise x64 Edition 1.
Installing Optional Modules IPv6 Page 15 of 48 Windows Vista *Only compatible with Support Pack 1.1 or later. 1. Ensure that the multifunction printer is turned off and unplug all cables including the power cord from the rear of the multifunction printer. 2. Turn the screw on the control board cover in counter-clockwise direction and open the cover. 3.
Installing Optional Modules Page 16 of 48 5. Insert the two screws through the control board case and into the Multi-Protocol Card as shown, and tighten the screws. 6. Close the control board cover and turn the screw clockwise. Confirming the Installation of the Multi-Protocol Card 1. Print a printer settings page to verify that the optional multi-protocol card is installed correctly. a. Press until >SETUP appears, and then press b. Press until >Reports appears, and then press c.
Installing Optional Modules Security Page 17 of 48 64(40-bit key)/128(104-bit key) WEP Encryption/WPA/WAP2 NOTE: To use the wireless printer adapter, you must install the multi-protocol card first. To install the card, see "Installing the Dell Multi-Protocol Card". 1. Ensure that the multifunction printer is turned off and unplug all cables including the power cord from the rear of the multifunction printer. NOTE: Ensure that the multi-protocol card is installed. 2.
Installing Optional Modules Page 18 of 48 5. Turn on the multifunction printer and configure the wireless network settings. Wireless Installation using USB connection NOTE: The optional multi-protocol card with the Wireless LAN Adapter attached must be installed on the multifunction printer. Read this manual or the installation manual found in the wireless network adapter box to install the optional multi-protocol card and wireless network adapter for the Dell MFP Laser 3115cn.
Installing Optional Modules Page 19 of 48 3. Connect a USB cable from the Dell MFP Laser 3115cn to your computer. NOTE: When the Found New Hardware Wizard dialog box appears, press Cancel to continue. 4. Select Configure Wireless Printer using a USB connection to setup the wireless protocol on the printer. 5. When this instruction screen appears, follow the instructions to reset the wireless settings on the printer. mk:@MSITStore:C:\Users\14JMIS~1\AppData\Local\Temp\Rar$DIa0.409\UsersGuide.ch...
Installing Optional Modules Page 20 of 48 6. Click OK when you are done. NOTE: When the Found New Hardware Wizard dialog box appears, press Cancel to continue. 7. Click on the checkbox next to the printer you want to configure and click Next. NOTE: If you are unable to see any printer listed, click on Update to search for the printer.
Installing Optional Modules Page 21 of 48 8. Enter the SSID used in your wireless router. 9. Enter the Security used in your wireless router. 10. If you are using WEP or WPA-PSK security in your wireless router, enter the Index, Protocol, and Password information. NOTE: To set WPA2-PSK-AES as security, select WPA-PSK and AES. 11. Click Next when you are done. 12. You can change the Printer Name and driver setup according to your requirement.
Installing Optional Modules Page 22 of 48 14. Select the different printer software to install. 15. Click Install when you are done. 16. When you see the Wireless configuration is now complete screen, you have successfully configured the wireless setting on your printer. 17. Click Next to continue. mk:@MSITStore:C:\Users\14JMIS~1\AppData\Local\Temp\Rar$DIa0.409\UsersGuide.ch...
Installing Optional Modules Page 23 of 48 18. You should now see this screen with an IP Address detected for your wireless printer. If you do not see an IP Address listed next to your printer, click Update. 19. Click Install to continue.
Installing Optional Modules Page 24 of 48 20. If you select the I am setting up this printer on server check box on the Select Printer screen and also select the PostScript Driver check box on the Enter Printer Settings screen, the Adobe Systems Inc. License Agreement screen appears. Select the I accept the terms of the license agreement option button, and then click Install. 21.
Installing Optional Modules Page 25 of 48 2. Select Personal Installation. 3. Select Configure New Wired Printer, or Install Driver and Software for existing network printer to install the printer software on your computer. 4. Click Local Installation-Install printer on this computer to install the printer software on your computer. mk:@MSITStore:C:\Users\14JMIS~1\AppData\Local\Temp\Rar$DIa0.409\UsersGuide.ch...
Installing Optional Modules Page 26 of 48 5. Click on the checkbox next to the printer to select the printer that you want to connect to for this installation. 6. Click Update if you do not see your printer listed or click Add Printer to manually add the IP address. 7. Click Next to continue. 8. You can change the Printer Name and driver setup according to your requirement. mk:@MSITStore:C:\Users\14JMIS~1\AppData\Local\Temp\Rar$DIa0.409\UsersGuide.ch...
Installing Optional Modules Page 27 of 48 9. Click Next when you are done. 10. Select the different printer software to install. 11. Click Install when you are done. 12. You have now successfully installed the printer software on the computer. 13. Click Print Test Page to test your printer software setup or FAX Initial Setup to setup the fax on your printer or click Finish to exit the installation. mk:@MSITStore:C:\Users\14JMIS~1\AppData\Local\Temp\Rar$DIa0.409\UsersGuide.ch...
Installing Optional Modules Page 28 of 48 Case 3. Construct new wireless network environment for both computer and multifunction printer (When wireless setting needs to be set to your computer) 1. Insert the Drivers and Utilities CD into your computer. 2. The Drivers and Utilities CD should launch the installation software automatically. If the CD does not automatically launch, click StartoRun, type D:\Setup.exe (where D is the drive letter of your CD), and then click OK.
Installing Optional Modules Page 29 of 48 b. Right-click Wireless Network Connection and select Properties. c. Select the Wireless Network tab. d. Ensure that the check box for Use Windows to configure my wireless network settings is checked. e. Click Advanced. f. Do either of the following: When wireless ad-hoc mode is set to the multifunction printer: z Select Computer to Computer (ad hoc) networks only and close the Advanced dialog box.
Installing Optional Modules Page 30 of 48 13. On the Congratulations! screen, click Finish to complete the installation. A test page will be printed with the installed printer by clicking the Print Test Page button. Use the Dell Printer Configuration Web Tool to monitor the status of your network printer without leaving your desk.
Installing Optional Modules Page 31 of 48 b. Select Network and Internet. c. Select Network and Sharing Center. d. Select Connect to a network. e. Select dell_device from the network items listed in Connect to a network. f. Select Connect Anyway in the warning dialog box indication indicating you are entering an unsecured area. g. Click Close in the dialog box after confirming the connection is a success. For Windows Server 2008: a. Open Control Panel. b. Select Network and Sharing Center. c.
Installing Optional Modules Page 32 of 48 e. Select the original setting from the network items listed in Connect to a network, and then click Connect. For Windows Server 2008: a. Open Control Panel. b. Select Network and Sharing Center. c. Select Connect to a network. d. Select the original setting from the network items listed in Connect to a network, and then click Connect. 11.
Installing Optional Modules Page 33 of 48 h. In the Association tab, enter the following information and click OK. Network name (SSID): dell_device Network Authentication: Open Data encryption: Disabled Ad hoc network: checked i. Click the Move up button to move the newly added SSID to the top of the list. j. Click OK to close the Property dialog box. For Windows Vista: a. Open Control Panel. b. Select Network and Internet. c. Select Network and Sharing Center. d. Select Connect to a network. e.
Installing Optional Modules Page 34 of 48 When wireless ad-hoc mode is set to the multifunction printer: z Select Computer to Computer (ad hoc) networks only and close the Advanced dialog box. When wireless infrastructure mode is set to the multifunction printer: z Select Access point (Infrastructure) networks only and close the Advanced dialog box. g. Click Add to display Wireless network properties. h. Enter the setting that you send to the multifunction printer and click OK. i.
Installing Optional Modules Page 35 of 48 Wireless Installation using Dell Printer Configuration Web Tool Step 1. Install a multifunction printer to the already-operating wireless network (When wireless setting is already set to your computer) For Dynamic Host Configuration Protocol network: 1. Create wireless setting of your computer following the steps below: For Windows XP and Windows Server 2003: a. Select Network Connections from Control Panel. b.
Installing Optional Modules Page 36 of 48 e. Select Connect Anyway in the warning dialog box indicating you are entering an unsecured area. f. Click Close in the dialog box after confirming the connection is a success. 2. Check the IP address assigned by AutoIP on the multifunction printer. For example, 168.254.1.1 3. Check that the IP address on your computer is assigned by DHCP. 4. Open Dell Printer Configuration Web Tool using the Web browser. For example, http://168.254.1.1/ 5.
Installing Optional Modules Page 37 of 48 For Fixed IP network: 1. Create wireless setting of your computer following the steps below: For Windows XP and Windows Server 2003: a. Select Network Connections from Control Panel. b. Right-click Wireless Network Connection and select Properties. c. Select the Wireless Networks tab. d. Ensure that the check box for Use Windows to configure my wireless network settings is checked.
Installing Optional Modules Page 38 of 48 For example, 1.2.3.4 3. Set the IP address on the multifunction printer. For example, 1.2.3.5 4. Open Dell Printer Configuration Web Tool using the Web browser. For example, http://1.2.3.5/ 5. Change the wireless setting of the multifunction printer on Dell Printer Configuration Web Tool. 6. Reset the multifunction printer. 7. Restore the wireless setting on your computer. For Windows XP and Windows Server 2003: a. Select Network Connections from Control Panel.
Installing Optional Modules Page 39 of 48 For Dynamic Host Configuration Protocol network: 1. Create wireless setting of your computer following the steps below: For Windows XP and Windows Server 2003: a. Select Network Connections from Control Panel. b. Right-click Wireless Network Connection and select Properties. c. Select the Wireless Networks tab. d. Ensure that the check box for Use Windows to configure my wireless network settings is checked.
Installing Optional Modules Page 40 of 48 For example, 168.254.1.1 3. Check that the IP address on your computer is assigned by DHCP. 4. Open Dell Printer Configuration Web Tool using the Web browser. For example, http://168.254.1.1 5. See "Print Server Settings" in the "Dell Printer Configuration Web Tool" to create a wireless setting. 6. Reset the multifunction printer. 7. Restore the wireless setting on your computer. For Windows XP and Windows Server 2003: a.
Installing Optional Modules Page 41 of 48 e. Select Connect Anyway in the warning dialog box indication indicating you are entering an unsecured area. f. Click Close in the dialog box after confirming the connection is a success. For Fixed IP network: 1. Create wireless setting of your computer following the steps below: For Windows XP and Windows Server 2003: a. Select Network Connections from Control Panel. b. Right-click Wireless Network Connection and select Properties. c.
Installing Optional Modules Page 42 of 48 f. Click Close in the dialog box after confirming the connection is a success. 2. Check the IP address on your computer. For example, 1.2.3.4 3. Set the IP address on the multifunction printer. For example, 1.2.3.5 4. Open Dell Printer Configuration Web Tool using the Web browser. For example, http://1.2.3.5 5. Change the wireless setting of the multifunction printer on Dell Printer Configuration Web Tool. 6. Reset the multifunction printer. 7.
Installing Optional Modules Page 43 of 48 a. Open Control Panel. b. Select Network and Sharing Center. c. Select Connect to a network. d. Select the setting you send to the printer from the network items listed in Connect to a network. e. Select Connect Anyway in the warning dialog box indication indicating you are entering an unsecured area. f. Click Close in the dialog box after confirming the connection is a success.
Installing Optional Modules Page 44 of 48 b. Select Network and Sharing Center. c. Select Connect to a network. d. Select dell_device from the network items listed in Connect to a network. e. Select Connect Anyway in the warning dialog box indicating you are entering an unsecured area. f. Click Close in the dialog box after confirming the connection is a success. 2. Set up the printer wireless adapter IP address. a. Reset the settings for the wireless adapter to the default. i.
Installing Optional Modules Page 45 of 48 a. Select Network Connections from Control Panel. b. Right-click Wireless Network Connection and select Properties. c. Select the Wireless Network tab. d. Click the Advanced button. e. Select Access point (Infrastructure) networks only and close the Advanced dialog box (Applicable to the multifunction printer with the wireless infrastructure mode). f. Select the setting that you send to the multifunction printer in the list in the Preferred Network group g.
Installing Optional Modules Page 46 of 48 g. Click the Add button to display Wireless network properties. h. In the Association tab, enter the following information and click OK. Network name (SSID): dell_device Network Authentication: Open Data encryption: Disabled Ad hoc network: Checked i. Click the Move up button to move the newly added SSID to the top of the list. j. Click OK to close the Property dialog box.
Installing Optional Modules Page 47 of 48 For example, 192.168.1.2 i. Scroll back to Subnet Mask. j. Manually enter the subnet mask address using the directional buttons on Control Panel and press the button. k. Scroll back to Gateway Address. l. Manually enter the gateway address using the directional buttons on Control Panel and press the button. m. Restart the multifunction printer. 5. Open Dell Printer Configuration Web Tool using the Web browser. For example, http://:192.168.1.2 6.
Installing Optional Modules Page 48 of 48 a. Open Control Panel. b. Select Network and Sharing Center. c. Select Connect to a network. d. Select the setting you send to the printer from the network items listed in Connect to a network. e. Select Connect Anyway in the warning dialog box indication indicating you are entering an unsecured area. f. Click Close in the dialog box after confirming the connection is a success. 8. Click OK to close the Property dialog box.
Print Media Guidelines Page 1 of 9 Print Media Guidelines Print media is paper, transparencies, labels, envelopes, coated paper among others. Your multifunction printer provides high-quality printing on a variety of print media. Selecting the appropriate print media for your multifunction printer helps avoid printing troubles. This section describes how to select print media, how to care for print media, and how to load the print media in the standard 250-sheet tray or optional 550-sheet paper feeder.
Print Media Guidelines Page 2 of 9 Smoothness The degree of paper smoothness directly affects print quality. If the paper is too rough, the toner does not fuse to the paper properly, resulting in poor print quality. If the paper is too smooth, it can cause paper feeding problems. Smoothness between 150 and 250 Sheffield points produces the best print quality.
Print Media Guidelines Page 3 of 9 z Coated papers (erasable bond), synthetic papers, thermal papers z Rough-edged, rough or heavily textured surface papers or curled papers z Recycled papers containing more than 25% post-consumer waste that do not meet DIN 19 309 z Multiple-part forms or documents z Print quality may deteriorate (blank spaces or blotches may appear in the text) when printing on talc or acid paper.
Print Media Guidelines Page 4 of 9 z Use papers printed with heat-resistant inks designed for use in xerographic copiers. The ink must withstand temperatures of 225°C (437°F) without melting or releasing hazardous emissions. z Use inks that are not affected by the resin in toner or the silicone in the fuser unit. Inks that are oxidation-set or oil-based should meet these requirements; latex inks might not. If you are in doubt, contact your paper supplier.
Print Media Guidelines Page 5 of 9 may result in a paper jam. z Pre-punched paper can include more paper dust than standard paper. Your multifunction printer may require more frequent cleaning and feed reliability may not be as good as standard paper. z Weight guidelines for pre-punched paper are the same as non-punched paper. Transparencies You can load up to 75 sheets of transparencies in the multipurpose feeder for a single print job.
Print Media Guidelines z z Page 6 of 9 Set the print media source to the multipurpose feeder. Set the paper type to Envelope, and select the correct size of envelope from the printer driver. For best performance, use envelopes made from 75 g/m2 (20 lb bond) paper. You can use up to 105 g/m2 (28 lb bond) weight for the envelope feeder as long as the cotton content is 25% or less. Envelopes with 100% cotton content must not exceed 90 g/m2 (24 lb bond) weight. z Use only new, undamaged envelopes.
Print Media Guidelines Page 7 of 9 z Do not load labels together with paper or transparencies in the same tray. This may result in a jam. z Do not use label sheets with a slick backing material. z Do not print within 1 mm (0.04 in.) of the die cut. z Use full label sheets. Partial sheets may cause labels to peel off during printing, resulting in a jam.
Print Media Guidelines Page 8 of 9 Multipurpose feeder Standard 250-sheet tray Optional 550-sheet paper feeder Optional duplexer A4 Y Y Y Y A5 Y Y Y Y B5 Y Y Y Y Letter Y Y Y Y Folio (8.5 x 13 in.) Y Y Y Y Legal (8.5 x 14 in.) Y Y Y Y Executive Y Y Y Y COM-10 Envelope Y N N N Monarch Y N N N C5 Y N N N DL Y N N N Y*1 Y*2 Y*2 Y*3 User-specified print size *1 The tray supports user-specified print media that are 76.2 mm (3.00 in.) to 220 mm (8.
Print Media Guidelines Page 9 of 9 Covers Thick - Side2 (164–216 gsm)*1 Y N N N Transparency Y N N N Label Y Y Y N Coated (106–163 gsm) Y Y Y Y Coated - Side2 (106 –163 gsm) Y N N N Coated Thick (164–216 gsm)*1 Y Y Y N Coated Thick - Side2 (164 –216 gsm) Y N N N Envelope Y N N N *1 When you load several sheets of this type of paper on the ADF, two or more sheets of paper may be fed into the ADF at the same time.
Loading Print Media Page 1 of 9 Loading Print Media Loading print media properly helps prevent jams and ensures trouble-free printing. Before loading print media, identify the recommended print side of the print media. This information is usually on the print media package.
Loading Print Media Page 2 of 9 2. Slide the width guides to the edge of the tray. The width guides should be fully extended. NOTE: For Letter paper, push the lever to the 8.5" position. 3. Slide the tray to the size of the paper to be loaded by using the length guide. mk:@MSITStore:C:\Users\14JMIS~1\AppData\Local\Temp\Rar$DIa0.409\UsersGuide.ch...
Loading Print Media Page 3 of 9 NOTE: When loading user-specified print media, fully extend the tray by squeezing the length guide at the back of the tray. 4. Before loading the print media, flex the sheets back and forth, and then fan them. Straighten the edges of the stack on a level surface. 5. Place the print media into the tray with the recommended print side face up. NOTE: Do not exceed the maximum fill line in the tray. Overfilling the tray may cause paper jams. 6.
Loading Print Media Page 4 of 9 feeder Multipurpose feeder Face down Letterhead enters the multifunction printer first Multipurpose Feeder Capacity The multipurpose feeder can hold approximately: z 150 sheets of the standard paper or 15 mm (0.59 in.) or less in height. Print Media Dimensions The multipurpose feeder accepts print media within the following dimensions: z Width — 76.2 mm (3.00 in.) to 220.0 mm (8.66 in.) z Length — 98.4 mm (3.87 in.) to 355.6 mm (14.00 in.
Loading Print Media Page 5 of 9 2. Slide the guides to the edge of the tray. The guides should be fully extended. 3. Insert all media face down and top edge first into the multipurpose feeder. NOTE: Do not force the print media. 4. Slide both guides until they rest lightly against the edge of the print media stack. mk:@MSITStore:C:\Users\14JMIS~1\AppData\Local\Temp\Rar$DIa0.409\UsersGuide.ch...
Loading Print Media Page 6 of 9 NOTE: Be careful not to bend the print media. 5. Ensure the type setting for the multipurpose feeder is set to the correct value for the print media you have loaded. 6. Select print media source, size, and type in your software program and select the print media size and type on the printer operator panel.
Loading Print Media Page 7 of 9 z Load only one size and type of print media during a single print job. z To achieve the best possible print quality, use only high-quality print media that is designed for use in laser printers. For more guidelines on print media, see "Print Media Guidelines." z Do not add or remove print media when there is still print media in the multipurpose feeder or when the multifunction printer is printing from the multipurpose feeder. This may result in a paper jam.
Loading Print Media Page 8 of 9 To use booklet print, you must select either Flip on Short Edge or Flip on Long Edge from the Duplex menu in the printer properties dialog box and then select Booklet Creation in the Booklet/Poster/Mixed Document dialog box displayed by clicking the Booklet/Poster/Mixed Document button.
Loading Print Media z Page 9 of 9 250 sheets (20 lb (75 g/m2)) of plain paper Using the Output Tray Extension The output tray extension is designed to prevent print media from falling from the multifunction printer after the print job is complete. Before printing a document, ensure that the output tray extension is fully extended. mk:@MSITStore:C:\Users\14JMIS~1\AppData\Local\Temp\Rar$DIa0.409\UsersGuide.ch...
Operator Panel Page 1 of 2 Operator Panel Using the Operator Panel Buttons Printing a Panel Settings Page Using the Operator Panel Buttons The printer operator panel has a 4-line by 20-character liquid crystal display (LCD), control buttons, and number pad, which allow you to control your multifunction printer. 1. LCD Panel 2. z 3. Returns to the previous screen. buttons z 4. In the Menu mode, selects submenus or sets values. button z 5.
Operator Panel Page 2 of 2 z Choose the currently displayed menu or item. z In the Menu mode, returns to the standby mode without saving any settings. z Cancels the current working job (copy/scan/fax/print) by choosing the available listed job. 8. 9. Number pad z Enters the characters and numbers, for example, for the Phone Book, and passwords. z Enters a pause. 10. Printing a Panel Settings Page The Panel Settings page shows current settings for the operator panel menus. 1.
System Settings Page 1 of 3 System Settings You can change most system settings from your software program or operator panel. If your multifunction printer is attached to the network, you can change settings from the Dell Printer Configuration Web Tool. To launch the Dell Printer Configuration Web Tool, type the printer IP address in your Web browser. Print a printer settings page to find your printer's IP address (see "Printing a System Settings Page").
System Settings Page 2 of 3 To select a new value as a setting: 1. Press until >SETUP appears, and then press 2. Press or 3. Press , . until the desired menu appears, and then press , until the desired menu or menu item appears, and then press z If the selection is a menu, the menu is opened and the first system setting in the menu appears. z If the selection is a menu item, the default menu setting for the menu item appears.
System Settings Page 3 of 3 Resetting Defaults After executing this function and rebooting the multifunction printer, all the menu parameters, except the parameters for the network, are reset to their default values. 1. Press until >SETUP appears, and then press . 2. Press until >Admin Menu appears, and then press 3. Press until >Maintenance appears, and then press 4. Press until >Initialize NVM appears, and then press 5. Press to select >User Section or >System Section, and then press . . .
Understanding Menus Page 1 of 61 Understanding Menus When your multifunction printer is configured as a network printer available to a number of users, the access to the Admin Menu menus can be limited. This prevents other users from using the operator panel to inadvertently change a printer user default that has been set by the administrator. However, you can use your printer driver to override printer user defaults and select settings for individual print jobs.
Understanding Menus Page 2 of 61 Purpose: To specify the input tray. Values: Tray1* The paper is fed from the standard 250-sheet tray. Tray2*1 The paper is fed from the optional 550-sheet paper feeder. MPF The paper is fed from the multipurpose feeder. *1 Only displayed when an optional 550-sheet paper feeder is installed on the multifunction printer. Reduce/Enlarge Purpose: To reduce or enlarge the size of a copied image.
Understanding Menus Page 3 of 61 Purpose: To adjust the density, to make the copy lighter or darker than the original. Values: Normal* Works well with standard typed or printed documents. Darker1 Works well with light print or faint pencil markings. Darker2 Darker3 Lighter3 Works well with dark print. Lighter2 Lighter1 Sharpness Purpose: To adjust the sharpness to make the copy sharper or softer than the original. Values: Normal* Does not make the copy sharper or softer than the original.
Understanding Menus Page 4 of 61 Purpose: To adjust the overall brightness to make the copy overexposed than the original. Values: On* Adjusts the overall brightness to make the copy overexposed than the original. Off Does not adjust the overall brightness to make the copy overexposed than the original. Auto Fit Purpose: To automatically reduce or enlarge the image to fit the paper that is currently loaded in the multifunction printer. Values: On Fits the image on the paper currently loaded.
Understanding Menus Page 5 of 61 ID Copy Prints the original pages onto one sheet of paper in the original size. Manual Prints the original pages onto the one sheet of paper in the size specified in Reduce/Enlarge. Collated Purpose: To sort the copy job. Values: Uncollated* Does not sort the copy job. Collated Sorts the copy job. Poster Purpose: To print an image onto several sheets of paper. Values: Off* Does not print an image onto several sheets of paper.
Understanding Menus Page 6 of 61 Purpose: To specify the margin of the copy. Values: Off* Does not specify the margin of the copy. On Margin Top/Bottom Specifies the size of the top and bottom margins. Margin Left/Right Specifies the size of the left and right margins. Margin Middle Specifies the size of the middle margin. Copy Defaults Purpose: To use the Copy Defaults to modify the Copy menu defaults. Using the Scan Menus Use the Scan menus to configure a variety of scanner features.
Understanding Menus Page 7 of 61 Purpose: To store the scanned image in the network server or a computer. Values: Server Stores the scanned image on the server by using the FTP protocol. Search Address Allows you search for a server address and specify it as the transfer destination. Computer Stores the scanned image on the computer by using the SMB protocol. Scan to Application Purpose: To store the scanned image in the application file. Values: TIFF Scans an image in TIFF.
Understanding Menus Page 8 of 61 To select color or black and white scanning. Values: Color* Scans in the color mode. Black&White Scans in the black and white mode. Resolution Purpose: To specify the resolution of a scanned image. Values: 300 400 600 150* Original Type Purpose: To improve the image quality by selecting the document type. Values: Text&Photo* Uses for documents with both text and photo/gray tones. Photo Uses for documents with photo or gray tones.
Understanding Menus Page 9 of 61 *1 Denotes country-specific factory default values. Lighter/Darker Purpose: To adjust the density to make the scanned copy lighter or darker than the original. Values: Normal* Works well with standard typed or printed documents. Darker1 Works well with light print or faint pencil markings. Darker2 Darker3 Lighter3 Works well with dark print. Lighter2 Lighter1 Sharpness Purpose: To adjust the sharpness to make the scanned copy sharper or softer than the original.
Understanding Menus Lower Page 10 of 61 Adjusts the amount of color in a specified hue to make the scanned copy lower than the original. Auto Exposure Purpose: To adjust the overall brightness to make the scanned copy overexposed than the original. Values: On* Adjusts the overall brightness to make the scanned copy overexposed than the original. Off Does not adjust the overall brightness to make the scanned copy overexposed than the original.
Understanding Menus Page 11 of 61 To enter numbers in the Phone Book list as speed dial and group dial numbers. Group Dial Purpose: To list a group of destinations and set them under a one-digit (1-6) group dial location. Resolution Purpose: To improve the output quality of the original or if scanning photographic materials. Values: Standard* For documents with normal sized characters. Fine For documents containing small characters or thin lines or documents printed using a dotmatrix printer.
Understanding Menus Page 12 of 61 Normal* Works well with standard typed or printed documents. Darker1 Works well with light print or faint pencil markings. Darker2 Darker3 Lighter3 Works well with dark print. Lighter2 Lighter1 OnHook Purpose: To send or receive a fax manually. Values: Off* Does not send or receive a fax manually. On Sends or receives a fax manually. Polling Receive Purpose: To receive faxes from the remote fax machine when you want to receive it.
Understanding Menus On Page 13 of 61 Sends a fax at a later time. NOTE: A maximum of 19 delayed fax jobs can be stored in the Dell Multifunction Color Laser Printer 3115cn. Fax Defaults Purpose: To use the Fax Defaults to modify the Fax menu defaults. Using the Job Status Menus Use the Job Status menus to print the stored files and completed fax numbers. Stored Print This Stored Print menu provides applicable printing services such as Secure Print and Proof Print.
Understanding Menus Del after Print Print and Save Delete Page 14 of 61 Prints the job, and then deletes it from print memory. Prints the job, and then saves it in print memory. Deletes the job from print memory. Secure Receive Purpose: To list fax numbers received in the Secure Receive mode. Completed Fax Purpose: To list completed fax numbers. Pending Fax Purpose: To list pending fax numbers.
Understanding Menus Paper Type Page 15 of 61 Plain* Plain Thick Transparency Covers Covers Thick Label Coated Coated Thick Envelope Plain S2 Plain Thick S2 Covers S2 Covers Thick S2 Coated S2 Coated Thick S2 Paper Size A4* A5 B5 Driver Size Letter 8.
Understanding Menus Display Pop Up Page 16 of 61 Specified* the operation panel. Driver Specified Continue to print even if the paper specified from the printer driver does not match the paper configured for the MFP from the operation panel. On* Specifies the size and type of paper loaded in the multipurpose feeder. This item is available only when Panel Specified is selected for MFP Mode. Off Size and type of paper loaded in the multipurpose feeder is not specified.
Understanding Menus Paper Type Page 17 of 61 Plain* Plain Thick Covers Covers Thick Label Coated Coated Thick Paper Size Auto* Custom Size Reports Use the Reports menu to print various types of reports and lists. System Settings Purpose: To print a list of the current user default values, the installed options, the amount of installed print memory, and the status of printer supplies. Panel Settings Purpose: To print a detailed list of all the settings on the operator panel menus.
Understanding Menus Page 18 of 61 "Understanding Fonts", "Printing a Font Sample List" Job History Purpose: To print a detailed list of the processed print jobs. This list contains the latest 20 print jobs. Error History Purpose: To print a detailed list of paper jam and fatal errors. Color Test Page Purpose: To print a page for testing colors. Protocol Monitor Purpose: To print a detailed list of monitored protocols. PCL Macro List Purpose: To print the information on the downloaded PCL macro.
Understanding Menus Page 19 of 61 Speed Dial Purpose: To store up to 200 frequently dialed numbers in speed dial locations . Group Dial Purpose: To create a group of these destinations and set them under a two-digit group dial location. Print Language Purpose: To specify the settings for PCL and PostScript. PCL Use the PCL menu to change printer settings that only affect jobs using the PCL emulation printer language. NOTE: Values marked by an asterisk (*) are the factory default menu settings.
Understanding Menus Page 20 of 61 Values: A4*1 C5 A5 Executive B5 Monarch Letter*1 DL 8.5x13" Envelope #10 Legal Custom Size *1 Denotes country-specific factory default values. NOTE: Selecting a custom size for the paper size prompts you to enter a custom length and width. Orientation Purpose: To specify how text and graphics are oriented on the page. Values: Portrait* Landscape Prints text and graphics parallel to the short edge of the paper.
Understanding Menus Page 21 of 61 Prints on both sides of the paper. On Binding Edge To select binding along the long or short edge of the page. (Select Duplex from the printer driver to duplex only specific jobs.) NOTE: Values marked by an asterisk (*) are the factory default menu settings. NOTE: The 2 Sided menu is only available when the optional duplexer is installed on the multifunction printer. Values: Flip long edge* Flip short edge Assumes binding along the long edge of the page.
Understanding Menus Page 22 of 61 LetterGothic LetterGothic It LetterGothic Bd Albertus Md Albertus XBd Clarendon Cd Coronet Marigold Arial Arial It Arial Bd Arial BdIt Times New Times New It Times New Bd Times New BdIt Symbol Wingdings Line Printer Times Roman Times It Times Bd Times BdIt Helvetica Helvetica Ob Helvetica Bd Helvetica BdOb CourierPS CourierPS Ob CourierPS Bd CourierPS BdOb SymbolPS Palatino Roman Palatino It Palatino Bd Palatino BdIt ITCBookman Lt ITCB
Understanding Menus Page 23 of 61 ROMAN-8* ISO L1 ISO L2 ISO L5 ISO L6 PC-8 PC-8 DN PC-775 PC-850 PC-852 PC-1004 PC-8 TK WIN L1 WIN L2 WIN L5 DESKTOP PS TEXT MC TEXT MS PUB MATH-8 PS MATH PI FONT LEGAL ISO-4 ISO-6 ISO-11 ISO-15 ISO-17 ISO-21 ISO-60 ISO-69 WIN 3.0 WINBALT SYMBOL WINGDINGS DNGBTSMS Font Size Purpose: To specify the font size for scalable typographic fonts. Values: 4.00 - 50.00 The values are in units of 0.25. 12.
Understanding Menus Page 24 of 61 Font Pitch Purpose: To specify the font pitch for scalable monospaced fonts. Values: 6.00 - 24.00 The values are in units of 0.01. 10.00* Font pitch refers to the number of fixed-space characters in a horizontal inch of type. For nonscalable monospaced fonts, the pitch is displayed, but cannot be changed. NOTE: The Font Pitch menu is only displayed for fixed, or monospaced, fonts.
Understanding Menus Page 25 of 61 specific job from the printer driver. Values selected from the printer driver always override values selected from the operator panel.) Values: 1-999 The values are in units of 1. 1* Image Enhance Purpose: To specify whether to perform the image enhancement feature. Image enhancement is a feature that makes the boundary line between black and white smoother to decrease jagged edges and enhance the visual appearance.
Understanding Menus Enable Page 26 of 61 Prints in the draft mode. LineTermination Purpose: To add the line termination commands. Values: Off* The line termination command is not added. CR=CR, LF=LF, FF=FF Add-LF The LF command is added. CR=CR-LF, LF=LF, FF=FF The CR command is added. Add-CR CR=CR, LF=CR-LF, FF=CR-FF CR-XX The CR and LF commands are added. CR=CR-LF, LF=CR-LF, FF=CR-FF Default Color Purpose: To specify the color mode to Color or Black.
Understanding Menus Page 27 of 61 Values: On* Prints an error message before it discards the job. Discards the print job without printing an error message. Off NOTE: This instructions from the PS driver override the settings specified on the operator panel. PS Job Time-Out Purpose: To specify the execution time for one PostScript job. The change becomes effective after the multifunction printer is turned off and then on again. Values: Off* 1-900min. Job timeout does not occur.
Understanding Menus Page 28 of 61 To specify the communication speed and the duplex settings of Ethernet. The change becomes effective after the multifunction printer is turned off and then on again. Values: Auto* 10 Base Half 10 Base Full 100 Base Half 100 Base Full Detects the Ethernet settings automatically. Uses 10base-T half-duplex. Uses 10base-T full-duplex. Uses 100base-TX half-duplex. Uses 100base-TX full-duplex. TCP/IP Purpose: To specify the TCP/IP settings for the wired network.
Understanding Menus Page 29 of 61 Disables IPsec. Reset IPsec*2 *1 Only displayed when an optional multi-protocol card is installed on the printer. *2 Only displayed when IPsec is enabled. *3 This mode is available only when firmware version 200706291103 or later and network (MPC) firmware version 16.03 or later are installed. Since you cannot set IPsec in Windows Vista in this mode, use the Dell Printer Configuration Web Tool.
Understanding Menus Page 30 of 61 Disable NetWare IPX Enable* Disable WSD Enable* Disable SNMP UDP Enable* Disable E-Mail Alert Enable* Disable EWS Apple Talk*1 Enables the IPX. Disables the IPX. Enables the WSD port. Disables the WSD port. Enables the UDP. Disables the UDP. Enables the E-Mail Alert feature. Disables the E-Mail Alert feature. Enable* Enables an access to Dell Printer Configuration Web Tool embedded in the printer.
Understanding Menus Page 31 of 61 Ethernet II Ethernet 802.3 Ethernet 802.2 Ethernet SNAP Uses the IEEE802.3 frame type. Uses the IEEE802.2 frame type. Use the SNAP frame type. NOTE: The IPX/SPX menu is only displayed when an optional multi-protocol card is installed on the printer and the optional wireless printer adapter is not installed on the card. IP Filter (IPv4) Purpose: To specify that data received from certain IP addresses through the wired network is blocked.
Understanding Menus Auto* Standard Page 32 of 61 Used when auto-detecting the PostScript communication protocol. Used when the communication protocol is in ASCII interface. Used when the communication protocol is in binary format. BCP TBCP Binary Used when the communication protocol supports both ASCII and binary data to switch between them according to the specified control code. Used when no special processing is required for data.
Understanding Menus Page 33 of 61 Purpose: To specify the TCP/IP settings for the wireless network. The change becomes effective after the printer is turned off and then on again. Values: IP Mode*1 Uses both IPv4 and IPv6 to set the IP address. Dual Stack Uses IPv4 to set the IP address. IPv4 Mode IPv6 Mode* IPv4 Uses IPv6 to set the IP address. 3 Get IP Address AutoIP* BOOTP RARP DHCP Panel IP Address Subnet Mask Gateway Address Reset IPsec*2 Automatically sets the IP address.
Understanding Menus LPD Enable* Disable Port9100 Enable* Disable IPP Enable* Disable SMB TCP/IP Enable* Disable SMB NetBEUI Enable* Disable FTP Enable* Disable NetWare IP Enable* Disable NetWare IPX Enable* Disable WSD Enable* Disable SNMP UDP Enable* Disable SNMP IPX Enable* Disable Page 34 of 61 Enables the LPD port. Disables the LPD port. Enables the Port9100 port. Disables the Port9100 port. Enables the IPP port. Disables the IPP port. Uses TCP/IP for SMB.
Understanding Menus E-Mail Alert Enable* Disable EWS Enable* Disable Bonjour (mDNS) Enables the E-Mail Alert feature. Disables the E-Mail Alert feature. Enables an access to Dell Printer Configuration Web Tool embedded in the Enable* multifunction printer. Disable Apple Talk Page 35 of 61 Enable* Disable Disables an access to Dell Printer Configuration Web Tool embedded in the multifunction printer. Enables the AppleTalk port. Disables the AppleTalk port. Enables the Bonjour(mDNS) port.
Understanding Menus Page 36 of 61 IP Filter*1 No. n/Address (n is 1-5.) Sets the IP address for Filter n. Sets the mask for Filter n. No. n/Mask (n is 1-5.) No. n/Mode (n is 1-5.) Off* Accept Reject Disable the IP Filter feature for Filter n. Accepts an access from specified IP address. Rejects an access from specified IP address. *1 This item is only available for LPD or Port9100. Initialize NVM Purpose: To initialize wireless network data stored in NVRAM.
Understanding Menus Page 37 of 61 Purpose: To specify the ECP communication mode of the parallel interface. The change becomes effective after the multifunction printer is turned off and then on again. Values: Enable* Disable The ECP communication mode is enabled. The ECP communication mode is disabled. Adobe Protocol Purpose: To specify PostScript communication protocol for each interface. You can configure Adobe Protocol settings for the wireless network.
Understanding Menus Page 38 of 61 To specify the interval time (3-255 seconds) of the resend attempts. Number of Redial Purpose: To specify the number of redial attempts, 0-9. If you enter 0, the multifunction printer will not redial. Int. of Redial Purpose: To automatically redial a remote fax machine if it was busy. Intervals from 1-15 minutes can be entered. Ans Select Purpose: To select the default fax receiving mode. Values: TEL Mode Automatic fax reception is turned off.
Understanding Menus Page 39 of 61 Auto Ans. Ans/FAX Purpose: To share one telephone line with an answering machine. You can specify the time for incoming call of the external phone in 0-255 seconds. Line Monitor Purpose: To specify the volume of the external phone (line monitor). Values: Off Turns off the volume of the external phone. Min Selects the volume of the external phone. Middle* Max Ring Tone Volume Purpose: To specify the volume for the incoming faxes.
Understanding Menus Page 40 of 61 To select the dialing type. Values: PB* Uses PB. DP (10PPS) Uses DP (10PPS). DP (20PPS) Uses DP (20PPS). DM Prevention Purpose: To reject faxes sent from unwanted stations. Values: On Only accepts faxes from numbers registered in the PhoneBook. Incoming faxes from numbers whose G3ID is not registered correctly are not accepted even if the number is registered in the PhoneBook. Off* Accepts faxes from numbers that are not registered in the PhoneBook.
Understanding Menus Page 41 of 61 Send Header Purpose: To print the sender record at the head of the fax. Values: On* Prints the sender record at the head of the fax. Off Does not print the sender record at the head of the fax. Send Header Name Purpose: To register the sender name to be recorded in the sender report. G3ID Purpose: To contain your telephone number, which is printed at the top of each page sent from your multifunction printer. NOTE: Ensure to specify G3ID before using DM Prevention.
Understanding Menus Page 42 of 61 Ask your telephone company which pattern you need to select to use this service. Forward Settings Purpose: To set the multifunction printer to always forward all of the incoming faxes to the specified destination. Values: Trans. at Error Forwards the incoming faxes when an error occurs. Trans. Always Always forwards the incoming faxes. Not Trans.* Does not forward incoming faxes. Fwd.
Understanding Menus Page 43 of 61 Purpose: To select whether or not to add the prefix number when you send a fax. Values: On Adds the prefix number when you send a fax. Off* Does not add the prefix number when you send a fax. Prefix Dial Num Purpose: To set a prefix dial number up to five digits. This number dials before any auto dial number is started. It is useful for accessing the PABX exchange. Discard Size Purpose: To set the multifunction printer to discard any excess at the bottom of the page.
Understanding Menus Higher Page 44 of 61 Sets Higher in the threshold value. Country Purpose: To select the country where the multifunction printer is used. Fwd. Error Print Purpose: To print the documents failed to transfer when Forward Set Print is set to Off. Values: On* Prints documents that failed to transfer when Forward Set Print is set to Off. Off Does not print documents that failed to transfer when Forward Set Print is set to Off.
Understanding Menus Page 45 of 61 5 min* Mode2 1-6 min 6 min* Enter 5 to put the multifunction printer in power saver mode five minutes after it finishes a job. This uses much less energy, but requires more warm-up time for the multifunction printer. Enter 5 if your multifunction printer shares an electrical circuit with room lighting and you notice lights flickering. Select a high value if your multifunction printer is in constant use.
Understanding Menus Page 46 of 61 Loud Panel Alert Tone Off* Does not sound an alert when you press a button on the operator panel. Soft Sounds an alert when you press a wrong button. Normal Loud Machine Ready Tone Off* Does not sound an alert when you press a wrong button. Soft Sounds an alert when the multifunction printer is ready. Normal* Loud Copy Job Tone Off Does not sound an alert when the multifunction printer is ready. Soft Sounds an alert when copying is completed.
Understanding Menus Low Toner Soft Page 47 of 61 Sounds an alert when toner becomes low. Normal* Loud Off Auto Clear Alert Soft Does not sound an alert when toner becomes low. Sounds an alert before 5 seconds when an operator panel message is cleared automatically.
Understanding Menus Page 48 of 61 To specify the date format. Values: Set Date:yy/mm/dd Set Time Date Format Time Format Sets the date in the yy/mm/dd format depending on the settings for Date Format. Sets the time. Sets the date format. 12H 24H* Time Zone Sets the time in the 12H format. Sets the time in the 24H format. Sets the time zone. mm/inch Purpose: Specifies the default measurement unit displayed after the numeric value on the operator panel.
Understanding Menus Page 49 of 61 Print ID Purpose: To specify a location where the user ID is printed. This feature is available for the PCL driver and unavailable for the PS driver. Values: Does not print the user ID. Off* Top Left Top Right Bottom Left Bottom Right Prints the user ID on the top left of the page. Prints the user ID on the top right of the page. Prints the user ID on the bottom left of the page. Prints the user ID on the bottom right of the page.
Understanding Menus Page 50 of 61 Front Back Front & Back Specify Tray*1 Tray 1* Tray 2*2 MPF Prints on the beginning of document. Prints on the end of document. Prints on both beginning and end of document. The banner sheet is loaded in the standard 250-sheet tray. The banner sheet is loaded in tray 2. The banner sheet is loaded in multipurpose feeder.
Understanding Menus Page 51 of 61 Purpose: To specify the communication result for a fax to multiple locations. Values: Does not print the report. Not Print Print at Error Print Always* Prints the report when a communication error is detected. Always prints the report for the fax transmission. Protocol Monitor Purpose: To specify the protocol monitor report to detect the cause of the communication trouble. Values: Does not print the report.
Understanding Menus Page 52 of 61 Purpose: Specifies whether or not to use another size paper when the paper that is loaded in the specified tray does not match the paper size settings for the current job. Values: No tray size substitute accepted. Off* Substitutes paper of next largest size. When there is no larger paper size, the multifunction printer substitutes paper of nearest size. Larger Size Nearest Size MPF Feed Substitutes paper of nearest size.
Understanding Menus Page 53 of 61 To specify the reference voltage settings for the transfer roller. Values: Plain -3 - +3 0* Plain Thick -3 - +3 0* Transparency -3 - +3 0* Covers -3 - +3 0* Covers Thick -3 - +3 0* Label -3 - +3 0* Coated -3 - +3 0* Coated Thick -3 - +3 0* Envelope -3 - +3 0* Adjust Fuser NOTICE: The print quality changes depending on the setting values you select for this item. mk:@MSITStore:C:\Users\14JMIS~1\AppData\Local\Temp\Rar$DIa0.409\UsersGuide.ch...
Understanding Menus Page 54 of 61 Purpose: To specify the temperature settings value for the fuser unit. Values: Plain -2 - +2 0 Plain Thick -2 - +2 0 Transparency -2 - +2 0 Covers -2 - +2 0 Covers Thick -2 - +2 0 Label -2 - +2 0 Coated -2 - +2 0 Coated Thick -2 - +2 0 Envelope -2 - +2 0 Auto Reg Adjust Purpose: mk:@MSITStore:C:\Users\14JMIS~1\AppData\Local\Temp\Rar$DIa0.409\UsersGuide.ch...
Understanding Menus Page 55 of 61 To adjust the registration automatically. Values: On Off* Adjusts the registration automatically. Does not adjust the registration automatically. Color Reg Adjust Purpose: To print the color registration chart and to adjust the color registration by using the chart. This function is required after the multifunction printer is set up or moved. Values: Auto Correct Color Reg Chart Enter Number Adjusts color registration automatically.
Understanding Menus Page 56 of 61 Purpose: To clear all files that are stored as Secure, Store, and Proof Print in the RAM disk. NOTE: The Clear Storage menu is only displayed when 256 MB or more of additional print memory is installed on the multifunction printer and then the RAM Disk menu is set to Enable. Non-DELL Toner NOTICE: When Non-Dell toner is used, the multifunction printer may be severely damaged and may not be covered by your warranty.
Understanding Menus Page 57 of 61 Panel Lock/Panel Lock Set Purpose: To limit access to the Admin menu. Values: Disable* Enable Does not limit access to the Admin menu. Limits access to the Admin menu. Panel Lock/Change Password Purpose: To set a password to limit access to the Admin menu. Values: 0000-9999 0000* Copy/Scan/Fax Lock/Copy/Scan/Fax Set NOTE: Before enabling COPY/Scan/Fax Lock, ensure that Panel Lock is enabled. Purpose: To limit access to the Copy, Scan, and Fax menus.
Understanding Menus Page 58 of 61 0000-9999 0000* Secure Receive/Secure Receive Set NOTE: Before enabling Secure Receive, ensure that Panel Lock is enabled. Purpose: To set a password when you print received fax documents. Values: Disable* Enable Does not limit when you print received fax documents. Limits when you print received fax documents. Secure Receive/Change Password Purpose: To set a password when you receive a fax.
Understanding Menus Page 59 of 61 Address Book Purpose: To print Address Book report. Server Address Purpose: To print server address report. Fax Activity Purpose: To print fax activity report. Fax Pending Purpose: To print pending faxes report. Print Meter Purpose: To print the reports for the total number of pages printed. When printed using either the printer control panel or Dell Printer Configuration Web Tool, the report will be titled Print Volume Report.
Understanding Menus Page 60 of 61 Setting of Panel Lock This feature prevents unauthorized personnel from changing settings made by the printer administrator. For regular printing, items can be selected from the menu and printer settings remain unchanged. For regular printing, items can be configured using the printer driver. NOTE: Disabling the operator panel menus does not prevent access to the Stored Print and Tray Settings menus. 1. Press until >SETUP appears, and then press . 2.
Understanding Menus Page 61 of 61 4. Panel Lock is displayed. Press 5. Panel Lock Set is displayed. Press 6. Press . until Disable appears, and then press mk:@MSITStore:C:\Users\14JMIS~1\AppData\Local\Temp\Rar$DIa0.409\UsersGuide.ch...
Understanding Your Multifunction Printer Software Page 1 of 4 Understanding Your Multifunction Printer Software Printer Settings Utility Use the Drivers and Utilities CD that came with your multifunction printer to install a combination of software programs, depending on your operating system. The following software programs can only operate on Windows. They cannot operate on Macintosh, UNIX, or Linux.
Understanding Your Multifunction Printer Software Page 2 of 4 3. If ordering from the Web: a. When you cannot get information from the multifunction printer automatically by two- way communication, a window that prompts you to type the Service Tag number appears. Type your Dell printer Service Tag number in the field provided. Your Service Tag number is located inside the front door of your multifunction printer. b. Select an URL from the Select Reorder URL list. c.
Understanding Your Multifunction Printer Software Page 3 of 4 To open the Dell MFP Laser 3115cn Launcher window: 1. Click StartoProgramsoDell PrintersoDell MFP Color Laser Printer 3115cnoLauncher. The Dell MFP Laser 3115cn Launcher window opens. 2. The Dell MFP Laser 3115cn Launcher window provides three buttons; Address Book Editor, ScanButton Manager, and Dell ScanCenter. To exit, click the X button at the top-right of the window. For details, click the Help button of each application.
Understanding Your Multifunction Printer Software Page 4 of 4 Click the ScanButton Manager button to configure the scan destination list that appears on the operator panel display when you press the Start button on the operator panel. Dell ScanCenter Dell ScanCenter is a PaperPort application that enables you to scan items and send them directly to PaperPort or other programs on your computer without first running PaperPort.
Printing Page 1 of 5 Printing This chapter covers tips for printing, how to print certain lists of information from your multifunction printer, and how to cancel a job. Tips for Successful Printing Sending a Job to Print Canceling a Print Job Printing a Report Page Using the Print and Hold Function Tips for Successful Printing Tips on Storing Print Media Store your print media properly. For more information, see "Storing Print Media.
Printing Page 2 of 5 Help for more information. Changing paper size or type that is different from type setting in the operator panel will require a user to change the operator panel tray setting before the job will print. To print a job from a typical Windows application: 1. Open the file you want to print. 2. From the File menu, select Print. 3. Verify that the correct printer is selected in the dialog box.
Printing Page 3 of 5 A list of print jobs appears in the printer window. 4. Select the job you want to cancel. 5. Press Delete on the keyboard. Printing a Report Page By using the Report menu, you can print a various of settings for your multifunction printer including system settings, panel setting, and font list. The following describes two examples of printing from the Report menu. Printing a System Settings Page To verify detailed system settings, print a system settings page.
Printing Page 4 of 5 prints. Using the Print and Hold Function When you send a job to the multifunction printer, you can specify in the driver that you want the multifunction printer to hold the job in memory. When you are ready to print the job, you must go to the multifunction printer and use the operator panel menus to identify which job in the memory you want to print.
Printing Page 5 of 5 If you send a Store Print job, the multifunction printer does not print the job immediately, but stores the job in memory so you can print the job later. See "Printing and Deleting Held Jobs" for more information. NOTE: The multifunction printer holds the job until you delete it by using the operator panel or you turn off the multifunction printer. NOTE: When you select Del after Print, the held job is automatically deleted after printing.
Copying Page 1 of 14 Copying Loading Paper for Copying Selecting Paper Tray Preparing a Document Making Copies From the Document Feeder Glass Making Copies From the ADF Setting Copy Options Changing the Default Settings Setting the Power Saver Timer Option Loading Paper for Copying The instructions for loading print materials are the same whether you are printing, faxing, or copying. For further details, see "Print Media Guidelines".
Copying Page 2 of 14 When you use the ADF: z Do not load documents smaller than 5.59 by 5.83 in. (142 by 148 mm) or larger than 8.5 by 14 in. (216 by 356 mm). z Do not attempt to feed the following types of documents: z Carbon-paper or carbon-backed paper z Coated paper z Onion skin or thin paper z Wrinkled or creased paper z Curled or rolled paper z Torn paper z Remove all staples and paper clips before loading documents.
Copying Page 3 of 14 2. Place the document face down on the document feeder glass and align it with the registration guide on the top left corner of the glass. 3. Close the document cover. NOTE: Leaving the cover open while copying may affect the copy quality and toner consumption. NOTE: If you are copying a page from a book or magazine, lift the cover until its hinges are caught by the stopper and then close the cover. If the book or magazine is thicker than 30 mm, start copying with the cover open. 4.
Copying Page 4 of 14 Making Copies From the ADF NOTICE: Do not load more than 50 sheets into the ADF or allow more than 50 sheets to be fed to the ADF output tray. The ADF output tray should be emptied before it exceeds 50 sheets or your original documents may be damaged. NOTE: A computer connection is not required for copying. 1. Load up to 50 sheets of 75 g/m2 (20 lb) documents face up on the ADF with top edge of the documents in first. Then adjust the document guides to the correct document size. 2.
Copying Page 5 of 14 2. Press until >COPY appears, and then press . 3. Press until Number of Copies appears. 4. Press to select the desired settings, and then press 5. Press Start to begin copying. Color You can select color or black and white copying. 1. Load the document to be copied on the document feeder glass, and close the cover. 2. Press until >COPY appears, and then press . 3. Press until Color appears, and then press . 4.
Copying Page 6 of 14 NOTE: You can set the value in a percent for Custom. 5. Press Start to begin copying. Original Type The Original Type setting is used to improve the image quality by selecting the document type for the current copy job. To select the image quality: 1. Load the document to be copied on the document feeder glass, and close the cover. 2. Press until >COPY appears, and then press . 3. Press until Original Type appears. 4.
Copying Page 7 of 14 Lighter2 Lighter1 5. Press Start to begin copying. Sharpness Adjust the sharpness to make the copy sharper or softer than the original. To adjust the sharpness: 1. Load the document to be copied on the document feeder glass, and close the cover. 2. Press until >COPY appears, and then press . 3. Press until Sharpness appears. 4. Press to select the desired settings, and then press Normal* Does not make the copy sharper or softer than the original.
Copying Page 8 of 14 Auto Exposure Adjust the overall brightness to make the copy overexposed than the original. To make the Auto Exposure copying: 1. Load the document to be copied on the document feeder glass, and close the cover. 2. Press until >COPY appears, and then press 3. Press until Auto Exposure appears. 4. Press to select On, and then press . 5. Press Start to begin copying.
Copying Page 9 of 14 2Sided Print a two-sided original document onto one sheet of paper. When you copy using this feature, the multifunction printer prints one side on the upper half of the paper and the other side on the lower half without reducing the original. If the original document is larger than the printable area, some portions may not be printed. To make the 2Sided copying: 1. Load the document(s) face up with top edge in first into the ADF.
Copying Page 10 of 14 Multiple-Up Print two original images to fit onto one sheet of paper. To make the Multiple-Up copying: 1. Load the document(s) face up with top edge in first into the ADF. OR Place a single document face down on the document feeder glass. For details about loading a document, see "Loading an Original Document". 2. Press until >COPY appears, and then press . 3. Press until Multiple-Up appears. 4.
Copying Page 11 of 14 5. If necessary, customize the copy settings including the number of copies, contrast, and image quality. See "Setting Copy Options". 6. Press Start to begin copying. For the document loaded on the document feeder glass, the display asks if you want to load another page. Press to select Yes or No, and then press . Poster Copying Print an image onto several sheets of paper. You can paste the printed pages together to make one postersize document.
Copying Page 12 of 14 6. Press Start to begin copying. Your original document is divided into 9 portions. Each portion is scanned and printed one by one in the following order: Image Repeat Print multiple image copies from the original document on a single page. The number of images is automatically determined by the original image and paper size. This special copy mode can be applied when you load a document using only the document feeder glass.
Copying Page 13 of 14 To make the Margin copying: 1. Load the document to be copied on the document feeder glass, and close the cover. 2. Press until >COPY appears, and then press 3. Press until Margin appears. 4. Press to select On, and then press . 5. Press Start to begin copying. Collated Sort the copy job. For example, if you make two copies of three page documents, one complete three page document will print followed by the second complete document.
Copying Page 14 of 14 NOTE: While you set copy options, pressing Cancel cancels the changed settings and returns to the default status. To create your own default settings: 1. Press until >COPY appears, and then press . 2. Press until >Copy Defaults appears, and then press 3. Press until the desired menu item appears. 4. Press to change the setting, and then press 5. Repeat steps 3 to 4, as needed. 6. To return to the standby mode, press Cancel.
Scanning Page 1 of 18 Scanning Scanning Overview Scanning From Operator Panel Scanning Using the TWAIN Driver Scanning Using the Windows Image Acquisition (WIA) Driver Using a Scanner on the Network Sending an E-Mail with the Scanned Image Scanning Overview Use your Dell™ Multifunction Color Laser Printer 3115cn to turn pictures and text into editable images on your computer.
Scanning Page 2 of 18 Icons on the Dell ScanCenter bar represent the programs that are limited to PaperPort and to Dell ScanCenter. To scan and send an item to a program, click the program icon and then scan the item. Dell ScanCenter automatically starts the selected program when the scan is complete. Scanning From Operator Panel NOTE: Ensure that the multifunction printer is connected to the computer by using the USB cable. 1. Load the document(s) face up with top edge in first into the ADF.
Scanning Page 3 of 18 2. Start the drawing software, such as Imaging for Windows. NOTE: When you use Windows XP, Windows Server 2003, or Windows Vista, use PaperPort instead of Imaging. 3. Click FileoScan or Get Photo... The Available Scanner dialog box appears. NOTE: If the Available Scanner dialog box does not appear, click the Select... button in the left pane of the Scan or Get Photo window. 4. In the Available Scanner dialog box, select Dell MFP Laser 3115cn Scanner, and then click OK. 5.
Scanning Page 4 of 18 Place a single document face down on the document feeder glass. For details about loading a document, see "Loading an Original Document". 2. Start the drawing software, such as Microsoft Paint. NOTE: When you use Windows Vista or Windows Server 2008, use Windows Photo Gallery instead of Paint. 3. Click FileoFrom Scanner or Camera. The Scan using Dell MFP Laser 3115cn window appears. NOTE: The illustration may vary for different operating systems. 4.
Scanning Page 5 of 18 NOTE: The illustration may vary for different operating systems. 5. Select your scanning preferences and click Next. 6. Enter a picture name, and select a file format and destination to save the picture. 7. Click Next to start scanning. 8. Follow the on-screen instructions to edit the picture after it is copied to your computer.
Scanning Page 6 of 18 NOTE: Write down this shared name because you will use this name in the next setting procedure. 5. Click on Permissions to create a write permission for this folder. 6. Click Add. 7. Enter your user login name in the Enter the object names to select box (Example of user login name, Myself). NOTE: User login account with empty password will be rejected in the Scan to Folder authentication. Ensure that all user login accounts have a valid and non-empty password.
Scanning Page 7 of 18 If you are using Windows Vista® or Windows Server 2008, you can share a folder with the following or similar instructions: 1. Create a folder in the desired directory on your computer (Example of folder name, MyShare). 2. Right-click on the folder, and then select Properties. 3. The Properties dialog box appears, click on the Sharing tab, and then select Advanced Sharing. 4. Select the Share this folder check box. mk:@MSITStore:C:\Users\14JMIS~1\AppData\Local\Temp\Rar$DIa0.
Scanning Page 8 of 18 5. Enter a shared name in the Share name box. NOTE: Note down the shared name as you need to use this name in the next setting procedure. 6. Click on Permissions to create a write permission for this folder. 7. Click Add. 8. Enter your user login name in the Enter the object names to select box (Example of user login name, Myself). NOTE: User login account with empty password will be rejected in the Scan to Folder authentication.
Scanning Page 9 of 18 Setting Up the Address Book To setup the Scan to Server/Computer address book through the network, you will first need to locate the IP address of the Dell MFP Laser 3115cn. You can obtain this IP address from the System Settings report by performing the following steps from the operator panel: 1. When the printer is Ready (Copy, Scan, Fax appears in the LCD), press 2. Press until Reports appears, then press until SETUP is indicated, then press . . 3.
Scanning Page 10 of 18 mk:@MSITStore:C:\Users\14JMIS~1\AppData\Local\Temp\Rar$DIa0.409\UsersGuide.ch...
Scanning Page 11 of 18 To fill in the fields, enter the information as follows: Name: Enter a friendly name that you want it to appear on the address book. Server Type: Select SMB if you storing the document in a shared folder from your Microsoft Windows operating system. Select FTP if you have a FTP server. NOTE: FTP Server depends on Microsoft Internet Information Services (IIS) and may not be installed on your computer.
Scanning Page 12 of 18 Example of an entry for Scan to Computer, SMB. Example of an entry for Scan to Server, FTP. mk:@MSITStore:C:\Users\14JMIS~1\AppData\Local\Temp\Rar$DIa0.409\UsersGuide.ch...
Scanning Page 13 of 18 NOTE: Ensure that you enter an IP address in the Server Address box correctly. Scan to Computer/Server Through Wireless Setup NOTE: This step can be performed only if you have the Wireless Network Card (Sold separately). If you are intending to perform Scan to Computer/Server through your wireless network connection, you will need to configure the scan network path as follows: 1. Open a web browser. 2. Type in the IP address of the printer and click Go.
Scanning Page 14 of 18 Sharing a Folder With Sub-folder From Your Computer To create and share a folder, follow the steps found in "Sharing a Folder From Your Computer". To add sub-folder, you will need to create a sub-folder from your share folder. 1. Create a folder in the desired directory on your computer (Example of folder name, MyShare). 2. From the folder, create your desired sub-folder. (Example of sub-folder name, MyPic\John.
Scanning Page 15 of 18 NOTE: Ensure that you enter an IP address in the Server Address box correctly. Start to send the scanned file on the Network 1. From the operator panel, press until >SCAN appears, and then press 2. Press until Scan to Network appears. 3. Press or . to select the option you selected in "Setting Up the Address Book", and then press . Server: Stores the scanned image on the server by using the FTP protocol.
Scanning Login Error 016-782 Scan Page 16 of 18 · Ensure the shared name or password is correct. Press SMB/FTP Error · Ensure the specified server path name and access right to the folder are correct. · Ensure the server path is set correctly. 016-783 Scan Press SMB/FTP Error · Change the access rights for the shared folder.
Scanning Page 17 of 18 Setting E-Mail Alert 1. Form the Dell Printer Configuration Web Tool, click E-Mail Alert. The E-mail Server Alert Settings page appears. 2. Specify the settings for E-Mail Alert as follows: Primary SMTP gateway: Enter the IP address of the e-mail server. E-Mail Send Authentication: Specify Invalid to enable the e-mail server. NOTE: If the error message including 016-506 or 016-764 is displayed, contact your server administrator for the settings for E-Mail Send Authentication. 3.
Scanning Page 18 of 18 Address Book: Select the e-mail address registered in the Address Book. NOTE: Users need to be registered before you can select Address Book on the operator panel. 4. Press to select or . 5. Press Start to send e-mail. Setting Problems Mail Size Limits · Change the file format and resolution. 016-985 Scan Press SMTP Error 016-764 Scan · Ensure the SMTP server address is correct. Press Address Error 016-767 Scan · Ensure the e-mail address is correct.
Faxing Page 1 of 20 Faxing FAX Languages Setting Procedure Setting the Machine ID Using the Number Keypad to Enter Characters Setting the Time and Date Changing the Clock Mode Setting Sounds Sending a Delayed Fax Specifying the Fax Settings Sending a Fax Sending a Fax from the driver (Direct Fax) Receiving a Fax Color Fax Automatic Dialing Other Ways to Fax FAX Languages Setting Procedure 1. Using Fax Initial Setup in Windows Installer is recommended. Please follow to the procedure of the display. 2.
Faxing Page 2 of 20 NOTE: If you make a mistake while entering numbers, press 6. Press when the number on the display is correct. 7. Press until >Send Header Name appears, and then press to delete the last digit. . 8. Enter your name or company name using the number keypad. You can enter alphanumeric characters using the number keypad, including special symbols by pressing the 0 button.
Faxing Page 3 of 20 a pause is entered. Setting the Time and Date NOTE: It may be necessary to reset the correct time and date if loss of power to the multifunction printer occurs. To set the time and date: 1. Press until >SETUP appears, and then press . 2. Press until >Admin Menu appears, and then press 3. Press until >System Settings appears, and then press 4. Press until >Clock Settings appears, and then press 5. Press until >Set Date appears, and then press . . . . 6.
Faxing 5. Press Page 4 of 20 until the desired tone appears, and then press . 6. Press until the desired volume appears, and then press . The multifunction printer works normally even if the ringer is turned off. 7. Press Cancel to return to the standby mode. Speaker Volume NOTE: You can turn on/off the speaker only when the telephone line is connected. 1. Press until >FAX appears, and then press 2. Press until >OnHook appears. 3. Press to select On, and then press . . 4.
Faxing Page 5 of 20 Available Fax Settings Options You can use the following settings options for configuring the fax system: Option Description Interval Timer You can specify the interval time (3-255 minutes) of the resend attempts. Number of Redial You can specify the number of redial attempts, 0-9. If you enter 0, the multifunction printer will not redial. Int. of Redial Your multifunction printer can automatically redial a remote fax machine if it was busy.
Faxing Page 6 of 20 DRPD Pattern Before using the Distinctive Ring Pattern Detection (DRPD) option, distinctive ring service must be installed on your telephone line by the telephone company. After the telephone company has provided a separate number for faxing with a distinctive ring pattern, configure the fax setup to monitor for that specific ring pattern. Forward Settings You can set your multifunction printer to forward incoming faxes to another fax number during a specified time period.
Faxing Page 7 of 20 4. Press the button until Capability ECM appears, then press the 5. Press the button until Disable appears, then press the button. button to disable ECM. Modem Speed Some of the legacy fax devices do not support the V.34 modem speed of 33,600 bits per second (bps). You may experience fax send or receive errors due to the higher modem speed. You can disable the V.34 with the following instructions. 1. When the printer is in Customer Mode, select Fax/Scanner Diag and press 2.
Faxing Page 8 of 20 2. Press the button until Parameter appears, then press the 3. Press the button until FAX Parameter appears, then press the button. 4. Press the button until G3M RX Coding appears, then press the button. 5. Press the button until MMR appears, then press the MH encoding. button. button to enable MMR encoding, select MR to enable MR encoding, or select MH to enable Sending a Fax You can fax data from you multifunction printer.
Faxing Page 9 of 20 3. Adjust the document resolution, referring to "Adjusting the Document Resolution". 4. Close the document cover. NOTE: If you are faxing a page from a book or magazine, lift the cover until its hinges are caught by the stopper and then close the cover. If the book or magazine is thicker than 30 mm, start faxing with the cover open. Adjusting the Document Resolution Use the Document Resolution setting to improve the output quality of the original or if scanning photographic materials.
Faxing Page 10 of 20 2. Press until >FAX appears, and then press . 3. Press until >Lighter/Darker appears. 4. Press to select the desired setting, and then press . Normal* Works well with standard typed or printed documents. Darker1 Works well with light print or faint pencil markings. Darker2 Darker3 Lighter3 Works well with dark print. Lighter2 Lighter1 5. Press Start to begin faxing. Sending a Fax Automatically 1. Load the document(s) face up with top edge in first into the ADF.
Faxing Page 11 of 20 If something goes wrong while sending your fax, an error message appears on the display. For a listing of error messages and their meanings, see "Understanding Multifunction Printer Messages". If you receive an error message, press Cancel to clear the message and try to send the document again. You can set your multifunction printer to print a confirmation report automatically after each fax transmission. For further details, see "Printing a Report".
Faxing Page 12 of 20 NOTE: The settings done here are only applied to a single fax job. a. Transmission image quality Purpose: To set the output quality. Values: Standard For documents with normal sized characters. High Quality* For documents containing small characters or thin lines or documents printed using a dot-matrix printer. Super-high image quality For documents containing extremely fine detail. The super fine mode is enabled only if the remote printer also supports Super Fine resolution.
Faxing Page 13 of 20 7. Enter the destination for the recipient. The following procedure is for entering the destination. For details on how to enter the destination, please refer to the Help file for the driver. a. Enter the name and phone number directly. b. Specify a destination that is saved to the Phone Book on the PC. c. Specify a destination that is saved to the Address Book on the Dell Multifunction Color Laser Printer 3115cn.
Faxing Page 14 of 20 If you want to adjust the ringer volume, see "Setting Sounds". Receiving Manually in the Tel Mode You can receive a fax by picking up the handset of the external telephone and then pressing the remote receive code (see "Available Fax Settings Options"), or by setting OnHook to On (you can hear voice or fax tones from the remote machine) and then pressing Start. The multifunction printer begins receiving a fax and returns to the standby mode when the reception is completed.
Faxing Page 15 of 20 2. Press until >Polling Receive appears. 3. Press to select On, and then press . Color Fax You can use the color fax function on your multifunction printer. Conditions faxing in color To send and receive color faxes you need to check the following conditions. z Check that the sending or receiving party's fax is set for color faxes. z You can only send one page if you send a fax using the document feeder glass.
Faxing Page 16 of 20 Check on the panel: Color or Black & White is displayed on the operator panel while a fax is sending. z While a fax is sending in color, Color appears on the fourth line of the LCD panel. z While a fax is sending in black and white, Black & White appears on the fourth line of the LCD panel. Check on the activity report: You can check the Mode field on the activity report. z If the fax was sent in color, "Color" is output on the report.
Faxing Page 17 of 20 1. Load the document(s) face up with top edge in first into the ADF. OR Place a single document face down on the document feeder glass. For details about loading a document, see "Loading an Original Document". 2. To enter the speed dial number do either of the following: a. Press until >FAX appears, and then press b. Press until >Speed Dial appears. . c.
Faxing Page 18 of 20 Sending a Fax Using Group Dialing (Multi-address Transmission) You can use group dialing for Broadcasting or Delayed transmissions. Follow the procedure of the desired operation (For Delayed transmission, see "Sending a Delayed Fax"). You can use one or more group numbers in one operation. Then continue the procedure to complete the desired operation.
Faxing Page 19 of 20 To turn the secure receiving mode off: 1. Access the Secure Receive menu by following steps 1 to 5 in "To turn the secure receiving mode on:". 2. Press to select Disable, and then press . 3. To return to the standby mode, press Cancel. Printing Reports The following reports are available: Speed Dial This list shows all of the numbers currently stored in the printer's memory as speed dial numbers.
Faxing Page 20 of 20 You can connect a telephone answering device (TAD) directly to the back of your multifunction printer as shown above. z Set your multifunction printer to the Ans/FAX mode and set Auto Ans. Ans/FAX to specify the time for the TAD. z When the TAD picks up the call, the multifunction printer monitors and takes the line if fax tones are received and then starts receiving the fax.
Networking Page 1 of 8 Networking About Sharing the Multifunction Printer on a Network Setting Up the Locally Shared Printer Point and Print Peer-to-Peer Setting Up a Network-connected Printer Printing a Network Configuration Page Setting Network Protocols Static Addressing Dynamic Addressing (BOOTP/DHCP) Restoring the Network Configuration Resetting the Network Interface Card About Sharing the Multifunction Printer on a Network Locally-shared Printer You can connect the multifunction printer directly to
Networking Page 2 of 8 Setting Up the Locally Shared Printer You can share your new printer on the network using the Drivers and Utilities CD that shipped with your multifunction printer, or using Microsoft's point and print or peer-to-peer method. However, if you use one of the Microsoft methods, you will not have all of the features, such as the status monitor and other printer utilities, that are installed with the Drivers and Utilities CD.
Networking Page 3 of 8 2. Right-click the printer's icon and select Sharing. 3. Click the Change sharing options button. 4. Click the Continue button. 5. Click Additional Drivers and select the processors of all the network clients printing with this printer. 6. Click OK. 7.
Networking Page 4 of 8 1. On the Windows desktop of the client computer, click Starto Network. 2. Locate the host name of the server computer, and then double-click the host name. 3. Right-click the shared printer name, and then click Connect. 4. Click Install driver. 5. Click Continue in the User Account Control dialog box (You can skip this step in Windows Server 2008). 6.
Networking Page 5 of 8 c. Click FileoProperties. d. From the General tab, click Print Test Page (Print a Test Page for Windows 2000). When a test page prints successfully, printer installation is complete. For Windows Vista and Window Server 2008 1. Click Starto Control Panelo Hardware and Soundo Printers (Starto Control Panelo Printers for Windows Server 2008). 2. Click Add a printer to launch the Add Printer wizard. 3. Select Add a network, wireless or Bluetooth printer, and then click Next.
Networking Page 6 of 8 Dynamic Addressing Server · DHCP · BOOTP Printing a Network Configuration Page The Network Configuration page shows how the network interface card on your multifunction printer is configured. The default settings are suitable for most applications. 1. Press until >SETUP appears, and then press . 2. Press until >Admin Menu appears, and then press 3. Press until >Admin Reports appears, and then press 4. Press until >Server Address appears, and then press . .
Networking Page 7 of 8 z Static Addressing: TCP/IP address is assigned manually by the system administrator. z Dynamic Addressing BOOTP/DHCP(default): TCP/IP address is assigned automatically by a DHCP or BOOTP server on your network. Static Addressing To enter the TCP/IP address from your multifunction printer's operator panel, take the following steps: 1. Press until >SETUP appears, and then press . 2. Press until >Admin Menu appears, and then press 3.
Networking Page 8 of 8 Restoring the Network Configuration You can return the network configuration to its default settings. 1. Press until >SETUP appears, and then press . 2. Press until >Admin Menu appears, and then press 3. Press until >Wired Net or >Wireless Net appears, and then press 4. Press until >Initialize NVM appears, and then press 5. Press to select Yes, and then press . . . The network configuration is restored. 6.
Understanding Fonts Page 1 of 9 Understanding Fonts Typefaces and fonts Bitmapped and Scalable Fonts Resident Fonts Symbol Sets Typefaces and fonts A font is a set of characters and symbols created with a distinct design. The distinct design is called a typeface. The typefaces you select add personality to a document. Well-chosen typefaces make a document easier to read. The multifunction printer has numerous resident fonts in PCL 5/PCL 6 and Adobe PostScript 3.
Understanding Fonts Page 2 of 9 In fixed space fonts, each character has the same width. Pitch is used to specify the size of fixed space fonts. It is a measure of the number of characters that will print in one horizontal inch of type. For example, all 10pitch fonts print 10 characters per inch (cpi) and all 12-pitch fonts print 12 cpi: In proportional (or typographic) fonts, every character can have a different width.
Understanding Fonts Page 3 of 9 Bitmapped fonts are available in different type styles and point sizes as downloadable fonts. Scalable fonts (also called outline fonts) are stored as computer programs that define the outlines of the characters in the font. Each time you print characters from a scalable font, the multifunction printer creates a bitmap of the characters at the point size you choose and saves it temporarily in print memory.
Understanding Fonts Page 4 of 9 Resident scalable fonts PCL 5/PCL 6 PostScript 3 CG Times Albertus CG Times It Albertus Italic CG Times Bd Albertus Light CG Times BdIt Antique Olive Roman Univers Md Antique Olive Italic Univers MdIt Antique Olive Bold Univers Bd Antique Olive Compact Univers BdIt Apple Chancery Univers MdCd Arial Univers MdCdIt Arial Italic Univers BdCd Arial Bold Univers BdCdIt Arial Bold Italic ITC Avant Garde Gothic Book AntiqueOlv ITC Avant Garde Gothic Book O
Understanding Fonts Page 5 of 9 Carta Courier Chicago Courier It Clarendon Roman Courier Bd Clarendon Bold Courier BdIt Clarendon Light Cooper Black LetterGothic Cooper Black Italic LetterGothic It Cooper Gothic 32BC LetterGothic Bd Cooper Gothic 33BC Coronet Albertus Md Courier Albertus XBd Courier Oblique Courier Bold Clarendon Cd Courier Bold Oblique Eurostile Medium Coronet Eurostile Bold Eurostile Extended No. 2 Marigold Eurostile Bold Extended No.
Understanding Fonts Page 6 of 9 Goudy Bold Wingdings Goudy Bold Italic Goudy Extra Bold Line Printer Helvetica Helvetica Oblique Times Roman Helvetica Bold Times It Helvetica Bold Oblique Times Bd Helvetica Narrow Times BdIt Helvetica Narrow Oblique Helvetica Narrow Bold Helvetica Helvetica Narrow Bold Oblique Helvetica Ob Helvetica Condensed Helvetica Bd Helvetica Condensed Oblique Helvetica BdOb Helvetica Condensed Bold Helvetica Condensed Bold Oblique CourierPS Hoefler Text Courie
Understanding Fonts Page 7 of 9 ITC Lubalin Graph Demi ITC Lubalin Graph Demi Oblique HelveticaNr Marigold HelveticaNr Ob Monaco HelveticaNr Bd ITC Mona Lisa Recut HelveticaNr BdOb New Century Schoolbook Roman New Century Schoolbook Italic N C Schbk Roman New Century Schoolbook Bold N C Schbk It New Century Schoolbook Bold Italic N C Schbk Bd NewYork N C Schbk BdIt Optima Roman Optima Italic ITC A G Go Bk Optima Bold ITC A G Go BkOb Optima Bold Italic ITC A G Go Dm Oxford ITC A G Go
Understanding Fonts Page 8 of 9 Times New Roman Italic Times New Roman Bold Times New Roman Bold Italic Univers 45 Light Univers 45 Light Oblique Univers 55 Univers 55 Oblique Univers 65 Bold Univers 65 Bold Oblique Univers 57 Condensed Univers 57 Condensed Oblique Univers 67 Condensed Bold Univers 67 Condensed Bold Oblique Univers 53 Extended Univers 53 Extended Oblique Univers 63 Extended Bold Univers 63 Extended Bold Oblique Wingdings ITC Zapf Chancery Medium Italic ITC Zapf Dingbats Symbol Sets A sym
Understanding Fonts Page 9 of 9 Not all font names support all of the symbol sets listed. Roman 8 (Default) ISO 8859-1 Latin 1 ISO 8859-2 Latin 2 ISO 8859-9 Latin 5 ISO 8859-10 Latin 6 PC-8 PC-8 DN PC-775 Baltic PC-850 Multilingual PC-852 Latin 2 PC-1004 OS/2 PC Turkish Windows 3.1 Latin 1 Windows 3.1 Latin 2 Windows 3.
Understanding Multifunction Printer Messages Page 1 of 7 Understanding Multifunction Printer Messages The printer operator panel displays messages describing the current state of the multifunction printer and indicates possible printer problems you must resolve. This topic provides a list of all printer messages, explains what they mean, and tells you how to clear the messages.
Understanding Multifunction Printer Messages Page 2 of 7 Reseat Fuser Contact Support locked. not solve the problem, contact Dell. Error NNN-NNN relates to printer problems. See "Contacting Dell" in the Owner's Manual or in this manual. 016-316 Restart Printer Reseat Memory Contact Support The multifunction printer Remove the additional memory module. If this detected an unsupported does not solve the problem, contact Dell.
Understanding Multifunction Printer Messages Page 3 of 7 077-903 Remove Paper Open & close Front Cover a paper jam. N indicates the tray path. number. See "Clearing Jams". Insert PrintCart NNN-NNN Insert XXX Cartridge The specified print cartridge is either missing or not fully inserted into the multifunction printer. Reinsert the specified print cartridge. See "Replacing Print Cartridges". XXX is one of the following: · · · · Black Cyan Yellow Magenta Error NNN-NNN relates to printer problems.
Understanding Multifunction Printer Messages 016-799 Data Violation Press Page 4 of 7 multifunction printer on the · Press to clear the message, cancel the printer driver does not conform current print job, and conduct the next print to the multifunction printer you job, if any. are using, this message appears. · Ensure that the printer configuration on the printer driver conforms to the multifunction printer you are using. Over Heat 042-700 Cooling down Please Wait...
Understanding Multifunction Printer Messages No Dial Tone 035-749 Fax Job Failure Page 5 of 7 The remote machine does not respond after dialing the number. · Press The fax memory is full and the communication was disconnected. · Press Paper Jam 005-121 Open ADF Cover and Clear Jam Paper jam is detected in the ADF. Remove the jammed paper. Paper Jam 005-110 Open ADF Cover and Clear Jam Paper jam is detected in the ADF. Remove the jammed paper.
Understanding Multifunction Printer Messages Page 6 of 7 Press SMB/FTP Error 016-784 Scan An error occurred when you transfer data to the server. · Press Cannot transfer the file. · Press to clear the message. · Ensure you have the right to rename/delete files. · Ensure SP1 is already installed in the Windows Server 2003. If it is not installed, install SP1. Files of the same name exist. · Press to clear the message.
Understanding Multifunction Printer Messages 016-507 Scan Page 7 of 7 which you send e-mail. · Ensure the user name and password used in the SMTP server are correct. There are unspecified settings. · Press Press SMTP Login Error 016-506 Scan Press POP login Error 016-505 Scan Cannot log in the POP3 server to which you send e-mail. · Press Cannot resolve the name of the SMTP server to which you send e-mail. · Press Press SMTP Error 016-503 Scan to clear the message.
Clearing Jams Page 1 of 16 Clearing Jams Careful selection of appropriate print media and proper loading allow you to avoid most jams. See "Print Media Guidelines" for more information.
Clearing Jams Page 2 of 16 z Overtightening the guides may cause jams. z Wipe the feeder rollers in the trays or multipurpose feeder with a cloth that is slightly dampened with water if jams caused by misfeeding paper occur frequently. Identifying the Location of Paper Jams The following illustration shows where paper jams may occur along the print media path. CAUTION: Do not attempt to clear any jams using tools or instruments. This may permanently damage the multifunction printer.
Clearing Jams Page 3 of 16 Removing Print Jams from the ADF When a document jams while it passes through the Automatic Document Feeder (ADF), remove jams in the following procedure. NOTE: To prevent document jams, use the document feeder glass for thick, thin or mixed documents. 1. Remove the remaining documents from the ADF. If the document is jammed in the paper feed area: a. Open the ADF cover. b. Remove the document by gently pulling it straight up.
Clearing Jams Page 4 of 16 b. Close the document cover. Then load the documents back into the ADF. 2. If you cannot see the paper or the paper does not move when you pulled, open the document cover. 3. Remove the document from the roller or the feed area by carefully pulling it gently to the right. 4. Close the document cover. Then load the documents back into the ADF.
Clearing Jams Page 5 of 16 3. Open the front cover by pushing the button (right side) and remove the jammed paper. Then, confirm that there are no scraps of paper remaining inside the multifunction printer. 4. Insert the tray back into the multifunction printer, and push until it stops. mk:@MSITStore:C:\Users\14JMIS~1\AppData\Local\Temp\Rar$DIa0.409\UsersGuide.ch...
Clearing Jams Page 6 of 16 5. Open and close the front cover. Removing Print Jams From the Standard Tray NOTICE: To protect the drums of the print cartridges against bright light, close the front cover within five minutes. If the front cover remains open for more than five minutes, print quality may deteriorate. NOTE: To resolve the error displayed on the operator panel, you must clear all print media from the print media path. 1. Pull the tray out of the multifunction printer until it stops.
Clearing Jams Page 7 of 16 3. Pull the jammed paper out carefully to avoid tearing it. If it is still hard to remove the paper, go to the next step to remove the jammed paper from the inside of the multifunction printer. 4. Open the front cover by pushing the button (right side) and remove the jammed paper. Then, confirm that there are no scraps of paper remaining inside the multifunction printer. 5. Close the front cover. mk:@MSITStore:C:\Users\14JMIS~1\AppData\Local\Temp\Rar$DIa0.409\UsersGuide.ch...
Clearing Jams Page 8 of 16 6. Insert the tray into the multifunction printer, and push until it stops. CAUTION: Do not use excessive force on the tray. Doing so could damage the tray or the inside of the multifunction printer. Removing Print Jams From the Fuser Unit NOTICE: Ensure nothing touches or scratches the surface (black-colored film) of the transfer belt unit. Scratches, dirt, or oil from your hands on the film of the transfer belt unit may reduce print quality.
Clearing Jams Page 9 of 16 1. Turn off the multifunction printer and wait for 30 minutes. 2. Push the button (right side) and open the front cover. 3. Lift the levers at both ends of the fuser unit, and remove the jammed paper. If any jammed paper cannot be found, go to the next step. CAUTION: The fuser unit is hot. Do not touch it, doing so may cause burns. 4. Open the cover of the fuser unit and remove the jammed paper. mk:@MSITStore:C:\Users\14JMIS~1\AppData\Local\Temp\Rar$DIa0.409\UsersGuide.ch...
Clearing Jams Page 10 of 16 5. Close the cover of the fuser unit and press down the levers at both ends of the fuser unit. 6. Confirm that there are no scraps of paper remaining inside the multifunction printer, and then close the front cover. mk:@MSITStore:C:\Users\14JMIS~1\AppData\Local\Temp\Rar$DIa0.409\UsersGuide.ch...
Clearing Jams Page 11 of 16 Removing Print Jams From the Optional Duplexer NOTICE: Ensure nothing touches or scratches the surface (black-colored film) of the transfer belt unit. Scratches, dirt, or oil from your hands on the film of the transfer belt unit may reduce print quality. NOTICE: To protect the drums of the print cartridges against bright light, close the front cover within five minutes. If the front cover remains open for more than five minutes, print quality may deteriorate.
Clearing Jams Page 12 of 16 3. Pull up on the belt release levers and rotate the transfer belt unit up as shown in the illustration. 4. Remove the jammed paper and close the transfer belt unit. 5. Close the front cover. mk:@MSITStore:C:\Users\14JMIS~1\AppData\Local\Temp\Rar$DIa0.409\UsersGuide.ch...
Clearing Jams Page 13 of 16 Removing Print Jams From the Optional Feeder NOTICE: To protect the drums of the print cartridges against bright light, close the front cover within five minutes. If the front cover remains open for more than five minutes, print quality may deteriorate. NOTE: To resolve the error displayed on the operator panel, you must clear all print media from the print media path. 1. Pull the tray out of the multifunction printer until it stops.
Clearing Jams Page 14 of 16 2. Remove all jammed and/or creased paper from the tray. 3. Pull the jammed paper out carefully to avoid tearing it. If it is still hard to remove the paper, go to the next step to remove the jammed paper from the inside of the multifunction printer. mk:@MSITStore:C:\Users\14JMIS~1\AppData\Local\Temp\Rar$DIa0.409\UsersGuide.ch...
Clearing Jams Page 15 of 16 4. Open the front cover by pushing the button (right side) and remove the jammed paper. Then, confirm that there are no scraps of paper remaining inside the multifunction printer. 5. Close the front cover. NOTE: If the paper jam message is not cleared after closing the front cover, pull out the 250-sheet tray from the multifunction printer and remove the jammed paper. 6. Insert the tray back into the multifunction printer, and push until it stops.
Clearing Jams Page 16 of 16 CAUTION: Do not use excessive force on the tray. Doing so could damage the tray or the inside of the multifunction printer. mk:@MSITStore:C:\Users\14JMIS~1\AppData\Local\Temp\Rar$DIa0.409\UsersGuide.ch...
Printing With Web Services for Devices (WSD) Page 1 of 1 Printing With Web Services for Devices (WSD) This section provides information for network printing with WSD, Microsoft's new Windows Vista protocol. Printer Setup Printer Setup You can install your new printer on the network using the Drivers and Utilities CD that shipped with your printer, or using Microsoft's Windows Add Printer wizard. However, when you use IPv6 Mode, you cannot install the printer driver from the Drivers and Utilities CD.
Maintaining Your Multifunction Printer Page 1 of 24 Maintaining Your Multifunction Printer Periodically, your printer requires you to complete certain tasks to maintain optimum print quality. If several people are using the multifunction printer, you may want to designate a key operator to maintain your multifunction printer. Refer printing problems and maintenance tasks to this key operator.
Maintaining Your Multifunction Printer Setting Function Print cartridge Draft Mode in the Advanced This check box allows the users to select a print mode that uses less toner. When this feature is used, the image quality will be lower than when it is not used. Print media Multiple Up The multifunction printer prints two or more pages on one side of a sheet. Values for Multiple Up are 2 Up, 4 Up, 8 Up, 16 Up, or 32 Up.
Maintaining Your Multifunction Printer Page 3 of 24 z Store cartons of print media on a pallet or shelf, rather than directly on the floor. z If you store individual packages of print media out of the original carton, ensure that they rest on a flat surface so the edges do not buckle or curl. z Do not place anything on top of the print media packages. Storing Consumables Store consumables in their original packaging until you need to use them.
Maintaining Your Multifunction Printer Page 4 of 24 2. Grasp the handles at both ends of the print cartridge that you want to replace and pull it out. CAUTION: Since the used print cartridge may spill some toner, do not shake it. Installing a New Print Cartridge 1. Select the new print cartridge which color matches the color of the handles on the printer cartridge to be replaced and shake it five or six times to distribute the toner evenly. mk:@MSITStore:C:\Users\14JMIS~1\AppData\Local\Temp\Rar$DIa0.
Maintaining Your Multifunction Printer Page 5 of 24 2. Remove the print cartridge from its packaging. NOTE: To protect the drum against bright light, do not remove the orange protective cover of the print cartridge before the cartridge is inserted into its slot in the multifunction printer. 3. Completely remove the seal from the print cartridge by pulling the tab on the end of the print cartridge. NOTE: Pull the seal out straight. Pulling the seal diagonally may tear it. 4.
Maintaining Your Multifunction Printer Page 6 of 24 5. Remove the orange protective cover of the installed print cartridge and discard. 6. Close the front cover. Replacing the Fuser Unit CAUTION: To prevent electric shock, always turn off the multifunction printer and disconnect the power cable from the grounded outlet before performing maintenance. CAUTION: Before performing any of the following procedures, read and follow the safety instructions in your Owner's Manual or Product Information Guide.
Maintaining Your Multifunction Printer Page 7 of 24 the front cover. Dell fuser unit is available only through Dell. To order by phone, see "Contacting Dell" in the Owner's Manual or in this manual. Dell recommends Dell fuser unit for your multifunction printer. Dell does not provide warranty coverage for problems caused by using accessories, parts, or components not supplied by Dell.
Maintaining Your Multifunction Printer Page 8 of 24 4. Release the levers at both ends of the fuser unit. 5. Hold both sides of the installed fuser unit, pull it towards the front of the multifunction printer to release the connection on the right side, then lift upward to remove. mk:@MSITStore:C:\Users\14JMIS~1\AppData\Local\Temp\Rar$DIa0.409\UsersGuide.ch...
Maintaining Your Multifunction Printer Page 9 of 24 Installing a New Fuser Unit 1. Unpack a new fuser unit and hold both sides of the fuser unit with both hands. 2. With the connector of the fuser unit toward the slot, push the connector into the slot firmly. NOTE: Ensure that the fuser connector is firmly seated. 3. Lock both levers at the ends of the fuser unit. mk:@MSITStore:C:\Users\14JMIS~1\AppData\Local\Temp\Rar$DIa0.409\UsersGuide.ch...
Maintaining Your Multifunction Printer Page 10 of 24 4. Lower the chute gate to its horizontal position. 5. Close the front cover. mk:@MSITStore:C:\Users\14JMIS~1\AppData\Local\Temp\Rar$DIa0.409\UsersGuide.ch...
Maintaining Your Multifunction Printer Page 11 of 24 Replacing Separator Rollers There are three separator rollers in the multifunction printer which need to be replaced periodically. One is in the tray and the others are inside the multifunction printer. Basically, all the separator rollers are replaced in the same way as described in this section.
Maintaining Your Multifunction Printer Page 12 of 24 NOTE: Remove all paper from the tray before opening the separator roller cover. 2. Push back the handles on each side of the separator roller cover as shown in the following illustration and open the cover. 3. Turn the separator roller until the roller hook can be seen. mk:@MSITStore:C:\Users\14JMIS~1\AppData\Local\Temp\Rar$DIa0.409\UsersGuide.ch...
Maintaining Your Multifunction Printer Page 13 of 24 4. Pull the separator roller hook out of the groove in the axle, and then slide the separator roller to the right. Installing the New Separator Roller in the Tray 1. Align the hole of the new separator roller with the axle. 2. Slide the separator roller along the axle so the protrusions fit completely into the slots and the roller hook reseats into the groove on the axle. mk:@MSITStore:C:\Users\14JMIS~1\AppData\Local\Temp\Rar$DIa0.409\UsersGuide.ch..
Maintaining Your Multifunction Printer Page 14 of 24 3. Close the separator roller cover until both sides click into place. 4. Load paper into the tray and replace it into the multifunction printer. Removing the Used Separator Roller Inside the Multifunction mk:@MSITStore:C:\Users\14JMIS~1\AppData\Local\Temp\Rar$DIa0.409\UsersGuide.ch...
Maintaining Your Multifunction Printer Page 15 of 24 Printer 1. Pull the tray out of the multifunction printer until it stops. Hold the tray with both hands, lift the front slightly, and remove it from the multifunction printer. 2. Turn the separator roller until the roller hook can be seen. NOTE: The roller is located approximately 165 mm (6.5 in.) inside the machine as measured from the face of the paper tray opening. 3.
Maintaining Your Multifunction Printer Page 16 of 24 4. Repeat steps 2 and 3 to remove the other separator roller from the inside of the multifunction printer. Installing the New Separator Roller Inside the Multifunction Printer 1. Align the hole of the new separator roller with the axle. mk:@MSITStore:C:\Users\14JMIS~1\AppData\Local\Temp\Rar$DIa0.409\UsersGuide.ch...
Maintaining Your Multifunction Printer Page 17 of 24 2. Slide the separator roller along the axle so the protrusions fit completely into the slots and the roller hook re-seats into the groove on the axle. 3. Replace the tray into the multifunction printer. Replacing the Transfer Belt Unit CAUTION: Before performing any of the following procedures, read and follow the safety instructions in your Owner's Manual or Product Information Guide.
Maintaining Your Multifunction Printer Page 18 of 24 does not provide warranty coverage for problems caused by using accessories, parts, or components not supplied by Dell. Removing the Used Transfer Belt Unit NOTE: Remove any print jobs from the output tray, and close the multipurpose feeder cover before opening the front cover. 1. Ensure that the multifunction printer is turned off. 2. Push the button (right side) and open the front cover. 3.
Maintaining Your Multifunction Printer Page 19 of 24 CAUTION: Do not touch the inside of the multifunction printer. Some parts may be hot. Allow time for the multifunction printer to cool before attempting to remove parts in this area. 4. Hold both sides of the transfer belt unit with both hands and pull up the left side of the unit until the peg on the left side comes out of the groove. Then, shift the transfer belt unit to the right and remove the unit from the multifunction printer.
Maintaining Your Multifunction Printer Page 20 of 24 4. Remove the film cover from the installed transfer belt unit and discard. 5. Close the front cover. mk:@MSITStore:C:\Users\14JMIS~1\AppData\Local\Temp\Rar$DIa0.409\UsersGuide.ch...
Maintaining Your Multifunction Printer Page 21 of 24 Adjusting Color Registration To adjust the color registration when you first install the multifunction printer or after moving it to a new location, follow the procedure below. See "Operator Panel" and "Color Reg Adjust" for information about the operator panel. Printing the Color Registration Chart Use the operator panel to print the color registration chart. 1. Press until >SETUP appears, and then press . 2.
Maintaining Your Multifunction Printer Page 22 of 24 Entering Values Using the operator panel, enter the values that you found in the color registration chart to make adjustments. 1. Press until >SETUP appears, and then press . 2. Press until >Admin Menu appears, and then press 3. Press until >Maintenance appears, and then press 4. Press until >Color Reg Adjust appears, and then press 5. Press until >Enter Number appears, and then press .
Maintaining Your Multifunction Printer Page 23 of 24 3. Wipe the surface of the document feeder glass and ADF glass until it is clean and dry. 1 White Sheet NOTE: Handle with care. 2 Document Cover 3 ADF Glass 4 Document Feeder Glass 4. Wipe the underside of the white document cover and white sheet until it is clean and dry. 5. Close the document cover. Cleaning the Roller in the ADF mk:@MSITStore:C:\Users\14JMIS~1\AppData\Local\Temp\Rar$DIa0.409\UsersGuide.ch...
Maintaining Your Multifunction Printer Page 24 of 24 Keeping the two rollers in the ADF clean helps ensure the best possible copies. Dell recommends cleaning the rollers at regular intervals. 1. Open the cover of the ADF. 2. Wipe the roller with a dry soft lint-free cloth or paper towel until it is clean. If the rollers get soiled with ink stains, paper from the ADF may also be soiled.
Removing Options Page 1 of 11 Removing Options If the printer location needs to change or the multifunction printer and print media handling options need to be shipped to a new location, all print media handling options must be removed from the multifunction printer. For shipping, pack the multifunction printer and print media handling options securely to avoid damage.
Removing Options Page 2 of 11 4. Gently lift the multifunction printer off the tray module, and place it on a level surface. CAUTION: To lift the multifunction printer safely, remove the print cartridges and lift it with two people facing the front and back. Never try to lift the multifunction printer while facing its right and left sides. 5. Insert the tray into the multifunction printer, and push until it stops. mk:@MSITStore:C:\Users\14JMIS~1\AppData\Local\Temp\Rar$DIa0.409\UsersGuide.ch...
Removing Options Page 3 of 11 Removing the Optional Duplexer NOTICE: Ensure nothing touches or scratches the surface (black-colored film) of the transfer belt unit. Scratches, dirt, or oil from your hands on the film of the transfer belt unit may reduce print quality. NOTICE: To protect the drums of the print cartridges against bright light, close the front cover within five minutes. If the front cover remains open for more than five minutes, print quality may deteriorate. 1.
Removing Options Page 4 of 11 4. Hold the latch of the duplexer as shown in the following illustration and pull out the duplexer from the multifunction printer. 5. Close the transfer belt unit by pulling it down. mk:@MSITStore:C:\Users\14JMIS~1\AppData\Local\Temp\Rar$DIa0.409\UsersGuide.ch...
Removing Options Page 5 of 11 6. Close the front cover. Removing the Optional Memory Card 1. Ensure that the multifunction printer is turned off and unplug all cables including the power cord from the rear of the multifunction printer. 2. Turn the screw on the control board cover gently in a counter-clockwise direction and open the cover. mk:@MSITStore:C:\Users\14JMIS~1\AppData\Local\Temp\Rar$DIa0.409\UsersGuide.ch...
Removing Options Page 6 of 11 3. Pull the latches on both edges of the socket outward at the same time to raise the memory card up. 4. Hold the memory card and pull it out. mk:@MSITStore:C:\Users\14JMIS~1\AppData\Local\Temp\Rar$DIa0.409\UsersGuide.ch...
Removing Options Page 7 of 11 5. Close the control board cover and turn the screw clockwise. Removing the Optional Multi-Protocol Card NOTE: If the optional wireless printer adapter is also installed, it must be removed first. 1. Ensure that the multifunction printer is turned off and unplug all cables including the power cord from the rear of the multifunction printer. 2. Turn the screw on the control board cover gently in counter-clockwise direction and open the cover.
Removing Options Page 8 of 11 3. Remove the two screws from the multipurpose card on the back side of the control board. 4. Hold the multi-protocol card and remove it from the control board. 5. Close the control board cover and turn the screw clockwise. mk:@MSITStore:C:\Users\14JMIS~1\AppData\Local\Temp\Rar$DIa0.409\UsersGuide.ch...
Removing Options Page 9 of 11 Removing the Wireless Printer Adapter 1. Ensure that the multifunction printer is turned off. 2. Turn the screw on the control board cover gently in a counter-clockwise direction and open the cover. 3. Remove the wireless printer adapter cap from the control board by releasing the cap's hooks. mk:@MSITStore:C:\Users\14JMIS~1\AppData\Local\Temp\Rar$DIa0.409\UsersGuide.ch...
Removing Options Page 10 of 11 4. Remove the wireless printer adapter from the multifunction printer. 5. Attach the plate by tightening the screw on the back side of the multifunction printer to cover the wireless printer adapter socket. mk:@MSITStore:C:\Users\14JMIS~1\AppData\Local\Temp\Rar$DIa0.409\UsersGuide.ch...
Removing Options Page 11 of 11 6. Close the control board cover and turn the screw clockwise. mk:@MSITStore:C:\Users\14JMIS~1\AppData\Local\Temp\Rar$DIa0.409\UsersGuide.ch...
Printer Specifications Page 1 of 6 Printer Specifications OS Compatibility Power Supply Dimensions Memory Page Description Language (PDL)/Emulation, Operating System, and Interface Environmental Cables Copier Specification Scanner Specification Facsimile Specifications OS Compatibility Your Dell™ Multifunction Color Laser Printer 3115cn is compatible with Windows® (Windows Vista®, ® ® Windows XP, Windows XP 64-bit Edition, Windows Server 2003, Windows Server 2003 Enterprise x64 Edition, Windows Server®
Printer Specifications Page 2 of 6 Power Supply Rated Voltage Frequency Current 220-240 VAC 110-127 VAC 50/60 Hz 50/60 Hz 5A 11 A Dimensions Height: 730 mm (28.74 in.) Width: 460 mm (18.11 in.) Depth: 520 mm (20.47 in.) Weight (not including cartridge): 35 kg (77.
Printer Specifications Page 3 of 6 Optional network: IEEE802.11b/802.11g (Wireless) MIB Compatibility A Management Information Base (MIB) is a database containing information about network devices (such as adapters, bridges, routers, or computers). This information helps network administrators manage the network (analyze performance, traffic, errors, and so on).
Printer Specifications Page 4 of 6 Cables Your interconnection cable must meet the following requirements: Connection type Connection specifications and symbols 1 Wall jack connector 2 Phone connector 3 USB USB2.0 4 Parallel IEEE 1284 5 Wireless IEEE802.11b/802.11g 6 Ethernet 10 Base-T/100 Base-TX Copier Specification mk:@MSITStore:C:\Users\14JMIS~1\AppData\Local\Temp\Rar$DIa0.409\UsersGuide.ch...
Printer Specifications Page 5 of 6 Item Description Copy Resolution Optical: 600 x 600 dpi Copy Speed Color 17 cpm, Black&White 30 cpm (In case when scanned from document feeder glass, and feed paper from standard tray) Paper Size A5, A4, B5, Executive, Letter, Legal 13", Legal 14 Zoom Rate Document feeder glass: 25% - 400%, ADF: 25% - 400% Multiple copies 1 - 99 pages Copy mode (=Original Text, Text&Photo, Photo, Best Type) Scanning method Charge coupled device (CCD) module Scanner Specific
Printer Specifications Page 6 of 6 Transmission speed Approx. 3 seconds/page *Transmission time applies to memory transmission of text data with ECM compression using only ITU-T No.1 Chart. Scanning speed Document glass: approx. 3 seconds/A4 (at standard fax resolution mode) ADF: approx. 5 seconds/Letter (at standard fax resolution mode), 7.
Safety and Regulatory Information Page 1 of 7 Safety and Regulatory Information Safety Information Regulatory Information Noise Emissions Levels Laser Notice Energy Star MSDS Materials for Dell Printer Telecommunication Line Cord When Using the Telephone Equipment Safety Information CAUTION: Read and follow all safety instructions in your Owner's Manual or Product Information Guide prior to setting up and operating your printer.
Safety and Regulatory Information z Page 2 of 7 Consult your point of purchase or service representative for additional suggestions. The manufacturer is not responsible for any radio or television interference caused by using other than recommended cables or by unauthorized changes or modifications to this equipment. Unauthorized changes or modifications could void the user's authority to operate this equipment.
Safety and Regulatory Information Page 3 of 7 Avis de Conformité aux Normes de l'industrie du Canada Cet appareil numérique de la classe B respecte toutes les exigences du Règlement sur le matériel brouilleur du Canada. European Community (EC) Directives Conformity This product has been determined to be in compliance with 73/23/EEC (Low Voltage Directive), 89/336/EEC (EMC Directive), and amendments of the European Union.
Safety and Regulatory Information Page 4 of 7 Información NOM (únicamente para México) La información siguiente se proporciona en el dispositivo o en los dispositivos descritos en este documento, en cumplimiento con los requisitos de la Norma Oficial Mexicana (NOM): Exportador: Dell Inc. One Dell Way Round Rock, TX 78682 Importador: Dell Computer de México, S.A. de C.V. Paseo de la Reforma 2620 - 11° Piso Col. Lomas Altas 11950 México, D.F. Enviar a: Dell Computer de México, S.A. de C.V.
Safety and Regulatory Information Page 5 of 7 1-meter average sound power level, B Printing Without option: 6.3B With full option: 6.8B Idling 4B Laser Notice The printer is certified in the U.S. to conform to the requirements of 21CFR, Chapter 1, Subchapter J for Class I (1) laser products, and elsewhere is certified as a Class I laser product conforming to the requirements of IEC 60825-1. Class I laser products are not considered to be hazardous.
Safety and Regulatory Information Page 6 of 7 The EPA's ENERGY STAR® program is a joint effort between the EPA and manufacturers to reduce air pollution by promoting energy-efficient products. You can help reduce electricity usage and its side effects by turning off your product when it is not in use for extended periods of time, particularly at night and on weekends. MSDS Materials for Dell Printer All MSDS materials for Dell Printers can be found at the following URL: http://www1.us.dell.
Safety and Regulatory Information z Do not use the telephone to report a gas leak in the vicinity of the leak. z Use only the power cord indicated in this manual. Page 7 of 7 mk:@MSITStore:C:\Users\14JMIS~1\AppData\Local\Temp\Rar$DIa0.409\UsersGuide.ch...
Appendix Page 1 of 2 Appendix Dell Technical Support Policy Contacting Dell Warranty and Return Policy Dell Technical Support Policy Technician-assisted technical support requires the cooperation and participation of the customer in the troubleshooting process and provides for restoration of the operating system, software program and hardware drivers to the original default configuration as shipped from Dell, as well as the verification of appropriate functionality of the printer and all Dell-installed h
Appendix Page 2 of 2 Warranty and Return Policy Dell Computer Corporation ("Dell") manufactures its hardware products from parts and components that are new or equivalent to new in accordance with industry-standard practices. For information about the Dell warranty for your printer, see the Owner's Manual or Product Information Guide. mk:@MSITStore:C:\Users\14JMIS~1\AppData\Local\Temp\Rar$DIa0.409\UsersGuide.ch...