
User`s guide
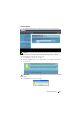
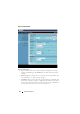

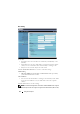
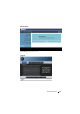
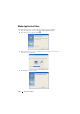
Table Of Contents
- 1 Your Dell Projector 7
- 2 Connecting Your Projector 10
- 3 Using Your Projector 24
- 4 Troubleshooting Your Projector 101
- 5 Specifications 108
- 6 Contacting Dell 115
- 7 Appendix: Glossary 116
- Your Dell Projector
- Connecting Your Projector
- Using Your Projector
- Turning Your Projector On
- Turning Your Projector Off
- Adjusting the Projected Image
- Adjusting the Projector Zoom and Focus
- Adjusting Projection Image Size
- Using the Control Panel
- Using the Remote Control
- Installing the Remote Control Batteries
- Operating Range With Remote Control
- Using the On-Screen Display
- Wireless Networking Installation
- Presentation to Go (PtG) Installation
- Audio Projection Installation
- Video Stream Installation
- Managing the Projector From Web Management
- Make Application Token
- Troubleshooting Your Projector
- Specifications
- Contacting Dell
- Appendix: Glossary

Using Your Projector 99
Windows Firewall 1
Open Windows Firewall (Start > All Programs >
Control Panel). Double-click on
Windows Firewall
.
2
On the
General
tab, uncheck
Don’t allow
exceptions
.
3
On the
Exceptions
tab, click the
Add Program...
button.
4
Find and select
Dell 4220 or 4320 Projector
from the
list of programs, then click
OK
.
5
Click
OK
to confirm exceptions settings.
Zone Alarm 1
Open Zone Alarm Firewall (Start > All Programs >
Zone Labs > Zone Labs Center).
2
On the
Program Control
page, find and select
Dell 4220 or 4320 Projector
from the list.
3
Right-click on its
Access-Trusted
column.
4
Select
Allow
from the pop-up menu.
5
Right-click and select
Allow
for the
Access-Internet
,
Server-Trusted
, and
Server-Internet
columns.
Firewall Protection Configuration