Dell™ Wireless 4350 Small Network Access Point User's Guide Contents Introduction Overview Wireless Networking Overview A Look at the Hardware Installation and Configuration Configuration of the Access Point Connecting the Access Point to the network How to obtain the IP address of the Access Point Setting Wireless Encryption in Your Access Point Turning Off Broadcast SSID Setting Up File and Printer
Back to Contents Page Introduction: Dell™ Wireless 4350 Small Network Access Point User's Guide Overview Wireless Networking Overview A Look at the Hardware Overview The Dell Wireless 4350 Small Network Access Point is an 802.11b/g wireless access point that allows wireless clients access to a corporate network. The Access Point can be configured in the following ways: Wireless hub (Access Point): In this mode the Access Point connects wireless computers to the corporate network.
The Dell Wireless 4350 Small Network Access Point supports up to 64 wireless clients. It runs at speeds up to 54 Megabits per second (Mbps), and the LAN (wired) port runs at 10/100 Mbps. The maximum distance between the Access Point and each Wireless computer is 300 feet. This distance may be less depending on your environment. By default, the Dell Wireless 4350 Small Network Access Point provides the following functionality: a wireless access point using wireless as the wireless network name.
Back to Contents Page Wireless Networking Overview: Dell™ Wireless 4350 Small Network Access Point User's Guide Wireless Local Area Network (WLAN) Identifying a WLAN Encryption Automatic Rate Selection and Rate Scaling Wireless Local Area Network (WLAN) A Local Area Network (LAN) is a network in one location. Users at that location can share files, printers, and other services. In a LAN, a networked computer that requests services is called a client.
A common way of implementing security and protecting information is encryption. Encryption applies a set of instructions, called an algorithm, to information. The instructions combine the plain or clear text of information with a sequence of hexadecimal numbers, called an encryption key. Before transmitting information over the airwaves, the wireless client or access point encrypts or scrambles the information.
with each other. The Dell Wireless 4350 Small Network Access Point uses either hexadecimal digits or ASCII characters to create encryption keys. Hexadecimal digits include the numbers 0 to 9 and the letters A to F. For example, the decimal number 15 is represented as F in the hexadecimal numbering system. ASCII is the acronym for the American Standard Code for Information Interchange.
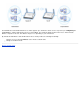
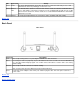
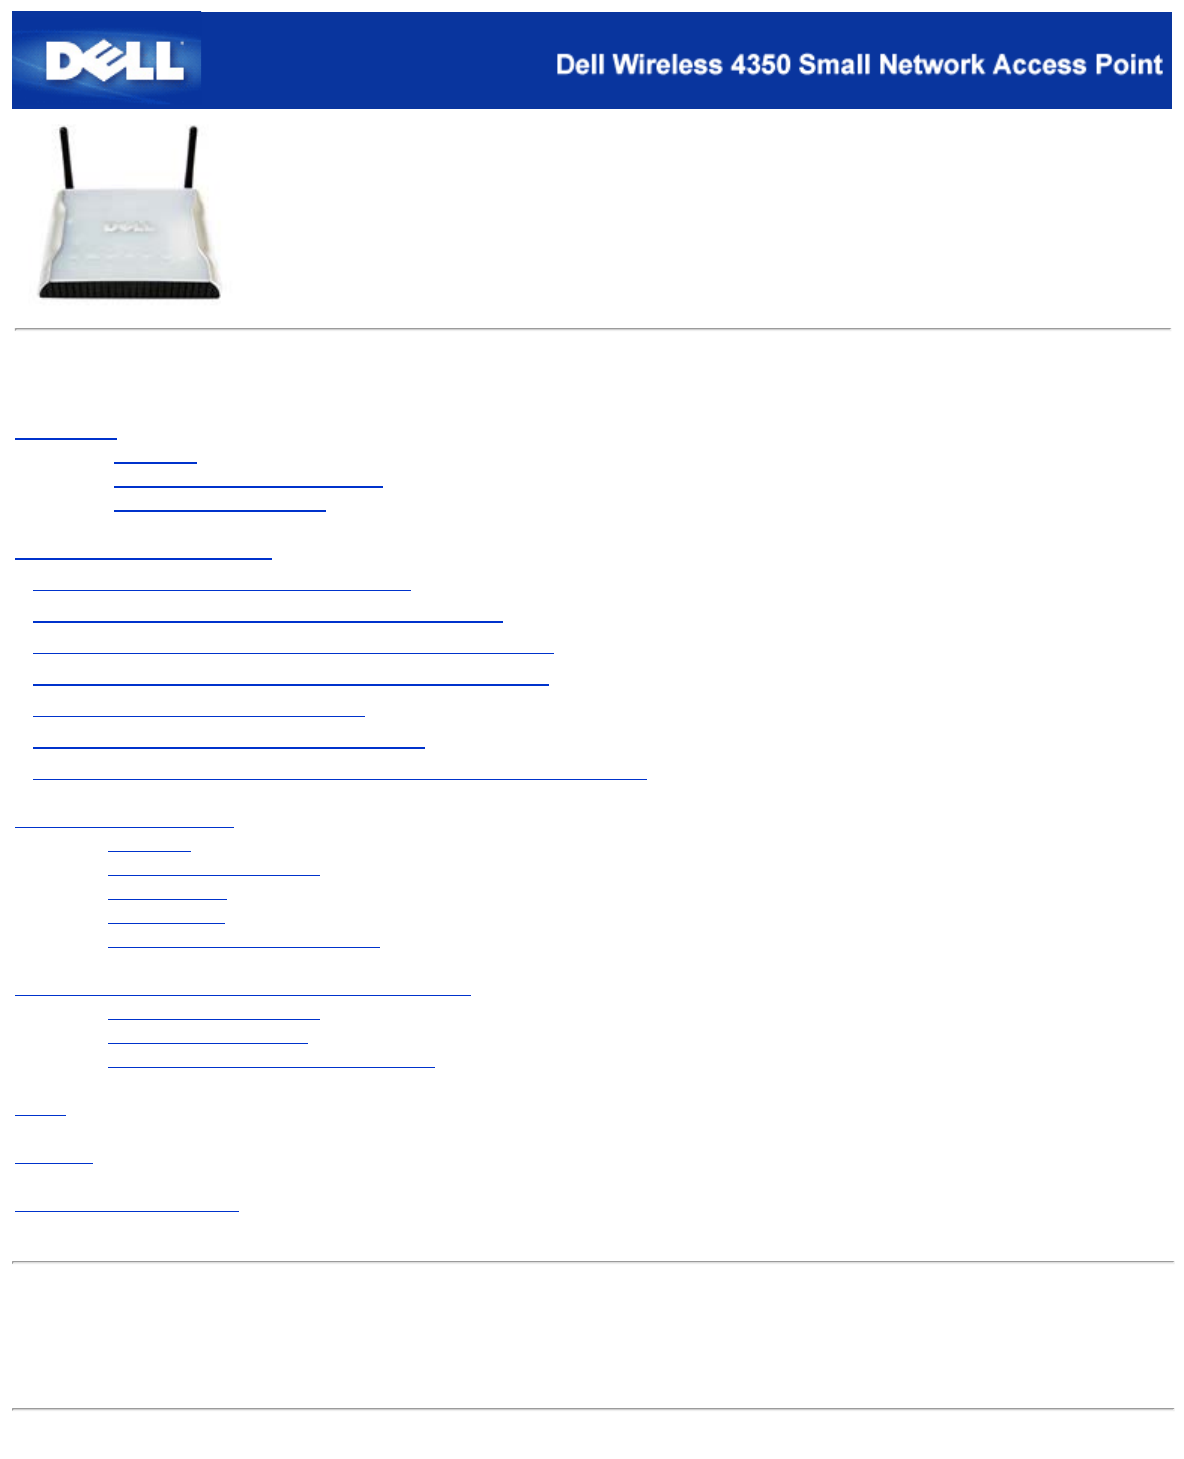
Back to Contents Page A Look at the Hardware: Dell™ Wireless 4350 Small Network Access Point User's Guide Front Panel Back Panel Front Panel The Dell Wireless 4350 Small Network Access Point has three Light Emitting Diodes (LEDs), or link lights, on its front side.
LED Power Represents Activity Power The Power LED will light up green when the device is powered on and ready for use. It will blink when the device is powering up or when it is reset Wireless Wireless The LED alternates between on and off when wireless clients are attached. It will blink when LAN there is data activity on the wireless network. The rate of blinking will vary with the rate of data transfer.
Back to Contents Page Installation and Configuration: Dell™ Wireless 4350 Small Network Access Point User's Guide Configuration of the Access Point Connecting the Access Point to the network How to obtain the IP address of the Access Point Setting Wireless Encryption in Your Access Point Turning Off Broadcast SSID Setting Up File and Printer Sharing How to setup wireless clients to connect to the Access Point Back to Contents Page
Back to Contents Page Configuration of the Access Point NOTE:It is recommended that you configure the Dell Wireless 4350 Small Network Access Point with the Setup Wizard provided on the Dell Wireless 4350 Small Network Access Point CD. NOTE:Advanced users can configure the Dell Wireless 4350 Small Network Access Point with the web-based configuration utility which can be accessed by browsing to the IP address of the access point.
6. Select Use the following IP address in the Internet Protocol (TCP/IP) Properties window. 7. Input your IP address and Sumnet mask in the appropriate fields. (The IP addresses on your network must be within the same range (e.g. 192.168.2.3 or 192.168.2.4). The subnet mask must be the same for all computers on the network (i.e. 255.255.255.0). 8. Click OK.
Back to Contents Page Connecting the Access Point to the network NOTE:It is recommended that you follow the instructions in the Quick Start Guide on connecting the Dell Wireless 4350 Small Network Access Point to the network. The following are the relevant steps on connecting the access point to your network. 1. Find the optimum location for your Access Point. The Access Point should be located at the center of your wireless network, ideally with line of sight to all your mobile stations. 2.
Back to Contents Page How to obtain the IP Address of the Access Point To browse to the Dell Wireless 4350 Small Network Access Point's web-based configuration tool, you must known the access point's IP address. The IP address of the access point can be either a static IP address or a dynamically assigned IP address. The default configuration for the access point is with a static IP address of 192.168.2.2.
Back to Contents Page Setting Wireless Encryption in Your Access Point Without wireless security options configured in your network, an eavesdropper within your wireless range may be able to access the network and the data that is being transmitted over it. The Dell Wireless 4350 Small Network Access Point provides Wired Equivalent Privacy (WEP) and Wi-Fi Protected Access (WPA) encryption for wireless security. WPA is an upgrade to the WEP standard for securing your wireless network.
3. The WPA Group Rekey Interval value specifies how often the key “rotates” or changes. 4. WPA Encryption allows you to select one of two possible encryption methods—TKIP and AES. Choose one that your wireless clients support. 5. Click the NEXT button, and then click Save and Restart to apply the changes. 6. Set up WPA-PSK on your wireless clients.
Back to Contents Page Turning Off Broadcast SSID 1. Log into the web configuration of your Access Point using it's IP address (for information on obtaining the Access Point's IP address see How to obtain the IP Address of the Access Point). The Enter Network Password login prompt appears. 2. Type the following text in the user name and password fields: "admin". 3. Click Advanced Settings and then select Advanced Wireless from the drop down menu. 4. Check Yes for Hide my wireless network 5. Click Submit.
Back to Contents Page Setting Up File & Printer Sharing Installing File and Printer Sharing Sharing a printer Sharing files Installing the File & Printer Sharing Follow the instructions below to install the file and printer sharing service. For Windows 2000 and XP 1. Right-click the My Network Places icon (on the desktop in Windows 2000 and in the Start button menu in Windows XP) and left-click to select Properties in menu. 2. Right-click the Local Area Connection icon and select Properties in the menu.
4. On the next screen, select Network printer, and then click the Next button. 5. Click the Browse button and click to select the shared printer. 6. Follow the on-screen instructions to complete. Sharing files You can share files on your computer so that users on other computers on your network can view them. 1. In Microsoft Windows Explorer, right-click on the file, folder, or drive letter you wish to share and left-click Sharing. 2. Click Share As. 3.
Back to Contents Page How to setup wireless clients to connect to the Access Point NOTE:It is recommended that you connect wireless clients to the Dell Wireless 4350 Small Network Access Point using the Setup Wizard provided on the Dell Wireless 4350 Small Network Access Point CD.
Back to Contents Page Using Your Access Point: Dell™ Wireless 4350 Small Network Access Point User's Guide Overview Factory Default Settings Setup Wizard Control Utility Web-Based Configuration Tool Overview Factory Default Settings: Your Wireless 4350 Small Network Access Point came with factory default settings that should work for the majority of the network usage scenarios. However, there are cases where your network environment may require a different access point configuration.
Back to Contents Page Factory Default Settings: Dell™ Wireless 4350 Access Network Access Point User's Guide Dell pre-configures the Dell Wireless 4350 Small Network Access Point with the following settings: NOTE:If you lose track of the device settings, you can reset the router by pushing the reset button to restore these settings back to your router. Setting Default User Name admin Password admin AP Host Name Dell_4350_AP IP Address Static IP address of 192.168.2.2 Subnet Mask 255.255.255.
Back to Contents Page Setup Wizard: Dell™ Wireless 4350 Small Network Access Point User's Guide Introduction Launch the Setup Wizard Setup Wizard Screens Introduction The Setup Wizard is an easy-to-use program included on your Dell Wireless 4350 Small Network Access Point CD. It provides simplified steps for configuring the Access Point. The Setup Wizard displays a series of graphical illustrations on how to connect the Access Point to your computer.
X:\setup.exe where X is the drive letter of your CD drive. Once the Setup Wizard has been launched, you will be guided through a series of windows. These windows are illustrated below along with an explanation on their functionalities. Back to Top Setup Wizard Screens Welcome Menu This menu offers several options to select from. · AP Configuration Begin connecting your access point to the network, it's wireless and security parameters need to be configured.
AP Configuration Click AP Configuration if you want to configure the access point before connecting it to the network and follow the steps described below. Step 1 illustrates how the computer is to be connected to the Dell Wireless 4350 Small Network Access Point. Configure AP: Step 1 Step 2 illustrates how the Dell Wireless 4350 Small Network Access Point is connected to the power supply.
Step 3 informs the user that you need to assign your computer a static IP address within the same range as the access point. .
Step 4 gives the user the option to change the wireless network’s SSID and channel number.
Step 5 gives the user the option to enable WEP wireless encryption and to specify the WEP encryption key values.
Step 6 gives the user the option to either change the static IP address or set the access point as a DHCP client.
Step 7 informs the user to wait until the Access Point configuration is finished.
. Step 8 is a congratulations screen if the user has successfully configured the Dell Wireless 4350 Small Network Access Point.
Step 9 is an optional screen that displays the configuration settings chosen by the user.
Back to Top Connect Wireless Computer To connect computers to your wireless network after you have successfully configured and installed the Access Point, place the Dell Wireless 4350 Small Network Access Point CD into each computer and run the Setup Wizard. Click Connect Wireless Computer to add each wireless computer to your network.
Step 2 asks the user to wait while the Setup Wizard does a site survey scanning for the requested wireless network.
Step 3 guides the user through using the Windows wireless configuration utility to configure the wireless client.
Step 4 guides the user through the remaining steps in using the Windows wireless configuration utility to configure the wireless client.
Step 5 informs the user to wait while the wireless client configuration is being verified.
Step 6 informs the user that the wireless client is successfully configured and is now on the wireless network.
Setup Wireless Computer - Win XP (WEP Encryption) Pressing the Setup Wireless Computer button displays instructions to connect computers to the network through a wireless connection. Step 1 asks the user to enter the SSID of the wireless network that you wish to connect to.
Step 2 asks the user to wait while the Setup Wizard does a site survey scanning for the requested wireless network.
Step 3 asks the user to enter the WEP key of the wireless network that they wish to connect to.
Step 4 guides the user through using the Windows wireless configuration utility to configure the wireless client.
Step 5 guides the user through the remaining steps in using the Windows wireless configuration utility to configure the wireless client.
Step 6 informs the user to wait while the wireless client configuration is being verified.
Step 7 informs the user that the wireless client is successfully configured and is now on the wireless network.
Setup Wireless Computer - Win XP SP2 (No Encryption) Pressing the Setup Wireless Computer button displays instructions to connect computers to the network through a wireless connection. Step 1 asks the user to enter the SSID of the wireless network that you wish to connect to.
Step 2 asks the user to wait while the Setup Wizard does a site survey scanning for the requested wireless network.
Step 3 informs the user to wait while the wireless client is being configured to join the network.
Step 4 informs the user that the wireless client is successfully configured and is now on the wireless network.
Setup Wireless Computer - Win XP SP2 (WEP Encryption) Pressing the Setup Wireless Computer button displays instructions to connect computers to the network through a wireless connection. Step 1 asks the user to enter the SSID of the wireless network that you wish to connect to.
Step 2 asks the user to wait while the Setup Wizard does a site survey scanning for the requested wireless network.
Step 3 asks the user to enter the WEP key of the wireless network that they wish to connect to.
Step 4 informs the user to wait while the wireless client is being configured to join the network.
Step 5 informs the user that the wireless client is successfully configured and is now on the wireless network.
Back to Top Back to Contents Page
Back to Contents Page Control Utility: Dell™ Wireless 4350 Small Network Access Point User's Guide The Control Utility is Windows-based software that allows you to configure your Access Point and monitor the status of your Dell Wireless 4350 Small Network Access Point.
Back to Top Start the Control Utility The control utility program will run automatically upon each computer startup by default. If the utility does not start automatically, run the Dell Wireless 4350 Small Network Access Point Dell Control Utility from the Start menu. Once running, a access point icon is created in the system tray in the lower right corner of your screen. If you have a connection to the access point, the system tray icon looks gray and white NOTE: If the icon is red .
Back to Contents Page Web-based Configuration Tool: Dell™ Wireless 4350 Small Network Access Point User's Guide Overview Basic Settings Device Status System Tools Advanced Settings Log Off Overview The web-based configuration tool enables you to set up advanced network configuration for your Dell Wireless 4350 Small Network Access Point. Follow the instructions below to gain access to the web tool. NOTE:Microsoft Internet Explorer 4.0 or higher or Netscape 4.
Back to Top Log Off The Log Off button logs the user off the web based configuration tool. This configuration tool only allows access to one user at a time.
Back to Contents Page Technical Specifications and Regulatory Information: Dell™ Wireless 4350 Small Network Access Point User's Guide Technical Specifications Regulatory Information Limited Warranties and Return Policy Wireless Interoperability The Dell Wireless 4350 Small Network Access Point products are designed to be interoperable with any wireless LAN product that is based on direct sequence spread spectrum (DSSS) and orthogonal frequency division multiplexing (OFDM) radio technology and to comply w
· Operating Temperature 0° to 40° C (32° F to 104° F) Power specification · Storage Temperature 0° to 70° C (32° F to 158° F) Receive Sensitivity · 11Mbps: 10-5 BER @ -80 dBm, typical · 54Mbps: 10-5 BER @ -65 dBm, typical Transmit Power · Normal Temp Range: ±12 dBm DC power supply · Input: AC 100-250 50-60 Hz 1A · Output: 5V DC 2A Radio specification · Power over Ethernet Range: "Up to 100m" indoors and "Up to 450m" outdoors (open range) Fr
· 1 Mbps Utility Software Data Encryption: WEP (64/128 bit) and WPA · Setup Wizard software · Control Utility software Back to Top Regulatory Information The Dell Wireless 4350 Small Network Access Point device must be installed and used in strict accordance with the manufacturer's instructions as described in the user documentation that comes with the product. For country-specific approvals, see Radio approvals.
There are few possibilities for outdoor use: On private property or on the private property of public persons, use is subject to a preliminary authorization procedure by the Ministry of Defence, with maximum authorized power of 100 mW in the 2446.5 - 2483.5 MHz band. Use outdoors on public property is not permitted. In the departments listed below, for the entire 2.
interference will not occur in a particular installation. If this equipment does cause harmful interference to radio or television reception (which can be determined by turning the equipment off and on), the user is encouraged to try to correct the interference by taking one or more of the following measures: Reorient or relocate the receiving antenna. Increase the distance between the equipment and the receiver.
- Problems caused by using accessories, parts, or components not supplied by us • Products with missing or altered service tags or serial numbers • Products for which we have not received payment THIS WARRANTY GIVES YOU SPECIFIC LEGAL RIGHTS, AND YOU MAY ALSO HAVE OTHER RIGHTS WHICH VARY FROM STATE TO STATE (OR JURISDICTION TO JURISDICTION). DELL'S RESPONSIBILITY FOR MALFUNCTIONS AND DEFECTS IN HARDWARE IS LIMITED TO REPAIR AND REPLACEMENT AS SET FORTH IN THIS WARRANTY STATEMENT.
When you contact us, we will issue a Return Material Authorization Number for you to include with your return. You must return the products to us in their original or equivalent packaging, prepay shipping charges, and insure the shipment or accept the risk if the product is lost or damaged in shipment. We will return the repaired or replacement products to you. We will pay to ship the repaired or replaced products to you if you use an address in the United States (excluding Puerto Rico and U.S.
(WHETHER IN CONTRACT, TORT, OR OTHERWISE, WHETHER PREEXISTING, PRESENT, OR FUTURE, AND INCLUDING STATUTORY, COMMON LAW, INTENTIONAL TORT, AND EQUITABLE CLAIMS) AGAINST DELL arising from or relating to this limited warranty, its interpretation, or the breach, termination, or validity thereof, the relationships which result from this limited warranty (including, to the full extent permitted by applicable law, relationships with third parties), Dell's advertising, or any related purchase SHALL BE RESOLVED EXCL
accessory products (for example: televisions, printers, projectors, MP3 players, PDAs, battery chargers, un-preinstalled third party software, wireless cards/access points/routers), including but not limited to those sold by or through Dell's "Software & Peripherals" or "Electronics & Accessories" groups, may be returned within twenty-one (21) days from the date on the packing slip or invoice, but a fifteen percent (15%) return fee may be deducted from any refund or credit.
CONDITIONS OF MERCHANTABILITY AND FITNESS FOR A PARTICULAR PURPOSE, STATUTORY OR OTHERWISE. SOME PROVINCES DO NOT ALLOW THE EXCLUSION OF CERTAIN IMPLIED WARRANTIES OR CONDITIONS, OR LIMITATIONS ON HOW LONG AN IMPLIED WARRANTY OR CONDITION LASTS. THEREFORE, THE FOREGOING EXCLUSIONS AND LIMITATIONS MAY NOT APPLY TO YOU.
. NOTE:Before you ship the product(s) to us, make sure to back up the data on the hard drive(s) and any other storage device(s) in the product(s). Remove any confidential, proprietary or personal information, removable media, such as floppy disks, CDs, or PC Cards. We are not responsible for any of your confidential, proprietary or personal information; lost or corrupted data; or damaged or lost removable media.
may be entered as a judgment in any court of competent jurisdiction. Information may be obtained and claims may be filed with the NAF at P.O. Box 50191, Minneapolis, MN 55405. May I transfer the limited warranty? Limited warranties on systems may be transferred if the current owner transfers ownership of the system and records the transfer with us. The limited warranty on Dell-branded memory may not be transferred.
we recommend and encourage you to contact the third-party software and peripheral product manufacturer or publisher directly. Dell-Branded Peripheral Products Dell does provide a limited warranty for new Dell-branded peripheral products (products for which Dell is listed as the manufacturer) such as monitors, batteries, memory, docking stations, and projectors).
fullest extent permitted by law. In the absence of applicable legislation, this Guarantee will be the end user's sole and exclusive remedy against Dell or any of its affiliates, and neither Dell nor any of its affiliates shall be liable for loss of profit or contracts, or any other indirect or consequential loss arising from negligence, breach of contract, or howsoever.
FAQs Hardware Installation: How do I install the Dell Wireless 4350 Small Network Access Point for optimal coverage? Can the Dell Wireless 4350 Small Network Access Point attach to a hub, switch, or router? What is the physical connection from the Dell Wireless 4350 Small Network Access Point to a wired network? Software Configuration Wireless Attributes Supported Features Troubleshooting Other Glossary Back to Contents How do I install the Dell™ Wireless 4350 Small Network Access Point
Access Point An Access Point is a device on the wireless network that receives and retransmits data. It allows computers with wireless network adapters to be connected, typically, to an Ethernet network. Client A client is a computer on a network. Domain Name System (or Service) (DNS) DNS is an Internet service that translates domain names into IP addresses. A DNS server keeps a database of host computers, their respective domain names, and IP addresses.
An Ethernet address is a unique, pre-programmed address, sometimes referred to as a media access control (MAC) address. Each computer on an Ethernet network has its own Ethernet address. This 12-digit hexadecimal address is encoded into the circuitry of the computer’s network adapter when it is manufactured. Other devices on the network use this address to identify the computer. This address is not the same as the IP address that is assigned to computers on TCP/IP networks.
Service Set Identifier (SSID) is more generic and is a 32-character name that uniquely identifies all the computers and equipments that make up a wireless network. A type of SSID is ESSID. Another type of SSID is Basic Service Set Identifier (BSSID). The BSSID is the MAC address of a wireless adapter or Access Point. Port A port is a connector on a networking device used to attach the network cable. Hubs and switches have numerous ports that connect to computers on the network.
Dell™ Wireless 4350 Small Network Access Point User's Guide Contents Introduction Overview Wireless Networking Overview A Look at the Hardware Installation and Configuration Configuration of the Access Point Connecting the Access Point to the network How to obtain the IP address of the Access Point Setting Wireless Encryption in Your Access Point Turning Off Broadcast SSID Setting Up File and Printer
Back to Contents Page Wireless Networking Overview: Dell™ Wireless 4350 Small Network Access Point User's Guide Wireless Local Area Network (WLAN) Identifying a WLAN Encryption Automatic Rate Selection and Rate Scaling Wireless Local Area Network (WLAN) A Local Area Network (LAN) is a network in one location. Users at that location can share files, printers, and other services. In a LAN, a networked computer that requests services is called a client.
A common way of implementing security and protecting information is encryption. Encryption applies a set of instructions, called an algorithm, to information. The instructions combine the plain or clear text of information with a sequence of hexadecimal numbers, called an encryption key. Before transmitting information over the airwaves, the wireless client or access point encrypts or scrambles the information.
with each other. The Dell Wireless 4350 Small Network Access Point uses either hexadecimal digits or ASCII characters to create encryption keys. Hexadecimal digits include the numbers 0 to 9 and the letters A to F. For example, the decimal number 15 is represented as F in the hexadecimal numbering system. ASCII is the acronym for the American Standard Code for Information Interchange.
Back to Contents Page A Look at the Hardware: Dell™ Wireless 4350 Small Network Access Point User's Guide Front Panel Back Panel Front Panel The Dell Wireless 4350 Small Network Access Point has three Light Emitting Diodes (LEDs), or link lights, on its front side.
LED Power Represents Activity Power The Power LED will light up green when the device is powered on and ready for use. It will blink when the device is powering up or when it is reset Wireless Wireless The LED alternates between on and off when wireless clients are attached. It will blink when LAN there is data activity on the wireless network. The rate of blinking will vary with the rate of data transfer.
Back to Contents Page Introduction: Dell™ Wireless 4350 Small Network Access Point User's Guide Overview Wireless Networking Overview A Look at the Hardware Overview The Dell Wireless 4350 Small Network Access Point is an 802.11b/g wireless access point that allows wireless clients access to a corporate network. The Access Point can be configured in the following ways: Wireless hub (Access Point): In this mode the Access Point connects wireless computers to the corporate network.
The Dell Wireless 4350 Small Network Access Point supports up to 64 wireless clients. It runs at speeds up to 54 Megabits per second (Mbps), and the LAN (wired) port runs at 10/100 Mbps. The maximum distance between the Access Point and each Wireless computer is 300 feet. This distance may be less depending on your environment. By default, the Dell Wireless 4350 Small Network Access Point provides the following functionality: a wireless access point using wireless as the wireless network name.
Back to Contents Page Configuration of the Access Point NOTE:It is recommended that you configure the Dell Wireless 4350 Small Network Access Point with the Setup Wizard provided on the Dell Wireless 4350 Small Network Access Point CD. NOTE:Advanced users can configure the Dell Wireless 4350 Small Network Access Point with the web-based configuration utility which can be accessed by browsing to the IP address of the access point.
6. Select Use the following IP address in the Internet Protocol (TCP/IP) Properties window. 7. Input your IP address and Sumnet mask in the appropriate fields. (The IP addresses on your network must be within the same range (e.g. 192.168.2.3 or 192.168.2.4). The subnet mask must be the same for all computers on the network (i.e. 255.255.255.0). 8. Click OK.
Back to Contents Page Connecting the Access Point to the network NOTE:It is recommended that you follow the instructions in the Quick Start Guide on connecting the Dell Wireless 4350 Small Network Access Point to the network. The following are the relevant steps on connecting the access point to your network. 1. Find the optimum location for your Access Point. The Access Point should be located at the center of your wireless network, ideally with line of sight to all your mobile stations. 2.
Back to Contents Page How to obtain the IP Address of the Access Point To browse to the Dell Wireless 4350 Small Network Access Point's web-based configuration tool, you must known the access point's IP address. The IP address of the access point can be either a static IP address or a dynamically assigned IP address. The default configuration for the access point is with a static IP address of 192.168.2.2.
Back to Contents Page Setting Wireless Encryption in Your Access Point Without wireless security options configured in your network, an eavesdropper within your wireless range may be able to access the network and the data that is being transmitted over it. The Dell Wireless 4350 Small Network Access Point provides Wired Equivalent Privacy (WEP) and Wi-Fi Protected Access (WPA) encryption for wireless security. WPA is an upgrade to the WEP standard for securing your wireless network.
3. The WPA Group Rekey Interval value specifies how often the key “rotates” or changes. 4. WPA Encryption allows you to select one of two possible encryption methods—TKIP and AES. Choose one that your wireless clients support. 5. Click the NEXT button, and then click Save and Restart to apply the changes. 6. Set up WPA-PSK on your wireless clients.
Back to Contents Page Turning Off Broadcast SSID 1. Log into the web configuration of your Access Point using it's IP address (for information on obtaining the Access Point's IP address see How to obtain the IP Address of the Access Point). The Enter Network Password login prompt appears. 2. Type the following text in the user name and password fields: "admin". 3. Click Advanced Settings and then select Advanced Wireless from the drop down menu. 4. Check Yes for Hide my wireless network 5. Click Submit.
Back to Contents Page Setting Up File & Printer Sharing Installing File and Printer Sharing Sharing a printer Sharing files Installing the File & Printer Sharing Follow the instructions below to install the file and printer sharing service. For Windows 2000 and XP 1. Right-click the My Network Places icon (on the desktop in Windows 2000 and in the Start button menu in Windows XP) and left-click to select Properties in menu. 2. Right-click the Local Area Connection icon and select Properties in the menu.
4. On the next screen, select Network printer, and then click the Next button. 5. Click the Browse button and click to select the shared printer. 6. Follow the on-screen instructions to complete. Sharing files You can share files on your computer so that users on other computers on your network can view them. 1. In Microsoft Windows Explorer, right-click on the file, folder, or drive letter you wish to share and left-click Sharing. 2. Click Share As. 3.
Back to Contents Page How to setup wireless clients to connect to the Access Point NOTE:It is recommended that you connect wireless clients to the Dell Wireless 4350 Small Network Access Point using the Setup Wizard provided on the Dell Wireless 4350 Small Network Access Point CD.
Back to Contents Page Installation and Configuration: Dell™ Wireless 4350 Small Network Access Point User's Guide Configuration of the Access Point Connecting the Access Point to the network How to obtain the IP address of the Access Point Setting Wireless Encryption in Your Access Point Turning Off Broadcast SSID Setting Up File and Printer Sharing How to setup wireless clients to connect to the Access Point Back to Contents Page
Back to Contents Page How to Configure the Access Point via the Control Utility: Dell™ Wireless 4350 Small Network Access Point User's Guide My Network Overview Wireless Settings Network Access Control Administration Diagnostics Advanced Settings My Network Overview This screen provides information about your network connection and settings. The left pane displays your connection status.
The Control Utility allows the user to manage multiple Dell Wireless 4350 Small Network Access Points on the network by allowing the user to configure an alternative access point to the default access point presented by the Control Utility. To configure an alternative access point, perform the following steps: 1. Click to select Configure Alternative AP. 2. Enter the IP Address and Subnet Mask of the access point to be configured into the IP Address and Subnet Mask fields. 3.
Saves current settings. · Restore Restores previous settings. Your Dell Wireless 4350 Small Network Access Point has an advanced security mechanism. It ensures the confidentiality of data, and also guards data against being modified. If you want to enable the security mechanism, click to select Enable Wireless Security. Wireless Settings WEP WEP Settings The Wired Equivalent Privacy (WEP) encryption defined in the 802.11 standard is used to protect wireless communication from eavesdropping.
character (or 10 hexadecimal digits). For 104(128)-bit encryption, enter a 13-character (or 26 hexadecimal digits) WEP key. · Default Key Select only one key out of the four provided in the Default Key field. Wireless Settings WPA-PSK WPA-PSK Settings Wi-Fi Protected Access (WPA) is an upgrade to the WEP standard for securing your wireless network. If you would like to secure your wireless network using WPA, you must have WPA support for your wireless clients.
Wireless Settings WPA 802.1x WPA-802.1x Settings · Radius Server IP, Radius Server Port and Shared Secret. The Radius Server IP, Radius Server Port and Shared Secret fields required to be populated with the relevant information. This information regarding the Radius authentication server can be obtained from the network administrator. · WPA Encryption WPA Encryption allows you to select one of two possible encryption methods—TKIP and AES. Choose one that your wireless clients support.
Allows you to edit entries. · Delete Deletes a record from the list. · Delete All Deletes all records from the list. · Restore Restores previous settings. Network Access Control MAC Access Control The MAC Access Control page allows you to control which local client computer is allowed to access the network through the Dell Wireless 4350 Small Network Access Point based on the client computer’s MAC address.
3. Click the Add button. The MAC Access Control: Add a Record window appears. 4. Enter the hexadecimal MAC address (for example, 00:11:22:33:44:55) that you want to grant or deny access in the Host MAC box. 5. Click the OK button to apply, or click the Cancel button to exit without making any changes. 6. You can click on the selected record and click again on its Host Name to enter the desired name for this record. 7.
NOTE:The system configuration files can only be used by the Control Utility on Dell Wireless 4350 Small Network Access Points. NOTE:Do not use the Control Utility to import configurations settings files created by the web based configuration tool. Change Password To prevent unauthorized administration changes to the access point, the access point is password protected. It is strongly recommended that you change the factory default password. 1. Click the To Change the Access Point Password button.
You can monitor the current status of your network connection in the Diagnostics menu. The network diagnostics can be activated by clicking the Start Diagnostics button on the bottom of the screen. When the detection is done, the screen will display either a PASS! or FAIL! message indicating whether the access point is connected to a network or not.
To configure the advanced settings of the access point, click the Login button to log in to the web-based configuration tool. The web-based configuration tool allows you to set up advanced network configurations for your Dell Wireless 4350 Small Network Access Point.
Back to Contents Page Factory Default Settings: Dell™ Wireless 4350 Access Network Access Point User's Guide Dell pre-configures the Dell Wireless 4350 Small Network Access Point with the following settings: NOTE:If you lose track of the device settings, you can reset the router by pushing the reset button to restore these settings back to your router. Setting Default User Name admin Password admin AP Host Name Dell_4350_AP IP Address Static IP address of 192.168.2.2 Subnet Mask 255.255.255.
Back to Contents Page Setup Wizard: Dell™ Wireless 4350 Small Network Access Point User's Guide Introduction Launch the Setup Wizard Setup Wizard Screens Introduction The Setup Wizard is an easy-to-use program included on your Dell Wireless 4350 Small Network Access Point CD. It provides simplified steps for configuring the Access Point. The Setup Wizard displays a series of graphical illustrations on how to connect the Access Point to your computer.
X:\setup.exe where X is the drive letter of your CD drive. Once the Setup Wizard has been launched, you will be guided through a series of windows. These windows are illustrated below along with an explanation on their functionalities. Back to Top Setup Wizard Screens Welcome Menu This menu offers several options to select from. · AP Configuration Begin connecting your access point to the network, it's wireless and security parameters need to be configured.
AP Configuration Click AP Configuration if you want to configure the access point before connecting it to the network and follow the steps described below. Step 1 illustrates how the computer is to be connected to the Dell Wireless 4350 Small Network Access Point. Configure AP: Step 1 Step 2 illustrates how the Dell Wireless 4350 Small Network Access Point is connected to the power supply.
Step 3 informs the user that you need to assign your computer a static IP address within the same range as the access point. .
Step 4 gives the user the option to change the wireless network’s SSID and channel number.
Step 5 gives the user the option to enable WEP wireless encryption and to specify the WEP encryption key values.
Step 6 gives the user the option to either change the static IP address or set the access point as a DHCP client.
Step 7 informs the user to wait until the Access Point configuration is finished.
. Step 8 is a congratulations screen if the user has successfully configured the Dell Wireless 4350 Small Network Access Point.
Step 9 is an optional screen that displays the configuration settings chosen by the user.
Back to Top Connect Wireless Computer To connect computers to your wireless network after you have successfully configured and installed the Access Point, place the Dell Wireless 4350 Small Network Access Point CD into each computer and run the Setup Wizard. Click Connect Wireless Computer to add each wireless computer to your network.
Step 2 asks the user to wait while the Setup Wizard does a site survey scanning for the requested wireless network.
Step 3 guides the user through using the Windows wireless configuration utility to configure the wireless client.
Step 4 guides the user through the remaining steps in using the Windows wireless configuration utility to configure the wireless client.
Step 5 informs the user to wait while the wireless client configuration is being verified.
Step 6 informs the user that the wireless client is successfully configured and is now on the wireless network.
Setup Wireless Computer - Win XP (WEP Encryption) Pressing the Setup Wireless Computer button displays instructions to connect computers to the network through a wireless connection. Step 1 asks the user to enter the SSID of the wireless network that you wish to connect to.
Step 2 asks the user to wait while the Setup Wizard does a site survey scanning for the requested wireless network.
Step 3 asks the user to enter the WEP key of the wireless network that they wish to connect to.
Step 4 guides the user through using the Windows wireless configuration utility to configure the wireless client.
Step 5 guides the user through the remaining steps in using the Windows wireless configuration utility to configure the wireless client.
Step 6 informs the user to wait while the wireless client configuration is being verified.
Step 7 informs the user that the wireless client is successfully configured and is now on the wireless network.
Setup Wireless Computer - Win XP SP2 (No Encryption) Pressing the Setup Wireless Computer button displays instructions to connect computers to the network through a wireless connection. Step 1 asks the user to enter the SSID of the wireless network that you wish to connect to.
Step 2 asks the user to wait while the Setup Wizard does a site survey scanning for the requested wireless network.
Step 3 informs the user to wait while the wireless client is being configured to join the network.
Step 4 informs the user that the wireless client is successfully configured and is now on the wireless network.
Setup Wireless Computer - Win XP SP2 (WEP Encryption) Pressing the Setup Wireless Computer button displays instructions to connect computers to the network through a wireless connection. Step 1 asks the user to enter the SSID of the wireless network that you wish to connect to.
Step 2 asks the user to wait while the Setup Wizard does a site survey scanning for the requested wireless network.
Step 3 asks the user to enter the WEP key of the wireless network that they wish to connect to.
Step 4 informs the user to wait while the wireless client is being configured to join the network.
Step 5 informs the user that the wireless client is successfully configured and is now on the wireless network.
Back to Top Back to Contents Page
Back to Contents Page Control Utility: Dell™ Wireless 4350 Small Network Access Point User's Guide The Control Utility is Windows-based software that allows you to configure your Access Point and monitor the status of your Dell Wireless 4350 Small Network Access Point.
Back to Top Start the Control Utility The control utility program will run automatically upon each computer startup by default. If the utility does not start automatically, run the Dell Wireless 4350 Small Network Access Point Dell Control Utility from the Start menu. Once running, a access point icon is created in the system tray in the lower right corner of your screen. If you have a connection to the access point, the system tray icon looks gray and white NOTE: If the icon is red .
Back to Contents Page Web-based Configuration Tool: Dell™ Wireless 4350 Small Network Access Point User's Guide Overview Basic Settings Device Status System Tools Advanced Settings Log Off Overview The web-based configuration tool enables you to set up advanced network configuration for your Dell Wireless 4350 Small Network Access Point. Follow the instructions below to gain access to the web tool. NOTE:Microsoft Internet Explorer 4.0 or higher or Netscape 4.
Back to Top Log Off The Log Off button logs the user off the web based configuration tool. This configuration tool only allows access to one user at a time.
Back to Contents Page Using Your Access Point: Dell™ Wireless 4350 Small Network Access Point User's Guide Overview Factory Default Settings Setup Wizard Control Utility Web-Based Configuration Tool Overview Factory Default Settings: Your Wireless 4350 Small Network Access Point came with factory default settings that should work for the majority of the network usage scenarios. However, there are cases where your network environment may require a different access point configuration.
Back to Contents Page How to Configure the Access Point via the Control Utility: Dell™ Wireless 4350 Small Network Access Point User's Guide My Network Overview Wireless Settings Network Access Control Administration Diagnostics Advanced Settings My Network Overview This screen provides information about your network connection and settings. The left pane displays your connection status.
The Control Utility allows the user to manage multiple Dell Wireless 4350 Small Network Access Points on the network by allowing the user to configure an alternative access point to the default access point presented by the Control Utility. To configure an alternative access point, perform the following steps: 1. Click to select Configure Alternative AP. 2. Enter the IP Address and Subnet Mask of the access point to be configured into the IP Address and Subnet Mask fields. 3.
Saves current settings. · Restore Restores previous settings. Your Dell Wireless 4350 Small Network Access Point has an advanced security mechanism. It ensures the confidentiality of data, and also guards data against being modified. If you want to enable the security mechanism, click to select Enable Wireless Security. Wireless Settings WEP WEP Settings The Wired Equivalent Privacy (WEP) encryption defined in the 802.11 standard is used to protect wireless communication from eavesdropping.
character (or 10 hexadecimal digits). For 104(128)-bit encryption, enter a 13-character (or 26 hexadecimal digits) WEP key. · Default Key Select only one key out of the four provided in the Default Key field. Wireless Settings WPA-PSK WPA-PSK Settings Wi-Fi Protected Access (WPA) is an upgrade to the WEP standard for securing your wireless network. If you would like to secure your wireless network using WPA, you must have WPA support for your wireless clients.
Wireless Settings WPA 802.1x WPA-802.1x Settings · Radius Server IP, Radius Server Port and Shared Secret. The Radius Server IP, Radius Server Port and Shared Secret fields required to be populated with the relevant information. This information regarding the Radius authentication server can be obtained from the network administrator. · WPA Encryption WPA Encryption allows you to select one of two possible encryption methods—TKIP and AES. Choose one that your wireless clients support.
Allows you to edit entries. · Delete Deletes a record from the list. · Delete All Deletes all records from the list. · Restore Restores previous settings. Network Access Control MAC Access Control The MAC Access Control page allows you to control which local client computer is allowed to access the network through the Dell Wireless 4350 Small Network Access Point based on the client computer’s MAC address.
3. Click the Add button. The MAC Access Control: Add a Record window appears. 4. Enter the hexadecimal MAC address (for example, 00:11:22:33:44:55) that you want to grant or deny access in the Host MAC box. 5. Click the OK button to apply, or click the Cancel button to exit without making any changes. 6. You can click on the selected record and click again on its Host Name to enter the desired name for this record. 7.
NOTE:The system configuration files can only be used by the Control Utility on Dell Wireless 4350 Small Network Access Points. NOTE:Do not use the Control Utility to import configurations settings files created by the web based configuration tool. Change Password To prevent unauthorized administration changes to the access point, the access point is password protected. It is strongly recommended that you change the factory default password. 1. Click the To Change the Access Point Password button.
You can monitor the current status of your network connection in the Diagnostics menu. The network diagnostics can be activated by clicking the Start Diagnostics button on the bottom of the screen. When the detection is done, the screen will display either a PASS! or FAIL! message indicating whether the access point is connected to a network or not.
To configure the advanced settings of the access point, click the Login button to log in to the web-based configuration tool. The web-based configuration tool allows you to set up advanced network configurations for your Dell Wireless 4350 Small Network Access Point.
Back to Contents Page Basic Settings: Dell™ Wireless 4350 Small Network Access Point User's Guide The following configuration options are included in Basic Settings: General Settings Wireless Settings Wireless Security Save & Apply NOTE:To implement the changes you make to the settings, you must save your settings and restart the access point. Otherwise, the access point uses the previous settings.
AP Host Name The AP Host Name is the network name that the Dell Wireless 4350 Small Network Access Point will have on a network. Back to Top Wireless Settings Wireless Settings NOTE:You must change each client’s wireless adapter settings to match the Dell Wireless 4350 Small Network Access Point settings. Use the factory defaults for the access point, unless the default settings have been changed. In this case, note the changes and use the new settings for each wireless network card.
Data encryption provides added security by encoding network communications using an encryption key. Your Dell Wireless 4350 Small Network Access Point, in conjunction with wireless network adapters that support encryption, can scramble your transmitted data to make it difficult for someone to eavesdrop or intercept your information. Two methods of data encryption are available: Wired Equivalent Privacy (WEP) and Wi-Fi Protected Access (WPA).
disconnects it from the rest of the network. Wireless Security WPA If you wish to enable WPA encryption, select WPA from the Network Encryption list. WPA is an upgrade to the WEP standard for securing your wireless network. If you would like to secure your wireless network using WPA, you must have WPA support for your wireless clients. If you are using a Dell Wireless wireless client, you can check for the availability of WPA-enabled software update for your wireless client at http://support.dell.com.
to the network. Note that the Key format must also match the setting for the wireless clients. · Key Format Key Format is a box that lists 2 items: Hexadecimal Digits (numbers 0 through 9 and letters A through F) and ASCII Characters (any letter, number, or symbol). Select the proper format for your key. If your wireless client(s) only support one of the two formats, be sure to specify the correct one.
· WPA Group Rekey Interval WPA Group Rekey Interval is used to specify the frequency of encryption key rotations. The lower the number, the faster your encryption key will rotate, however, setting this number too low may cause your wireless network to slow down. · WPA Encryption WPA Encryption has 2 choices: TKIP (Temporal Key Integrity Protocol) is the most commonly used encryption method. AES (Advanced Encryption Standard) can be used if your wireless clients do not support TKIP. WPA 802.
Back to Top Back to Contents Page
Back to Contents Page Device Status: Dell™ Wireless 4350 Small Network Access Point User's Guide The Device Status screen displays the basic network settings for your Dell Wireless 4350 Small Network Access Point. When changes are made to the network settings, those changes are updated on this screen. In addition, it graphically displays the current connection status for the access point and other devices in your network. Connections between network devices are shown with a yellow arrow.
Ethernet Settings Refer to the left side of the screen for the following LAN Ethernet settings and the Internet protocol (IP) settings for the Dell Wireless 4350 Small Network Access Point: Setting/Device AP IP LAN MAC AP Host Name Firmware Version Wireless Channel Network Name Information Displayed The IP address assigned to the Dell Wireless 4350 Small Network Access Point The MAC address for the LAN (Ethernet) interface The host name for the Dell Wireless 4350 Small Network Access Point (the default is
Back to Contents Page System Tools: Dell™ Wireless 4350 Small Network Access Point User's Guide Use the System Tools section to view the intruder detection log, the network activity log, system statistics and system diagnostics regarding the device. The System Tools section also includes features to import/export the device’s configuration settings, restore the default settings, upgrade the firmware and reset the device.
Network Activity Log Click to select Enable Network Activity Log to allow the user to see transmitted and received traffic from the Dell Wireless 4350 Small Network Access Point to the network. Back to Top Import/Export Settings Import/Export Settings The Dell Wireless 4350 Small Network Access Point allows the user to save the current configurations settings into a file on the computer and to load previously saved settings into the access point. Export Current Settings File: 1.
1. Click Browse to locate a previously saved configuration file to load into the access point. 2. Click Import to load the configuration file. The access point will automatically restart after loading the imported settings. NOTE:The configuration settings files can only be used by a web browser utility on Dell Wireless 4350 Small Network Access Points. NOTE:Do not use the web browser utility to import configurations settings files created by the windows-based Control Utility.
Back to Top Load Default Settings The Load Default Settings page allows you to reload the factory default configurations that came with the device. When this option is used, all settings are reset to the factory default value. This is equivalent to pressing and holding the Reset button on the back panel of the device for more than 5 seconds (for more details, refer to A Look at the Hardware).
Back to Top Upgrade Firmware Dell periodically releases firmware updates to provide improved performance or capabilities. Use the firmware upgrade feature to easily upgrade the firmware on your Dell Wireless 4350 Small Network Access Point. The Upgrade firmware page supports two methods for upgrading the firmware onto the access point (a) local file upgrade (b) Internet file upgrade. NOTE:Make sure the file you choose is an actual Dell Wireless 4350 Small Network Access Point firmware file.
Upgrade Firmware – Internet File The other option to upgrade firmware is through the Internet. The Dell Wireless 4350 Small Network Access Point can be configured to automatically check the internet for upgrades by entering the URL ftp.us.dell.com/network in the URL field and the number of hours to automatically check for upgrades into the hours field. The user can also click Check Internet Now to see if there is new firmware available for upgrading.
Back to Contents Page Advanced Settings: Dell™ Wireless 4350 Small Network Access Point User's Guide Time Zone Advanced Wireless Access Control Settings Administration Settings Wired Settings SSID Manager SNMP Rogue AP Detection NOTE:Dell technical support representatives do not support the configuration options in the Advanced Settings portion of the configuration program. These options are provided for your convenience only. However, the advanced settings are fully documented and explained in this guide.
Select your local time zone from the pull-down list, Please choose your local time zone. During the summer months, the clock will move one or several hours ahead (depending on geographical location). Different countries have different change dates, in most of the U.S and Canada, daylight saving time begins on the last Sunday of October and reverts back to standard time on the first Sunday of April. To enable daylight saving, click Yes for Enable Daylight Saving.
the use of a site survey tool. If you want to increase wireless network security, you can disable the transmission of the beacon packets. Click No to allow transmission of beacon packets from the access point. Click Yes to disable the transmission of beacon packets from the access point. Mode The setting allows the user to select the 802.11 mode that the Dell Wireless 4350 Small Network Access Point will use when communicating with wireless clients. Select 802.11b and 802.
The fragmentation threshold determines the size of data packets that will be fragmented before transmission. The available range is from 1 to 2346, with the default value being 2346 (Note: The fragmentation threshold is specified in bytes). Data packets that are smaller than the specified fragmentation threshold value will not be fragmented. Data packets that are larger than the fragmentation threshold will be fragmented into smaller packets and transmitted one at a time instead of all at once.
To Configure your Access Point back as a root AP: There are 2 options available to configure your access point back as a root AP (a) reset the device back to it's defaults by pressing the reset button on the device for at least 5 seconds or (b) connect a computer to the repeater AP via an ethernet cable and browse to the AP's default IP address of 192.168.2.1 and perform the following steps. 1. Click the option Enable this AP as a Root AP 2. Click the Submit button.
To enable access control in the access point, perform the following steps: 1. Click Yes to enable Enable MAC Access Control. 2. Click Yes to enable the appropriate table, the Grant Access Table or the Deny Access Table. 3. Click the Add button, a pop-up window will open, then enter the MAC address of the network card on the computer that you wish to add to the table. 4. Click Submit to enter the MAC address into the table. 5. Click Submit to enable the new table’s entries. 6.
Password Settings The Dell Wireless 4350 Small Network Access Point uses a password to authenticate the user before allowing the user access to the web configuration tool or Control Utility. If you would like to change the current password, click to select Change Your Password and enter the new password in both New Password and Retype Password fields. Write down the password and keep it in a secure location for future reference.
If the access point will obtain an IP address automatically from a DHCP server, select the Connection Type as DHCP. If you would like to assign the access point a static IP address, select the Connection Type as Static IP and enter an IP address, Subnet Mask and Default Gateway in the corresponding fields. If the access point will obtain DNS server information automatically from the network, select the Domain Name Server (DNS) as Dynamic.
To configure multiple SSID’s (VLAN-aware network): In a VLAN-aware network, the Dell Wireless 4350 Small Network Access Point can support three SSID’s (one of which is the Guest Access SSID). In this network, the user has the option of configuring VLAN tags to be associated with wireless traffic from each SSID. To add an extra SSID: 1. Click to select I'm on a VLAN aware network. 2. Click the Submit button. 3.
SSID supporting WEP and the guest SSID supporting no encryption. To enable the Guest Access SSID (VLAN-aware network): To enable Guest Access mode, the Dell Wireless 4350 Small Network Access Point must be part of a VLAN-aware network. Perform the following steps to enable the feature. 1. Click to select I’m on a VLAN-aware network. 2. Click to select Enable Guest Access. 3. Click the Submit button. 4.
To enable SNMP protocol support: 1. Click to select Enable SNMP. 2. The SNMP Community Names are passwords used in SNMP messages between the access point and the SNMP management system. A Read-Only community allows the management system to monitor the device, while a Read-Write community can both monitor and configure the device. Enter the Get and Set community names in the appropriate fields. 3.
Rogue AP Detection The Rogue AP Detection feature is an advanced feature that is used by network administrators to scan for adjacent access points. A table of detected access points is presented to the administrator and a determination if any rogue access points are present on the network can be made by verifying the SSID and MAC addresses.
There are three modes of operation for Rogue AP detection (a) Background scan (always-on), (b) Background scan (scheduled) & (c) Foreground scan. When the background scan is enabled, the access point will periodically scan the wireless channels (a single channel at a time for 400 ms) if and only if certain load conditions are met. Any wireless stations that are associated to the AP may experience a loss of the AP during the scan interval.
Back to Contents Page
How do I install the Dell™ Wireless 4350 Small Network Access Point for optimal coverage? Each Dell Wireless 4350 Small Network Access Point supports up to about a 150 to 200 foot radius, depending on obstacles and interference issues. For smaller installations a little experimentation provides good placement of the Dell Wireless 4350 Small Network Access Point.
FAQs Hardware Installation Software Configuration: How can I manage the Dell Wireless 4350 Small Network Access Point ? How do I locate the MAC address for the Dell Wireless 4350 Small Network Access Point? Wireless Attributes Supported Features Troubleshooting Other Glossary Back to Contents
FAQs Hardware Installation Software Configuration Wireless Attributes: What is the practical coverage of the Dell Wireless 4350 Small Network Access Point ? Does the signal travel through walls? What devices cause interference? Can I roam to another subnet with the Dell Wireless 4350 Small Network Access Point ? How to turn Off Broadcast SSID? Supported Features Troubleshooting Other Glossary Back to Contents
FAQs Hardware Installation Software Configuration Wireless Attributes Supported Features: Does the Dell Wireless 4350 Small Network Access Point support wireless repeating? Does the Dell Wireless 4350 Small Network Access Point support multiple SSID's? Does the Dell Wireless 4350 Small Network Access Point support rogue AP detection? Does the Dell Wireless 4350 Small Network Access Point support notebook computers with integrated wireless adapters and wireless adapters from vendors other than De
FAQs Hardware Installation Software Configuration Wireless Attributes Supported Features Troubleshooting: My computer is not connected to the Dell Wireless 4350 Small Network Access Point. What should I do? My browser does not display the web-based configuration tool. What should I do? The Dell Wireless 4350 Small Network Access Point CD Setup Wizard program does not run automatically after placing the CD-ROM into the CD-ROM drive.
FAQs Hardware Installation Software Configuration Wireless Attributes Supported Features Troubleshooting Other: How do I find out about firmware upgrades? What is the actual speed throughput for the Dell Wireless 4350 Small Network Access Point ? Are there any known health issues caused by Radio Frequency (RF) transmission from the Dell Wireless 4350 Small Network Access Point ? Is this a shared or switched technology medium? What is the difference between Bluetooth™ and 802.
Glossary Access Point Client Domain Name System (or Service) (DNS) Dynamic Host Configuration Protocol (DHCP) Encryption Ethernet Ethernet Address (MAC Address) Host Internet Protocol (IP) IP Address Link Light Local Area Network (LAN) Network Adapter Network Name (SSID) Port Protocol Transmission Control Protocol/Internet Protocol (TCP/IP) Virtual Local Area Network (VLAN) Virtual Server Wide Area Network (WAN) Wireless Local Area Network (WLAN) FAQs
Back to Contents Page Configuration of the Access Point NOTE:It is recommended that you configure the Dell Wireless 4350 Small Network Access Point with the Setup Wizard provided on the Dell Wireless 4350 Small Network Access Point CD. NOTE:Advanced users can configure the Dell Wireless 4350 Small Network Access Point with the web-based configuration utility which can be accessed by browsing to the IP address of the access point.
6. Select Use the following IP address in the Internet Protocol (TCP/IP) Properties window. 7. Input your IP address and Sumnet mask in the appropriate fields. (The IP addresses on your network must be within the same range (e.g. 192.168.2.3 or 192.168.2.4). The subnet mask must be the same for all computers on the network (i.e. 255.255.255.0). 8. Click OK.
Back to Contents Page Connecting the Access Point to the network NOTE:It is recommended that you follow the instructions in the Quick Start Guide on connecting the Dell Wireless 4350 Small Network Access Point to the network. The following are the relevant steps on connecting the access point to your network. 1. Find the optimum location for your Access Point. The Access Point should be located at the center of your wireless network, ideally with line of sight to all your mobile stations. 2.
Back to Contents Page Setting Wireless Encryption in Your Access Point Without wireless security options configured in your network, an eavesdropper within your wireless range may be able to access the network and the data that is being transmitted over it. The Dell Wireless 4350 Small Network Access Point provides Wired Equivalent Privacy (WEP) and Wi-Fi Protected Access (WPA) encryption for wireless security. WPA is an upgrade to the WEP standard for securing your wireless network.
3. The WPA Group Rekey Interval value specifies how often the key “rotates” or changes. 4. WPA Encryption allows you to select one of two possible encryption methods—TKIP and AES. Choose one that your wireless clients support. 5. Click the NEXT button, and then click Save and Restart to apply the changes. 6. Set up WPA-PSK on your wireless clients.
Back to Contents Page Turning Off Broadcast SSID 1. Log into the web configuration of your Access Point using it's IP address (for information on obtaining the Access Point's IP address see How to obtain the IP Address of the Access Point). The Enter Network Password login prompt appears. 2. Type the following text in the user name and password fields: "admin". 3. Click Advanced Settings and then select Advanced Wireless from the drop down menu. 4. Check Yes for Hide my wireless network 5. Click Submit.
Back to Contents Page Setting Up File & Printer Sharing Installing File and Printer Sharing Sharing a printer Sharing files Installing the File & Printer Sharing Follow the instructions below to install the file and printer sharing service. For Windows 2000 and XP 1. Right-click the My Network Places icon (on the desktop in Windows 2000 and in the Start button menu in Windows XP) and left-click to select Properties in menu. 2. Right-click the Local Area Connection icon and select Properties in the menu.
4. On the next screen, select Network printer, and then click the Next button. 5. Click the Browse button and click to select the shared printer. 6. Follow the on-screen instructions to complete. Sharing files You can share files on your computer so that users on other computers on your network can view them. 1. In Microsoft Windows Explorer, right-click on the file, folder, or drive letter you wish to share and left-click Sharing. 2. Click Share As. 3.
Back to Contents Page How to setup wireless clients to connect to the Access Point NOTE:It is recommended that you connect wireless clients to the Dell Wireless 4350 Small Network Access Point using the Setup Wizard provided on the Dell Wireless 4350 Small Network Access Point CD.
Back to Contents Page How to Configure the Access Point via the Control Utility: Dell™ Wireless 4350 Small Network Access Point User's Guide My Network Overview Wireless Settings Network Access Control Administration Diagnostics Advanced Settings My Network Overview This screen provides information about your network connection and settings. The left pane displays your connection status.
The Control Utility allows the user to manage multiple Dell Wireless 4350 Small Network Access Points on the network by allowing the user to configure an alternative access point to the default access point presented by the Control Utility. To configure an alternative access point, perform the following steps: 1. Click to select Configure Alternative AP. 2. Enter the IP Address and Subnet Mask of the access point to be configured into the IP Address and Subnet Mask fields. 3.
Saves current settings. · Restore Restores previous settings. Your Dell Wireless 4350 Small Network Access Point has an advanced security mechanism. It ensures the confidentiality of data, and also guards data against being modified. If you want to enable the security mechanism, click to select Enable Wireless Security. Wireless Settings WEP WEP Settings The Wired Equivalent Privacy (WEP) encryption defined in the 802.11 standard is used to protect wireless communication from eavesdropping.
character (or 10 hexadecimal digits). For 104(128)-bit encryption, enter a 13-character (or 26 hexadecimal digits) WEP key. · Default Key Select only one key out of the four provided in the Default Key field. Wireless Settings WPA-PSK WPA-PSK Settings Wi-Fi Protected Access (WPA) is an upgrade to the WEP standard for securing your wireless network. If you would like to secure your wireless network using WPA, you must have WPA support for your wireless clients.
Wireless Settings WPA 802.1x WPA-802.1x Settings · Radius Server IP, Radius Server Port and Shared Secret. The Radius Server IP, Radius Server Port and Shared Secret fields required to be populated with the relevant information. This information regarding the Radius authentication server can be obtained from the network administrator. · WPA Encryption WPA Encryption allows you to select one of two possible encryption methods—TKIP and AES. Choose one that your wireless clients support.
Allows you to edit entries. · Delete Deletes a record from the list. · Delete All Deletes all records from the list. · Restore Restores previous settings. Network Access Control MAC Access Control The MAC Access Control page allows you to control which local client computer is allowed to access the network through the Dell Wireless 4350 Small Network Access Point based on the client computer’s MAC address.
3. Click the Add button. The MAC Access Control: Add a Record window appears. 4. Enter the hexadecimal MAC address (for example, 00:11:22:33:44:55) that you want to grant or deny access in the Host MAC box. 5. Click the OK button to apply, or click the Cancel button to exit without making any changes. 6. You can click on the selected record and click again on its Host Name to enter the desired name for this record. 7.
NOTE:The system configuration files can only be used by the Control Utility on Dell Wireless 4350 Small Network Access Points. NOTE:Do not use the Control Utility to import configurations settings files created by the web based configuration tool. Change Password To prevent unauthorized administration changes to the access point, the access point is password protected. It is strongly recommended that you change the factory default password. 1. Click the To Change the Access Point Password button.
You can monitor the current status of your network connection in the Diagnostics menu. The network diagnostics can be activated by clicking the Start Diagnostics button on the bottom of the screen. When the detection is done, the screen will display either a PASS! or FAIL! message indicating whether the access point is connected to a network or not.
To configure the advanced settings of the access point, click the Login button to log in to the web-based configuration tool. The web-based configuration tool allows you to set up advanced network configurations for your Dell Wireless 4350 Small Network Access Point.
Back to Contents Page Basic Settings: Dell™ Wireless 4350 Small Network Access Point User's Guide The following configuration options are included in Basic Settings: General Settings Wireless Settings Wireless Security Save & Apply NOTE:To implement the changes you make to the settings, you must save your settings and restart the access point. Otherwise, the access point uses the previous settings.
AP Host Name The AP Host Name is the network name that the Dell Wireless 4350 Small Network Access Point will have on a network. Back to Top Wireless Settings Wireless Settings NOTE:You must change each client’s wireless adapter settings to match the Dell Wireless 4350 Small Network Access Point settings. Use the factory defaults for the access point, unless the default settings have been changed. In this case, note the changes and use the new settings for each wireless network card.
Data encryption provides added security by encoding network communications using an encryption key. Your Dell Wireless 4350 Small Network Access Point, in conjunction with wireless network adapters that support encryption, can scramble your transmitted data to make it difficult for someone to eavesdrop or intercept your information. Two methods of data encryption are available: Wired Equivalent Privacy (WEP) and Wi-Fi Protected Access (WPA).
disconnects it from the rest of the network. Wireless Security WPA If you wish to enable WPA encryption, select WPA from the Network Encryption list. WPA is an upgrade to the WEP standard for securing your wireless network. If you would like to secure your wireless network using WPA, you must have WPA support for your wireless clients. If you are using a Dell Wireless wireless client, you can check for the availability of WPA-enabled software update for your wireless client at http://support.dell.com.
to the network. Note that the Key format must also match the setting for the wireless clients. · Key Format Key Format is a box that lists 2 items: Hexadecimal Digits (numbers 0 through 9 and letters A through F) and ASCII Characters (any letter, number, or symbol). Select the proper format for your key. If your wireless client(s) only support one of the two formats, be sure to specify the correct one.
· WPA Group Rekey Interval WPA Group Rekey Interval is used to specify the frequency of encryption key rotations. The lower the number, the faster your encryption key will rotate, however, setting this number too low may cause your wireless network to slow down. · WPA Encryption WPA Encryption has 2 choices: TKIP (Temporal Key Integrity Protocol) is the most commonly used encryption method. AES (Advanced Encryption Standard) can be used if your wireless clients do not support TKIP. WPA 802.
Back to Top Back to Contents Page
Back to Contents Page Device Status: Dell™ Wireless 4350 Small Network Access Point User's Guide The Device Status screen displays the basic network settings for your Dell Wireless 4350 Small Network Access Point. When changes are made to the network settings, those changes are updated on this screen. In addition, it graphically displays the current connection status for the access point and other devices in your network. Connections between network devices are shown with a yellow arrow.
Ethernet Settings Refer to the left side of the screen for the following LAN Ethernet settings and the Internet protocol (IP) settings for the Dell Wireless 4350 Small Network Access Point: Setting/Device AP IP LAN MAC AP Host Name Firmware Version Wireless Channel Network Name Information Displayed The IP address assigned to the Dell Wireless 4350 Small Network Access Point The MAC address for the LAN (Ethernet) interface The host name for the Dell Wireless 4350 Small Network Access Point (the default is
Back to Contents Page System Tools: Dell™ Wireless 4350 Small Network Access Point User's Guide Use the System Tools section to view the intruder detection log, the network activity log, system statistics and system diagnostics regarding the device. The System Tools section also includes features to import/export the device’s configuration settings, restore the default settings, upgrade the firmware and reset the device.
Network Activity Log Click to select Enable Network Activity Log to allow the user to see transmitted and received traffic from the Dell Wireless 4350 Small Network Access Point to the network. Back to Top Import/Export Settings Import/Export Settings The Dell Wireless 4350 Small Network Access Point allows the user to save the current configurations settings into a file on the computer and to load previously saved settings into the access point. Export Current Settings File: 1.
1. Click Browse to locate a previously saved configuration file to load into the access point. 2. Click Import to load the configuration file. The access point will automatically restart after loading the imported settings. NOTE:The configuration settings files can only be used by a web browser utility on Dell Wireless 4350 Small Network Access Points. NOTE:Do not use the web browser utility to import configurations settings files created by the windows-based Control Utility.
Back to Top Load Default Settings The Load Default Settings page allows you to reload the factory default configurations that came with the device. When this option is used, all settings are reset to the factory default value. This is equivalent to pressing and holding the Reset button on the back panel of the device for more than 5 seconds (for more details, refer to A Look at the Hardware).
Back to Top Upgrade Firmware Dell periodically releases firmware updates to provide improved performance or capabilities. Use the firmware upgrade feature to easily upgrade the firmware on your Dell Wireless 4350 Small Network Access Point. The Upgrade firmware page supports two methods for upgrading the firmware onto the access point (a) local file upgrade (b) Internet file upgrade. NOTE:Make sure the file you choose is an actual Dell Wireless 4350 Small Network Access Point firmware file.
Upgrade Firmware – Internet File The other option to upgrade firmware is through the Internet. The Dell Wireless 4350 Small Network Access Point can be configured to automatically check the internet for upgrades by entering the URL ftp.us.dell.com/network in the URL field and the number of hours to automatically check for upgrades into the hours field. The user can also click Check Internet Now to see if there is new firmware available for upgrading.
Back to Contents Page Advanced Settings: Dell™ Wireless 4350 Small Network Access Point User's Guide Time Zone Advanced Wireless Access Control Settings Administration Settings Wired Settings SSID Manager SNMP Rogue AP Detection NOTE:Dell technical support representatives do not support the configuration options in the Advanced Settings portion of the configuration program. These options are provided for your convenience only. However, the advanced settings are fully documented and explained in this guide.
Select your local time zone from the pull-down list, Please choose your local time zone. During the summer months, the clock will move one or several hours ahead (depending on geographical location). Different countries have different change dates, in most of the U.S and Canada, daylight saving time begins on the last Sunday of October and reverts back to standard time on the first Sunday of April. To enable daylight saving, click Yes for Enable Daylight Saving.
the use of a site survey tool. If you want to increase wireless network security, you can disable the transmission of the beacon packets. Click No to allow transmission of beacon packets from the access point. Click Yes to disable the transmission of beacon packets from the access point. Mode The setting allows the user to select the 802.11 mode that the Dell Wireless 4350 Small Network Access Point will use when communicating with wireless clients. Select 802.11b and 802.
The fragmentation threshold determines the size of data packets that will be fragmented before transmission. The available range is from 1 to 2346, with the default value being 2346 (Note: The fragmentation threshold is specified in bytes). Data packets that are smaller than the specified fragmentation threshold value will not be fragmented. Data packets that are larger than the fragmentation threshold will be fragmented into smaller packets and transmitted one at a time instead of all at once.
To Configure your Access Point back as a root AP: There are 2 options available to configure your access point back as a root AP (a) reset the device back to it's defaults by pressing the reset button on the device for at least 5 seconds or (b) connect a computer to the repeater AP via an ethernet cable and browse to the AP's default IP address of 192.168.2.1 and perform the following steps. 1. Click the option Enable this AP as a Root AP 2. Click the Submit button.
To enable access control in the access point, perform the following steps: 1. Click Yes to enable Enable MAC Access Control. 2. Click Yes to enable the appropriate table, the Grant Access Table or the Deny Access Table. 3. Click the Add button, a pop-up window will open, then enter the MAC address of the network card on the computer that you wish to add to the table. 4. Click Submit to enter the MAC address into the table. 5. Click Submit to enable the new table’s entries. 6.
Password Settings The Dell Wireless 4350 Small Network Access Point uses a password to authenticate the user before allowing the user access to the web configuration tool or Control Utility. If you would like to change the current password, click to select Change Your Password and enter the new password in both New Password and Retype Password fields. Write down the password and keep it in a secure location for future reference.
If the access point will obtain an IP address automatically from a DHCP server, select the Connection Type as DHCP. If you would like to assign the access point a static IP address, select the Connection Type as Static IP and enter an IP address, Subnet Mask and Default Gateway in the corresponding fields. If the access point will obtain DNS server information automatically from the network, select the Domain Name Server (DNS) as Dynamic.
To configure multiple SSID’s (VLAN-aware network): In a VLAN-aware network, the Dell Wireless 4350 Small Network Access Point can support three SSID’s (one of which is the Guest Access SSID). In this network, the user has the option of configuring VLAN tags to be associated with wireless traffic from each SSID. To add an extra SSID: 1. Click to select I'm on a VLAN aware network. 2. Click the Submit button. 3.
SSID supporting WEP and the guest SSID supporting no encryption. To enable the Guest Access SSID (VLAN-aware network): To enable Guest Access mode, the Dell Wireless 4350 Small Network Access Point must be part of a VLAN-aware network. Perform the following steps to enable the feature. 1. Click to select I’m on a VLAN-aware network. 2. Click to select Enable Guest Access. 3. Click the Submit button. 4.
To enable SNMP protocol support: 1. Click to select Enable SNMP. 2. The SNMP Community Names are passwords used in SNMP messages between the access point and the SNMP management system. A Read-Only community allows the management system to monitor the device, while a Read-Write community can both monitor and configure the device. Enter the Get and Set community names in the appropriate fields. 3.
Rogue AP Detection The Rogue AP Detection feature is an advanced feature that is used by network administrators to scan for adjacent access points. A table of detected access points is presented to the administrator and a determination if any rogue access points are present on the network can be made by verifying the SSID and MAC addresses.
There are three modes of operation for Rogue AP detection (a) Background scan (always-on), (b) Background scan (scheduled) & (c) Foreground scan. When the background scan is enabled, the access point will periodically scan the wireless channels (a single channel at a time for 400 ms) if and only if certain load conditions are met. Any wireless stations that are associated to the AP may experience a loss of the AP during the scan interval.
Back to Contents Page
Back to Contents Page A Look at the Hardware: Dell™ Wireless 4350 Small Network Access Point User's Guide Front Panel Back Panel Front Panel The Dell Wireless 4350 Small Network Access Point has three Light Emitting Diodes (LEDs), or link lights, on its front side.
LED Power Represents Activity Power The Power LED will light up green when the device is powered on and ready for use. It will blink when the device is powering up or when it is reset Wireless Wireless The LED alternates between on and off when wireless clients are attached. It will blink when LAN there is data activity on the wireless network. The rate of blinking will vary with the rate of data transfer.
FAQs Hardware Installation: How do I install the Dell Wireless 4350 Small Network Access Point for optimal coverage? Can the Dell Wireless 4350 Small Network Access Point attach to a hub, switch, or router? What is the physical connection from the Dell Wireless 4350 Small Network Access Point to a wired network? Software Configuration Wireless Attributes Supported Features Troubleshooting Other Glossary Back to Contents
How can I manage the Dell Wireless 4350 Small Network Access Point? The Dell Wireless 4350 Small Network Access Point can be managed on your computer using the Windows-based Setup Wizard, Control Utility programs, or a web-based configuration tool. For detailed information, refer to the Managing your Access Point section of the User's Guide.
What is the practical coverage of the Dell Wireless 4350 Small Network Access Point? The coverage of each Dell Wireless 4350 Small Network Access Point micro cell varies with physical objects and interference in the coverage area. The rated coverage is 1500 feet for line of site, open area, optimal conditions, and minimal throughput.
Does the Dell Wireless 4350 Small Network Access Point support wireless repeating? Yes, you can use the Dell Wireless 4350 Small Network Access Point as a repeater to extend the coverage range beyond the limits imposed by a single access point. 1. Open your web browser and log into your access point using it's IP address (for information on obtaining the Access Point's IP address see How to obtain the IP Address of the Access Point). The Enter Network Password login prompt appears. 2.
conditions are met. Any wireless stations that are associated to the AP may experience a loss of the AP during the scan interval. When a foreground scan occurs, the AP will immediately reset and upon reboot will scan all the available wireless channels for an extended period. A foreground scan will cause immediate termination of all and any connected wireless clients. 1.
My computer is not connected to the Dell Wireless 4350 Small Network Access Point. What should I do? 1. Make sure that you have the same SSID (network name) and security settings on your computer as the Dell Wireless 4350 Small Network Access Point. The default SSID (network name) is wireless (the name is casesensitive). 2. Unplug the power cable from the rear of the access point. Wait 5 seconds. Plug the power cable back in. My browser does not display the web-based configuration tool.
6. Check the Obtain an IP address automatically option. If you are using a manually assigned IP address for the client, the IP address for the client must be on the same subnet as the Dell Wireless 4350 Small Network Access Point: 1. Follow the instructions above to access the Internet Protocol (TCP/IP) Properties window. 2. Ensure the option Use the following IP address is selected. 3.
I cannot hide my wireless network, what should I do? 1. Open your web browser and log into your access point using it's IP address (for information on obtaining the Access Point's IP address see How to obtain the IP Address of the Access Point). The Enter Network Password login prompt appears. 2. Type the following text in the user name and password fields: "admin". 3. Click Advanced Settings and then click Advanced Wireless from the drop-down menu. 4. Click "Yes" for Hide my wireless network.
How do I find out about firmware upgrades? All new firmware upgrades are posted on the Web. To download the latest firmware, go to the Dell support website: support.dell.com. NOTE: You can only use firmware designed specifically for the Dell Wireless 4350 Small Network Access Point. Use the Upgrade Firmware page on the web-based configuration tool once you have downloaded the firmware. Click the System Tools tab, and then click the Upgrade Firmware option. Enter the file name and path for the new firmware.
How can I find additional information? For additional information, including international telecommunication certificates and customer support, visit support.dell.com.