
Service Manual
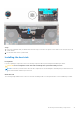
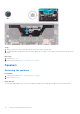
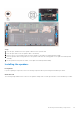


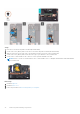
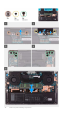
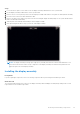
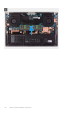
Table Of Contents
- Precision 5570 Service Manual
- Contents
- Working inside your computer
- Removing and installing components
- Drivers and downloads
- System setup
- Troubleshooting
- Handling swollen Lithium-ion batteries
- Locate the Service Tag or Express Service Code of your Dell computer
- System diagnostic lights
- SupportAssist diagnostics
- Built-in self-test (BIST)
- Recovering the operating system
- WiFi power cycle
- Drain residual flea power (perform hard reset)
- Backup media and recovery options
- Real Time Clock—RTC reset
- Getting help and contacting Dell

Steps
1. In reverse sequential order (as indicated on the heat sink), loosen the four captive screws that secure the heat sink to the
system board.
2. Lift the heat sink off the system board.
Installing the heat sink
Prerequisites
If you are replacing a component, remove the existing component before performing the installation procedure.
CAUTION: Incorrect alignment of the heat sink can damage the system board and processor.
NOTE: If either the system board or the heat sink is replaced, use the thermal pad or thermal paste provided in the kit to
ensure that thermal conductivity is achieved.
About this task
The following image indicates the location of the heat sink and provides a visual representation of the installation procedure.
Removing and installing components
31