Dell™ 7700FullHD -projektori Käyttöopas
Huomautukset, muistutukset ja varoitukset HUOMAUTUS: HUOMAUTUS merkitsee tärkeää tietoa, joka auttaa sinua hyötymään enemmän projektoristasi. MUISTUTUS: MUISTUTUS merkitsee mahdollista vahinkoa laitteistolle tai tietojen menetystä, jos ohjeita ei noudateta. VAROITUS: VAROITUS merkitsee mahdollisuutta omaisuusvaurioon, loukkaantumiseen tai kuolemaan. ____________________ Tämän asiakirjan tietoja saatetaan muuttaa ilman erillistä huomautusta. © 2012 Dell Inc. Kaikki oikeudet pidätetään.
Sisältö 1 Dell-projektorisi Tietoja projektoristasi 2 7 . . . . . . . . . . . . . . . . . . . . . . . . . . . . . . . . . . . . Projektorin kytkeminen . . . . . . . . . . . . . . Valinnaisen langattoman käyttöavaimen asentaminen . . . . . . . . . . . . . . Kytkeminen tietokoneeseen 10 . . . . . . 11 . . . . . . . . . . . . . . . 12 Tietokoneen kytkeminen VGA-kaapelilla . . . . . . Näytön kautta kytkeminen VGA-kaapeleilla Tietokoneen liittäminen USB-kaapelilla 12 . . . . 13 . . . 14 . .
Kytkeminen kaupasta saatavaan RS232-ohjauslaitteeseen: . . . . 3 . . . . . . . . . 24 Projektorin käyttäminen . . . . . . . . . . . . . 25 Projektorin kytkeminen päälle . . . . . . . . . . . . . 25 . . . . . . . . . . 25 . . . . . . . . . . . . 26 Projektorin kytkeminen pois päältä . Projektoidun kuvan asettaminen Projektorin korkeuden nostaminen . . . . . . . . 26 Projektorin korkeuden laskeminen . . . . . . . . . 26 Projektorin zoomin ja tarkennuksen asettaminen . . . 27 . . . . .
Langattoman verkon asennus . . . . . . . . . . . . . . . . . . . . 56 . . . . . . . . . 58 . . . . . . . . . . . . 61 Ota käyttöön langaton projektoriyhteys Asenna tietokoneeseen langaton sovellusohjelmisto . . . . . . . . Käynnistä langaton sovellus . . . . . . . . . . . 65 . . . . . . . . . . . . 66 Presentation to Go (PtG) -asennus . PtG Viewer (PtG-kuvaselain) 55 Photo Viewer (Valokuvaselain) . . . . . . . . . . .
Verkkoasetusten määrittäminen . . . . . . . . . . 78 . . . . . . . . . . . . 78 . . . . . . . . . . . . . . . . . . 99 Web-hallinnan käyttäminen Luo sovellustunniste . 4 Projektorin vianmääritys Merkkivalot . . . . . . . . . . . . . . . . . . . . . . . Lampun vaihtaminen 6 . . . . . . . . . . . . . . . . . . 5 Tekniset tiedot 6 Yhteydenotto Delliin 7 Liite: Sanasto Sisältö . . . . . . . . . . . . . . . . . . . . . . . . . . . . . . . . 101 105 106 108 . . . . . . . . . . . . . . .
1 Dell-projektorisi Projektorisi mukana tulee kaikki seuraavat osat. Varmista, että sinulla on kaikki osat, ja ota yhteyttä Delliin™, jos jotakin puuttuu.
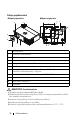
Tietoja projektoristasi Näkymä yläpuolelta Näkymä alapuolelta 11 1 2 9 202.50 73.50 180.50 7 8.65 3 6 55.00 4 5 10 8 55.00 10 1 Ohjauspaneeli 2 Infrapunavastaanottimet 3 Tarkennusrengas 4 Linssi 5 Nostopainike korkeudensäädölle 6 Linssin suojus 7 Kiinnitysreiät seinäkiinnitystä varten: Ruuvireikä M3 x 6,5 mm:n syvyyteen.
6 Älä yritä koskettaa tuuletusritilää, koska se voi olla erittäin kuuma projektorin ollessa käytössä tai heti sen jälkeen. 7 Älä katso linssiin projektorin ollessä käynnissä, koska se voi aiheuttaa silmävamman. 8 Älä aseta esineitä projektorin eteen tai lähelle äläkä peitä projektorin linssiä laitteen ollessa päällä, koska kuumuus voi sulattaa tai polttaa esineitä. 9 Älä käytä langatonta projektoria sydämentahdistimien lähellä. 10 Älä käytä langatonta projektoria lääketieteellisten laitteiden lähellä.
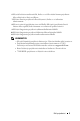
2 Projektorin kytkeminen 2 3 4 1 19 18 5 17 6 7 8 9 10 11 16 15 14 13 12 1 WiFi USB (Tyyppi A) -liitäntä 11 +12 V DC-lähtöliitäntä 2 USB-B-tyypin USB-näyttöliitäntä 12 Turvakaapelin liitäntä 3 USB-A-tyypin USBkuvaselainliitäntä 13 Komponenttivideotuloliitäntä 4 RJ45-liitäntä 14 Virtaliitäntä 5 S-videoliitäntä 15 VGA-A-lähtö (näytön ketjutus) liitäntä 6 Komposiittivideoliitäntä 16 VGA-B-tuloliitäntä (D-sub) 7 RS232 (D-sub) -liitäntä 17 VGA-A-tuloliitäntä (D-sub) 8 Min
Valinnaisen langattoman käyttöavaimen asentaminen Projektorin kanssa on asennettava käyttöoikeusavain, jos haluat käyttää langatonta verkkovaihtoehtoa. Katso "Langattoman verkon asennus" sivulla 55. Langaton käyttöoikeusavain ei kuulu projektorin toimitukseen. Voit ostaa sen Dellin verkkosivustolta osoitteesta www.dell.com. 1 Ruuvaa irti ja poista langattoman liitännän suojus. 2 Liitä langaton käyttöoikeusavain. 3 Aseta langattoman liitännän kansi takaisin paikoilleen.
Kytkeminen tietokoneeseen Tietokoneen kytkeminen VGA-kaapelilla 3 2 MOLEX 1 Virtajohto 2 VGA-kaapeli 3 USB-A–mini-USB-B-kaapeli 1 HUOMAUTUS: Mini-USB-kaapeli on kytkettävä, jos haluat käyttää Sivu ylösja Sivu alas -toimintoja kaukosäätimestä. HUOMAUTUS: Mini-USB-kaapeli ei kuulu projektorin toimitukseen. Voit ostaa mini-SB-kaapelin Dellin verkkosivustolta osoitteessa www.dell.com.
Näytön kautta kytkeminen VGA-kaapeleilla 1 2 1 Virtajohto 2 VGA-kaapeli 2 HUOMAUTUS: Projektorin mukana tulee vain yksi VGA-kaapeli. Ylimääräisen VGA-kaapelin voi ostaa Dellin verkkosivustolta osoitteesta www.dell.com.
Liittäminen tietokoneeseen RS232-kaapelilla 1 2 1 Virtajohto 2 RS232 (9-nastainen D-sub naaraasta naaraasen nasta 2-3 vaihto) -kaapeli HUOMAUTUS: RS232 (9-nastainen D-sub naaraasta naaraaseen nasta 2-3 vaihto) -kaapeli ei kuulu projektorin toimitukseen. Kysy neuvoa ammattiasentajalta kaapelin ja RS232-kaukosäätimen ohjelmiston suhteen.
Tietokoneen liittäminen USB-kaapelilla 1 2 XELOM 1 Virtajohto 2 USB-A–USB-B-kaapeli HUOMAUTUS: Plug and Play. Projektorin toimitukseen kuuluu vain yksi USBkaapeli. Ylimääräisen USB-kaapelin voi ostaa Dellin verkkosivustolta osoitteesta www.dell.com.
Kytkeminen tietokoneeseen langattomalla käyttöoikeusavaimella (Valinnainen) Z- : 5C ID 20 C C WU5 SU F HUOMAUTUS: Tietokoneesi tulisi olla varustettu langattomalla liitännällä ja oikein määritetty tunnistamaan toisen langattoman yhteyden. Katso tietokoneen asiakirjoista lisätietoja langattoman yhteyden määrittämisestä. HUOMAUTUS: Projektoriin on asennettava käyttöoikeusavain, jos halutaan käyttää langatonta verkkoa. Katso "Langattoman verkon asennus" sivulla 55.
DVD-soittimen kytkeminen Liittäminen DVD-soittimeen S-videokaapelilla 1 2 1 Virtajohto 2 S-videokaapeli HUOMAUTUS: Projektorin mukana ei tule S-videokaapelia. Voit ostaa Svideo-jatkokaapelin (15 m tai 30 m [50 ft/100 ft]) Dellin verkkosivustolta osoitteesta www.dell.com.
Kytkeminen DVD-soittimeen komposiittikaapelilla 1 2 1 Virtajohto 2 Komposiittivideokaapeli HUOMAUTUS: Projektorin mukana ei tule komposiittivideokaapelia. Voit ostaa komposiittivideojatkokaapelin (15 m tai 30 m [50 ft/100 ft]) Dellin verkkosivustolta osoitteesta www.dell.com.
Kytkeminen DVD-soittimeen komponenttikaapelilla 2 1 1 Virtajohto 2 VGA:n ja komponenttivideon välinen kaapeli HUOMAUTUS: Projektorin mukana ei tule VGA:n ja komponenttivideon välistä kaapelia. Voit ostaa VGA:n ja komponenttivideon välisen jatkokaapelin (15 m tai 30 m [50 ft/100 ft]) Dellin verkkosivustolta osoitteesta www.dell.com.
Kytkeminen DVD-soittimeen 3 RCA -komponenttivideokaapelilla 1 1 Virtajohto 2 3 RCA:sta 3 RCA:han komponentti-video (uroksesta urokseen) -kaapeli 2 HUOMAUTUS: 3 RCA:sta 3 RCA:han Komponenttivideo (uroksesta urokseen) kaapeli ei sisälly projektorin toimitukseen. Voit ostaa 3 RCA:sta 3 RCA:han komponenttivideo (uroksesta urokseen) -jatkokaapelin (15 m tai 30 m [50 ft/100 ft]) Dellin websivustolta osoitteessa www.dell.com.
Kytkeminen DVD-soittimeen HDMI-kaapelilla 2 1 Virtajohto 2 HDMI-kaapeli 1 HUOMAUTUS: Projektorin mukana ei tule HDMI-kaapelia. Voit ostaa HDMIkaapelin Dellin verkkosivustolta osoitteesta www.dell.com.
Paikallisverkkoon kytkeminen Jos haluat heijastaa kuvan ja hallita projektoria, joka on kytketty verkkoon RJ45-kaapelilla. 2 1 Lähiverkko (LAN) 1 Virtajohto 2 RJ45-kaapeli HUOMAUTUS: Projektorin mukana ei tule RJ45-kaapelia. Voit ostaa RJ45kaapelin Dellin verkkosivustolta osoitteesta www.dell.com.
Ammattimaiset asennusvaihtoehdot: Automaattista ruutua ohjaava asennus 3 1 2 1 Virtajohto 2 12 V:n DC-pistoke 3 Motorisoitu valkokangas HUOMAUTUS: Kytke automaattinen näyttö ja projektori 12 V:n DC-pistokkeella (1,7 mm (sisäpuoli) x 4,00 mm (ulkopuoli) x 9,5 mm (varsi)).
Kytkeminen kaupasta saatavaan RS232-ohjauslaitteeseen: 3 1 2 1 Virtajohto 2 RS232 (9-nastainen D-sub naaraasta naaraasen nasta 2-3 vaihto) -kaapeli 3 Kaupasta saatava RS232-ohjauslaite HUOMAUTUS: RS232 (9-nastainen D-sub naaraasta naaraaseen nasta 2-3 vaihto) -kaapeli ei kuulu projektorin toimitukseen. Kysy kaapelia asiantuntevalta teknikolta.
Projektorin käyttäminen 3 Projektorin kytkeminen päälle HUOMAUTUS: Kytke projektori päälle ennen kuin kytket päälle lähteen (tietokone, DVD-soitin jne.). Virta-painikkeen valo vilkkuu sinisenä, kunnes sitä painetaan. 1 Poista linssinsuojus. 2 Kytke virtajohto ja sopivat signaalikaapelit projektoriin. Lisätietoja projektorin kytkemisestä on osassa "Projektorin kytkeminen" sivulla 10. 3 Paina Virta-painiketta (katso "Ohjauspaneelin käyttäminen" sivulla 30 paikallistaaksesi Virta-painikkeen).
HUOMAUTUS: Ennen projektorin käynnistämistä uudelleen odota 60 sekuntia, jotta laitteen sisälämpötila tasaantuu. 4 Irrota virtajohto sähköpistokkeesta ja projektorista. Projektoidun kuvan asettaminen Projektorin korkeuden nostaminen 1 Paina Elevator button (nostopainiketta). 2 Nosta projektori haluttuun kulmaan ja vapauta painike, jolloin nostojalka lukkiutuu asentoonsa. 3 Käyttämällä kallistuksen säätöpyörää voit säätää kuvan kulman oikeaksi.
Projektorin zoomin ja tarkennuksen asettaminen MUISTUTUS: Välttääksesi projektorille aiheutuvia vaurioita, varmista, että sivuluukku on kokonaan kiinni ja nostojalka kokonaan sisäänvedetty ennen kuin liikutat projektoria. 1 Avaa projektorin sivuluukku. 2 Vapauta linssin siirtymän lukitus ennen kuin säädät linssin siirtymää. 3 Kierrä linssin siirtymän pysty/vaaka-säädintä muuttaaksesi linssin siirtymää. 4 Kun olet säätänyt linssin siirtymän, lukitse linssin siirtymän lukitus.
Projektion kuvakoon asettaminen 292,9" (743,97 cm) 7" ) 4,1 cm 24 ,19 0 2 (6 239,29" (607,80 cm) 28 188,01" (477,55 cm) 7" ) 6,6 cm 15 ,94 7 9 (3 134,29" (341,10 cm) 1" ) 1,9 cm 11 ,25 4 8 (2 83,02" (210,87 cm) Projektorin käyttäminen 11,15' (3,4 m) 18,04' (5,5 m) 25,26' (7,7 m) " ) ,18 m 69 72 c , 5 7 (1 32,15' (9,8 m) 39,37' (12,0 m) Projektorin ja ruudun välinen etäisyys 0" ) 9,4 cm 19 ,48 6 0 (5 24,42" (62,03 cm) 20,3" (51,56 cm) 3,28' (1,0 m)
(Min. zoomi) Haluttu etäisyys (m) (Maks.
Ohjauspaneelin käyttäminen 1 3 2 4 5 12 11 10 6 7 9 1 LAMP-varoitusvalo (lamppu) 8 Jos keltainen LAMP-valo palaa tai vilkkuu, se voi olla merkki jostakin seuraavista ongelmista: • Lamppu on lähestymässä käyttöikänsä loppua • Lamppumoduulia ei ole asennettu oikein • Lamppuohjaimen virhe • Väripyörän virhe Katso lisätietoja osista "Projektorin vianmääritys" sivulla 101 ja "Merkkivalot" sivulla 105.
5 Ylös / Trapetsikorjaus Painamalla painiketta voit valita näyttövalikon (OSD) kohtia. Paina korjataksesi projektorin kallistuksen aiheuttamaa kuvan vääristymää (+/-30 astetta). 6 Oikea / Auto Adjust (Automaattinen säätö) Painamalla painiketta voit valita näyttövalikon (OSD) kohtia. Painamalla painiketta voit synkronisoida projektorin tulolähteeseen. HUOMAUTUS: Auto Adjust (Automaattinen säätö) ei toimi, jos kuvaruutunäyttö (OSD) on näkyvissä.
Kaukosäätimen käyttäminen 1 11 2 12 3 4 13 5 14 15 6 7 16 17 8 18 9 19 10 20 1 Virta Kytkee projektorin päälle tai pois. Katso lisätietoja osista "Projektorin kytkeminen päälle" sivulla 25 ja "Projektorin kytkeminen pois päältä" sivulla 25. 2 Enter Painamalla painiketta voit hyväksyä valinnan. 3 Oikea Painamalla painiketta voit valita näyttövalikon (OSD) kohtia. 4 Alas Painamalla painiketta voit valita näyttövalikon (OSD) kohtia.
5 Kuvasuhde Painamalla painiketta voit vaihtaa näytetyn kuvan kuvasuhdetta. 6 Sivu ylös Painamalla painiketta voit siirtyä edelliselle sivulle. HUOMAUTUS: Mini-USB-kaapeli on kytkettävä, jos haluat käyttää Page Up (Sivu ylös) -toimintoa. 7 Mykistys Painamalla painiketta voit mykistää projektorin kaiuttimen ja poistaa mykistyksen. 8 Sivu alas Painamalla painiketta voit siirtyä seuraavalle sivulle. HUOMAUTUS: Mini-USB-kaapeli on kytkettävä, jos haluat käyttää Page Down (Sivu alas) -toimintoa.
16 Äänenvoimakkuuden Painamalla painiketta voit pienentää äänenvoimakkuutta. pienennys 17 Trapetsikorjaus Paina korjataksesi projektorin kallistuksen aiheuttamaa kuvan vääristymää (+/-30 astetta). 18 Lähde Painamalla painiketta voit selata läpi analogisen RGB:n, komposiitin, komponentin (YPbPr VGA:n kautta), HDMI:n ja S-videolähteen. 19 Automaattinen säätö Painamalla painiketta voit synkronisoida projektorin tulolähteeseen. Auto Adjust (Automaattinen säätö) ei toimi, jos kuvaruutunäyttö on näkyvissä.
Kaukosäätimen paristojen asentaminen HUOMAUTUS: Poista paristot kaukosäätimestä kun se ei ole käytössä. 1 Painamalla voit avata paristokotelon kannen. 1 2 Tarkista paristojen polariteettimerkinnät (+/-). 2 mukaisesti. AAA AAA 3 Aseta paristot paristokotelon polariteettimerkintöjen 3 HUOMAUTUS: Vältä sekoittamasta eri paristotyyppejä AAA 4 Aseta paristokotelon kansi takaisin paikalleen. AAA ja käyttämästä uusia ja vanhoja paristoja yhdessä.
Kaukosäätimen käyttöetäisyys Etäisyys Kulma Käyttöalue Kulma Etäisyys ±30° 7 m/22,97 jalkaa Kulma s yy äis Et HUOMAUTUS: Todellinen käyttöetäisyys voi poiketa hieman kaaviosta. Heikot paristot voivat myös estää kaukosäädintä ohjaamasta projektoria oikein.
Näyttövalikon käyttäminen • Projektorissa on monikielinen näyttövalikko (OSD), jonka saa näkyviin silloinkin, kun tulolähde ei ole kiinni projektorissa. • Siirry päävalikkoon painamalla ohjauspaneelin tai kaukosäätimen Valikkopainiketta. • Voit navigoida päävalikon välilehtiä painamalla projektorin ohjauspaneelin tai kaukosäätimen painikkeita tai . • Valitse alivalikko painamalla projektorin ohjauspaneelin tai kaukosäätimen - tai -painiketta.
WIRELESS (LANGATON)/USB—Painamalla voit aktivoida Input Source Wireless/USB (Tulolähde Langaton/USB) -valikon. HUOMAUTUS: Wireless/USB (Langaton/USB) -toimintoa voidaan käyttää, kun Wireless and LAN (Langaton ja LAN) on kytketty päälle. INPUT SOURCE WIRELESS/USB (TULOLÄHDE LANGATON/USB) Input Source Wireless/USB (Tulolähde Langaton/USB) -valikko mahdollistaa sovellusten Wireless Display (Langaton näyttö), USB Display (USB-näyttö) ja USB Viewer (USB-kuvaselain) aktivoimisen.
BRIGHTNESS (KIRKKAUS)/ CONTRAST (KONTRASTI) Brightness /Contrast (Kirkkaus/Kontrasti) -valikko mahdollistaa projektorin kirkkaus/kontrasti-asetusten säätämisen. BRIGHTNESS (KIRKKAUS)—Painikkeilla ja voit säätää kuvan kirkkautta. CONTRAST (KONTRASTI)—Painikkeilla ja voit säätää kuvan kontrastia. HUOMAUTUS: Jos säädät Brightness (Kirkkaus)- ja Contrast (Kontrasti)asetuksia, projektori kytkeytyy automaattisesti Custom mode (Muokattu) -tilaan.
VOLUME (ÄÄNENVOIMAKKUUS) Volume (Äänenvoimakkuus) -valikko mahdollistaa projektorin äänenvoimakkuusasetusten säätämisen. VOLUME (ÄÄNENVOIMAKKUUS)—Painamalla voit lisätä äänenvoimakkuutta ja painamalla voit vähentää äänenvoimakkuutta. AUDIO INPUT (AUDIOTULO) Audio Input (Audiotulo)-valikossa voit valita audiotulolähteen. Vaihtoehdot ovat: Analog In (Analoginen tulo), HDMI-A, HDMI-B ja Wireless/LAN (Langaton/LAN).
IMAGE SETTINGS (KUVA-ASETUKSET) (PC-TILASSA)—Aktivoi kuva-asetukset valitsemalla ja painamalla vaihtoehdot: . Kuva-asetukset-valikko tarjoaa seuraavat COLOR TEMPERATURE (VÄRILÄMPÖTILA)—Voit säätää värilämpötilaa. Värilämpötila on kylmempi korkeilla värilämpötilan asetuksilla ja lämpimämpi matalilla asetuksilla. Kun käyttäjä säätää värejä Color Adjust (Värisäätö) -valikossa, projektori muuttaa tilaksi valinnan Custom (Muokattu). Arvot tallennetaan Custom (Muokattu) -tilaan.
COLOR TEMPERATURE (VÄRILÄMPÖTILA)—Voit säätää värilämpötilaa. Värilämpötila on kylmempi korkeilla värilämpötilan asetuksilla ja lämpimämpi matalilla asetuksilla. Kun käyttäjä säätää värejä Color Adjust (Värisäätö) -valikossa, projektori muuttaa tilaksi valinnan Custom (Muokattu). Arvot tallennetaan Custom (Muokattu) -tilaan. RGB COLOR ADJUST (RGB-VÄRISÄÄTÖ)—Voit manuaalisesti säätää värejä punainen, vihreä ja sininen.
DISPLAY SETTINGS (NÄYTTÖASETUKSET) (PC-TILASSA)—Aktivoi näyttöasetukset valitsemalla ja painamalla vaihtoehdot: . Näyttöasetukset-valikko tarjoaa seuraavat HORIZONTAL POSITION (VAAKASIJAINTI)—Siirrä kuvaa oikealle painikkeella ja vasemmalle painikkeella . VERTICAL POSITION (PYSTYSIJAINTI)—Siirrä kuvaa ylös painikkeella alas painikkeella . ja FREQUENCY (TAAJUUS)—Mahdollistaa näytön kellotaajuuden muuttamisen tietokoneen näytönohjaimen mukaiseksi.
DISPLAY SETTINGS (NÄYTTÖASETUKSET) (VIDEOTILASSA)—Aktivoi näyttöasetukset valitsemalla ja painamalla vaihtoehdot: . Näyttöasetukset-valikko tarjoaa seuraavat ASPECT RATIO (KUVASUHDE)—Voit valita kuvasuhteen sen mukaan, miten haluat kuvan näkyvän. Vaihtoehdot ovat: Origin (Alkuperä), 16:9 ja 4:3. •Origin (Alkuperä) - Valitse Origin (Alkuperä) säilyttääksesi projisoitavan kuvan kuvasuhteen tulolähteen mukaisena. •16:9 — Tulolähteen kuva sovitetaan näytön leveyteen ja kuva projisoidaan 16:9-laajakuvana.
PROJECTOR SETTINGS (PROJEKTORIN ASETUKSET)—Valitse ja aktivoi projektoriasetukset painamalla vaihtoehdot: . Projektoriasetukset-valikko tarjoaa seuraavat AUTO SOURCE (AUTOMAATTINEN LÄHDE)—Valitse Off (Pois) (oletus) lukitaksesi nykyisen tulosignaalin. Jos painat Source (Lähde) –painiketta, kun Auto Source (Automaattinen lähde) –tila on asetettu tilaan Off (Pois), voit valita tulosignaalin manuaalisesti. Jos valitset On (Päälle), projektori tunnistaa automaattisesti käytettävissä olevat tulosignaalit.
CLOSED CAPTION (TEKSTITYKSET)—Valitse On (Päälle), jos haluat ottaa käyttöön tekstityksen ja näyttää tekstitysvalikon. Valitse haluttu tekstitysvaihtoehto: CC1, CC2, CC3 tai CC4. HUOMAUTUS: 1 Tekstitys on saatavilla vain NTSC:ssä. 2 Tekstitys on käytettävissä vain S-video- ja komposiittivideotuloista. TEST PATTERN (TESTIKUVIO)—Testikuviota käytetään tarkennuksen ja tarkkuuden testaamiseen. Voit ottaa Test Pattern (Testikuvio) valinnan käyttöön tai pois käytöstä valitsemalla Off (Pois), 1 tai 2.
LAN SETTINGS (LAN-ASETUKSET)—Valitse ja paina aktivoidaksesi LANasetukset. LAN-asetukset-valikko tarjoaa seuraavat vaihtoehdot: WIRELESS AND LAN (LANGATON JA LAN)—Valitse Enabled (Käytössä) aktivoidaksesi Langaton- ja LAN-toiminnon. DHCP—Jos siinä verkossa, johon projektori on kytketty, on DHCP-palvelin, IP-osoite haetaan automaattisesti kun tilaksi valitaan DHCP On (DHCP Päällä).
3. Kun IP Address (IP-osoite), Subnet Mask (Aliverkon peite), Gateway (Yhdyskäytävä) ja DNS on asetettu, valitse Store (Tallenna) ja tallenna asetukset painamalla -painiketta. 4. Jos valitset Store (Tallenna) painamatta Enter-painiketta, järjestelmä säilyttää alkuperäiset asetukset. RESET (NOLLAUS)—Nollaa verkkoasetukset painamalla . WIRELESS SETTINGS (LANGATON –ASETUKSET)—Valitse ja paina aktivoidaksesi langattomat asetukset.
2. Aseta -painiketta painamalla arvo valinnalle IP Address (IPosoite), Subnet Mask (Aliverkon peite), Gateway (Yhdyskäytävä) tai DNS. (Valittu asetus on korostettu sinisellä) a Valitse asetus painikkeilla ja . b Aseta arvo painikkeilla ja . c Kun asetukset on tehty, lopeta painamalla -painiketta. 3. Kun IP Address (IP-osoite), Subnet Mask (Aliverkon peite), Gateway (Yhdyskäytävä) ja DNS on asetettu, valitse Store (Tallenna) ja tallenna asetukset painamalla -painiketta. 4.
salasanasuojausominaisuus aktivoidaan, kun käynnistät projektorin seuraavan kerran. Jos otat tämän ominaisuuden käyttöön, sinulta kysytään projektorin salasanaa, kun kytket projektorin päälle. 1 Ensimmäisen kerran salasanasyöttöpyyntö: a Siirry kohtaan Menu Settings (Valikkoasetukset), paina ja valitse sitten Password (Salasana) Enabled (Käytössä) ottaaksesi salasanaasetukset käyttöön. b Salasanatoiminnon käyttöönotto tuo näyttöön muutosruudun. Näppäile ruutuun 4-numeroinen luku ja paina -painiketta.
CHANGE PASSWORD (SALASANAN MUUTTAMINEN)—Näppäile alkuperäinen salasana. Anna sitten uusi salasana ja vahvista salasana antamalla se uudelleen. POWER SETTINGS (VIRTA-ASETUKSET)—Valitse ja aktivoi virta-asetukset painamalla .
QUICK SHUTDOWN (NOPEA SAMMUTUS)—Valitse On (Päälle) sammuttaaksesi projektorin yhdellä virtapainikkeen painalluksella. Tällä toiminnolla projektorin virta sammuu nopeasti ja tuulettimet pyörivät nopeasti. Nopean sammutuksen aikana käyntiääni saattaa olla hiukan kovempi. HUOMAUTUS: Ennen projektorin käynnistämistä uudelleen odota 60 sekuntia, jotta laitteen sisälämpötila tasaantuu. Projektori käynnistyy hitaammin, jos yrität kytkeä sen heti päälle.
PIP SETTINGS (PIP-ASETUKSET)—Valitse ja paina aktivoidaksesi PIP-asetukset. PIP-asetukset-valikko tarjoaa seuraavat vaihtoehdot: PICTURE IN PICTURE (KUVA KUVASSA)—Valitse On (Päälle) ottaaksesi käyttöön kuva-kuvassa-näytön. Ota ominaisuus pois käytöstä valitsemalla Off (Pois). SECOND SOURCE (TOINEN LÄHDE)—Voit valita nykyisen ensisijaisen tulolähteen mukaan mahdollisen toisen OSD-valinnoissa käytettävissä olevan lähteen. Katso "PIP-yhdistelmälähteet" sivulla 113. SWAP (VAIHDA)—Paina näytön välillä.
LANGUAGE (KIELI) Valitse näyttövalikon kieli. Painamalla voit aktivoida Language (Kieli) -valikon. HELP (OHJE) Jos projektorin käytössä ilmenee ongelmia, voit käyttää ohje-valikkoa vianetsintään.
Langattoman verkon asennus HUOMAUTUS: Tietokoneen on täytettävä seuraavat järjestelmävaatimukset: Käyttöjärjestelmä: • Windows Microsoft Windows XP™ Home tai Professional Service pack 2 (32-bittinen suositeltava), Windows Vista 32-bittinen ja Windows® 7 Home tai Professional 32-bittinen tai 64-bittinen • MAC MacBook tai uudempi, MacOS 10.
Ota käyttöön langaton projektoriyhteys Noudata seuraavia vaiheita, jotta voit käyttää projektoria langattomasti: 1 Asenna valinnainen käyttöoikeusavain. Katso "Valinnaisen langattoman käyttöavaimen asentaminen" sivulla 11. 2 Liitä virtakaapeli seinäpistorasiaan ja paina virtapainiketta. 3 Paina projektorin ohjauspaneelin tai kaukosäätimen Menu (Valikko) painiketta. HUOMAUTUS: Navigoi painikkeilla . , , ja ja valitse painamalla 4 Langattoman yhteyden oletus on Enabled (Käytössä).
Seuraava Wireless Guide Screen (Langattoman opasruutu) tulee näkyviin: HUOMAUTUS: Jos langaton yhteys on pois käytöstä, ota se käyttöön seuraavien ohjeiden mukaisesti: ADVANCED SETTINGS (LISÄASETUKSET) Wireless Settings (Langaton –asetukset) Wireless (Langaton) Connected (Yhteys muodostettu). Kuvatulolähde kytketään automaattisesti langattomaan näyttöön, kun langaton valinta on valittu tässä vaiheessa.
Asenna tietokoneeseen langaton sovellusohjelmisto 7 Yhdistä tietokone langattomaan 7700FullHD-verkkoon. HUOMAUTUS: • Tietokoneessa on oltava langaton verkkotoiminnallisuus yhteyden tunnistamista varten. • Kun yhdistät 7700FullHD:n langattomaan verkkoon, menetät langattoman yhteyden muihin langattomiin verkkoihin. HUOMAUTUS: Muista kytkeä pois päältä kaikki välityspalvelimet.
8 Käynnistä Internet-selain. Sinut ohjataan automaattisesti 7700FullHD Web Management (7700FullHD-web-hallinta) -sivulle. HUOMAUTUS: Jos verkkosivu ei lataudu automaattisesti, kirjoita projektoriruudussa näkynyt IP-osoite (oletus- IP-osoite on 192.168.100.10) selaimen osoitepalkkiin. 9 10 7700FullHD Web Management (7700FullHD-web-hallinta) -sivu avautuu. Ensimmäisellä käyttökerralla napsauta Download (Lataa). Valitse oikea käyttöjärjestelmä ja napsauta sitten Download (Lataa).
11 Suorita ohjelmiston kertaasennus napsauttamalla Run (Suorita). HUOMAUTUS: Voit myös valita tiedoston tallentamisen ja asentaa sen myöhemmin. Voit tehdä sen napsauttamalla Save (Tallenna). HUOMAUTUS: Jos et pysty asentamaan sovellusta, koska tietokoneen käyttöoikeudet eivät ole riittävät, ota yhteyttä verkon ylläpitäjään. 12 60 Asennusohjelmisto käynnistyy. Suorita asennus loppuun noudattamalla ruudun ohjeita.
Käynnistä langaton sovellus Kun asennus on valmis, ohjelma käynnistyy ja aloittaa haun automaattisesti. Jos ohjelma ei käynnisty automaattisesti, voit käynnistää sovelluksen kaksoisnapsauttamalla työpöydän -kuvaketta. Valitse Dell 7700FullHD ja napsauta OK-painiketta. Login (Kirjaudu sisään) Saat yhteyden projektoriin antamalla kirjautumiskoodin vaiheessa 6 esitetyssä kohdassa Langattoman verkon asennus ja napsauttamalla sitten OK-painiketta.
Painikkeiden ymmärtäminen Kun olet kirjautunut onnistuneesti, seuraava ruutu tulee näkyviin. Projisointitila 1 2 3 4 1 Kohta Kuvaus Tilapalkki Näyttää IP- ja LOGIN CODE (KIRJAUTUMISKOODI) -tiedot. Valikko Aktivoi sovellusvalikko. Minimointipainike Minimoi sovellus. Sulkemispainike 2 3 4 Status-tila Projisointitila Napsauta aktivoidaksesi projisointitilan. Videotila Napsauta aktivoidaksesi videotilan. Hallinnan työkalupalkki Koko ruutu Projektoi kuva koko ruudulle.
Esityksen projektointi • Voit projisoida esityksen napsauttamalla mitä tahansa projisointipainiketta . • Voit asettaa esityksen tauolle painamalla . Kuvake muuttuu vihreäksi. • Voit jatkaa esitystä painamalla . • Voit käynnistää esityksen projisoinnin painamalla -painiketta. Katso "Audioprojisoinnin asennus" sivulla 71. • Voit pysäyttää esityksen painamalla .
HUOMAUTUS: 1 Ruudun vaihteluprosentti pohjautuu resoluutioon 1024 x 768. Esimerkiksi näytettäessä 320 x 240 -videota 1024 x 768 -resoluutiolla ruudun vaihtelu on 9,8 %. 2 Todelliseen ruutunopeuteen voivat vaikuttaa eri tekijät, esimerkiksi verkkoympäristö, kuvasisältö, signaaliolosuhteet, sijainnit ja suoritinteho. 3 Nykyisessä WLAN-ympäristössä, joka käyttää 802.11g-yhteyttä, ja ilman ruudun venytystä. 4 Pakattuna 1 024 x 768 -resoluutioon ja 802.11g-yhteydellä.
Presentation to Go (PtG) -asennus Järjestelmän minimivaatimukset PtG:n asentamista varten ovat seuraavat: Käyttöjärjestelmä: - Windows 32-bittinen Windows XP™ Home tai Professional ja Service Pack 2/3 (suositus on 32-bittinen), 32-bittinen Windows® Vista tai Windows® 7 Home tai Professional 32-bittinen tai 64-bittinen - Office 2003 tai Office 2007 Noudata seuraavia vaiheita, jotta voit käyttää USB-kuvaselainta: "Wireless and LAN (Langaton ja LAN)" -valinta ja "Wireless connection (Langaton yhteys)" oletukse
PtG Viewer (PtG-kuvaselain) Järjestelmä pysyy tällä sivulla, kun toiminto on valmis.
PtG/Photo Function Introduction (PtG/Valokuva-toiminnon esittely) Näyttää sopivia PtG- ja valokuvatiedostoja, jotka on tallennettu USB-levylle. HUOMAUTUS: Jos vain yksi levy tunnistetaan, järjestelmä ohittaa tämän vaiheen.
Photo Overview (Valokuvayleiskatsaus) HUOMAUTUS: Tukee 14 kieltä valokuvien tiedostonimien muodolle (kielet: englanti, hollanti, ranska, saksa, italia, japani, korea, puola, portugali, venäjä, yksinkertaistettu kiina, espanja, ruotsi ja perinteinen kiina). Buttons-Introduction (Painikkeiden esittely) Navigoi ylös-, alas- ja vasen-painikkeilla ja valitse projektorin ohjauspaneelin tai kaukosäätimen painikkeella .
Asenna PtG Converter -sovellusohjelmisto tietokoneeseen Suorita asennus loppuun noudattamalla ruudun ohjeita. HUOMAUTUS: Voit ladata "PtG Converter - Lite" -muuntimen Delltukisivustolta osoitteessa support.dell.com.
PtG Converter -ohjelmiston käyttäminen 1 Käynnistä "PtG Converter - Lite.exe" tai käynnistä sovellus napsauttamalla työpöydän -kuvaketta. 2 Valitse PowerPoint-tiedosto napsauttamalla muuntaminen. 3 Valitse tallennussijainti napsauttamalla Browse (Selaa)-painiketta ja paina sitten OK-painiketta. -painiketta ja aloita HUOMAUTUS: 1 Jos tietokoneessa ei ole asennettuna MS PowerPoint -sovellusta, tiedostonmuunnos epäonnistuu. 2 PtG-muunnin tukee korkeintaan 20 sivua. 3 PtG-muunnin tukee vain .
Audioprojisoinnin asennus Audioprojisointi tukee vain Wireless Display (Langaton näyttö)- ja LAN Display (LAN-näyttö)-tulolähdettä. Järjestelmän vähimmäisvaatimukset: Käyttöjärjestelmä: • Windows 32-bittinen Windows XP™ Home tai Professional ja Service Pack 2/3 (suositus on 32-bittinen), 32-bittinen Windows® Vista tai 32-bittinen tai 64-bittinen Windows® 7 Home tai Professional • MAC MacBook Pro tai uudempi, MacOS 10.
Ota käyttöön Langaton tai LAN-projektoriyhteys 1 Liitä virtakaapeli ja käynnistä projektori painamalla virtapainiketta. 2.1 Jos audioprojisointiin käytetään LAN-yhteyttä, toimi näiden ohjeiden mukaisesti ottaaksesi käyttöön Langattoman ja LAN-toiminnon (oletus on Enabled (Käytössä)): Advanced Settings (Lisäasetukset) LAN Settings (LAN-asetukset) Wireless and LAN (Langaton ja LAN) Enabled (Käytössä). 2.
3 Siirry Input Source (Tulolähde) -valikkoon, valitse Wireless (Langaton)/USB ja valitse alivalikosta Wireless Display (Langaton näyttö). Seuraava Wireless Guide (Langattoman opas) -ruutu tulee näkyviin: 4 Kirjoita muistiin LOGIN CODE (KIRJAUTUMISKOODI), NETWORK NAME (VERKKONIMI) (SSID) ja IP ADDRESS (IP-OSOITE). Tarvitset näitä tietoja myöhemmin kirjautumiseen.
HUOMAUTUS: Jos audioprojisointiin käytetään LAN-verkkoa, liitä LANkaapeli projektoriin ja tietokoneeseen. Käynnistä langaton sovellus 7 Kun asennus on valmis, ohjelma käynnistyy automaattisesti. Voit käynnistää sovelluksen myös kaksoisnapsauttamalla työpöydän -kuvaketta. HUOMAUTUS: 1 Kun valitset projisointiin LAN-valinnan, napsauta "Skip (Ohita)" -painiketta. 2 Kun valitset projisointiin Wireless (Langaton) -valinnan, valitse Dell 7700FullHD ja napsauta "OK"-painiketta.
Login (Kirjaudu sisään) 8 Voit muodostaa yhteyden projektoriin antamalla kirjautumiskoodin (katso vaihe 4) ja napsauttamalla sitten OK. HUOMAUTUS: Jos IP Address (IP-osoite) -asetusta ei tunnisteta, kirjoita ruudun vasemmassa alakulmassa näkyvä IP Address (IP-osoite). 9 Olet nyt kirjautunut sisään langattomaan 7700FullHD-sovellukseen. Napsauta sovelluksen "Play" (Toista) -painiketta käynnistääksesi LAN- tai langattoman projisoinnin.
Videovirta-asennus Videovirta tukee vain Wireless Display (Langaton näyttö) - ja LAN Display (LANnäyttö) -tulolähdettä. Järjestelmän vähimmäisvaatimukset: Käyttöjärjestelmä: • Windows 32-bittinen Windows XP™ Home tai Professional ja Service Pack 2/3 (suositus on 32-bittinen), 32-bittinen Windows® Vista™ tai 32-bittinen tai 64-bittinen Windows® 7 Home tai Professional • MAC MacBook Pro tai uudempi, MacOS 10.
Ota käyttöön Langaton tai LAN-projektoriyhteys Katso "vaiheet 1–4 luvussa Audioprojisoinnin asennus" sivu 71 ohjeet Langattoman- tai LAN-ominaisuuden käyttöönotosta. Asenna tietokoneeseen langaton sovellusohjelmisto Katso "vaiheet 5–4 luvussa Audioprojisoinnin asennus" sivu 73 ohjeet langattoman Dell-sovelluksen asentamisesta. Käynnistä langaton sovellus Katso "vaihe 7 luvussa Audioprojisoinnin asennus" sivu 74 ohjeet sovelluksen käynnistämiseen.
Projektorin hallinta web-hallinnan avulla Verkkoasetusten määrittäminen Jos projektori on yhdistetty verkkoon, voit käyttää projektoria verkkoselaimella. Verkkoasetusten määrittämistä varten katso "LAN Settings (LAN-asetukset)" sivulla 47. Web-hallinnan käyttäminen Käytä Internet Explorer 6.0 -selainta tai sitä uudempaa versiota tai Firefox 2.0 selainta tai sitä uudempaa versiota ja syötä IP-osoite. Voit nyt käyttää Web Management (Web-hallinta) -toimintoa projektorin etähallintaan.
Langattoman sovelluksen lataaminen Katso myös "Langattoman verkon asennus" sivulla 55. Napsauta tietokoneen käyttöjärjestelmää vastaavaa Download (Lataa) -painiketta.
Conference Control (Kokoushallinta) Voit isännöidä kokousesityksiä eri lähteistä ilman projektorikaapeleita sekä hallita esitysten näkymistä ruudulla. HUOMAUTUS: Ilman Conference Play Control (Kokouksen toistonhallinta) toimintoa, viimeinen käyttäjä, joka painaa sovelluksen Play (Toisto) -painiketta saa koko ruudun projektion hallintaansa. Computer Name (Tietokonenimi): Luetteloi kokoushallintaan kirjautuneet tietokoneet.
Managing Properties (Ominaisuuksien hallinta) Admin (Järjestelmänvalvoja) Järjestelmänvalvojan salasana vaaditaan Admin (Järjestelmänvalvoja) -sivun käyttöä varten. • Admin Password (Järjestelmänvalvojan salasana): Anna järjestelmänvalvojan salasana ja napsauta Login (Kirjaudu sisään). Oletussalasana on "admin". Salasanan vaihtamista varten katso "Change Passwords (Salasanan muuttaminen)" sivulla 86.
System Status (Järjestelmän tila) Näyttää Network Status (Verkon tila) , Connection Status (Yhteyden tila) ja Projector Status (Projektorin tila) -tiedot.
Network Setup (Verkon asetukset) Katso Näyttövalikko sivulla sivu 47. IP Setup (IP-asetukset) • Valitse Obtain an IP address automatically (Hae IP-osoite automaattisesti) määrittääksesi projektorin IP-osoitteen automaattisesti tai Use the following IP address (Käytä seuraavaa IP-osoitetta) määrittääksesi IPosoitteen manuaalisesti.
Wireless Setup (Langattomat asetukset) • Valitse Enabled (Käytössä) asettaaksesi kohdat Region (Alue), SSID, SSID Broadcast (SSID-lähtys), Channel (Kanava), Encryption (Salaus) ja Key (Avain). Valitse Disable (Pois käytöstä) ottaaksesi langattoman asennuksen pois käytöstä. SSID: Maksimipituus 32 merkkiä. Encryption (Salaus): Voit ottaa WPA-salauksen pois käytöstä valitsemalla Disable (Pois käytöstä) tai valita yhden 64-bittisen tai 128-bittisen ASCIItai HEX-merkkijonon.
Projection Setup (Projektioasetukset) Projection Setup (Projektioasetukset) • Resolution (Resoluutio): Mahdollistaa resoluution asettamisen. Vaihtoehdot ovat: XGA (1024x768) ja 720p (1280x720). • Login Code (Kirjautumiskoodi): Valitse, kuinka haluat projektorin luovan kirjautumiskoodin. Vaihtoehtoja on kolme: • Disable (Pois käytöstä): Kirjautumiskoodia ei vaadita järjestelmään kirjauduttaessa. • Random (Satunnainen): Oletus on Random (Satunnainen). Kirjautumiskoodi luodaan satunnaisesti.
Change Passwords (Salasanan muuttaminen) Tällä sivulla voit muuttaa järjestelmänvalvojan salasanaa. • Enter New Password (Anna uusi salasana): Anna uusi salasana. • Confirm New Password (Vahvista uusi salasana): Anna salasana uudelleen ja napsauta Apply (Käytä). HUOMAUTUS: Ota yhteyttä Delliin, jos unohdat järjestelmänvalvojan salasanan.
Reset to Default (Palauta oletukset) Napsauttamalla Apply (Käytä) -painiketta voit palauttaa kaikki langattoman/verkon asetukset oletusasetuksiin.
Firmware Upgrade (Firmware-päivitys) Firmware-päivityssivulta voit päivittää projektorin langattoman firmwaren. HUOMAUTUS: Kun olet päivittänyt firmwaren onnistuneesti, ota Wireless/Network (Langaton/Verkko) pois käytöstä ja takaisin käyttöön OSDnäyttövalikosta, jotta projektorin verkkokortti käynnistetään uudelleen. Voit aloittaa firmware-päivityksen seuraavasti: 1 Valitse päivitettävä tiedosto painamalla Browse (Selaa) . 2 Aloita painamalla Update (Päivitä) -painiketta.
Projector Upgrade (Projektorin päivitys) Voit päivittää projektorin laiteohjelmiston Projector Upgrade (Projektorin päivitys) -sivulla. HUOMAUTUS: Kun olet päivittänyt firmwaren onnistuneesti, ota Wireless/Network (Langaton/Verkko) pois käytöstä ja takaisin käyttöön OSDnäyttövalikosta, jotta projektorin verkkokortti käynnistetään uudelleen.
3 Avaa internet-selain ja kirjoita osoiteriville IP-osoite (oletus-IP-osoite on 192.168.100.10). 4 Paina Projector Upgrade (Projektorin päivitys) web-sivulla Browse (Selaa) valitaksesi päivitettävän tiedoston. 5 Aloita painamalla Update (Päivitä) -painiketta. Odota, että järjestelmä päivittää laitteen firmwaren. HUOMAUTUS: Temp (Lämpötila) - ja Lamp (Lamppu) LED-valo syttyy (keltainen).
Projector Control Panel (Projektorin ohjauspaneeli) Projector Information (Projektorin tiedot) • Projector Status (Projektorin tila): Tiloja on viisi: Lamp On (Lamppu päällä), Standby (Valmiustila), Power Saving (Virransäästö), Cooling (Jäähdytys) ja Warming up (Lämmittely). Päivitä tila ja hallinta-asetukset napsauttamalla Refresh (Päivitä) -painiketta. • Power Saving (Virransäästö): Virransäästön viive voi olla Off (Pois), 30, 60, 90 tai 120 minuuttia.
Image Control (Kuvan hallinta) • • • • Operation Mode (Käyttötila): Sallii käyttötilan valitsemisen. Valittavissa on kaksi vaihtoehtoa: Normal Mode (Tavallinen tila) ja ECO Mode (Säästötila). Projector Mode (Projektoritila): Voit valita projektoritilan projektorin asennon mukaan. Projektiotiloja on neljä: Etuprojektio, Kattokiinnitteinen etuprojektio, Takaprojektio ja Kattokiinnitteinen takaprojektio.
Alert Setting (Hälytysasetukset) E-mail Alert (Sähköposti-ilmoitukset) • E-mail Alert (Sähköposti-ilmoitukset): Voit valita haluatko sähköpostiasetukset käyttöön (Enable) vai pois (Disable). • To (Vastaanottaja)/Cc (Kopio)/From (Lähettäjä): Voit antaa sähköpostin lähettäjän osoitteen (From (Lähettäjä)) ja vastaanottajat (To (Vastaanottaja)/Cc (Kopio)) virhetoimintojen ja varoituksien ilmoituksille. • Subject (Aihe): Voit kirjoittaa sähköpostin aiherivin.
Reboot System (Käynnistä järjestelmä uudelleen) Käynnistä järjestelmä uudelleen napsauttamalla Reboot (Käynnistä uudelleen). Crestron Crestron-toimintoa varten.
FAQS (Usein kysyttyä): Haluaisin käyttää projektoria etänä Internetin kautta. Mitkä ovat parhaat asetukset selaimelle? Saat parhaat asetukset selaimelle seuraavasti: 1 Avaa Control Panel (Ohjauspaneeli) Internet Options (Internet-asetukset) General (Yleiset) -välilehti Temporary Internet Files (Väliaikaiset InternetSettings (Asetukset) ja tiedostot) valitse Every visit to the pages (Jokaisella käynnillä sivulla). 2 Jotkut palomuurit tai virustorjuntaohjelmistot voivat torjua HTTP-sovelluksen.
Miksi en voi käyttää SMTPpalvelinta? Miksi en voi vastaanottaa testisähköpostia, vaikka projektori ilmoittaa, että testisähköposti on lähetetty? 96 Projektorin käyttäminen 1 Tarkista verkonvalvojalta, onko SMTP- palvelintoiminto avoinna projektorille ja projektorin IP-osoite sallittu SMTPpalvelimella. Projektorin SMTPporttinumero on 25, mitä ei voi muuttaa. 2 Tarkista, että lähtevä SMTP-palvelin, käyttäjänimi ja salasana on asetettu oikein.
Palomuurin määritykset ja usein kysytyt kysymykset K: Miksi en voi käyttää Web-hallinnan sivua? V: Tietokoneen palomuurin asetukset voivat estää käyttämästä Web-hallinnan web-sivua. Katso määritysasetukset seuraavasta: Palomuurisuojaus McAfee Security Center Norton AntiVirus Määritykset 1 Käynnistä McAfee Security Center (Start (Käynnistä) > All Programs (Kaikki ohjelmat) > McAfee > McAfee Security Center.
Palomuurisuojaus Määritykset 1 Käynnistä Windows Firewall (Windowsin palomuuri) Windows Firewall (Windowsin (Start (Käynnistä) > All Programs (Kaikki ohjelmat) > palomuuri) Control Panel (Ohjauspaneeli)). Kaksoisnapsauta kohtaa Windows Firewall (Windowsin palomuuri). 2 Poista General (Yleiset) -välilehdeltä valinta Don’t allow exceptions (Älä salli poikkeuksia). 3 Napsauta Exceptions (Poikkeukset) -välilehdeltä Add Program... (Lisää ohjelma...) -painiketta.
Luo sovellustunniste HUOMAUTUS: Tämä ominaisuus on käytettävissä vain malleissa, joka langaton-tila on käytettävissä. Sovellustunnisteen avulla voit suorittaa Plug and Show (Liitä ja esitä) -toiminnon USB-tunnisteella. 1 Napsauta sovellusohjelmistosta sovellustunniste). 2 Seuraava ruutu tulee näkyviin. Napsauta Next (Seuraava). 3 Liitä flash-asema mihin tahansa tietokoneen USB-porteista. Valitse asema luettelosta ja valitse Next (Seuraava).
4 100 Sulje asennusohjelma napsauttamalla Finish (Valmis).
Projektorin vianmääritys 4 Jos sinulla on ongelmia projektorisi kanssa, katso seuraavat vianmääritysohjeet. Jos ongelma ei selviä, ota yhteyttä Delliin™ (Katso Yhteydenotto Delliin™ sivulta sivu 115). Ongelma Mahdollinen ratkaisu Ruudulle ei tule kuvaa • Varmista, että linssin suojus on otettu pois ja että projektori on päällä. • Varmista, että olet valinnut oikean tulolähteen INPUT SOURCE (TULOLÄHDE) -valikosta. • Varmista, että ulkoinen grafiikkaportti on toiminnassa.
Ongelma (jatkuu) Mahdollinen ratkaisu (jatkuu) 1 Paina Auto Adjust (Automaattinen säätö) - Osittainen, liukuva tai väärin näytetty kuva painiketta kaukosäätimestä tai ohjauspaneelista. 2 Jos käytät Dell™-kannettavaa tietokonetta, aseta tietokoneen resoluutioksi Full HD (1920x1080): a Napsauta hiiren oikealla painikkeella Microsoft® Windows® -työpöydän käyttämätöntä osiota, valitse Properties (Ominaisuudet ) ja valitse sitten Settings (Asetukset) -välilehti.
Ongelma (jatkuu) Mahdollinen ratkaisu (jatkuu) Kuvan väri on väärä • Jos näyttö vastaanottaa väärää lähtösignaalia grafiikkakortilta, valitse signaalin tyypiksi RGB kuvaruutuvalikon Image Settings (Kuva-asetukset) -valikon Advanced Settings (Lisäasetukset) -välilehdeltä. • Käytä valintaa Test Pattern (Testikuvio) Projector Settings (Projektorin asetukset) valikon kohdassa Advanced Settings (Lisäasetukset). Varmista, että testikuvion värit ovat oikein.
Ongelma (jatkuu) Mahdollinen ratkaisu (jatkuu) LAMP-valo vilkkuu keltaisena Jos LAMP-valo vilkkuu keltaisena, lamppumoduulin liitännässä voi olla häiriö. Tarkista lamppumoduuli ja varmista, että se on oikein asennettu. Jos LAMP-valo ja Power-valo vilkkuvat keltaisina, lampun ajurissa on vikaa ja projektori kytkeytyy automaattisesti pois päältä.
Merkkivalot Hallintanäppäimet Projektorin tila Kuvaus Merkkivalo Virta TEMP (Keltainen) LAMP (Keltainen) Valmiustila Projektori valmiustilassa. Valmis kytkemään virran päälle. SININEN Vilkkuu POIS POIS Projektorin lämmitys Projektori lämpiää ja virta kytkeytyy päälle hetken kuluttua. SININEN POIS POIS Lamppu palaa Projektori on normaalissa tilassa, valmiina näyttämään kuvaa. Huom.: Kuvaruutunäyttö ei ole auki. SININEN POIS POIS Jäähdytystila Projektori jäähtyy virran sammutusta varten.
Lampun vaihtaminen MUISTUTUS: Ennen kuin teet tässä osiossa kuvattuja toimenpiteitä, seuraa sivulla sivu 8 olevia turvallisuusohjeita. Vaihda lamppu uuteen, kun ruutuun tulee teksti "Lamp is approaching the end of its useful life in the operation (Lampun käyttöikä lähenee loppuaan). Replacement suggested! www.dell.com/lamps" (lamppu lähestyy sen täyden toimintakunnon loppua. Suosittelemme sen vaihtamista. www.dell.com/lamps). Jos ongelma jatkuu lampun vaihtamisen jälkeen, ota yhteyttä Dell™asiakastukeen.
8 Pane lampun suojus takaisin paikalleen ja kiristä molemmat ruuvit. 9 Nollaa lampun käyttöikä valitsemalla "Yes" (Kyllä) kuvaruutunäytön Lamp Hour Reset (Nollaa lampputunnit) -valikon Power Settings (Virta-asetukset) välilehden Advanced Settings (Lisäasetukset) -kohdassa (Katso lisätietoja Lisäasetukset-valikon Virta-asetuksista sivu 51). Kun uusi lamppumoduuli on vaihdettu, projektori tunnistaa sen automaattisesti ja nollaa lampun tunnit.
Tekniset tiedot Valoventtiili 0,95" 1080p DMD, DarkChip2™ Kirkkaus 5000 ANSI-lumenia (enintään) Kontrastisuhde 2500:1 (Luonnollinen) 5 10000:1 (Dynaaminen) 20000:1 (Staattinen) Yhdenmukaisuus 85% tyypillisesti (Japanin standardi - JBMA) Pikseleiden määrä 1920x1080 (1080p) Aspect Ratio (Kuvasuhde) 16:9 Näytettävä väri 1,07 miljardia väriä (sekoitussävytyksellä) Väripyörän nopeus 2X Projektiolinssi F-Stop: F/ 2,6–2,9 Polttoväli, f = 39,12–46,94 mm 1,2X manuaalinen zoom-linssi Heittosuhde = 1
Virrankulutus Normaalitila: 525 W ± 10 % @ 110 Vac Säästötila: 430 W ± 10 % @ 110 Vac Virransäästötila: <20 W (Langaton ja Verkko päällä) Valmiustila: < 0,5 W (Verkko, VGA-lähtö ja Langaton pois) Audio 2 kaiutinta x 5 watin RMS Melutaso 39 dB(A) tavallisessa tilassa , 36 dB(A) säästötilassa Paino 7,26 kg Mitat (L x K x S) 17,01x5,31x11,42 tuumaa (432x135x290 mm) 17 ,01 "(4 32 mm ) 5,31"(135 mm) ,4 11 Käyttöympäristö (2 2" 90 m m ) Käyttölämpötila: 5 oC - 35oC (41oF- 95oF) Kosteus: 80
S-Videotulo: Yksi vakio 4-nastainen mini-DIN-liitin S-Video-liitin Y/C-signaalia varten. Komposiittivideotulo: Yksi keltainen RCA-liitäntä CVBS-signaalille. HDMI-tuloliitäntä: Kaksi HDMI-liitäntää HDMI 1.3 -tukea varten. HDCP-yhteensopiva. Analoginen audiotulo: Yksi 3,5 mm:n stereominikuulokeliitäntä (sininen). Määrittämätön audiolähtö: Yksi 3,5 mm:n stereominikuulokeliitäntä (vihreä). USB (Tyyppi A) -portti: Yksi USB-liitäntä Valokuva/PtG-kuvaselainta varten (JPG/PPTmuoto).
Langaton käyttöavain Langaton standardi: IEEE802.11b/g/n Langaton: Yksi Wi-Fi USB (Tyyppi A) -liitäntä langattoman käyttöavaimen tukea varten (USBkäyttöliittymä, valinnainen). Käyttöjärjestelmät: Windows 7/Vista/XP/2000, MAC OS X Tuki: Diaesitysten ja projektorin hallinta Jopa 30 käyttäjän samanaikainen yhteys. Neljä yhteen -jako. Mahdollistaa neljä esitysdian heijastamisen ruudulle. Kokoushallinta-tila.
PS232-nastamääritys RS232-protokolla • Tietoliikenneasetukset Yhteysasetukset Arvo Siirtonopeus 19,200 Databittejä 8 Pariteetti Ei mitään Loppubittejä 1 • Komentotyypit Näyttövalikon tuominen näkyviin ja asetusten säätö.
PIP-yhdistelmälähteet HDMI-A HDMI-B VGA-A VGA-B Komponentti S-video Komposiitti Langaton näyttö USB-näyttö USB-kuvaselain HDMI-A Ei Ei Kyllä Kyllä Kyllä Kyllä Kyllä Ei Ei Ei HDMI-B Ei Ei Kyllä Kyllä Kyllä Kyllä Kyllä Ei Ei Ei S-video Komposiitti HDMI-A HDMI-B Kyllä Kyllä VGA-A VGA-B Komponentti S-video Komposiitti Langaton näyttö USB-näyttö USB-kuvaselain VGA-A Kyllä Kyllä Ei Ei Ei Ei Ei Kyllä Kyllä Kyllä VGA-B Kyllä Kyllä Ei Ei Ei Ei Ei Kyllä Kyllä Kyllä Komponentti Kyllä Kyllä Ei Ei Ei Ei Ei Kyl
Yhteensopivuustilat (analoginen/digitaalinen) 114 Resoluutio Päivitystaajuus (Hz) Vaakataajuus (kHz) Pikselitaajuus (MHz) 640 x 350 70,087 31,469 25,175 640 x 480 59,940 31,469 25,175 640 x 480 p60 59,940 31,469 25,175 720 x 480 p60 59,940 31,469 27,000 720 x 576 p50 50,000 31,250 27,000 720 x 400 70,087 31,469 28,322 640 x 480 75,000 37,500 31,500 848 x 480 60,000 31,020 33,750 640 x 480 85,008 43,269 36,000 800 x 600 60,317 37,879 40,000 800 x 600 75,000 46,
Yhteydenotto Delliin Yhdysvalloissa olevat asiakkaat voivat soittaa numeroon 800-WWWDELL (800-999-3355). HUOMAUTUS: Jos sinulla ei ole toimivaa Internet-yhteyttä, löydät yhteystietomme ostokuitista, lähetysluettelosta, laskusta tai Dellin tuoteluettelosta. Dell™ tarjoaa useita Internet- ja puhelintukia sekä palvelumahdollisuuksia. Palveluiden saatavuus vaihtelee maittain, eikä kaikkia ehkä ole saatavilla juuri sinun alueellasi.
Liite: Sanasto ANSI LUMENS (ANSI-LUMENIT) — Kirkkauden mittaamisen standardi. Lumenit lasketaan jakamalla neliömetrin kokoinen kuva yhdeksään yhtä suureen neliöön, mittaamalla luksilukema (eli kirkkaus) jokaisen neliön keskeltä ja laskemalla lopuksi näiden yhdeksän lukeman keskiarvo. ASPECT RATIO (KUVASUHDE) — Yleisin kuvasuhde on 4:3. Varhaiset televisiot ja tietokonenäytöt käyttävät kuvasuhdetta 4:3, joka tarkoittaa että kuvan leveys on 4/3 kertaa sen korkeus.
dB — desibeli —Yksikkö, jota käytetään ilmoittamaan suhteellinen ero voimassa tai intensiteetissä, yleensä kahden akustisen tai sähköisen signaalin välillä, joka on kymmenen kertaa kyseisten kahden tason suhteen logaritmi. Diagonal Screen (Ruudun halkaisija) — Tapa, jolla mitataan ruudun tai projektoidun kuvan koko. Siinä mitataan yhdestä nurkasta vastakkaiseen nurkkaan. 2,74 m (9 jalkaa) korkean ja 3,66 m (12 jalkaa) leveän valkokankaan halkaisija on n. 4,57 m (15 jalkaa).
NTSC — National Television Standards Committee. Pohjoisamerikkalainen standardi kuvalle ja televisiolähetyksille. Videoformaatti on 525 juovaa ja 30 ruutua per sekunti. PAL — Phase Alternating Line. Eurooppalainen standardi kuvalle ja televisiolähetyksille. Videoformaatti on 625 juovaa ja 25 ruutua per sekunti. Reverse Image (Käänteinen kuva) — Toiminto, jolla kuva peilataan vaakasuunnassa. Kun sitä käytetään normaalin etuprojektion kanssa, tekstit ja kuva ovat väärin päin.
Sisällysluettelo D USB-näyttöliitäntä 10 VGA-A-lähtö (näytön ketjutus) -liitäntä 10 VGA-A-tuloliitäntä (D-sub) 10 VGA-B-tuloliitäntä (D-sub) 10 Virtaliitäntä 10 WiFi USB (Tyyppi A) -liitäntä 10 Dell yhteydenotto 115 K Kaukosäädin 32 Infrapunavastaanotin 31 L Lampun vaihtaminen 106 Liitäntäportit +12 V DC-lähtöliitäntä 10 Audiolähtöliitäntä 10 Audiotuloliitäntä 10 HDMI-A-liitäntä 10 HDMI-B-liitäntä 10 Komponenttivideotuloliitäntä 10 Komposiittivideoliitäntä 10 Mini-USB (Mini-tyyppi-B) liitäntä kaukosäädi
O Kytkeminen komposiittikaapelilla 18 Kytkeminen S-videokaapelilla 17 Kytkeminen tietokoneeseen RS232-kaapelilla 14, 15 Motorisoitu valkokangas 23 RS232 (9-nastainen D-sub naaraasta naaraasen nasta 2-3 vaihto) -kaapeli 14, 24 S-videokaapeli 17 Tietokoneeseen 12 USB-A–USB-B-kaapeli 15 USB-kaapeli 12 VGA:n ja YPbPr:n välinen kaapeli 19 VGA-kaapeli 12, 13 Virtajohto 12, 13, 14, 15, 17, 18, 19, 20, 21, 22, 23, 24 Ohjauspaneeli 30 P Pääyksikkö 8 Infrapunavastaanotin 8 Linssi 8 Linssin suojus 8 Nostapainike ko
Melutaso 109 Mitat 109 Näytettävä väri 108 Paino 109 Pikseleiden määrä 108 Projektioetäisyys 108 Projektiolinssi 108 Projektioruutukoko 108 RS232-protokolla 112 Valoventtiili 108 Väripyörän nopeus 108 Videoyhteensopivuus 108 Virrankulutus 109 Virranotto 108 Yhdenmukaisuus 108 tuki yhteydenotto Delliin 115 V Vianmääritys 101 Yhteydenotto Delliin 101 Virran kytkeminen päälle / pois päältä Projektorin kytkeminen päälle 25 Projektorin kytkeminen pois päältä 25 Y Yhteydenotto Delliin 7, 104, 106 Sisällysluett