Dell™ Personal All-In-One Printer A920 Owner’s Manual Look Inside For: • Learning about your printer • Understanding the software • Maintenance and Troubleshooting w w w. d e l l . c o m / s u p p l i e s | s u p p o r t . d e l l .
Order ink cartridges Dell™ ink cartridges are available only through Dell. You can order ink cartridges online at www.dell.com/supplies or by phone. USA 877-465-2968 (877-Ink2You) Canada 877-501-4803 Mexico 001-800-210-7607 Puerto Rico UK 800-805-7545 0870 907 4574 Ireland 1850 707 407 France 0825387247 Italy 800602705 Spain 902120385 Germany Austria Netherlands 0800 2873355 08 20 - 24 05 30 35 020 - 674 4881 Belgium 02.
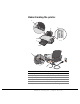
Understanding the printer 1 3 2 6 5 4 7 8 9 # Use the: When you want to: 1 Paper guide Ensure proper paper feeding. 2 Paper support Load paper into the printer. 3 Operator panel Operate the printer. 4 Paper exit tray Hold paper as it exits the printer. 5 Printer (scanner unit) Access the ink cartridges. 6 Top cover Place an item on the scanner glass. w w w. d e l l . c o m / s u p p l i e s | s u p p o r t . d e l l .
# Use the: When you want to: 7 USB cable connector Insert the USB cable. 8 Power supply Supply power to the printer. NOTE: Place the metal contacts to the left. 9 USB cable (sold separately) Connect the printer to your computer.
Notes, Notices, and Cautions NOTE: A NOTE indicates important information that helps you make better use of your printer. NOTICE: A NOTICE indicates either potential damage to hardware or loss of data and tells you how to avoid the problem. CAUTION: A CAUTION indicates a potential for property damage, personal, injury, or death. ____________________ Information in this document is subject to change without notice. © 2003 Dell Computer Corporation. All rights reserved.
Caution: SAFETY INFORMATION Use the following safety guidelines to help ensure your own personal safety and to help protect your computer and working environment from potential damage. • Use only the power supply provided with this product or the manufacturer’s authorized replacement power supply. • Connect the power cord to an electrical outlet that is near the product and easily accessible.
Contents Understanding the printer . . . . . . . . . . . . . . . . . . . . . . i . . . . . . . . . . . . . . . . . iv . . . . . . . . . . . . . . . . . . . . . . . 2 Caution: SAFETY INFORMATION 1 Learning about your printer Setting up the printer Using the operator panel . . . . . . . . . . . . . . . . . . . . . . 2 2 Understanding the software Accessing the Dell All-In-One Center . . . . . . . . . . . . . . . 4 The All-In-One Main page . . . . . . . . . . . . . . . . . . . .
Placing your document on the scanner glass . Printing . . . . . . . . . . . 15 . . . . . . . . . . . . . . . . . . . . . . . . . . . . . . . 16 . . . . . . . . . . . . . . . . . . . . . . . . . 16 . . . . . . . . . . . . . . . . . . . . . . . . . . . . . . . 17 Printing photos Copying . . . . . . . . . . . . . . . . . . . . . . . . . 17 . . . . . . . . . . . . . . . . . . . . . . . . . . . . . . 18 Copying photos Scanning Scanning photos . . . . . . . . . . . . . . . . . . . . . . . .
4 Maintenance Ordering supplies . . . . . . . . . . . . . . . . . . . . . . . . . . Replacing the ink cartridges Aligning the ink cartridges 30 . . . . . . . . . . . . . . . . . . . . 30 . . . . . . . . . . . . . . . . . . . . . 31 . . . . . . . . . . . . . . . . . 32 . . . . . . . . . . . . . . . . . . . . . . . 34 . . . . . . . . . . . . . . . . . . . . . . 34 . . . . . . . . . . . . . . . . . . . . . . . 34 . . . . . . . . . . . . . . . . . . . . . . . . . . .
Ink and Toner Cartridges Limited Warranty (Latin America Only) 64 . . . . . . . . . . . . . . . . . 65 . . . . . . . . . . . . . . . . . . . . . . . . . . . . . . . . . . .
1 SECTION 1 Learning about your printer Setting up the printer Using the operator panel
w w w. d e l l . c o m / s u p p l i e s | s u p p o r t . d e l l . c o m Setting up the printer If you have not already done so, follow the steps on the Placemat (poster) to complete the hardware and software installation. If problems occur during the setup process, see Setup troubleshooting on page 34. Using the operator panel The printer has an operator panel that lets you scan and copy with the press of a button.
2 SECTION 2 Understanding the software Accessing the Dell All-In-One Center Accessing Print Properties Using the Dell Printer Solution Center Using the Dell Image Expert
w w w. d e l l . c o m / s u p p l i e s | s u p p o r t . d e l l . c o m The printer software includes the: • Dell All-In-One Center—helps you perform various scan and copy operations and manage your saved images. • Print Properties—helps you adjust print settings. • Dell Image Expert—helps you edit your photos. • Dell Printer Solution Center—provides maintenance and troubleshooting help, as well as cartridge ordering information.
From this section: You can: Copy • Select the quantity and color of your copies. • Select a quality setting for your copies. • Adjust the size of the scanned area. • Lighten or darken your copies. • Enlarge or reduce your copies. NOTE: Click See More Copy Settings to view all settings. Creative Tasks Choose from a variety of creative ideas. • Enlarge or reduce an image. • Repeat an image several times on one page. • Print an image as a multi-page poster. • E-mail an image to a friend.
w w w. d e l l . c o m / s u p p l i e s | s u p p o r t . d e l l . c o m From this section: You can: Creative Tasks Select from a variety of creative ideas. For a list of creative tasks available from the All-In-One Main page, see page 5. Maintain/Troubleshoot page The Maintain/Troubleshoot page (accessed from the All-In-One Main page) provides you with direct links to the Dell Printer Solution Center.
The Print Properties screen appears along with the I Want To menu. Print Properties tabs Use the Quality/Copies, Paper Setup, and Print Layout tabs to select the print settings. I Want To menu Select one of the projects from the menu to help print photos, banners, envelopes, posters, and more. The I Want To menu The I Want To menu displays when you open Print Properties. It contains a variety of task wizards to help you select the correct print settings for your project.
w w w. d e l l . c o m / s u p p l i e s | s u p p o r t . d e l l . c o m Save Settings menu From the Save Settings menu, you can name and save the current Print Properties settings for future use. You can save up to five custom settings. Options menu Use the Options menu to make changes to the Quality, Layout, and Printing Status Options settings. For more information on these settings, open the tab dialog box from the menu, and then click the Help button located in the lower right corner of the screen.
The following table describes the Dell Printer Solution Center tabs. From this tab: You can: Printer Status (the tab • Check the current printer status. For example, while printing, the status that appears on Start) is Busy Printing. • See what type of paper is loaded into your printer. • View ink levels. How To • • • • • Receive information about basic features. Receive scan, copy, fax, and print instructions. Receive project information. Search the electronic guide. Go online to view more ideas.
w w w. d e l l . c o m / s u p p l i e s | s u p p o r t . d e l l . c o m Using the Dell Image Expert The Dell Image Expert lets you adjust photo attributes. With the Dell Image Expert, you can: Eliminate red eye Rotate images Attach images to e-mail Add text to images Resize images Create and share slideshows Add special effects Create Web pages Make a series of images into a movie There are two ways to open the Dell Image Expert: • Click Start → Programs → Dell Computer → Dell Image Expert.
3 SECTION 3 Using the printer Loading paper Placing your document on the scanner glass Printing Copying Scanning Editing scanned images Using special scan features Faxing Creating other projects
w w w. d e l l . c o m / s u p p l i e s | s u p p o r t . d e l l . c o m Loading paper To load other paper types, follow the guidelines on page 13. To load most types of paper: 1 Place the paper against the right side of the paper support with the print side facing you and the top of the paper feeding into the paper support. 2 Squeeze and slide the paper guide to the left edge of the paper. NOTE: Do not force paper into the printer.
You can load up to: Make sure: 100 sheets of plain paper The paper is designed for use with inkjet printers. • The envelopes are loaded vertically against the right side of the paper support. • The stamp location is in the upper left corner. • The envelopes are designed for use with inkjet printers. • You squeeze and slide the paper guide to the left edge of the envelope (as shown). NOTE: Do not load envelopes with: • Holes, perforations, cutouts, or deep embossing.
w w w. d e l l . c o m / s u p p l i e s | s u p p o r t . d e l l . c o m Before you begin copying, scanning, printing, or sending faxes, refer to the information below about how much paper the printer exit tray can hold.
Placing your document on the scanner glass 1 Open the top cover. 2 Place the item you want to copy face down on the scanner glass. NOTE: Make sure the upper left corner of the front of the item aligns with the arrow. 3 Close the scanner lid to avoid dark edges.
w w w. d e l l . c o m / s u p p l i e s | s u p p o r t . d e l l . c o m Printing The Print Properties I Want To menu (see page 7) provides you with printing wizards to help you complete tasks such as printing banners, photographs, or posters. 1 Load paper. For help, see page 12. 2 With your document open, click File → Print. 3 To change the printer settings, click Properties, Preferences, Options, or Setup (depending on the program or operating system). The Print Properties dialog box displays.
Copying 1 Place your document on the scanner glass. For help, see page 15. 2 Make sure your computer and your printer are on. 3 Open the Dell All-In-One Center. For help, see page 4. The All-In-One Main page appears. 4 Click Preview Now to see your scanned image. 5 Select a quantity and color for your copies. To further customize your copy job, click See More Copy Settings. 6 When you are finished customizing your image, click Copy Now. Copying photos 1 Place your photo on the scanner glass.
w w w. d e l l . c o m / s u p p l i e s | s u p p o r t . d e l l . c o m Scanning The following steps show you how to scan and save images. 1 Place your document on the scanner glass. For help, see page 15. 2 Open the Dell All-In-One Center. For help, see page 4. The All-In-One Main page appears. 3 Click Preview Now to see your scanned image. 4 Adjust the dotted lines to fit around the part of the image you want to print.
• Add text to your image • Adjust the brightness and contrast of the image • Flip or rotate your image • Change colors For help, refer to the documentation that came with your graphics program. Using special scan features You can use your printer software to scan in many ways. You can: • Repeat images • Autofit • Multi-up—A printer software option that lets you print multiple pages of a document on a single sheet of paper.
w w w. d e l l . c o m / s u p p l i e s | s u p p o r t . d e l l . c o m Faxing In order to send and receive faxes with your printer: • • Your computer must have faxing software installed and configured. You may use BVRP Classic Phone Tools/FaxTools or Microsoft Fax Console. – See "Using BVRP fax software" on page 21 to use BVRP. – See "Using Fax Console" on page 24 to use Fax Console. Your computer must be equipped with a data/fax modem. NOTE: A data/fax modem is not built into your printer.
Using BVRP fax software Installing BVRP fax software 1 Click the Start button. 2 Click All Programs. A list of your installed software appears. 3 Check for any entry referring to Classic PhoneTools or FaxTools. If you have either of these entries, skip to “Configuring BVRP fax software.” 4 Click on the desktop. The All Programs window closes. 5 Insert the Dell Personal All-In-One Printer A920 Drivers and Utilities CD. An installation window appears.
w w w. d e l l . c o m / s u p p l i e s | s u p p o r t . d e l l . c o m 4 Click Next. 5 Read the license agreement, and then click Yes to continue. 6 Enter your name and company name. 7 Click Next. 8 Enter an identifier, phone number, and fax number. 9 Click Next, click Next, and click Next again. 10 Click Finish. BVRP fax software launches. 11 Select your country, enter your area code, and enter any number you must press first before getting to an outside line. 12 Click OK.
Sending a multiple-page fax with BVRP 1 Click the Start button. 2 Move your mouse pointer over All Programs, then Dell Printers, and then Dell AIO Printer A920. 3 Click Dell All-In-One Center. 4 Click See More Scan Settings. 5 Click Display Advanced Scan Settings. 6 Click to select Scan multiple items before output. 7 Click OK. 8 Select Fax from the Send scanned image to drop-down menu. 9 Place the document you want to fax face down under the lid of the printer. 10 Click Preview Now.
w w w. d e l l . c o m / s u p p l i e s | s u p p o r t . d e l l . c o m Using Fax Console Installing Fax Console 1 Click the Start button. 2 Click Control Panel. 3 Click Add or Remove Programs. 4 Click Add/Remove Windows Components. 5 Click to select Fax Services. 6 Click Next. If prompted, insert the Microsoft Windows XP CD and click OK. Close the Welcome to Microsoft Windows XP window when it opens. 7 Click Finish. 8 Close the Add/Remove Programs window.
10 Click to select Print it on and use the drop-down menu to the right of this field to select Dell AIO Printer A920 if you want to print all received faxes. 11 To create an archive copy of each fax, click to select Store a copy in a folder and use the Browse button to select the desired archive location. 12 Click Next, confirm your settings, and click Finish. Sending a one-page fax with Fax Console 1 Click the Start button.
w w w. d e l l . c o m / s u p p l i e s | s u p p o r t . d e l l . c o m 10 Click Yes until all pages you want to fax are scanned. 11 Click No. 12 Follow the instructions on your computer screen to send your fax. Receiving faxes with Fax Console 1 Click the Start button. 2 Move your mouse pointer over All Programs, then Accessories, then Communications, then Fax. 3 Click Fax Console. You are now ready to receive a fax if you selected the Enable Receive check box when configuring Fax Console.
Creating other projects You can create other projects by following wizards provided in the software. Select a project from one of the following locations and follow the instructions on the screen. • From the Dell All-In-One Center Creative Tasks section. For help accessing the Dell All-In-One Center, see page 4. • From the Print Properties I Want To menu. For help accessing Print Properties, see page 6. • From the Dell Printer Solution Center How To tab.
28 Usi n g th e p r in ter w w w. d e l l . c o m / s u p p l i e s | s u p p o r t . d e l l .
4 SECTION 4 Maintenance Ordering supplies Replacing the ink cartridges Aligning the ink cartridges Cleaning the ink cartridge nozzles
w w w. d e l l . c o m / s u p p l i e s | s u p p o r t . d e l l . c o m Ordering supplies Your Dell Personal AIO Printer A920 comes with software installed to detect the ink levels in the printer. During a print job, a screen appears on your computer to warn you if the ink levels are low. To order more ink, follow the instructions on the screen or visit the Dell website at www.dell.com/supplies or www.dell.euro.com/supplies.
NOTICE: Do not touch the gold contact area on the cartridges. 6 Insert the new cartridges. Make sure the color ink cartridge is secure in the left carrier and the black cartridge is secure in the right carrier, and then snap the lids closed. 7 Lift the printer (scanner unit) and push the scanner support back while lowering the printer (scanner unit) until it is closed.
w w w. d e l l . c o m / s u p p l i e s | s u p p o r t . d e l l . c o m Cleaning the ink cartridge nozzles To improve print quality, you may need to clean the ink cartridge nozzles. Clean the nozzles when: • Characters are not printing completely. • White dashes appear in graphics or printed text. • Print is smudged or too dark. • Colors on print jobs are faded or they differ from the colors on the screen. • Vertical, straight lines are not smooth.
5 SECTION 5 Tr o u b l e s h o o t i n g Setup troubleshooting General troubleshooting More troubleshooting
w w w. d e l l . c o m / s u p p l i e s | s u p p o r t . d e l l . c o m Setup troubleshooting If you experience problems while setting up your printer, make sure: • You only have one Dell Personal AIO Printer A920 attached to your computer. • Your operating system is compatible with your printer. The Dell Personal AIO Printer A920 supports both Microsoft ® Windows® XP and Windows 2000.
6 SECTION 6 Regulator y notices Federal Communications Commission (FCC) compliance information statement Industry Canada compliance statement European Community (EC) directives conformity The United Kingdom Telecommunications Act 1984 ENERGY STAR Copyright advisory
w w w. d e l l . c o m / s u p p l i e s | s u p p o r t . d e l l . c o m Federal Communications Commission (FCC) compliance information statement The Dell Personal AIO Printer A920 has been tested and found to comply with the limits for a Class B digital device, pursuant to Part 15 of the FCC Rules.
Industry Canada compliance statement This Class B digital apparatus meets all requirements of the Canadian Interference-Causing Equipment Regulations. Avis de conformité aux normes d’Industrie Canada Cet appareil numérique de la classe B respecte toutes les exigences du Règlement sur le matériel brouilleur du Canada.
w w w. d e l l . c o m / s u p p l i e s | s u p p o r t . d e l l . c o m ENERGY STAR The EPA ENERGY STAR Office Equipment program is a partnership effort with office equipment manufacturers to promote the introduction of energy-efficient products and to reduce air pollution caused by power generation. Companies participating in this program introduce products that power down when they are not being used. This feature will cut the energy used by up to 50 percent.
7 SECTION 7 Appendix Contacting Dell Limited Warranties and Return Policy Dell Computer Corporation Ink and Toner Cartridges Limited Warranties Dell Software License Agreement
w w w. d e l l . c o m / s u p p l i e s | s u p p o r t . d e l l . c o m Contacting Dell To contact Dell electronically, you can access the following websites: • www.dell.com • support.dell.com (technical support) • premiersupport.dell.com (technical support for educational, government, healthcare, and medium/large business customers, including Premier, Platinum, and Gold customers) For specific web addresses for your country, find the appropriate country section in the table below.
Country (City) International Access Code Country Code City Code Department Name or Service Area, Website and E-Mail Address Belgium (Brussels) Website: support.euro.dell.com International Access Code: 00 E-mail: tech_be@dell.com Country Code: 32 E-mail for French Speaking Customers: support.euro.dell.
w w w. d e l l . c o m / s u p p l i e s | s u p p o r t . d e l l . c o m Country (City) International Access Code Country Code City Code Department Name or Service Area, Website and E-Mail Address Denmark (Copenhagen) Website: support.euro.dell.com International Access Code: 00 E-mail Support (portable computers): den_nbk_support@dell.com Country Code: 45 Area Codes, Local Numbers, and Toll-Free Numbers E-mail Support (desktop computers): den_support@dell.
Country (City) International Access Code Country Code City Code Department Name or Service Area, Website and E-Mail Address Area Codes, Local Numbers, and Toll-Free Numbers France (Paris) (Montpellier) Website: support.euro.dell.com International Access Code: 00 E-mail: support.euro.dell.
w w w. d e l l . c o m / s u p p l i e s | s u p p o r t . d e l l . c o m Country (City) International Access Code Country Code City Code Department Name or Service Area, Website and E-Mail Address Greece Website: support.euro.dell.com International Access Code: 00 E-mail: support.euro.dell.
Country (City) International Access Code Country Code City Code Department Name or Service Area, Website and E-Mail Address Area Codes, Local Numbers, and Toll-Free Numbers Italy (Milan) Website: support.euro.dell.com International Access Code: 00 E-mail: support.euro.dell.
w w w. d e l l . c o m / s u p p l i e s | s u p p o r t . d e l l .
Country (City) International Access Code Country Code City Code Department Name or Service Area, Website and E-Mail Address Norway (Lysaker) Website: support.euro.dell.com International Access Code: 00 E-mail Support (portable computers): Country Code: 47 nor_nbk_support@dell.com Area Codes, Local Numbers, and Toll-Free Numbers E-mail Support (desktop computers): nor_support@dell.com E-mail Support (servers): nordic_server_support@dell.
w w w. d e l l . c o m / s u p p l i e s | s u p p o r t . d e l l . c o m Country (City) International Access Code Country Code City Code Department Name or Service Area, Website and E-Mail Address St.
Country (City) International Access Code Country Code City Code Department Name or Service Area, Website and E-Mail Address Sweden (Upplands Vasby) Website: support.euro.dell.com International Access Code: 00 E-mail: swe_support@dell.com Country Code: 46 E-mail Support for Latitude and Inspiron: Swe-nbk_kats@dell.com City Code: 8 Area Codes, Local Numbers, and Toll-Free Numbers E-mail Support for OptiPlex: Swe_kats@dell.com E-mail Support for Servers: Nordic_server_support@dell.
w w w. d e l l . c o m / s u p p l i e s | s u p p o r t . d e l l . c o m Country (City) International Access Code Country Code City Code Department Name or Service Area, Website and E-Mail Address Area Codes, Local Numbers, and Toll-Free Numbers U.K. (Bracknell) Website: support.euro.dell.com International Access Code: 00 Customer Care website: support.euro.dell.com/uk/en/ECare/Form/Home.asp Country Code: 44 City Code: 1344 E-mail: dell_direct_support@dell.
Country (City) International Access Code Country Code City Code Department Name or Service Area, Website and E-Mail Address Area Codes, Local Numbers, and Toll-Free Numbers U.S.A.
w w w. d e l l . c o m / s u p p l i e s | s u p p o r t . d e l l . c o m Limited Warranties and Return Policy Dell-branded hardware products purchased in the U.S. or Canada come with either a 90-day, one-year, two-year, three-year, or four-year limited warranty. To determine which warranty came with your hardware product(s), see your packing slip or invoice. The following sections describe the limited warranties and return policy for the U.S.
WE DO NOT ACCEPT LIABILITY BEYOND THE REMEDIES PROVIDED FOR IN THIS LIMITED WARRANTY OR FOR CONSEQUENTIAL OR INCIDENTAL DAMAGES, INCLUDING, WITHOUT LIMITATION, ANY LIABILTY FOR THIRD-PARTY CLAIMS AGAINST YOU FOR DAMAGES, FOR PRODUCTS NOT BEING AVAILABLE FOR USE, OR FOR LOST DATA OR LOST SOFTWARE. OUR LIABILITY WILL BE NO MORE THAN THE AMOUNT YOU PAID FOR THE PRODUCT THAT IS THE SUBJECT OF A CLAIM. THIS IS THE MAXIMUM AMOUNT FOR WHICH WE ARE RESPONSIBLE.
w w w. d e l l . c o m / s u p p l i e s | s u p p o r t . d e l l . c o m When you contact us, we will issue a Return Material Authorization Number for you to include with your return. You must return the products to us in their original or equivalent packaging, prepay shipping charges, and insure the shipment or accept the risk if the product is lost or damaged in shipment. We will return the repaired or replacement products to you.
What do I do if I am not satisfied? We pride ourselves on our great customer service. If you are not satisfied with the service you receive under this limited warranty, please let us know. We have found that the best way to resolve issues regarding our limited warranty is to work together. If, after those discussions, you are still not satisfied, we believe arbitration is the most expeditious way to resolve your concerns.
w w w. d e l l . c o m / s u p p l i e s | s u p p o r t . d e l l . c o m • Reconditioned or Refurbished Dell-Branded Hardware Products and Parts — All reconditioned or refurbished Dell-branded server and storage products may be returned within thirty days from the date on the packing slip or invoice. All other reconditioned or refurbished Dell-branded hardware products and parts may be returned within fourteen days of the date on the packing slip or invoice.
THIS WARRANTY GIVES YOU SPECIFIC LEGAL RIGHTS, AND YOU MAY ALSO HAVE OTHER RIGHTS WHICH VARY FROM PROVINCE TO PROVINCE. DELL'S RESPONSIBILITY FOR MALFUNCTIONS AND DEFECTS IN PRODUCT IS LIMITED TO REPAIR AND REPLACEMENT AS SET FORTH IN THIS WARRANTY STATEMENT, FOR THE TERM OF THE WARRANTY PERIOD REFLECTED ON YOUR PACKING SLIP OR INVOICE.
w w w. d e l l . c o m / s u p p l i e s | s u p p o r t . d e l l . c o m What do I do if I need warranty service? Before the warranty expires, please call us at the relevant number listed in the following table. Please also have your Dell service tag number or order number available.
We will pay to ship the part to you if you use an address in Canada. Otherwise, we will ship the part freight collect. We will also include a prepaid shipping container with each replacement part for your use in returning the replaced part to us. NOTE: Before you replace parts, make sure to back up the data on the hard drive(s) and any other storage device(s) in the product(s). We are not responsible for lost or corrupted data.
w w w. d e l l . c o m / s u p p l i e s | s u p p o r t . d e l l . c o m If you do not have Internet access, call Dell at 1-800-847-4096 (Home Consumer customers) or 1-800-326-9463 (Corporate Commercial or Government customers). "Total Satisfaction" Return Policy (Canada Only) If you are an end-user customer who bought new products directly from Dell, you may return them to Dell up to 30 days after you receive them for a refund or credit of the product purchase price.
Dell-Branded Peripheral Products Dell does provide a limited warranty for new Dell-branded peripheral products (products for which Dell is listed as the manufacturer) such as monitors, batteries, memory, docking stations, and projectors). To determine which limited warranty applies to the product you purchased, see the Dell packing slip or invoice and/or the product documentation that accompanied your product. Descriptions of Dell's limited warranties are described in preceding sections.
w w w. d e l l . c o m / s u p p l i e s | s u p p o r t . d e l l . c o m Making a Claim Claims must be made in Latin America or the Caribbean by contacting the Dell point of sale within the guarantee period. The end user must always supply proof of purchase, indicating name and address of the seller, date of purchase, model and serial number, name and address of the customer, and details of symptoms and configuration at the time of malfunction, including peripherals and software used.
Dell Computer Corporation Ink and Toner Cartridges Limited Warranties The following sections describe the limited warranty for ink and toner cartridges for the U.S., Canada, and Latin America. Refer to the appropriate limited warranty accordingly. Ink and Toner Cartridges Limited Warranty (U.S.
w w w. d e l l . c o m / s u p p l i e s | s u p p o r t . d e l l . c o m Ink and Toner Cartridges Limited Warranty (Latin America Only) Dell Computer Corporation warrants to the original purchaser of genuine Dell-branded toner cartridges that the cartridges will be free from defects resulting from material or manufacturing process for the life of the cartridge.
Dell Software License Agreement This is a legal agreement between you, the user, and Dell Products, L.P ("Dell"). This agreement covers all software that is distributed with the Dell product, for which there is no separate license agreement between you and the manufacturer or owner of the software (collectively the "Software").
w w w. d e l l . c o m / s u p p l i e s | s u p p o r t . d e l l . c o m Limited Warranty Dell warrants that the Software disks will be free from defects in materials and workmanship under normal use for ninety (90) days from the date you receive them. This warranty is limited to you and is not transferable. Any implied warranties are limited to ninety (90) days from the date you receive the Software.
U.S. Government Restricted Rights The software and documentation are "commercial items" as that term is defined at 48 C.F.R. 2.101, consisting of "commercial computer software" and "commercial computer software documentation" as such terms are used in 48 C.F.R. 12.212. Consistent with 48 C.F.R. 12.212 and 48 C.F.R. 227.7202-1 through 227.7202-4, all U.S. Government end users acquire the software and documentation with only those rights set forth herein. Contractor/manufacturer is Dell Products, L.P.
68 Appendix w w w. d e l l . c o m / s u p p l i e s | s u p p o r t . d e l l .
Index A Advanced tab, 9 aligning ink cartridges, 31 All-In-One Center, see Dell All-In-One Center All-In-One Main page Copy section, 5 Creative Tasks section, 5 Preview section, 5 Scan section, 4 B banner paper, 13 banners, printing, 7 black and white, printing in, 7 both sides, printing on, see duplexing C cards loading, 13 cartridges aligning, 31 cleaning, 32 removing, 30 replacing, 30 viewing ink levels of, 8 cleaning, ink cartridge nozzles, 32 envelopes, printing, 7 Contact Information tab, 9 F
70 see more printing ideas, 7 multiple copies, 7 Preview section Print/Copy preview, 5 Scan preview, 5 O Print Layout tab, 7 operator panel, 2 Print Properties I Want To menu, 7 Options menu, 8 Paper Setup tab, 7 Print Layout tab, 7 Quality/Copies tab, 7 Save Settings menu, 8 tabs, 7 I Want To menu, 7 index cards loading, 13 ink cartridges aligning, 31 cleaning, 32 removing, 30 replacing, 30 viewing ink levels of, 8 ink levels, viewing, 8 iron-on transfers loading, 13 printing, 7 L loading cards, 1
scan settings, 4 W scanning, 18 placing document, 15 warranty, 52 settings, saving for future use, 8 setup, 2 software setup, 2 specialty papers banner, 13 cards, 13 custom size paper, 13 envelopes, 13 greeting cards, 13 index cards, 13 iron-on transfers, 13 photo cards, 13 photo paper, 13 postcards, 13 transparencies, 13 supplies, ordering, ii T toner, ordering, ii transparencies loading, 13 troubleshooting setup problems, 34 Troubleshooting tab, 9 V View Saved Images page, 5 Open with...
72 72 Index
w w w. d e l l . c o m / s u p p l i e s | s u p p o r t . d e l l .