Active System Manager Version 7.
Notes, Cautions, and Warnings NOTE: A NOTE indicates important information that helps you make better use of your computer. CAUTION: A CAUTION indicates either potential damage to hardware or loss of data and tells you how to avoid the problem. WARNING: A WARNING indicates a potential for property damage, personal injury, or death. Copyright © 2014 Dell Inc. All rights reserved. This product is protected by U.S. and international copyright and intellectual property laws.
Contents 1 Overview.................................................................................................................4 Other Documents You May Need........................................................................................................ 4 Licensing................................................................................................................................................4 Virtual Appliance Requirements..........................................................
Overview 1 Active System Manager (ASM) is Dell’s unified management product that provides a comprehensive infrastructure and workload automation solution for IT administrators and teams. ASM simplifies and automates the management of heterogeneous environments, enabling IT to respond more rapidly to dynamic business needs.
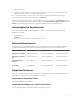
To download a license: 1. You will receive an email from customer service with instructions to access the license file from digital locker that includes your login ID and password. 2. To view the instructions, log in to "My Locker" with your login (email address) and password. 3. To download a license to your local share, click download. If you are using ASM for the first time, you must upload the license file through the Initial Setup wizard.
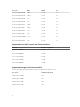
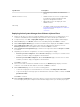
Resource BIOS iDRAC LC Dell PowerEdge M420 2.0.23 1.51.51 1.3 Dell PowerEdge M520 2.0.23 1.51.51 1.3 Dell PowerEdge M620 2.1.6 1.51.51 1.3 Dell PowerEdge M820 1.7.3 1.51.51 1.3 Dell PowerEdge R420 2.0.22 1.51.51 1.3 Dell PowerEdge R520 2.0.22 1.51.51 1.3 Dell PowerEdge R620 2.1.3 1.51.51 1.3 Dell PowerEdge R720 2.1.3 1.51.51 1.3 Dell PowerEdge R720XD 2.1.3 1.51.51 1.3 Dell PowerEdge R820 1.51.51 1.3 1.7.
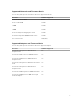
Supported Networks and Firmware Matrix The following table provides information about the supported Networks. Resource Firmware Supported Dell PowerConnect 7024K 5.1.2.3 Dell Force10 S4810 9.3.0.0 S5000 9.3.0.0 S6000 9.3.0.0 Dell PowerEdge M I/O Aggregator switch 9.2.0.0 Dell Networking MXL 10/40GbE blade switch 9.2.0.0 Cisco Nexus 5548 6.0(2)N2(3) Supported Adapters and Firmware Matrix The following table provides information about the supported adapters.
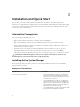
Installation and Quick Start 2 The following sections provide installation and quick start information, including step-by-step instructions for deploying and configuring Active System Manager (ASM) in VMware vSphere Client. Only one instance of ASM should be installed within a network environment. Exceeding this limit can cause conflicts in device communication. Information Prerequisites Before you begin the installation process: • Gather TCP/IP address information to assign to the virtual appliance.
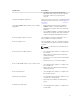
Specification Prerequisite • The DHCP server is fully functional with appropriate PXE settings to PXE boot images from ASM or Razor in your deployment network. Firmware and BIOS Requirements Make sure all the resources are configured with the firmware versions listed in the section Supported Resources PowerEdge M1000e Chassis, blade server, and IO aggregators • Chassis Management Controller (CMC) for M1000e chassis is configured and has the management IP address and login credentials assigned.
Specification VMware vCenter 5.1 or 5,5 PXE Setup Prerequisite • All storage array members are added to the group. • VMware vCenter 5.1 or 5.5 is configured and accessible through the management and hypervisor management network. • Appropriate licenses are deployed on the VMware vCenter. • The details of PXE setup is described in the Configuring ASM Virtual Appliance as PXE Boot Responder section. Deploying Active System Manager from VMware vSphere Client 1. Extract the .
Configuring the Active System Manager Virtual Appliance 3 You must configure the following settings in the virtual appliance console before you start using Active System Manager (ASM): • Configure static IP Address in the virtual appliance. For detailed information, see Configuring Static IP Address in the Virtual Appliance • Configure ASM Virtual Appliance as PXE boot responder.
This section provides information about configuring DHCP on the following servers. The information includes only the basic configuration options and declarations required for an iPXE environment. These details should be used as a cumulative addition to the settings currently used in your DHCP implementation (if you already have a DHCP environment). • Microsoft Windows 2012 Server. See Configure DHCP on Windows 2012 DHCP Server • Microsoft Windows 2008 Server R2.
8. • If you do not want to use the portion of the DHCP scope for PXE, click No. For PXE service to function properly, under Available Options, select 067 Bootfile Name, and enter the string value as bootstrap.ipxe. 9. Click Next, and then click Finish. Create the Boot File Scope Option 1. Open the Windows 2012 DHCP Server DHCP Manager. 2. In the console tree, expand the scope that will service your ASM PXE network. Right click Scope Options and select Configure Options. 3.
3. In the Scope Options dialog box, click the Advanced tab, select 067 Bootfile Name check box, and in the String value box, enter bootstrap.ipxe . NOTE: For PXE service to function properly, you must enter bootstrap.ipxe for the 067 Bootfile Name. 4. Select DHCP Standard Options from the Vendor class drop-down list. 5. Select iPXEclass from the User Class drop-down list. 6. Click OK to save the scope option. The policy is created by utilizing the new User Class with a scope option.
} else { } filename "undionly.kpxe"; Secondly, add the following code to the subnet declaration within your dhcpd.conf file. This code instructs a legacy PXE server to boot to a legacy boot file, and then directs to the iPXE boot file. For more details, see the Sample DHCP Configuration The configuration file must contain the following information: # dhcpd.conf # Sample configuration file for ISC dhcpd next-server 192.168.123.
have to hack syslog.conf to complete the redirection. log-facility local7; # No service will be given on this subnet, but declaring it helps the # DHCP server to understand the network topology. #subnet 192.168.123.0 netmask 255.255.255.0 { #} # This is a very basic subnet declaration. subnet 192.168.123.0 netmask 255.255.255.0 { range 192.168.123.24 192.168.123.29; option subnet-mask 255.255.255.0; option routers 192.168.123.1; if exists user-class and option user-class = "iPXE" { filename "bootstrap.
# Fixed IP addresses can also be specified for hosts. These addresses # should not also be listed as being available for dynamic assignment. # Hosts for which fixed IP addresses have been specified can boot using # BOOTP or DHCP. Hosts for which no fixed address is specified can only # be booted with DHCP, unless there is an address range on the subnet # to which a BOOTP client is connected which has the dynamic-bootp flag # set.
6. Execute the following commands to extract the .iso file from the directory /var/lib/razor/repo-store to the directory /var/lib/razor/repo-store/win2012. Make sure that your Windows .iso fileis available in “repo-store” directory where you run the following commands. "mount -o loop en_windows_server_2012_x64_dvd_915478.iso /mnt" "rsync -av /mnt/ win2012" "/umount/mnt” 7. Rename the WinPE image file that you created to razor-winpe.wim, and then copy the file to the directory win2012. 8.
Completing Initial Configuration 4 Log in to Active System Manager using the appliance IP address after completing the steps in this guide, After logging into ASM, you need complete the basic configuration setup in the Initial Setup wizard. For more information about completing the initial setup see the Active System Manger Version 7.5 User’s Guide.