Dell Adapter - USB 3.0 to HDMI/VGA/Ethernet/USB 2.
NOTE: A NOTE indicates important information that helps you make better use of your computer. CAUTION: A CAUTION indicates potential damage to hardware or loss of data if instructions are not followed. WARNING: A WARNING indicates a potential for property damage, personal injury, or death. © 2014 Dell Inc. All rights reserved. Information in this document is subject to change without notice. Reproduction of these materials in any manner whatsoever without the written permission of Dell Inc.
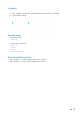
Contents a. Dell Adapter - USB 3.0 to HDMI/VGA/Ethernet/USB 2.0 - DA100 b. Quick Setup Guide a b Specifications Upstream Input • USB 3.0 Downstream Outputs • USB 2.
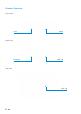
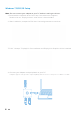
Product Overview Front View VGA HDMI Back View Ethernet USB 2.0 Top View USB 3.
Recommended System Requirements Hardware •Dual Core Intel CPU 2 GHz or better •USB 3.0 output port Operating System •Windows OS (Win 7, 8, 8.1, 10) 32/64 bits Operating Temperature Max.
Windows 7/8/8.1/10 Setup Note: Do not connect your adapter to your PC before installing the drivers. 1. Download the software driver from http://www.dell.com/support/. Double click on “Displaylink.exe” when driver is downloaded. 2. After installation, accept the End User License Agreement to continue. 3. Click "I Accept". DisplayLink Core software and DisplayLink Graphics will be installed. 4. Connect your Adapter and peripherals to your PC.
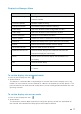
DisplayLink Manager Menu Menu Option Description DisplayLink Manager Clicking on this item will show the version of DisplayLink software installed. Check for Updates Windows update checking. DisplayLink Devices Connected DisplayLink devices checking. Audio Setup Opens the Windows Audio Configuration window. Video Setup Opens the Windows Screen Resolution window. Screen Resolution Displays a list of available resolutions.
Fit to TV configuration 1. To configure Fit to TV, choose the option from the DisplayLink GUI. The following interface appears 2. You will also see a red border on the DisplayLink screen The red border shows the size of the new Windows desktop. Use the “+” and “-” controls on the Fit to TV GUI to change the size of the red border until it fits on the TV screen. Note: Finer configuration of the size of the border can be achieved by holding down the CTRL key and clicking the “+” and “-”. 3.
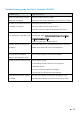
Troubleshooting guide for Dell 4-1 Adapter (DA100) Troubleshooting Suggested Solutions There is no video on the monitor Check the video connection cables attached to the Adapter Unplug from the power, wait 10 seconds, and then re-connect The video on the attached monitor Check video connection cables is distorted or corrupted Check the video resolution under Control Panel\All Control Panel Items\Display\Screen Resolution The video on the attached monitor Change the settings by either: is not display
Regulatory Information Dell 4-1 Adapter (DA100) complies with the FCC/CE rules and abides by worldwide regulatory compliance, engineering, and environmental affairs. Contacting Dell: 1. Visit www.dell.com/support 2. Select your support category 3. Select the appropriate service or support link based on your need. Or Visit: http://www.displaylink.com/support/.