Alienware AW2721D Monitor Benutzerhandbuch Modell: AW2721D Behördliche Modellnummer: AW2721Db
Hinweise, Vorsichtsmaßregeln und Warnungen HINWEIS: Ein HINWEIS weist auf wichtige Informationen hin, die Ihnen helfen, Ihren Computer besser zu nutzen. VORSICHT: Eine VORSICHT weist auf mögliche Schäden an der Hardware oder Datenverluste hin, wenn die Anweisungen nicht befolgt werden. ACHTUN: Eine ACHTUNG beschreibt die Möglichkeit von Eigentumsschäden, Verletzungen oder Tod. © 2020-2021 Dell Inc. oder deren Tochtergesellschaften. Alle Rechte vorbehalten.
Inhalt Sicherheitshinweise . . . . . . . . . . . . . . . . . . . . . . . . . . . . . 6 Über Ihren Monitor . . . . . . . . . . . . . . . . . . . . . . . . . . . . . 7 Lieferumfang . . . . . . . . . . . . . . . . . . . . . . . . . . . . . . . . . . . . . . . . 7 Produktmerkmale . . . . . . . . . . . . . . . . . . . . . . . . . . . . . . . . . . . . 8 Komponenten und Bedienelemente . . . . . . . . . . . . . . . . . . . . 10 Vorderseite . . . . . . . . . . . . . . . . . . . . . . . . . . . . . . . . . . . . . .
Monitor einrichten . . . . . . . . . . . . . . . . . . . . . . . . . . . . . 32 Ständer anbringen . . . . . . . . . . . . . . . . . . . . . . . . . . . . . . . . . . .32 Anschluss des Computers. . . . . . . . . . . . . . . . . . . . . . . . . . . . 36 Entfernen des Monitorständers . . . . . . . . . . . . . . . . . . . . . . . .37 VESA Wandmontageset (optional). . . . . . . . . . . . . . . . . . . . 39 Monitor bedienen . . . . . . . . . . . . . . . . . . . . . . . . . . . . . . 40 Monitor einschalten . . .
Selbstdiagnose. . . . . . . . . . . . . . . . . . . . . . . . . . . . . . . . . . . . . . 71 Allgemeine Probleme . . . . . . . . . . . . . . . . . . . . . . . . . . . . . . . . 72 Produktspezifische Probleme . . . . . . . . . . . . . . . . . . . . . . . . . 75 Universal Serial Bus (USB) spezifische Probleme . . . . . . . . 78 Anhang. . . . . . . . . . . . . . . . . . . . . . . . . . . . . . . . . . . . . . .80 FCC-Erklärung (nur für die USA) und weitere rechtliche Informationen . . . . . . . . . . . . . .
Sicherheitshinweise VORSICHT: Die Verwendung von anderen als in dieser Dokumentation angegebenen Bedienelementen, Anpassungen oder Verfahren kann zu Schock-, elektrischen und/oder mechanischen Gefahren führen. • Stellen Sie den Monitor auf eine feste Oberfläche und behandeln Sie ihn vorsichtig. Der Bildschirm ist zerbrechlich und kann beschädigt werden, wenn er fallen gelassen oder hart getroffen wird.
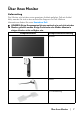
Über Ihren Monitor Lieferumfang Der Monitor wird mit den unten gezeigten Artikeln geliefert. Falls ein Artikel fehlt, wenden Sie sich an den technischen Support von Dell. Weitere Informationen finden Sie unter Kontakt zu Dell. HINWEIS: Einige Komponenten könnten optional sein und nicht mit dem Monitor geliefert werden. Einige Funktionen oder Medien könnten in einigen Ländern nicht verfügbar sein.
Netzkabel (Je nach Land verschieden) DisplayPort auf DisplayPort Kabel (1,8 Meter) Mini-DisplayPort auf DisplayPort Kabel (1,8 Meter) USB 3.2 Gen1 (5 Gbps) Upstream Kabel (aktiviert die USB-Ports am Monitor, 1,8 Meter) • Kurzanleitung • Sicherheit, Umweltschutz und Bestimmungen • Alienware Willkommenskarte Produktmerkmale Der Alienware AW2721D Monitor arbeitet mit Active Matrix-, Dünnschichttransistor- (TFT) und Flüssigkristall-Technologien (LCD) und einer LED-Beleuchtung.
• Farbbereich von 131,3% sRGB und DCI P3 98%. • Einstellmöglichkeiten für Kippen, Schwenken, Drehung und Höhenanpassung. • Abnehmbarer Ständer, VESA-kompatible Montagebohrungen (100 mm Lochabstand) zur flexiblen Anbringung. VESA™ steht für Video Electronics Standards Association. • Digitale Konnektivität via 1 DisplayPort und 2 HDMI Ports. • Ausgestattet mit 1 SuperSpeed USB 5 Gbps (USB 3.2 Gen1) Type-B Upstream-Port, 1 SuperSpeed USB 5 Gbps (USB 3.
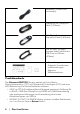
Komponenten und Bedienelemente Vorderseite Etikett Beschreibung Verwenden 1 Kabelführungsöffnung (an der Vorderseite des Ständers) Zum sauberen Verlegen der Kabel. 2 Ein/Aus-Taste (mit LEDAnzeige) Zum Ein-/Ausschalten des Monitors. Ein leuchtendes blaues Licht zeigt an, dass der Monitor eingeschaltet ist und normal funktioniert. Ein blinkendes weißes Licht zeigt an, dass sich der Monitor im Standbymodus befindet.
Obenansicht Etikett 1 Beschreibung Umgebungslichtsensor Verwenden Erkennt das Umgebungslicht und passt die Helligkeit der Anzeige entsprechend an. Weitere Informationen finden Sie unter Umgebungslichtsensor.
Etikett Beschreibung Verwenden 1 Joystick Zur Steuerung des OSD-Menüs. 2 Funktionstasten Weitere Informationen finden Sie unter Monitor bedienen. 3 Strichcode, Seriennummer und Nehmen Sie auf dieses Etikett Bezug, Service Tag Etikett wenn Sie Dell bezüglich technischer Unterstützung kontaktieren.
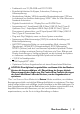
Ansicht von hinten und von unten Ansicht von hinten und von unten ohne Monitorständer Etikett Beschreibung Verwenden 1 Netzkabelanschluss Schließen Sie das Netzkabel an (im Lieferumfang des Monitors enthalten). 2 HDMI Port (HDMI 1) Schließen Sie Ihren Computer mit dem HDMI-Kabel an. 3 HDMI Port (HDMI 2) Schließen Sie Ihren Computer mit dem HDMI-Kabel an. 4 DisplayPort • Verbinden Sie Ihren Computer mit dem DisplayPort-DisplayPort Kabel (im Lieferumfang des Monitors enthalten).
5 Strahler Wenn die Einrichtung des Monitors abgeschlossen ist, tippen Sie auf den Berührungssensor unten auf dem Display, um die Strahler ein- oder auszuschalten. HINWEIS: Die Werkseinstellung ist Ein, so dass die Strahler aktiv sind, wenn das Netzkabel angeschlossen ist. Siehe AlienFX Beleuchtung, um die Standardeinstellungen zu ändern. HINWEIS: Wenn die Spektrum Funktion auf Ein gestellt ist, werden die Strahler ausgeschaltet.
7 Kopfhöreranschluss Zum Anschluss des Kopfhörers oder Lautsprechers. VORSICHT: Eine Erhöhung der Audioausgabe über 50% am Lautstärkeregler oder Equalizer kann die Ausgangsspannung an den Kopfhörern erhöhen und damit den Schalldruckpegel erhöhen. SuperSpeed USB 5 Gbps (USB 3.2 Gen1) Type-A Downstream-Port (3) Hier schließen Sie Ihre USB 3.2 Gen1 (5 Gbps) Geräte an.* 9 SuperSpeed USB 5 Gbps (USB 3.
Technische Daten des Monitors Modell AW2721D Bildschirmtyp Aktiv-Matrix-TFT-LCD Panel-Technologie IPS Seitenverhältnis 16:9 Sichtbares Bild Diagonale 684,7 mm (27,0 Zoll) Breite (aktiver Bereich) 596,7 mm (23,49 Zoll) Höhe (aktiver Bereich) 335,7 mm (13,21 Zoll) Gesamtbereich 200301,7 mm2 (310,30 Zoll2) Pixelabstand 0,2331 mm x 0,2331 mm Pixel pro Zoll (PPI) 109 Anzeigewinkel Vertikal 178° (typisch) Horizontal 178° (typisch) Luminanz 450 cd/m² (typisch) 600 cd/m² (HDR Spitze) Kontr
Farbgamut 131,3% sRGB und DCI P3 98% Integrierte Geräte • SuperSpeed USB 5 Gbps (USB 3.2 Gen1) Hub (mit 1 USB 3.2 Gen1 (5 Gbps) Upstream-Port) • 4 x USB 5 Gbps (USB 3.2 Gen1) DownstreamPort (einschließlich 1 Port, der schnelles Laden unterstützt) Konnektivität • 1 x DisplayPort Version 1.4 (hinten) • 2 x HDMI Port Version 2.0 (hinten) • 1 x USB 3.2 Gen1 (5 Gbps) Upstream-Port (hinten) • 4 x USB 3.
Unterstützte Videomodi Modell AW2721D Videoanzeigefähigkeiten (HDMI & DisplayPort-Wiedergabe) 480p, 576p, 720p, 1080p, QHD Voreingestellte Anzeigemodi HDMI Anzeigemodi Anzeigemodus Horizon- Vertikaletalfrequenz frequenz (kHz) (Hz) Pixeltakt (MHz) SyncPolarität (horizontal/ vertikal) VESA, 640 x 480 31,47 60 25,175 -/- VESA, 800 x 600 37,88 60 40 +/+ VESA, 1024 x 768 48,36 60 65 -/- 640 x 480p 31,48 60 25,18 -/- 720 x 480p 31,5 60 27,03 -/- 720 x 576p 31,25 50 27 -/- 128
DP Anzeigemodi Anzeigemodus HorizonVertikaletalfrequenz frequenz (kHz) (Hz) Pixeltakt (MHz) SyncPolarität (horizontal/ vertikal) VESA, 640 x 480 31,47 60 25,175 -/- VESA, 800 x 600 37,88 60 40 -/- VESA, 1024 x 768 48,36 60 65 -/- 2560 x 1440 @ 60 Hz 89,43 60 243,25 +/- 2560 x 1440 @ 100 Hz 150,92 100 410,5 +/- 2560 x 1440 @ 120 Hz 183 120 497,75 +/- 2560 x 1440 @ 144 Hz 222,2 144 597,69 +/- 2560 x 1440 @ 200 Hz 317,2 200 862,75 +/- 2560 x 1440 @ 240 Hz 388,5 240
Elektrische Daten Modell AW2721D Videoeingangssignale HDMI 2.0/DisplayPort 1.4, 600 mV für jede differentielle Linie, 100 Ω Eingangsimpedanz pro Differentialpaar Netzeingangsspannung / 100 VAC bis 240 VAC / 50 Hz oder 60 Hz + Frequenz / Strom 3 Hz / 1,8 A (typisch) Einschaltstrom • 120 V: 40 A (max.) bei 0°C (Kaltstart) • 220 V: 80 A (max.) bei 0°C (Kaltstart) Stromverbrauch • 0,2 W (Aus Modus)1 • 0,3 W (Standbymodus)1 • 31 W (Ein Modus)1 • 95 W (Max.
Physische Eigenschaften Modell AW2721D Signalkabeltyp • Digital: HDMI, 19-polig (Kabel ist nicht enthalten) • Digital: DisplayPort, 20-polig • Universal Serial Bus: USB, 9-polig HINWEIS: Dell Monitore sind so konzipiert, dass sie optimal mit den Videokabeln zusammenarbeiten, die mit Ihrem Monitor mitgeliefert werden.
Gewicht ohne montierten Ständer (zur Wand- oder VESA-Befestigung - ohne Kabel) 6,3 kg (13,89 lb) Gewicht des Ständers 4,3 kg (9,48 lb) Umgebungsbedingungen Modell AW2721D Kompatible Standards Bildschirm aus arsenfreiem Glas und frei von Quecksilber Temperatur Im Betrieb 0°C bis 40°C (32°F bis 104°F) Ausgeschaltet • Lagerung: -20°C bis 60°C (-4°F bis 140°F) • Versand: -20°C bis 60°C (-4°F bis 140°F) Luftfeuchtigkeit Im Betrieb 10% bis 80% (nicht kondensierend) Ausgeschaltet • Lagerung: 5% bis 90
Pinbelegung DisplayPort-Anschluss Pin Nummer Seite mit 20 Stiften des angeschlossenen Signalkabels 1 ML3 (n) 2 GND 3 ML3 (p) 4 ML2 (n) 5 GND 6 ML2 (p) 7 ML1 (n) 8 GND 9 ML1 (p) 10 ML0 (n) 11 GND 12 ML0 (p) 13 GND 14 GND 15 AUX (p) 16 GND 17 AUX (n) 18 Hot-Plug-Erkennung 19 Re-PWR 20 +3,3 V DP_PWR Über Ihren Monitor | 23
HDMI-Anschluss Pin Nummer 24 | Seite mit 19 Stiften des angeschlossenen Signalkabels 1 TMDS DATA 2+ 2 TMDS DATA 2, Abschirmung 3 TMDS DATA 2- 4 TMDS DATA 1+ 5 TMDS DATA 1, Abschirmung 6 TMDS DATA 1- 7 TMDS DATA 0+ 8 TMDS DATA 0, Abschirmung 9 TMDS DATA 0- 10 TMDS CLOCK+ 11 TMDS CLOCK, Abschirmung 12 TMDS CLOCK- 13 CEC 14 Reserviert (am Gerät nicht angeschlossen) 15 DDC CLOCK (SCL) 16 DDC DATA (SDA) 17 DDC/CEC-Masse 18 +5 V STROM 19 HOT-PLUG-ERKENNUNG Über Ihren Moni
Plug & Play Unterstützung Sie können den Monitor mit jedem Plug-and-Play-kompatiblen System verbinden. Der Monitor stellt dem Computersystem automatisch eigene EDIDDaten (Extended Display Identification Data) über DDC-Protokolle (Display Data Channel) zur Verfügung, so dass sich das System selbst konfigurieren und die Monitoreinstellungen optimieren kann. Die meisten Monitor-Installationen laufen automatisch ab; auf Wunsch können Sie unterschiedliche Einstellungen wählen.
4 GND 5 SSTX- 6 SSTX+ 7 GND 8 SSRX- 9 SSRX+ USB 3.2 Gen1 (5 Gbps) Downstream Anschluss Pin Nummer 9-poliger Verbinder 1 VCC 2 D- 3 D+ 4 GND 5 SSRX- 6 SSRX+ 7 GND 8 SSTX- 9 SSTX+ USB-Ports • 1 x Upstream - hinten • 2 x Downstream - hinten • 2 x Downstream - unten Ladeanschluss - der Anschluss mit dem Symbol unterstützt bis zu 2 A Schnellladung, wenn das Gerät BC1.2-kompatibel ist. HINWEIS: Für die SuperSpeed USB 5 Gbps (USB 3.
HINWEIS: Die USB-Anschlüsse am Monitor funktionieren nur, wenn der Monitor eingeschaltet oder im Standbymodus ist. Wenn Sie den Monitor aus- und wieder einschalten, kann es ein paar Minuten dauern, bis angeschlossene Peripheriegeräte wieder normal funktionieren. LCD-Monitorqualität und Hinweise zu Pixeln Bei der Herstellung von LCD-Monitoren ist es keine Seltenheit, dass einzelne Bildpunkte (Pixel) nicht oder dauerhaft leuchten.
• Stellen Sie die Neigung des Monitors, seinen Kontrast und die Helligkeitseinstellungen ein. • Stellen Sie die Umgebungsbeleuchtung um Sie herum ein (z. B. Deckenleuchten, Schreibtischlampen und die Vorhänge oder Jalousien an nahegelegenen Fenstern), um Reflexionen und Blendung auf dem Monitorbildschirm zu minimieren. • Verwenden Sie einen Stuhl, der den unteren Rücken gut stützt.
Monitor auf oder unter Augenhöhe Monitor und Tastatur direkt vor dem Benutzer positioniert Handgelenke entspannt und flach Füße flach auf dem Boden Handhabung und Bewegung Ihres Monitors Um sicherzustellen, dass der Monitor beim Anheben oder Bewegen sicher gehandhabt wird, befolgen Sie die unten genannten Richtlinien: • Schalten Sie Ihren Computer und den Monitor aus, bevor Sie den Monitor bewegen oder anheben. • Trennen Sie alle Kabel vom Monitor.
• Achten Sie beim Anheben oder Verschieben des Monitors darauf, dass der Bildschirm von Ihnen weg zeigt und nicht auf den Anzeigebereich drückt, um Kratzer oder Beschädigungen zu vermeiden. • Wenn Sie den Monitor anheben oder bewegen, drehen Sie ihn nicht auf den Kopf, während Sie den Sockel oder den Ständer festhalten. Dies könnte zu einer versehentlichen Beschädigung des Monitors oder zu Verletzungen führen.
Hinweise zur Wartung Monitor reinigen VORSICHT: Lesen und befolgen Sie die Sicherheitshinweise, bevor Sie den Monitor reinigen. ACHTUN: Trennen Sie das Monitornetzkabel von der Stromversorgung, bevor Sie den Monitor reinigen. Beim Auspacken, Reinigen und beim allgemeinen Umgang mit dem Monitor halten Sie sich am besten an die nachstehenden Hinweise: • Befeuchten Sie zur Reinigung Ihres antistatischen Monitors ein weiches, sauberes Tuch leicht mit Wasser.
Monitor einrichten Ständer anbringen HINWEIS: Der Ständer wird im Werk nicht montiert. HINWEIS: Die folgenden Anweisungen beziehen sich nur auf die Anbringung des Ständers, der mit Ihrem Monitor geliefert wurde. Wenn Sie einen Ständer anbringen, den Sie von einer anderen Quelle gekauft haben, folgen Sie den Anweisungen, die mit dem Ständer geliefert wurden. VORSICHT: Die folgenden Schritte sind wichtig, um Ihren gebogenen Bildschirm zu schützen.
5. Öffnen Sie die Schutzabdeckung am Monitor, um auf den VESASteckplatz am Monitor zuzugreifen. VORSICHT: Beim Anschließen des Ständers an den Monitor darf der Ständerarm nicht direkt auf der Rückseite des Monitors angebracht werden. Dabei könnten die Pogo-Stifte auf dem Ständer aufgrund von falscher Ausrichtung beschädigt werden. 6. Fügen Sie die Laschen am Ständer vorsichtig in die Schlitze an der hinteren Abdeckung des Monitors ein und senken Sie den Ständer ab, um ihn einrasten zu lassen. 7.
8. Schließen Sie das Netzkabel an den Monitor an. 9. Verlegen Sie die erforderlichen Kabel, z.B. USB 3.2 Gen1 (5 Gbps) Upstream-Kabel, USB 3.2 Gen1 (5 Gbps) Downstream-Kabel, HDMIKabel und DisplayPort-Kabel durch den Kabelführungsschlitz am Ständer. HINWEIS: Die USB 3.2 Gen1 (5 Gbps) Kabel und HDMI-Kabel werden nicht mit Ihrem Monitor geliefert und sind separat erhältlich. 10. Schließen Sie die erforderlichen Kabel an den Monitor an.
VORSICHT: Stecken Sie das Netzkabel nicht in die Steckdose und schalten Sie den Monitor nicht ein, bis Sie dazu aufgefordert werden. 11. Halten Sie den Ständer fest und heben Sie den Monitor vorsichtig an, und legen Sie ihn dann auf eine ebene Fläche. VORSICHT: Halten Sie den Ständer beim Anheben des Monitors fest, um unbeabsichtigte Beschädigungen zu vermeiden. 12. Heben Sie die Schutzabdeckung vom Monitor.
13. Schieben Sie die Laschen auf der E/A-Abdeckung in die Steckplätze an der hinteren Abdeckung des Monitors, bis sie einrasten. HINWEIS: Vergewissern Sie sich, dass alle Kabel durch die E/A Abdeckung und den Kabelführungsöffnung am Ständer geführt werden. Anschluss des Computers ACHTUNG: Bevor Sie die in diesem Abschnitt beschriebenen Schritte ausführen, lesen und befolgen Sie bitte die Sicherheitshinweise. HINWEIS: Schließen Sie nicht alle Kabel gleichzeitig an den Computer an.
2. Verbinden Sie das andere Ende des USB 3.2 Gen1 Upstream-Kabels mit einem geeigneten USB 3.2 Gen1 Anschluss an Ihrem Computer. 3. Schließen Sie USB 3.2 Gen1 Peripheriegeräte an die USB 3.2 Gen1 Downstream-Ports des Monitors an. 4. Schließen Sie die Netzkabel des Computers und Monitors an eine Steckdose in der Nähe an. 5. Schalten Sie Monitor und Computer ein. Falls Ihr Monitor ein Bild anzeigt, ist die Installation abgeschlossen. Falls kein Bild angezeigt wird, lesen Sie bitte unter Allgemeine Probleme.
5. Trennen Sie die Kabel vom Monitor und schieben Sie sie durch die Kabelführungsöffnung am Ständer. 6. Halten Sie die Ständer Entriegelungstaste gedrückt. 7. Heben Sie den Ständer vom Monitor ab.
VESA Wandmontageset (optional) (Schraubenabmessung: M4 x 10 mm) Lesen Sie die mit der VESA-kompatiblen Montageausrüstung für die Wand gelieferte Anleitung. 1. Legen Sie den Monitor auf ein weiches Tuch oder Kissen auf einer stabilen und ebenen Unterlage. 2. Entfernen Sie den Monitorständer. (Siehe Entfernen des Monitorständers.) 3. Die vier Schrauben, mit denen die Plastikabdeckung befestigt wird, mit einem Kreuzschlitzschraubenzieher entfernen. 4.
Monitor bedienen Monitor einschalten Drücken Sie auf die Ein/Aus-Taste, um den Monitor einzuschalten. Verwendung der Joystick Steuerung Verwenden Sie die Joystick Steuerung an der Rückseite des Monitors, um OSDEinstellungen vorzunehmen. 1. Drücken Sie die Joystick Taste, um das OSD-Hauptmenü zu starten. 2. Bewegen Sie den Joystick nach oben/unten/links/rechts, um zwischen den Optionen zu wechseln. 3. Drücken Sie die Joystick Taste erneut, um die Einstellungen zu bestätigen und zu beenden.
• Für die 2-Wege-Navigation (rechts und links). • Nach rechts bewegen, um in das Untermenü zu gelangen. • Nach links bewegen, um das Untermenü zu verlassen. • Erhöht (rechts) oder verringert (links) die Parameter des ausgewählten Menüpunktes. • Für die 2-Wege-Navigation (oben und unten). • Schaltet zwischen den Menüpunkten um. • Erhöht (oben) oder verringert (unten) die Parameter des ausgewählten Menüpunktes.
4 Schnellzugriffstasten/ Helligkeit/Kontrast 5 Schnellzugriffstasten/ Dunkel Stabilisierung Zum direkten Zugriff auf die Helligkeit/ Kontrast Anpassungsregler. Zum direkten Zugriff auf den Dunkel Stabilisierung Anpassungsregler. Wenn Sie eine dieser Tasten (einschließlich der Joystick Taste) an der Rückseite drücken, erscheint die OSD-Statusleiste, um Sie über die aktuellen Einstellungen einiger OSD-Funktionen zu informieren.
Voreinge- Ermöglicht Ihnen die Auswahl aus der Liste stellte Modi voreingestellter Farbmodi. • Standard*: Lädt die Standard-Farbeinstellungen des Monitors. Dies ist der voreingestellte Standardmodus. (* bedeutet DisplayHDR konform) • FPS: Lädt Farbeinstellungen, die ideal für Egoshooter (FPS) sind. • MOBA/RTS: Lädt Farbeinstellungen, die ideal für Multiplayer Online Kampfarenen (MOBA) und Echtzeitstrategie (RTS) Spiele sind. • RPG: Lädt Farbeinstellungen, die ideal für die meisten Rollenspiele (RPG) sind.
Voreingestellte Modi ACHTUNG: Die möglichen Langzeiteffekte von blauem Licht des Monitors könnten zu Verletzungen führen, z.B. digitale Überanstrengung der Augen, Übermüdung der Augen und Schädigung der Augen. Die Nutzung des Monitors über einen längeren Zeitraum könnte auch zu Schmerzen an Körperteilen wie z.B. Nacken, Arm, Rücken und Schultern führen. Weitere Informationen finden Sie unter Ergonomie. • Warm: Stellt Farben bei niedrigeren Farbtemperaturen dar.
Spiel verbessern Modus Die Option bietet drei verfügbare Funktion, um Ihr Gameplay Erlebnis zu verbessern. • Aus Zum Deaktivieren der Funktionen im Spiel verbessern Modus. • Timer Ermöglicht Ihnen die Deaktivierung oder Aktivierung des Timers oben links auf dem Monitor. Der Timer zeigt die absolvierte Zeit seit dem Beginn des Spiels. Wählen Sie eine Option aus der Liste der Zeitintervalle, um sich über die verbleibende Zeit im Klaren zu sein.
Dunkel Diese Option verbessert die Sichtbarkeit in dunklen Stabilisierung Spielszenarien. Je höher der Wert (zwischen 0 bis 3), desto besser die Sichtbarkeit im dunklen Bereich des angezeigten Bildes. Variable Passt die Hintergrundbeleuchtung des Monitors Hintergrund- optimal an, indem die Helligkeit und Dimmung des bel. Monitors auf der Grundlage des ausgewählten voreingestellten Modus gesteuert wird. • Modus 0: Ideal zum Spielen. • Modus 1: Geeignet für den hybriden Einsatz, z.B.
Helligkeit/ Kontrast Helligkeit Verwenden Sie dieses Menü, um die Helligkeit/ Kontrast Einstellung zu aktivieren. Mit der Helligkeit wird die Leuchtstärke der Hintergrundbeleuchtung eingestellt. Bewegen Sie den Joystick nach rechts, um die Helligkeit zu erhöhen, oder bewegen Sie den Joystick nach links, um die Helligkeit zu verringern (min. 0 / max. 100). Kontrast Stellen Sie zuerst die Helligkeit ein und danach nur den Kontrast, wenn weitere Einstellungen notwendig sind.
EingabeQuelle DP Wählen Sie den DP Eingang, wenn Sie den DisplayPort (DP) Anschluss nutzen. Drücken Sie auf die Joystick Taste, um die Auswahl zu bestätigen. HDMI 1 Den HDMI 1 oder HDMI 2 Eingang wählen Sie, wenn Sie einen HDMI-Anschluss nutzen. Drücken Sie auf die Joystick Taste, um die Auswahl zu bestätigen. HDMI 2 48 | Verwenden Sie das Eingabe-Quelle Menü, um zwischen verschiedenen Videosignalen auszuwählen, die eventuell an Ihrem Monitor angeschlossen sind.
AlienFX Verwenden Sie dieses Menü, um die LED Beleuchtung Lichteinstellungen für die Ein-/Aus-Taste, das Alienware Logo, die Strahler an der Unterseite des Monitors und den Lichtstreifen am Ständer anzupassen. Wählen Sie eine oder sämtliche dieser 4 Zonen aus den Untermenüs, bevor Sie Anpassungen vornehmen. Die untere Abbildung zeigt die Beleuchtungszonen.
Alle Zonen Zone 1: Rückseite Um eine LED Farbe für den ausgewählten Bereich einzustellen, wählen Sie Auf und verschieben Sie den Joystick zum Markieren der Option Benutzerfarbe. Zone 2: Ständer Zone 3: Strahler Zone 4: Ein/ Aus-Taste Nehmen Sie anschließend eine Auswahl aus der Liste der 20 verfügbaren Farben durch Verschieben des Joysticks nach oben oder unten vor.
Die folgende Tabelle zeigt die Farbnummer und RGB Codes für die 20 LED Farben ein. Nr. R G B 1 0 0 0 2 63 0 255 3 100 0 240 4 255 0 255 5 239 12 175 6 255 0 89 7 255 0 0 8 255 45 0 9 255 75 0 10 255 120 0 11 204 255 0 12 127 255 0 13 76 255 0 14 0 255 0 15 0 255 25 16 0 255 63 17 0 240 240 18 0 63 255 19 0 25 255 20 0 0 255 Wählen Sie Aus, um die AlienFX Lichter auszuschalten.
Spektrum Wenn Sie Auf auswählen, werden die AlienFX Lichter der 4 Zonen leuchten und die Farben in der Reihenfolge des Farbspektrums ändern: rot, orange, gelb, grün. blau, indigo und violett. AlienFX Setzen Sie im Menü AlienFX Beleuchtung sämtliche Beleuchtung Einstellungen auf die Standardwerte zurück. zurücksetzen Audio Lautstärke Ermöglicht Ihnen den Lautstärkepegel des Kopfhörerausgangs einzustellen. Verwenden Sie den Joystick zur Einstellung des Lautstärkepegels zwischen 0 und 100. Audio zurücks.
Menü Sprache Diese Option auswählen, um die Einstellungen der OSD, wie z. B. Sprache der OSD, die Zeitdauer der Anzeige des Menüs auf dem Bildschirm usw., vorzunehmen. Zum Einstellen der OSD-Anzeige auf eine der acht verfügbaren Sprachen (Englisch, Spanisch, Französisch, Deutsch, Brasilianisches Portugiesisch, Russisch, vereinfachtes Chinesisch oder Japanisch). Transparenz Wählen Sie diese Option, um die Menü-Transparenz durch Verschieben des Joysticks nach oben oder unten abzuändern (min. 0 / max.
Direkttaste 1 Ermöglicht Ihnen die Auswahl einer Option aus Direkttaste 2 Voreingestellte Modi, Spiel verbessern Modus, Dunkel Stabilisierung, Helligkeit/Kontrast, Direkttaste 3 Eingabe-Quelle oder Lautstärke und die Einstellung als eine Direkttaste. Personalisie- Setzen Sie im Menü Individualisieren sämtliche ren Einstellungen auf die Standardwerte zurück. rücksetzen Weiteres Info Anzeigen Zeigt die aktuellen Einstellungen des Monitors an. Firmware Zeigt die Firmwareversion des Monitors an.
Öko Modus Wenn der Computer in den Standbymodus wechselt, ermöglicht der Öko Modus, dass der Monitor ebenfalls in den Standbymodus wechselt. Die Standardeinstellung ist Auf. Die Auswahl von Aus kann verhindern, dass der Monitor in den Standbymodus wechselt. HINWEIS: Der Druck einer Taste (einschließlich der Joystick Taste) an der Rückseite des Monitors könnte den Monitor ebenfalls aufwecken, nachdem der Standbymodus aufgerufen wurde.
HINWEIS: Wenn Sie für eine der oben genannten Funktionen Ja wählen, wird die Meldung beim nächsten Mal nicht mehr angezeigt, wenn Sie beabsichtigen, die Einstellungen dieser Funktionen zu ändern. Wenn Sie eine Werksrückstellung durchführen, wird die Meldung erneut angezeigt. Wenn Zurücksetzen ausgewählt ist, wird die folgende Meldung angezeigt: Unter Problemlösung finden Sie weitere Informationen.
Wenn Sie keinen Dell-Computer (Laptop oder Desktop) verwenden: • Besuchen Sie die Kundendienst-Webseite Ihres Computerherstellers und laden Sie den aktuellsten Grafiktreiber herunter. • Besuchen Sie die Webseite Ihres Grafikkartenherstellers und laden Sie den aktuellsten Grafikkartentreiber herunter. Kippen, Schwenken und Höhenverstellung HINWEIS: Die folgenden Anweisungen beziehen sich nur auf die Anbringung des Ständers, der mit Ihrem Monitor geliefert wurde.
Höhenverstellung HINWEIS: Der Ständer kann um bis zu 130 mm nach oben ausgezogen werden. Die nachstehende Abbildung zeigt, wie Sie den Fuß ausziehen können. Die Anzeige drehen Bevor Sie die Anzeige drehen, stellen Sie sicher, dass sie vollständig vertikal ausgefahren und vollständig nach oben geneigt ist, damit sie nicht an den unteren Rand des Monitors stößt.
Im Uhrzeigersinn drehen Entgegen dem Uhrzeigersinn drehen HINWEIS: Um die Anzeige-Rotierung-Funktion (Querformat/ Hochformat) mit Ihrem Dell-Computer nutzen zu können, benötigen Sie einen aktualisierten Grafikkartentreiber, der nicht mit dem Monitor geliefert wird. Zum Herunterladen des Grafikkartentreibers besuchen Sie www.dell.com/support und schauen im Download Bereich unter Videotreiber nach den neuesten Treiberaktualisierungen.
Anzeigerotation-Einstellungen Ihres Systems anpassen Nachdem Sie Ihren Monitor gedreht haben, müssen Sie die AnzeigerotationEinstellungen Ihres Systems mit den folgenden Schritten anpassen. HINWEIS: Wenn Sie den Monitor nicht mit einem Dell-Computer verwenden, müssen Sie die Grafiktreiber-Webseite oder die Webseite Ihres Computerherstellers besuchen, um Informationen über das Ändern der Anzeigerotation-Einstellungen Betriebssystems zu erhalten. So stellen Sie die Anzeigerotation ein: 1.
Nutzung der AlienFX Anwendung Sie können die LED Lichteffekte über mehrere verschiedene Zonen auf Ihrem Alienware Monitor über AlienFX im AWCC (Alienware Command Center) konfigurieren. HINWEIS: Wenn Sie einen Alienware Gaming Desktop oder Laptop besitzen, können Sie direkt auf das AWCC zugreifen, um die Lichter zu steuern. HINWEIS: Weitere Informationen finden Sie in der Online-Hilfe des Alienware Command Center.
• Alienware Command Center Anwendung • Alienware Gaming Monitor Control Center Treiber 2. Navigieren Sie zu dem Ordner, in dem Sie die Setup Dateien gespeichert haben. 3. Doppelklick Sie die Setup Datei und folgen Sie den Anweisungen auf dem Bildschirm, um die Installation abzuschließen. Navigation durch das AlienFX Fenster Mit dem Alienware Command Center können Sie mit AlienFX die LED Lichtfarben und Übergangseffekte für Ihren Alienware Monitor steuern.
C Themenkomponenten Mit diesen Komponenten (LIGHTING (BELEUCHTUNG), MACROS (MAKROS), SETTINGS (EINSTELLUNGEN)) können Sie das ausgewählte Design als aktives Theme festlegen. D THEMES (THEMEN) Liste Zeigt die Themen in der Listen- oder Gitteransicht an. E Hintergrundsteuerungen Stellt die Effekte der Hintergrundanimation ein. F Hilfe Klicken Sie darauf, um die AWCC Online-Hilfe aufzurufen.
Bildschirm mit der Rückansicht des Monitors Die folgende Tabelle beschreibt die Funktionen und Merkmale auf dem Bildschirm: Nr. H Funktionen Beschreibungen LIGHTING (BELEUCHTUNG) Feld Verwenden Sie die Bedienelemente in diesem Bedienfeld, um Lichteffekte für ein Motiv einzurichten. I SAVE THEME (THEMA SPEICHERN) Klicken Sie hier, um alle Anpassungen und Änderungen für das Thema zu speichern.
Ein Thema erstellen So erstellen Sie ein Thema mit Ihren bevorzugten Lichteinstellungen: 1. Starten Sie AWCC. 2. Klicken Sie auf FX in der oberen Menüleiste, um auf den Startbildschirm von AlienFX zuzugreifen. 3. Klicken Sie in der linken oberen Ecke des Fensters auf Thema zu erstellen. , um ein neues 4. Geben Sie im Textfeld CREATE NEW THEME (NEUES THEMA ERSTELLEN) den Namen des Themas ein. 5.
Beleuchtungseffekte einstellen Das LIGHTING (BELEUCHTUNG) Feld bietet verschiedene Beleuchtungseffekte. Sie können auf Effect (Effekt) klicken, um ein DropdownMenü mit den verfügbaren Optionen zu öffnen. HINWEIS: Die angezeigten Optionen können je nach der/den von Ihnen angegebenen Beleuchtungszone(n) variieren.
3. Wiederholen Sie die vorherigen Schritte, um Color 2 (Farbe 2) als Endhelligkeit festzulegen. 4. Ziehen Sie den Schieberegler BRIGHTNESS (HELLIGKEIT), um die Helligkeit der Farbe einzustellen. 5. Ziehen Sie den TEMPO Schieberegler, um die Übergangsgeschwindigkeit anzupassen. Pulse (Pulsierend) Beschreibungen Der Effekt bewirkt, dass das Licht mit einer kurzen Pause blinkt. Um die Einstellungen vorzunehmen: 1.
Color (Farbe) Beschreibungen Der Effekt lässt das LED Licht in einer einzigen statischen Farbe leuchten. Um die Einstellungen vorzunehmen: 1. Wählen Sie eine bevorzugte Farbe aus der Farbpalette oder der Liste der PRESET COLORS (VOREINGESTELLTEN FARBEN). Die ausgewählte Farbe und ihre RGB-Farbcodes werden im rechten Feld angezeigt. HINWEIS: Um die Farbe zu ändern, verwenden Sie die Pfeiltasten nach oben und unten neben den Feldern R/G/B, um die Farbcodes zu bearbeiten. 2.
Breathing (Blinkend) Beschreibungen Der Effekt lässt das Licht von hell auf dunkel wechseln. Um die Einstellungen vorzunehmen: 1. Wählen Sie eine bevorzugte Farbe aus der Farbpalette oder der Liste der PRESET COLORS (VOREINGESTELLTEN FARBEN). Die ausgewählte Farbe und ihre RGB-Farbcodes werden im rechten Feld angezeigt. HINWEIS: Um die Farbe zu ändern, verwenden Sie die Pfeiltasten nach oben und unten neben den Feldern R/G/B, um die Farbcodes zu bearbeiten. 2.
Problemlösung ACHTUNG: Bevor Sie die in diesem Abschnitt beschriebenen Schritte ausführen, lesen und befolgen Sie bitte die Sicherheitshinweise. Selbsttest Ihr Monitor verfügt über eine Selbsttestfunktion, mit der Sie überprüfen können, ob der Monitor ordnungsgemäß funktioniert. Wenn Monitor und Computer ordnungsgemäß miteinander verbunden sind, der Monitorbildschirm jedoch leer bleibt, führen Sie bitte wie folgt den Monitor-Selbsttest aus: 1. Schalten Sie sowohl Computer als auch Monitor aus. 2.
4. Schalten Sie den Monitor aus und schließen Sie das Videokabel neu an; schalten Sie anschließend sowohl den Computer als auch den Monitor wieder ein. Wenn nach Durchführung der obigen Schritte auf dem Monitor keine Videoausgabe angezeigt wird, liegt das Problem möglicherweise an der Grafikkarte oder am Computer. Selbstdiagnose Ihr Monitor ist mit einem integrierten Selbstdiagnose-Werkzeug ausgestattet, das Ihnen bei der Diagnose von Problemen mit dem Monitor oder mit Computer und Grafikkarte helfen kann.
Allgemeine Probleme In der folgenden Tabelle finden Sie grundlegende Informationen zu allgemeinen Monitorproblemen und zu möglichen Lösungen: Allgemeine Symptome Beschreibung Kein Bild Kein Bild/ Betriebsanzeige -LED leuchtet nicht Mögliche Lösungen • Achten Sie darauf, dass das Videosignalkabel richtig und fest an Monitor und Computer angeschlossen ist. • Überzeugen Sie sich davon, dass die Steckdose ausreichend Strom liefert, indem Sie einfach vorübergehend ein anderes Gerät anschließen.
Zittriges/ verwackeltes Videobild Unruhiges Bild • Setzen Sie den Monitor auf die oder leichte Werkseinstellungen zurück. Bewegungen • überprüfen Sie die Umgebungsbedingungen. • Bringen Sie den Monitor in einen anderen Raum und testen Sie ihn dort. Fehlende Bildpunkte LCDBildschirm weist Punkte auf • Schalten Sie den Monitor aus und wieder ein. • Permanent nicht leuchtende Pixel zählen zu den natürlichen Defekten, die bei der LCD-Technologie auftreten können.
Horizontale/ vertikale Linien Bild weist eine • Setzen Sie den Monitor auf die oder mehrere Werkseinstellungen zurück. Linien auf • Führen Sie den Monitor-Selbsttest aus und prüfen Sie, ob die Linien auch im Selbsttestmodus vorhanden sind. • Überprüfen Sie die Stecker am Videokabel auf verbogene oder abgebrochene Kontaktstifte. • Starten Sie die Selbstdiagnose. Synchronisierungsprobleme Bildschirm ist • Setzen Sie den Monitor auf die verzerrt oder Werkseinstellungen zurück.
Falsche Farben Unzureichende Farbdarstellung • Ändern Sie die Einstellungen der Voreingestellte Modi im Spiel Menü OSD je nach Anwendung. • Passen Sie den R/G/B Wert unter Benutzerfarbe im OSD-Menü Spiel an. • Starten Sie die Selbstdiagnose. Nachbildeffekt (Eingebranntes Bild), verursacht durch längere Darstellung von Standbildern Ein schwaches • Stellen Sie den Bildschirm so ein, dass er sich nach einigen Minuten der Inaktivität Nachbild eines ausschaltet.
Kein Eingangssignal wenn Bedientasten gedrückt werden Kein Bild; die LED leuchtet weiß • Überprüfen Sie die Signalquelle. Vergewissern Sie sich, dass sich der Computer nicht im Energiesparmodus befindet. Dazu bewegen Sie die Maus oder drücken eine beliebige Taste an der Tastatur. • Überprüfen Sie, ob das Signalkabel richtig eingesteckt ist. Ziehen Sie nötigenfalls das Signalkabel und stecken Sie es wieder ein. • Setzen Sie den Computer oder das Videoabspielprogramm zurück.
Bildschirmflackern In den angezeigten Bildern ist ein Flackern zu erkennen • Verwenden Sie die native Auflösung Ihres Monitors (2560 x 1440 bei 60 Hz) oder eine höhere Bildwiederholrate. • Wenn die variable Bildwiederholrate (VRR) Ihres Geräts aktiviert ist, deaktivieren Sie die variable Bildwiederholrate (VRR). • Wenn Sie eine Nvidia Grafikkarte verwenden und G-Sync aktiviert ist, deaktivieren Sie G-Sync. • Wenn Sie eine AMD-Grafikkarte verwenden und Free-Sync aktiviert ist, deaktivieren Sie Free-Sync.
Universal Serial Bus (USB) spezifische Probleme Spezifische Symptome USBSchnittstelle funktioniert nicht Beschreibung Mögliche Lösungen • Vergewissern Sie sich, dass der Monitor USBeingeschaltet ist. Peripheriegeräte funktionieren • Trennen Sie das Upstream-Kabel zum nicht Computer ab, schließen Sie es anschließend wieder an. • Trennen Sie USB-Peripheriegeräte (Downstream-Anschluss) ab, schließen Sie diese anschließend wieder an. • Schalten Sie den Monitor aus und wieder ein.
Drahtlose USB Peripheriegeräte funktionieren nicht mehr, wenn ein USB 3.2 Gerät angeschlossen wird Drahtlose USB Peripheriegeräte reagieren langsam oder funktionieren nur, wenn der Abstand zwischen dem Gerät und dem Empänger kleiner wird • Vergrößern Sie den Abstand zwischen den USB 3.2 Peripheriegeräten und dem WLAN USB Empfänger. • Stellen Sie Ihren WLAN USB Empfänger so nah wie möglich an den USB Peripheriegeräten auf.
Anhang ACHTUNG: Sicherheitshinweise ACHTUNG: Die Verwendung von anderen als in dieser Dokumentation angegebenen Bedienelementen, Anpassungen oder Verfahren kann zu Schock-, elektrischen und/oder mechanischen Gefahren führen. Weitere Informationen über Sicherheitshinweise finden Sie unter Sicherheit, Umweltschutz und Bestimmungen (SERI). FCC-Erklärung (nur für die USA) und weitere rechtliche Informationen Lesen Sie bitte die Webseite über rechtliche Konformität unter www.dell.