
Service Manual


Removing the system board
WARNING: Before working inside your computer, read the safety information that shipped with your computer and
follow the steps in Before working inside your computer. After working inside your computer, follow the instructions
in
After working inside your computer. For more safety best practices, see the Regulatory Compliance home page at
www.dell.com/regulatory_compliance.
NOTE: Your computer’s Service Tag is stored in the system board. You must enter the Service Tag in the BIOS setup
program after you replace the system board.
NOTE: Replacing the system board removes any changes you have made to the BIOS using the BIOS setup program.
You must make the appropriate changes again after you replace the system board.
NOTE: Before disconnecting the cables from the system board, note the location of the connectors so that you can
reconnect the cables correctly after you replace the system board.
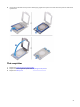
Prerequisites
1 Remove the stability foot.
2 Remove the left and right side-panels. See “Removing the side panels”.
3 Remove the top fan.
4 Remove the graphics card or multiple graphics cards.
5 Remove the memory modules.
6 Remove the processor liquid-cooling assembly.
7 Remove the wireless card.
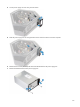
Procedure
NOTE: Note the routing of all cables as you remove them so that you can route them correctly after you replace the
system board. For information on system-board connectors, see “system-board components”.
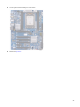
1 Lay the chassis on the right side.
2 Disconnect all the cables connected to the system-board assembly.
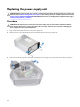
3 Remove the nine screws (#6-32x6) that secure the system-board assembly to the chassis.
96