
Service Manual


Steps
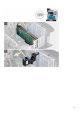
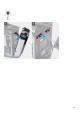
1. Disconnect the tron-light cable and then remove the cable from the routing guides on the chassis.
2. Lay the computer on the right side.
3. Press the releasing clip on the power-cable connectors and disconnect the power cables from the graphics card.
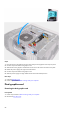
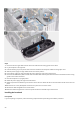
4. Slide the power-supply unit cage release latches to the unlock position.
5. Lift the power-supply unit cage and rotate the power-supply unit cage away from the chassis.
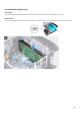
6. Disconnect the USB cables, LED controller cable and audio cable from the system board and remove the cables from the routing
guides on the inside of the chassis.
7. Place the computer in an upright position.
8. Rotate the power-supply unit cage towards the chassis.
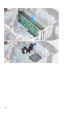
9. Rotate and pull the front bezel away from the front of the chassis to release the tabs on the front bezel from the slots on the front
panel.
10.Remove the two screws (#6-32) that secure the front-panel slot cover to the chassis.
11. Remove the cable management cover off the chassis.
12. Route the cables through the slot on the front panel and lift the front bezel away from the chassis.
Installing the front bezel
Prerequisites
If you are replacing a component, remove the existing component before performing the installation procedure.
60