
Service Manual
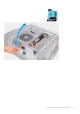
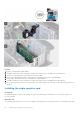
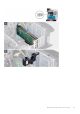
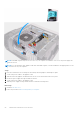
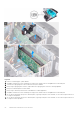


Table Of Contents
- Alienware Aurora R11 Service Manual
- Contents
- Munka a számítógép belsejében
- Alkatrészek eltávolítása és beszerelése
- A számítógép belső nézete
- System-board components
- Ajánlott szerszámok
- Csavarlista
- Bal oldali burkolat
- Felső burkolat
- Jobb oldali burkolat
- 2,5 hüvelykes merevlemez-meghajtó
- 3,5 hüvelykes merevlemez-meghajtó
- 2,5 hüvelykes merevlemezrekesz
- 3,5 hüvelykes merevlemezrekesz
- 550 W power-supply unit
- 1000 W Power-supply unit
- Jobb oldali tron-light kártya
- Processzor folyadékhűtő egység
- Gombelem
- Memóriamodulok
- SSD-meghajtó
- Külön videokártya
- Dupla videokártya
- Elülső keret
- Felső rács
- Alsó burkolat
- Processzorventilátor- és hűtőbordaegység
- Processzor
- Vezeték nélküli kártya
- Antennák
- Előlapi I/O-panel
- Elülső házventilátor
- Felső házventilátor
- Front AlienFX LED boards
- Bekapcsológomb-panel
- Alaplap
- Eszközillesztők
- Rendszerbeállítás
- Hibaelhárítás

NOTE: Install AMD Vega 20 only into the PCIe slot 1 of your computer. If installed on PCIe slot 4, the power-supply unit
cannot be closed.
NOTE: If you are using any other graphics card other than AMD Vega 20, it can be installed into the appropriate PCIe slot
i.e. X4, X8 or X16 on your computer.
Steps
1. Place the card into the X16 slot and press down firmly until the graphics card snaps into place.
2. Connect the power cables to the graphics card.
3. Slide the tab on the graphics-card bracket into the slot on the chassis and rotate it into place.
4. Rotate the power-supply unit cage towards the chassis.
5. Connect the power cables to the graphics card.
6. Slide the power-supply unit cage release latches towards the locked position.
Next steps
1. Install the left-side cover.
2. Follow the procedure in After working inside your computer.
54
Alkatrészek eltávolítása és beszerelése