Alienware m15 Ryzen Edition R5 Servicehandbok Regleringsmodell: P109F Regleringstyp: P109F002/P109F003 April 2021 Rev.
Anmärkningar, försiktighetsbeaktanden och varningar OBS: OBS innehåller viktig information som hjälper dig att få ut det mesta av produkten. CAUTION: VIKTIGT anger antingen risk för skada på maskinvara eller förlust av data och förklarar hur du kan undvika problemet. VARNING: En VARNING visar på en potentiell risk för egendoms-, personskador eller dödsfall. © 2021 Dell Inc. eller dess dotterbolag. Med ensamrätt. Dell, EMC och andra varumärken är varumärken som tillhör Dell Inc. eller dess dotterbolag.
Innehåll Kapitel 1: Arbeta inuti datorn.................................................................................................................. 6 Innan du arbetar inuti datorn............................................................................................................................................... 6 Säkerhetsanvisningar............................................................................................................................................................
Pekskärm.............................................................................................................................................................................39 Ta bort styrplattan......................................................................................................................................................... 39 Installera styrplattan..................................................................................................................................
Kapitel 6: Få hjälp och kontakta Alienware..........................................................................................
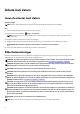
Arbeta inuti datorn Innan du arbetar inuti datorn Om denna uppgift OBS: Bilderna i det här dokumentet kan skilja från din dator beroende på konfigurationen du beställde. Steg 1. Spara och stäng alla öppna filer samt avsluta alla öppna program. 2. Stäng av datorn. Klicka på Start > Stänga > av strömmen. OBS: Om du använder ett annat operativsystem finns det anvisningar för hur du stänger av datorn i operativsystemets dokumentation. 3. Koppla bort datorn och alla anslutna enheter från eluttagen. 4.
Skydd mot elektrostatisk urladdning (ESD) ESD är ett stort problem när du hanterar elektroniska komponenter, särskilt känsliga komponenter såsom expansionskort, processorer, DIMM-minnen och moderkort. Mycket små belastningar kan skada kretsarna på ett sätt som kanske inte är uppenbart, men som kan ge tillfälliga problem eller en förkortad produktlivslängd. Eftersom det finns påtryckningar i branschen för lägre strömkrav och högre densitet blir ESD-skyddet allt viktigare att tänka på.
● Isolatorelement - Det är viktigt att hålla ESD-känsliga enheter, såsom kylflänsens platshöljen, borta från inre delar som är isolatorer och ofta är laddade. ● Arbetsmiljö - Innan du använder ESD-fältservicekittet ska du utvärdera situationen på kundanläggningen. Till exempel, driftsättning av kittet för en servermiljö är annorlunda än för en stationär eller bärbar dator.
Ta bort och installera komponenter OBS: Bilderna i det här dokumentet kan skilja från din dator beroende på konfigurationen du beställde. Rekommenderade verktyg Procedurerna i detta dokument kan kräva att följande verktyg används: ● Krysspårmejsel (Phillips), nr 0 Skruvlista OBS: När du tar bort skruvarna från en komponent rekommenderar vi att du noterar skruvtyp, antal skruvar och placerar dem i en skruvförvaringslåda.
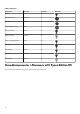
Tabell 1. Skruvlista Komponent Skruvtyp Kvantitet Batteri M2x3 4 Styrplattans fäste M2,5x2,5 2 Styrplatta M2x2 2 tangentbordets styrkort M2x2 1 Bakre I/O-kåpa M2x4 2 Bakre I/O-kåpa M2,5x5 2 Fäste för nätaggregatport M2x4 2 Moderkort M2x4 9 Kylflänsenhet M2x4 6 USB-kort M2x4 2 Strömbrytare M2x2 3 Skruvbild Huvudkomponenter i Alienware m15 Ryzen Edition R5 Följande bild visar huvudkomponenterna för Alienware m15 Ryzen Edition R5.
1. 2. 3. 4. 5. 6.
7. Kylfläns 8. I/O-kort 9. Batteri 10. Vänster högtalare 11. Handledsstöds- och tangentbordsmontering 12. Bildskärmsmontering 13. Styrplatta 14. Styrplattans fäste 15. Tangentbordets styrkort 16. Höger högtalare 17. Bakre I/O-kåpa 18. USB-kort 19. Strömbrytare 20.Strömbrytarfäste 21. Höger fläkt 22.Minnesmoduler 23.Trådlöst kort 24.Fäste för trådlöst kort 25.Moderkort 26.
Steg 1. Ta bort de två skruvarna (M2,5x5) som håller fast baskåpan i handledsstöds- och tangentbordsenheten. 2. Lossa de två fästskruvarna (M2,5x8,5+3,5) som håller fast baskåpan i handledsstöds- och tangentbordsenheten. 3. Lossa de fyra fästskruvarna (M2,5x1,7+3,3) som håller fast baskåpan i handledsstöds- och tangentbordsenheten. OBS: Genom att lossa de fyra skruvar bildas ett mellanrum som kan användas för att bända och lyfta bort baskåpan från handledsstöds- och tangentbordsenheten. 4.
5. Lirka upp den vänstra och högra sidan av baskåpan. 6. Lyft av baskåpan från handledsstöds- och tangentbordsenheten. OBS: Följande steg gäller endast om du vill ta bort någon annan komponent från datorn. 7. Koppla bort batterikabeln från moderkortet. 8. Vänd datorn och håll strömbrytaren nedtryckt i 20 sekunder för att tömma den kvarvarande strömmen. Installera baskåpan Förutsättningar Om du byter ut en komponent, ta bort den befintliga komponenten innan du utför installationsproceduren.
Steg 1. Anslut batterikabeln till moderkortet. 2. Skjut spåren på ovansidan av kåpan under det bakre I/O-höljet och fäst kåpan på plats på handledsstödet. 3. Sätt tillbaka de två skruvarna (M2,5x5) som håller fast kåpan i handledsstöds- och tangentbordsenheten. 4. Dra åt de två fästskruvarna (M2,5x8,5+3,5) som håller fast baskåpan i handledsstöds- och tangentbordsenheten. 5. Dra åt de fyra fästskruvarna (M2,5x1,7+3,3) som håller fast baskåpan i handledsstöds- och tangentbordsenheten. Nästa Steg 1.
● Lossa batteriet helt innan det tas bort. Koppla bort nätaggregatet från systemet och driv datorn enbart på batteriström – batteriet är helt urladdat när datorn inte längre slås på när strömbrytaren trycks in. ● Undvik att krossa, tappa, skada eller tränga in i batteriet med främmande föremål. ● Utsätt inte batteriet för höga temperaturer eller montera isär batteripaketen och -cellerna. ● Tryck inte på batteriets yta. ● Böj inte batteriet.
Installera batteriet Förutsättningar Om du byter ut en komponent, ta bort den befintliga komponenten innan du utför installationsproceduren. Om denna uppgift Följande bild visar var batteriet är placerat och hur installationsproceduren går till. Steg 1. Med hjälp av justeringsstolparna placerar du batteriet på handledsstöds- och tangentbordsenheten. 2. Rikta in skruvhålen på fläkten mot skruvhålen på handledsstöds- och tangentbordsenheten. 3.
CAUTION: SSD-diskar är ömtåliga. Var försiktig när du hanterar SSD-disken. CAUTION: Undvik dataförlust genom att inte ta bort SSD-disken medan datorn är i strömsparläge eller är påslagen. 2. Ta bort baskåpan. Om denna uppgift OBS: Den här proceduren gäller bara för datorer som levereras med en 2230 SSD-disk installerad på SSD-kortplats nr ett. Den följande bilden visar placeringen av 2230 SSD-disken som installerats på SSD-kortplats nr ett, och ger en visuell representation av borttagningsproceduren.
Steg 1. Rikta in spåret på SSD-disken med fliken på kortplatsen för SSD-disken. 2. För in SSD-disken i kontakten för SSD-disken. 3. Placera värmeskyddet på SSD-disken. 4. Rikta in skruvhålen på det termiska skyddet mot skruvhålen i SSD-disken och moderkortet. 5. Sätt tillbaka de två skruvarna (M2x4) som håller fast värmeskyddet på SSD-disken och moderkortet. Nästa Steg 1. Installera baskåpan. 2. Följ anvisningarna i När du har arbetat inuti datorn.
Steg 1. Ta bort de två skruvarna (M2x4) som håller fast värmeskyddet på SSD-disken och moderkortet. 2. Lyft av värmeskyddet från SSD-disken. 3. Skjut ut och lyft bort SSD-disken från kontakten på SSD-disken på moderkortet. Installera 2280 SSD-disken i SSD-kortplats ett Förutsättningar Om du byter ut en komponent, ta bort den befintliga komponenten innan du utför installationsproceduren.
Steg 1. Rikta in spåret på SSD-disken med fliken på kortplatsen för SSD-disken. 2. För in SSD-disken i kontakten för SSD-disken. 3. Placera värmeskyddet på SSD-disken. 4. Rikta in skruvhålen på det termiska skyddet mot skruvhålen i SSD-disken och moderkortet. 5. Sätt tillbaka de två skruvarna (M2x4) som håller fast värmeskyddet på SSD-disken och moderkortet. Nästa Steg 1. Installera baskåpan. 2. Följ anvisningarna i När du har arbetat inuti datorn.
Steg 1. Ta bort de två skruvarna (M2x4) som håller fast det termiska skyddet i moderkortet och handledsstödet och tangentbordsenheten. 2. Lyft av värmeskyddet från SSD-disken. 3. Skjut ut och lyft bort SSD-disken från kontakten på SSD-disken på moderkortet. Installera 2230 SSD-disken i SSD-kortplats två Förutsättningar Om du byter ut en komponent, ta bort den befintliga komponenten innan du utför installationsproceduren.
Steg 1. Rikta in spåret på SSD-disken med fliken på kortplatsen för SSD-disken. 2. För in SSD-disken i kontakten för SSD-disken. 3. Placera SSD-diskens fäste på SSD-disken. 4. Rikta in skruvhålen på det termiska skyddet mot skruvhålen i SSD-disken och moderkortet. 5. Sätt tillbaka de två skruvarna (M2x4) som håller fast SSD-disken i moderkortet. Nästa Steg 1. Installera baskåpan. 2. Följ anvisningarna i När du har arbetat inuti datorn. Ta bort 2280 SSD-disken i SSD-kortplats nr två Förutsättningar 1.
Steg 1. Ta bort de två skruvarna (M2x4) som håller fast det termiska skyddet i moderkortet och handledsstödet och tangentbordsenheten. 2. Lyft av värmeskyddet från SSD-disken. 3. Skjut ut och lyft bort SSD-disken från kontakten på SSD-disken på moderkortet. Installera 2280 SSD-disken i SSD-kortplats nr två Förutsättningar Om du byter ut en komponent, ta bort den befintliga komponenten innan du utför installationsproceduren.
Steg 1. Rikta in spåret på SSD-disken med fliken på kortplatsen för SSD-disken. 2. För in SSD-disken i kontakten för SSD-disken. 3. Placera SSD-diskens fäste på SSD-disken. 4. Rikta in skruvhålen på det termiska skyddet mot skruvhålen i SSD-disken och moderkortet. 5. Sätt tillbaka de två skruvarna (M2x4) som håller fast SSD-disken i moderkortet. Nästa Steg 1. Installera baskåpan. 2. Följ anvisningarna i När du har arbetat inuti datorn.
3. För att installera 2230 SSD-disken i SSD-kortplats ett, se Installera 2230 SSD-disken i SSD-kortplats ett. 4. För att installera 2280 SSD-disken i SSD-kortplats ett, se Installera 2280 SSD-disken i SSD-kortplats ett. Procedur för att flytta skruvmonteringen i SSD-kortplats två Om denna uppgift Den här datorn stöder två formfaktorer för SSD-diskar i SSD-kortplats två: ● M.2 2230 ● M.
3. För att installera 2230 SSD-disken i SSD-kortplats två, se Installera 2230 SSD-disken i SSD-kortplats två. 4. För att installera 2280 SSD-disken i SSD-kortplats två, se Installera 2280 SSD-disken i SSD-kortplats två. Högtalare Ta bort högtalarna Förutsättningar 1. 2. 3. 4. Följ anvisningarna i Innan du arbetar inuti datorn. Ta bort baskåpan. Ta bort batteriet. Ta bort 2280 SSD-disken i SSD-kortplats 2. OBS: Det här steget är nödvändigt om enheten levereras med en 2280 SSD-disk i SSD-kortplats 2.
Steg 1. Koppla bort högtalarkabeln från moderkortet. 2. Dra av bandet som håller fast högtalarkabeln i handledsstöds- och tangentbordsenheten. 3. Observera hur högtalarkabeln är dragen och ta bort högtalarkabeln från kabelhållarna på handledsstöds- och tangentbordsenheten. 4. Lyft ut högtalarna, tillsammans med kablarna, från handledsstöds- och tangentbordsenheten. Installera högtalarna Förutsättningar Om du byter ut en komponent, ta bort den befintliga komponenten innan du utför installationsproceduren.
I/O-kort Ta bort I/O-kortet Förutsättningar 1. Följ anvisningarna i Innan du arbetar inuti datorn. 2. Ta bort baskåpan. Om denna uppgift Följande bild visar var I/O-kortet är placerat och hur borttagningsproceduren går till. Steg 1. Lyft upp moderkortets mylartejp och öppna spärren för att koppla bort kabeln för I/O-kortet från I/O-kortet. 2. Ta bort skruven (M2x4) som håller fast I/O-kortet i handleds- och tangentbordsenheten. 3.
Steg 1. Dra tillbaka moderkortets mylartejp. 2. Justera och placera I/O-kortet på handledsstödet och tangentbordet. 3. Sätt tillbaka skruven (M2x4) som håller fast I/O-kortet i handleds- och tangentbordsenheten. 4. Dra åt fästskruven (M2x2) som håller fast I/O-kortet i handledsstöds- och tangentbordsenheten. 5. Anslut I/O-kortkabeln till I/O-kortet och stäng spärren så att kabeln sitter fast ordentligt. 6. Placera moderkortets mylartejp på moderkortet. Nästa Steg 1. Installera baskåpan. 2.
Steg 1. Lyft upp moderkortets mylartejp för att komma åt minnesmodulen. 2. Bänd isär låsklämmorna på vardera änden av minnesmodulspåret med fingertopparna tills modulen hoppar upp. 3. Ta bort minnesmodulen från minnesmodulkortplatsen. OBS: Upprepa steg 1 och 3 för att ta bort den andra minnesmodulen, om en sådan är installerad på datorn. Installera minnesmodulen Förutsättningar Om du byter ut en komponent, ta bort den befintliga komponenten innan du utför installationsproceduren.
Steg 1. Lyft upp moderkortets mylartejp för att komma åt platsen för minnesmodulen. 2. Rikta in spåret på minnesmodulen med fliken på minnesmodulplatsen. 3. För in minnesmodulen ordentligt i facket i en vinkel. 4. Tryck minnesmodulen nedåt tills den klickar på plats. OBS: Om du inte hör något klick tar du bort minnesmodulen och försöker igen. OBS: Upprepa steg 1 till 3 för att installera den andra minnesmodulen, om en sådan är tillgänglig på datorn. Nästa Steg 1. Installera baskåpan. 2.
Trådlöst kort Ta bort det trådlösa kortet Förutsättningar 1. Följ anvisningarna i Innan du arbetar inuti datorn. 2. Ta bort baskåpan. Om denna uppgift Följande bild visar placeringen av trådlöst kort och ger en visuell representation av borttagningsproceduren. Steg 1. Lyft upp moderkortets mylartejp för att komma åt det trådlösa kortet. 2. Ta bort skruven (M2x4) som håller fast fästet för det trådlösa kortet i moderkortet och handledsstöds- och tangentbordsenheten.
3. Lyft av fästet för det trådlösa kortet från det trådlösa kortet. 4. Koppla bort antennkablarna från det trådlösa kortet. 5. Skjut ut det trådlösa kortet och avlägsna det från platsen för det trådlösa kortet. Installera det trådlösa kortet Förutsättningar Om du byter ut en komponent, ta bort den befintliga komponenten innan du utför installationsproceduren. Om denna uppgift Följande bild visar placeringen av trådlöst kort och ger en visuell representation av installationsproceduren. Steg 1.
Följande tabell visar färgschemat för antennkablarna för de kort för trådlös teknik som stöds av datorn. Tabell 2. Färgschema för antennkablar Kontakter på det trådlösa kortet Färg på antennkabel Silkscreen-märkning Main (huvudmeny) Vit MAIN (huvudmeny) △ (vit triangel) Sekundär Svart AUX ▲ (svart triangel) 3. Rikta in spåret på det trådlösa kortet med fliken på öppningen för det trådlösa kortet och för in kortet i en vinkel i dess kortplats. 4.
Steg 1. Ta bort de två skruvarna (M2x4) som håller fast den bakre I/O-kåpan i handledsstöds- och tangentbordsenheten. 2. Ta bort de två skruvarna (M2,5x5) som håller fast den bakre I/O-kåpan i handledsstöds- och tangentbordsenheten. 3. Koppla bort Tron-ljuskabeln från moderkortet. 4. Ta tag i datorns sidor med båda händerna och tryck bort gummifötterna på det bakre I/O-höljet för att lossa det bakre I/O-höljet från handledsstöds- och tangentbordsenheten. 5.
Steg 1. Skjut på den bakre I/O-kåpan på handledsstöds- och tangentbordsenheten tills den snäpper på plats. 2. Sätt tillbaka de två skruvarna (M2x4) som håller fast den bakre I/O-kåpan i handledsstöds- och tangentbordsenheten. 3. Anslut Tronljuskabeln till moderkortet. 4. Sätt tillbaka de två skruvarna (M2,5x5) som håller fast den bakre I/O-kåpan i handledsstöds- och tangentbordsenheten. Nästa Steg 1. Installera baskåpan. 2. Följ anvisningarna i När du har arbetat inuti datorn.
Om denna uppgift Följande bild visar placeringen av styrplattan och ger en visuell representation av borttagningsproceduren. Steg 1. Ta bort högtalarkabeln från kabelhållarna på handledsstöds- och tangentbordsenheten. 2. Öppna spärren och koppla ur styrplattans kabel från moderkortet. 3. Öppna haken och koppla bort styrplattans kabel från styrplattan. 4. Ta bort de två skruvarna (M2,5x2,5) som håller fast styrplattans fäste i handledsstöds- och tangentbordsenheten. 5.
Installera styrplattan Förutsättningar Om du byter ut en komponent, ta bort den befintliga komponenten innan du utför installationsproceduren. Om denna uppgift Följande bild visar placeringen av styrplattan och ger en visuell representation av installationsproceduren. Steg 1. Rikta in och placera styrplattan in i kortplatsen på handledsstöds- och tangentbordsenheten. 2. Sätt tillbaka de två skruvarna (M2x2) som håller fast styrplattan i handledsstöds- och tangentbordsenheten. 3.
Nästa Steg 1. Installera batteriet. 2. Installera baskåpan. 3. Följ anvisningarna i När du har arbetat inuti datorn. Nätadapterport Ta bort nätaggregatporten Förutsättningar 1. Följ anvisningarna i Innan du arbetar inuti datorn. 2. Ta bort baskåpan. 3. Ta bort det bakre I/O-höljet. Om denna uppgift Följande bild visar placeringen av nätadapterporten och ger en visuell representation av borttagningsproceduren. Steg 1. Öppna kontaktspärren och koppla ur bildskärmskabeln från moderkortet. 2.
3. Dra bildskärmskabeln från moderkortet och ta bort bildskärmskabeln från platsen på moderkortet. 4. Lyft upp delen av moderkortets mylartejp bredvid den vänstra kylfläkten. 5. Ta bort de två skruvarna (M2x4) på strömadapterportens fäste som håller fast strömadapterporten på moderkortet. 6. Lyft bort nätadapterportens fäste från moderkortet. 7. Koppla bort kabeln för nätadapterporten från moderkortet. 8. Dra och lyft bort nätaggregatsporten, tillsammans med dess kabel, från moderkortet.
6. Sätt tillbaka moderkortets mylartejp på kanten av den vänstra kylfläkten. 7. Dra bildskärmskabeln genom öppningen mellan nätaggregatets port och kylflänsenheten. 8. Anslut bildskärmskabeln till moderkortet och stäng haken så att kabeln sitter fast ordentligt. 9. Anslut Alienhead LED-kabeln till moderkortet. 10. Anslut bildskärmskabeln till moderkortet. Nästa Steg 1. Installera det bakre i/O-höljet. 2. Installera baskåpan. 3. Följ anvisningarna i När du har arbetat inuti datorn.
Steg 1. Öppna kontaktspärren och koppla ur bildskärmskabeln från moderkortet. 2. Koppla bort Alienhead-LED-kabeln från moderkortet. 3. Koppla bort RGB-IR-kamerans kabel från USB-kort. OBS: Detta steg gäller enheter som levereras med en hybrid RGB-IR-kameramodul. 4. Lyft upp moderkortets mylartejp och ta bort tejpen som håller fast RGB-IR-kamerans kabel i moderkortet. OBS: Detta steg gäller enheter som levereras med en hybrid RGB-IR-kameramodul. 5. Lyft bort RGB-IR-kamerans kabel från moderkortet.
10. Lyft av bildskärmsmonteringen från handledsstöds- och tangentbordsenheten. 11. När stegen ovan är utförda återstår bara bildskärmsenheten. Installera bildskärmsenheten Förutsättningar Om du byter ut en komponent, ta bort den befintliga komponenten innan du utför installationsproceduren. Om denna uppgift Följande bild visar var bildskärmsmonteringen är placerad och hur installationsproceduren går till.
Steg 1. Rikta in skruvhålen på bildskärmens gångjärn med skruvhålen på handledsstöds- och tangentbordsenheten och placera bildskärmsenheten på handledsstöds- och tangentbordsenheten. 2. Dra bildskärmskabeln genom hållarna på handledsstöds- och tangentbordsenheten. 3. Dra RGB-IR-kamerakabeln genom kabelhållarna på handledsstöds- och tangentbordsenheten. OBS: Detta steg gäller enheter som levereras med en hybrid RGB-IR-kameramodul. 4.
tangentbordskort Ta bort tangentbordets styrkort Förutsättningar 1. Följ anvisningarna i Innan du arbetar inuti datorn. 2. Ta bort baskåpan. 3. Ta bort batteriet. Om denna uppgift Följande bild visar placeringen av tangentbordets styrkort och ger en visuell representation av borttagningsproceduren. Steg 1. Öppna haken och koppla bort kabeln för tangentbordets bakgrundsbelysning från tangentbordets styrkort. 2. Öppna haken och koppla bort tangentbordskabeln från tangentbordets styrkort. 3.
Steg 1. Använd justeringstapparna och placera styrkortet för tangentbordet på handledsstöds- och tangentbordsenheten. 2. Rikta in skruvhålet på tangentbordets styrkort med skruvhålet på handledsstöds- och tangentbordsenheten. 3. Sätt tillbaka skruven (M2x2) som håller fast tangentbordets styrkort i handledsstöds- och tangentbordsenheten. 4. Anslut tangentbordets styrkortskabel till tangentbordets styrkort och stäng spärren för att fästa kabeln. 5.
8. Ta bort det bakre I/O-höljet. 9. Ta bort moderkortets mylartejp. Om denna uppgift Följande bild visar kontakterna på moderkortet. OBS: Det här är en bild av moderkortet som stöder Intel-processorer. Kablarna finns även på moderkortet som stöder AMDprocessorer. 1. 2. 3. 4. 5. 6. 7. 8.
Steg 1. Ta bort de två skruvarna (M2x4) som håller fast fästet för USB typ C-porten i moderkortet. 2. Ta bort USB Type-C-portens fäste från moderkortet. 3. Öppna spärren och koppla ur bildskärmskabeln från moderkortet. 4. Koppla bort Alienhead-LED-kabeln från moderkortet. 5. Dra bort bildskärmskabeln från moderkortet. 6. Koppla bort kabeln för nätaggregatporten från moderkortet. 7. Dra bort kabeln för nätaggregatporten från moderkortet. 8. Koppla bort I/O-kortkabeln från moderkortet. 9.
17. Placera moderkortet på en ren och plan yta. 18. Vänd på moderkortenheten. 19. Ta bort USB-kortet. 20.Ta bort kylflänsmonteringen. 21. När du har utfört alla stegen ovan återstår moderkortet. Installera moderkortet Förutsättningar Om du byter ut en komponent, ta bort den befintliga komponenten innan du utför installationsproceduren. OBS: Alla ändringar du gjort i BIOS med BIOS-konfigurationsprogrammet tas bort om du byter ut moderkortet. Gör de lämpliga ändringarna igen när du byter ut moderkortet.
Om denna uppgift Följande bild visar kontakterna på moderkortet. 1. 2. 3. 4. 5. 6. 7. 8. 9. Bildskärmskabel Alienhead LED-kabel Högtalarkabel kabel för I/O-kort Kabel för nätadapterport Styrplattans kabel Tangentbordskabel RGB-IR-kamerakabel Strömbrytarkabel Följande bild visar var moderkortet är placerat och hur installationsproceduren går till.
Steg 1. OBS: Placera moderkortet på en ren, slät yta. Sätt tillbaka USB-kortet. 2. Sätt tillbaka kylflänsmonteringen. 3. Vänd på moderkortenheten. 4. Rikta in skruvhålen på moderkortenheten med skruvhålen på handledsstöds- och tangentbordsenheten. 5. Dra strömbrytarkortets kabel under USB-kortet. 6. Sätt tillbaka de sju skruvarna (M2x4) som håller fast moderkortet i handledsstöds- och tangentbordsenheten. 7. Rikta in skruvhålen på fästet för USB Type-C-porten med skruvhålen på moderkortet.
11. Anslut bildskärmskabeln till moderkortet. 12. Fäst nätaggregatportens kabel i moderkortet och anslut nätaggregatportens kabel till moderkortet. 13. Anslut kabeln för I/O-kortet från moderkortet. 14. Anslut högtalarkabeln till moderkortet. 15. Anslut styrplattans kabel till moderkortet och stäng haken så att kabeln sitter fast ordentligt. 16. Anslut tangentbordets styrkortskabel till moderkortet och stäng spärren för att fästa kabeln. 17.
Steg 1. Koppla bort den vänstra och högra fläktkabeln från moderkortet. 2. Vänd på moderkortenheten. 3. Ta bort de sex skruvarna (M2x4) som håller fast kylflänsenheten på moderkortet. 4. Lyft bort kylflänsenheten från moderkortet. Installera kylflänsenheten. Förutsättningar Om du byter ut en komponent, ta bort den befintliga komponenten innan du utför installationsproceduren. Om denna uppgift Följande bild visar placeringen av kylflänsenheten och ger en visuell representation av installationsproceduren.
Steg 1. Placera kylflänsenheten på moderkortet. 2. Passa in skruvhålen i kylflänsen med skruvhålen i moderkortet. 3. Sätt tillbaka de sex skruvarna (M2x4) som håller fast kylflänsenheten på moderkortet. 4. Vänd på moderkortet och anslut vänster och höger fläktkablar. Nästa Steg 1. Följ anvisningarna i steg 4 till 20 i Installera moderkortet. 2. Installera det bakre i/O-höljet. 3. Installera batteriet. 4. Installera trådlösa kortet. 5. Installera minnesmodulen. 6. Installera I/O-kortet. 7.
USB-kort Ta bort USB-kortet Förutsättningar 1. Följ anvisningarna i Innan du arbetar inuti datorn. 2. Ta bort baskåpan. 3. Ta bort 2230-SSD-disken eller 2280-SSD-disken i SSD-kortplats ett, beroende på vilket som gäller. 4. Ta bort 2230-SSD-disken eller 2280-SSD-disken i SSD-kortplats två, beroende på vilket som gäller. 5. Ta bort I/O-kortet. 6. Ta bort minnesmodulen. 7. Ta bort det trådlösa kortet. 8. Ta bort batteriet. 9. Ta bort det bakre I/O-höljet. 10.
Om denna uppgift Följande bild visar USB-kortets placering och ger en visuell representation av installationsproceduren. Steg 1. Rikta in skruvhålen på USB-kortet mot skruvhålen på moderkortet. 2. Sätt tillbaka de två skruvarna (M2x4) som håller fast USB-kortet i moderkortet. Nästa Steg 1. Följ anvisningarna i steg 4 till 20 i Installera moderkortet. 2. Installera det bakre I/O-höljet. 3. Installera batteriet. 4. Installera trådlösa kortet. 5. Installera minnesmodulen. 6. Installera I/O-kortet. 7.
7. Ta bort det trådlösa kortet. 8. Ta bort bildskärmsmonteringen. 9. Ta bort batteriet. 10. Ta bort det bakre I/O-höljet. 11. Följ anvisningarna i steg 1 till 16 i Ta bort moderkortet. OBS: Moderkortet kan tas bort med kylflänsenheten och USB-kortet anslutna. Om denna uppgift Följande bilder visar platsen för strömbrytaren och ger en visuell representation av borttagningsproceduren. Steg 1. Ta bort de tre skruvarna (M2x2) som fäster strömbrytarfästet i handledsstöds- och tangentbordsenheten. 2.
Steg 1. Placera strömbrytaren i kortplatsen på handledsstöd- och tangentbordsenheten. 2. Rikta in skruvhålet på strömbrytarfästet med skruvhålet på handledsstöds- och tangentbordsenheten. 3. Sätt tillbaka de tre skruvarna (M2x2) som fäster strömbrytarfästet vid handledsstöds- och tangentbordsenheten. Nästa Steg 1. Följ anvisningarna i steg 4 till 20 i Installera moderkortet. 2. Installera det bakre i/O-höljet. 3. Installera batteriet. 4. Installera bildskärmsmonteringen. 5. Installera trådlösa kortet. 6.
8. Ta bort bildskärmsmonteringen. 9. Ta bort batteriet. 10. Ta bort det bakre I/O-höljet. 11. Följ anvisningarna i steg 1 till 16 i Ta bort moderkortet. OBS: Moderkortet kan tas bort med kylflänsen och USB-kortet anslutna. 12. Ta bort strömbrytaren. Om denna uppgift När stegen i förhandsåtgärderna är utförda återstår handledsstöds- och tangentbordsenheten.
Nästa Steg 1. Installera strömbrytaren. 2. Följ anvisningarna i steg 4 till 20 i Installera moderkortet. 3. Installera det bakre i/O-höljet. 4. Installera batteriet. 5. Installera bildskärmsmonteringen. 6. Installera trådlösa kortet. 7. Installera minnesmodulen. 8. Installera I/O-kortet. 9. Installera 2230 SSD-disken eller 2280 SSD-disken i SSD-kortplats ett, beroende på vilket som gäller. 10. Installera 2230 SSD-disken eller 2280 SSD-disken i SSD-kortplats två, beroende på vilket som gäller. 11.
Drivrutiner och hämtningsbara filer Vid felsökning, hämtning eller installation av drivrutiner rekommenderas läsning av Dells kunskapsartikel Vanliga frågor om drivrutiner och hämtningsbara filer SLN128938.
Systeminstallationsprogram CAUTION: Såvida du inte är en mycket kunnig datoranvändare bör du inte ändra inställningarna i BIOSinställningsprogrammet. Vissa ändringar kan medföra att datorn inte fungerar som den ska. OBS: Innan du ändrar BIOS-inställningsprogrammet rekommenderar vi att du antecknar informationen som visas på skärmen i BIOS-inställningsprogrammet och sparar den ifall du skulle behöva den senare.
Engångsstartmenyn visar de enheter som du kan starta från inklusive diagnostikalternativet. Alternativen i startmenyn är följande: ● Borttagbar enhet (om sådan finns) ● STXXXX enhet (om sådan finns) OBS: XXX anger numret på SATA-enheten. ● Optisk enhet (om sådan finns) ● SATA-hårddisk (om sådan finns) ● Diagnostik Startsekvensskärmen visar även alternativet att öppna systeminstallationsskärmen.
Tabell 4. Systeminstallationsalternativ – menyn Avancerat (fortsättning) Avancerat OBS: Du kan inte starta från vilken typ av USB-enhet (diskett, hårddisk eller USB-minne) när det här alternativet är av. Standard: Aktiverad USB PowerShare Aktiverar eller inaktiverar USB PowerShare. Standard: Aktiverad USB Wake Support (stöd för USB-väckning) Aktiverar eller inaktiverar funktionen USB Wake Support.
Tabell 4. Systeminstallationsalternativ – menyn Avancerat Avancerat SupportAssist-systemupplösning Auto OS Recovery Threshold Kontrollerar det automatiska startflödet för SupportAssist System Resolution Console och för återställningsverktyget för Dell-operativsystemet. Standard: 2 SupportAssist OS Recovery (återställning av operativsystemet med SupportAssist) Aktiverar eller inaktiverar startflödet för SupportAssist OS Recovery-verktyget i händelse av vissa systemfel. Standard: Inaktiverat Tabell 5.
Tabell 5. Systemkonfigurationsalternativ – Säkerhetsmenyn Security (säkerhet) Secure Boot (säker start) Aktiverar eller inaktiverar konfiguration av plattformsfunktioner på Dell-klientsystem med ett WSMTaktiverat BIOS. Standard: Aktiverad Tabell 6. Systeminstallationsalternativ—menyn Boot (start) Boot (start) Boot List Option Visar startalternativen. Standard: UEFI File Browser Add Boot Option Låter dig lägga till startalternativen.
Tilldela ett systeminstallationslösenord Förutsättningar Du kan endast tilldela ett nytt system- eller administratörslösenord när statusen är Ej inställt. Om denna uppgift Starta systeminstallationsprogrammet genom att trycka på F2 omedelbart efter det att datorn startats eller startats om. Steg 1. På skärmen System BIOS (system-BIOS) eller System Setup (systeminstallation) väljer du Security (säkerhet) och trycker på Enter. Skärmen Security (säkerhet) visas. 2.
Återställa CMOS-inställningar Om denna uppgift CAUTION: Återställa CMOS-inställningar kommer att återställa BIOS inställningar på datorn. Steg 1. Ta bort baskåpan. 2. Koppla bort batterikabeln från moderkortet. 3. Tryck ned strömbrytaren i 20 sekunder. 4. Vänta en minut. 5. Anslut batterikabeln till moderkortet. 6. Installera baskåpan.
Felsökning Systemets diagnosindikatorer Kort för ström/batteristatuslampa Ström- och batteristatuslampan visar datorns ström- och batteristatus. Följande strömstatusar finns: Fast vitt sken – Nätaggregatet är anslutet och batteriet har mer än 5 % laddning. Orange sken – Datorn drivs med batteriet och batteriet har mindre än 5 % laddning. Släckt: ● Nätaggregatet är anslutet och batteriet är fulladdat. ● Datorn drivs med batteriet och batteriet har mer än 5 % laddning.
6. Starta från USB-enheten från menyn för engångsstart. 7. Skriv in filnamnet för BIOS-inställningsprogrammet och tryck på Enter. 8. BIOS-uppdateringsverktyget visas. Slutför BIOS-uppdateringen genom att följa anvisningarna på skärmen. Flash-uppdatera BIOS Om denna uppgift Du kan vara tvungen att uppdatera BIOS när det finns en uppdatering eller när du bytt ut moderkortet. Följ dessa steg för att flasha BIOS: Steg 1. Starta datorn. 2. Gå till www.dell.com/support. 3.
Dränering av kvarvarande ström (utför maskinvaruåterställning) Om denna uppgift Kvarvarande ström är den återstående statiska elektriciteten som finns kvar på datorn även efter att den har stängts av och batteriet har tagits bort. För din säkerhet och för att skydda de känsliga elektroniska komponenterna i datorn uppmanas du att dränera kvarvarande ström innan du tar ut eller sätter tillbaka några komponenter i datorn. Att dränera kvarvarande ström, dvs.
Få hjälp och kontakta Alienware Resurser för självhjälp Du kan få information och hjälp för Alienware-produkter och -tjänster med följande resurser för självhjälp online: Tabell 10. Alienware-produkter och resurser för självhjälp online Resurser för självhjälp Resursplats Information om Alienware-produkter och -tjänster www.alienware.com My Dell Tips Kontakta support I Windows-sökningen ska du skriva in Kontakta support och tryck på Enter. Onlinehjälp för operativsystemet www.dell.