Dell™ Latitude™ ATG D620 Quick Reference Guide Model PP18L w w w. d e l l . c o m | s u p p o r t . d e l l .
Notes, Notices, and Cautions NOTE: A NOTE indicates important information that helps you make better use of your computer. NOTICE: A NOTICE indicates either potential damage to hardware or loss of data and tells you how to avoid the problem. CAUTION: A CAUTION indicates a potential for property damage, personal injury, or death.
Contents Finding Information . . . . . . . . . . . . . . . . . . . . . . . . . . . . . . . . Setting Up Your Computer . . . . . . . . . . . . . . . . . . . . . . . . . . . . . 5 9 About Your Computer. . . . . . . . . . . . . . . . . . . . . . . . . . . . . . . 10 Front View . . . . Left Side View . . Right Side View . Back View . . . . Bottom View . . . . . . . . . . . . . . . . . . . . . . . . . . . . . . . . . . . . . . . . . . . . . . . . . . . . . . . . . . . . . . 10 11 11 12 13 . . . . . .
Contents
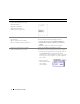
Finding Information NOTE: Some features or media may be optional and may not ship with your computer. Some features or media may not be available in certain countries. NOTE: Additional information may ship with your computer. What Are You Looking For? Find It Here • • • • Drivers and Utilities CD (also known as ResourceCD) NOTE: The Drivers and Utilities CD may be optional and may not ship with your computer.
What Are You Looking For? Find It Here • • • • • • Warranty information Terms and Conditions (U.S.
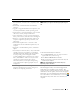
What Are You Looking For? Find It Here • Solutions — Troubleshooting hints and tips, articles from technicians, and online courses, frequently asked questions • Community — Online discussion with other Dell customers • Upgrades — Upgrade information for components, such as memory, the hard drive, and the operating system • Customer Care — Contact information, service call and order status, warranty, and repair information • Service and support — Service call status and support history, service contract, o
What Are You Looking For? Find It Here • How to use Windows • How to work with programs and files • How to personalize my desktop Windows Help and Support Center 1 Click the Start button and click Help and Support. 2 Type a word or phrase that describes your problem and click the arrow icon. 3 Click the topic that describes your problem. 4 Follow the instructions on the screen.
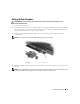
Setting Up Your Computer CAUTION: Before you begin any of the procedures in this section, follow the safety instructions in the Product Information Guide. 1 Unpack the accessories box. 2 Set aside the contents of the accessories box, which you will need to complete the setup of your computer. The accessories box also contains user documentation and any software or additional hardware (such as PC Cards, drives, or batteries) that you have ordered.
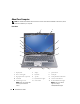
About Your Computer NOTE: For additional information about the functions and use of the features identified in this section, see the online User’s Guide for your computer.
Left Side View 1 2 3 4 5 6 7 8 9 10 1 air vents 2 security cable slot 3 audio connectors (2) 4 infrared sensor 5 smart card slot (with blank) 6 wireless switch 7 Wi-Fi Catcher™ light 8 PC Card or ExpressCard slot 9 hard drive 10 PC Card/ExpressCard latch release Right Side View 1 1 optical drive in media bay 4 USB port cover 2 2 media-bay device latch release 3 3 4 USB connectors (2) Quick Reference Guide 11
Back View CAUTION: Do not block, push objects into, or allow dust to accumulate in the air vents. Do not store your computer in a low-airflow environment, such as a closed briefcase, while it is running. Restricting the airflow can damage the computer or cause a fire.
Bottom View 1 2 3 7 4 5 6 1 memory module cover 2 battery charge gauge/health gauge 3 battery 4 battery-bay latch releases (2) 5 docking-device connector 6 air vents 7 hard drive Using a Battery Battery Performance NOTE: For information about the Dell™ warranty for your computer, see the Product Information Guide or separate paper warranty document that shipped with your computer.
You can install an optional second battery in the media bay to significantly increase operating time. For additional information about using a second battery, see "Media Bay" in the online User’s Guide for your computer. NOTE: Battery operating time (the time the battery can hold a charge) decreases over time. Depending on how often the battery is used and the conditions under which it is used, you may need to purchase a new battery during the life of your computer.
Microsoft® Windows® Power Meter The Windows Power Meter indicates the remaining battery charge. To check the Power Meter, doubleclick the icon on the taskbar. If the computer is connected to an electrical outlet, a icon appears.
Check the Battery Health NOTE: You can check battery health in one of two ways: by using the charge gauge on the battery as described below or by using the Battery Meter in Dell QuickSet. For information about QuickSet, right-click the icon in the taskbar, and click Help. To check the battery health using the charge gauge, press and hold the status button on the battery charge gauge for at least 3 seconds.
Replacing the Battery CAUTION: Before performing these procedures, turn off the computer, disconnect the AC adapter from the electrical outlet and the computer, disconnect the modem from the wall connector and computer, and remove any other external cables from the computer. CAUTION: Using an incompatible battery may increase the risk of fire or explosion. Replace the battery only with a compatible battery purchased from Dell. The battery is designed to work with your Dell™ computer.
Storing a Battery Remove the battery when you store your computer for an extended period of time. A battery discharges during prolonged storage. After a long storage period, recharge the battery fully before you use it (see "Charging the Battery" on page 16). Troubleshooting NOTE: For additional troubleshooting guidelines, see the online User’s Guide for your computer.
A solid blue screen appears TU R N T H E C O M P U T E R O F F — If you are unable to get a response by pressing a key on your keyboard or moving your mouse, press and hold the power button for at least 8 to 10 seconds until the computer turns off. Then restart your computer. Other Software Problems CHECK THE SOFTWARE DOCUMENTATION OR CONTACT THE SOFTWARE MANUFACTURER FOR TROUBLESHOOTING INFORMATION — • Ensure that the program is compatible with the operating system installed on your computer.
Starting the Dell Diagnostics From Your Hard Drive The Dell Diagnostics is located on a hidden diagnostic utility partition on your hard drive. NOTE: If your computer cannot display a screen image, contact Dell (see "Contacting Dell" in your online User’s Guide). 1 Shut down the computer. 2 If the computer is connected to a docking device (docked), undock it. See the documentation that came with your docking device for instructions. 3 Connect the computer to an electrical outlet.
3 When the boot device list appears, highlight CD/DVD/CD-RW Drive and press . 4 Select the Boot from CD-ROM option from the menu that appears and press . 5 Type 1 to start the menu and press to proceed. 6 Select Run the 32 Bit Dell Diagnostics from the numbered list. If multiple versions are listed, select the version appropriate for your computer. 7 When the Dell Diagnostics Main Menu appears, select the test you want to run.
Tab Function Configuration Displays your hardware configuration for the selected device. The Dell Diagnostics obtains configuration information for all devices from the system setup program, memory, and various internal tests, and it displays the information in the device list in the left pane of the screen. The device list may not display the names of all the components installed on your computer or all devices attached to your computer.
Index B battery charge gauge, 15 charging, 16 light, 16 performance, 13 power meter, 15 removing, 17 second battery in media bay, 14 storing, 18 drivers reinstalling, 5 Drivers and Utilities CD, 5 computer crashes, 18-19 stops responding, 18 D Dell Support Utility, 7 diagnostics about Dell Diagnostics, 5, 19 starting Dell Diagnostics, 20 documentation End User License Agreement, 6 ergonomics, 6 online, 7 Product Information Guide, 6 regulatory, 6 safety, 6 M Microsoft Windows label, 6 E End User Licens
Index R regulatory information, 6 S safety instructions, 6 Service Tag, 6 software problems, 19 support website, 7 T troubleshooting about, 18 Dell Diagnostics, 19 Help and Support Center, 8 See also problems U User’s Guide, 6 W warranty information, 6 Windows XP Help and Support Center, 8 Operating System CD, 8 reinstalling, 8 24 Index
Dell™ Latitude™ ATG D620 Snelle referentiegids Model PP18L w w w. d e l l . c o m | s u p p o r t . d e l l .
Opmerkingen, kennisgevingen en waarschuwingen OPMERKING: Een OPMERKING duidt belangrijke informatie aan voor een beter gebruik van de computer. KENNISGEVING: Een KENNISGEVING duidt mogelijke beschadiging van de hardware of gegevensverlies aan en geeft aan hoe u dergelijke problemen kunt voorkomen. LET OP: Een WAARSCHUWING duidt het risico aan van schade aan eigendommen, lichamelijk letsel of overlijden.
Inhoud Informatie vinden . . . . . . . . . . . . . . . . . . . . . . . . . . . . . . . . De computer instellen Over de computer . . . . . . . . . . . . . . . . . . . . . . . . . . . . . . 33 . . . . . . . . . . . . . . . . . . . . . . . . . . . . . . . . 34 . . . . . . . . . . . . . . . . . . . . . . . . . . . . . 34 35 35 36 37 . . . . . . . . . . . . . . . . . . . . . . . . . . . . . . 37 Vooraanzicht . . . Linkeraanzicht . . Rechterzijaanzicht Achteraanzicht . . Onderaanzicht . .
Inhoud
Informatie vinden OPMERKING: Sommige kenmerken of media zijn optioneel en zijn misschien niet meegeleverd met deze computer. Sommige kenmerken of media zijn niet beschikbaar in bepaalde landen. OPMERKING: Mogelijk werd er bij uw computer bijkomende informatie geleverd.
Waar bent u naar op zoek? Hier kunt u het vinden • • • • • • Garantie-informatie Algemene voorwaarden (alleen Verenigde Staten) Veiligheidsinstructies Informatie over regelgeving Ergonomische informatie Gebruiksrechtovereenkomst DELL™ Productinformatiegids • • • • Onderdelen verwijderen en vervangen Specificaties Systeeminstellingen configureren Problemen vaststellen en oplossen Dell Latitude™ handleiding • Servicelabel en code voor express-service • Microsoft Windows-licentielabel Microsoft Window
Waar bent u naar op zoek? Hier kunt u het vinden • Oplossingen — Probleemwijzer, tips en advies van monteurs en online cursussen, veel gestelde vragen • Community — online discussies met andere gebruikers van Dell-producten • Upgrades — Upgrade-informatie voor onderdelen als het geheugen, de vaste schijf en het besturingssysteem.
Waar bent u naar op zoek? Hier kunt u het vinden • Windows gebruiken • Met programma's en bestanden werken • Het bureaublad personaliseren Windows help en ondersteuning 1 Klik op de knop Start en klik vervolgens op Help en ondersteuning. 2 Geef met een of meer woorden een beschrijving van het probleem en klik vervolgens op het pijlpictogram. 3 Klik op het onderwerp dat uw probleem beschrijft. 4 Volg de instructies op het scherm.
De computer instellen LET OP: Voordat u aan een van de procedures in deze sectie begint, dient u de veiligheidsinstructies te volgen die u vindt in de productinformatiegids. 1 Haal de onderdelen uit de doos met accessoires. 2 Leg de onderdelen klaar, u hebt deze nodig om de computer te kunnen opstarten. De doos met accessoires bevat tevens gebruikersdocumentatie en eventuele software of extra hardware die u hebt besteld (zoals pc-kaarten, stations of batterijen).
Over de computer OPMERKING: Raadpleeg voor additionele informatie over de functies en het gebruik van functies die in dit gedeelte worden genoemd de online handleiding voor uw computer.
Linkeraanzicht 1 2 3 4 5 6 7 8 9 10 1 luchtgaten 2 sleuf voor beveiligingskabel 3 audioingangen (2) 4 infraroodsensor 5 sleuf voor smart card (met dummy-kaart) 6 draadloze schakelaar 7 Wi-Fi Catcher™lampje 8 sleuf voor pc-kaart of ExpressCard 9 vaste schijf 10 ontgrendelingsmechanisme voor sleuf pckaart/ExpressCard Rechterzijaanzicht 1 1 optisch station in 2 mediacompartiment 4 USB-poortkap 2 ontgrendelingsschuifje mediacompartiment 3 4 3 USB-ingangen (2) Snelle Refere
Achteraanzicht LET OP: Blokkeer de luchtopeningen niet, duw er geen voorwerpen in en zorg dat er zich geen stof in ophoopt. Bewaar de computer niet in een omgeving waar weinig lucht beschikbaar is, zoals een gesloten koffer. Als u dat toch doet, loopt u het risico van brand of beschadiging van de computer.
Onderaanzicht 1 2 3 7 4 5 6 1 geheugenmodulekap 4 ontgrendelingsmechanismen 5 batterijcompartiment (2) 7 vaste schijf 2 ladingmeter/statusmeter 3 batterij batterij dockingstation-ingang luchtgaten 6 Batterijen gebruiken Batterijprestatie OPMERKING: Raadpleeg voor meer informatie over de Dell™-garantie voor uw computer de productinformatiegids of het papieren exemplaar van de garantievoorwaarden die met de computer werden geleverd.
Om de werkduur aanzienlijk te verhogen, kunt u een optionele tweede batterij aanbrengen in het mediacompartiment. Raadpleeg voor additionele informatie over het gebruik van een tweede batterij "Mediacompartiment" in de online handleiding voor uw computer. OPMERKING: De werkingsduur van de batterij (de tijd gedurende welke de batterij stroom kan bieden) wordt met de tijd minder.
Dell™ QuickSet-batterijmeter Als Dell QuickSet is geïnstalleerd, drukt u op om de QuickSet-batterijmeter weer te geven. De batterijmeter toont de status, de levensduur, het laadniveau en de laadtijd van de batterij van de computer. Voor meer informatie over QuickSet klikt u met de rechtermuisknop op het pictogram op de taakbalk. Klik vervolgens op Help. Microsoft® Windows® Energiemeter De Windows Energiemeter geeft de resterende batterijlading weer.
Batterijvermogen controleren OPMERKING: U kunt de batterijstatus op twee manieren raadplegen: door gebruik te maken van de ladingmeter op de batterij zoals hieronder beschreven of door gebruik te maken van de batterijmeter in Dell QuickSet. Voor meer informatie over QuickSet, klik met de rechter muisknop op het pictogram op de taakbalk, en klik vervolgens op Help. Als u het batterijvermogen wilt meten met de laadmeter, moet u minstens 3 seconden de statusknop op de batterijladingmeter ingedrukt houden.
De batterij vervangen LET OP: Voordat u deze procedures uitvoert, moet u de computer uitzetten, de stekker van de netadapter uit het stopcontact verwijderen, de stekker van de modem uit het modemcontact en de computer verwijderen en alle andere externe kabels uit de computer verwijderen. LET OP: Het gebruik van een incompatibele batterij kan de kans op brand of een explosie vergroten. Vervang de batterij uitsluitend met een compatibele batterij die u bij Dell hebt aangeschaft.
Een batterij opslaan Verwijder de batterij als u de computer voor langere tijd opslaat. Een batterij verliest zijn lading als deze gedurende een lange periode niet wordt gebruikt. Na een lange opslagperiode moet u de batterij volledig opladen voordat u deze gebruikt (zie "De batterij opladen" op pagina 40). Problemen oplossen OPMERKING: Raadpleeg voor additionele richtlijnen met betrekking tot het oplossen van problemen de online handleiding.
Er verschijnt een blauw scherm Z E T D E C O M P U T E R U I T — Als de computer niet reageert zelfs als u een toets op het toetsenbord indrukt of de muis beweegt, dient u de aan/uit-knop in te drukken en deze minstens 8-10 seconden ingedrukt te houden tot de computer zichzelf uitschakelt. Herstart vervolgens de computer.
Dell Diagnostics (Dell-diagnostiek) starten vanaf de vaste schijf Het Dell-diagnoseprogramma bevindt zich op een verborgen partitie op de vaste schijf. OPMERKING: Als uw computer niet in staat is om een beeld op het scherm weer te geven, moet u contact opnemen met Dell (zie "Contact opnemen met Dell" in de online handleiding). 1 Sluit de computer af. 2 Als de computer is aangesloten op een dockingstation, koppelt u het dockingstation los.
Als u te lang wacht en het logo van Windows verschijnt, moet u wachten totdat u het bureaublad van Windows ziet. Sluit de computer vervolgens af en probeer het opnieuw. OPMERKING: Met de volgende stappen wordt de opstartvolgorde slechts één keer gewijzigd. De volgende keer dat u de computer start, gebeurt dat volgens de instellingen die zijn gedefinieerd in het systeem-setupprogramma. 3 Als de lijst met opstartbronnen verschijnt, markeert u Cd/dvd-cd-rw-station en drukt u op .
3 Wanneer u een test uitvoert via de optie Custom Test (Aangepaste test) of Symptom Tree (Symptomenstructuur), kunt u voor meer informatie over de test op een van de tabbladen klikken die in de volgende tabel worden beschreven. Tabblad Functie Results (Resultaten) Hier worden de resultaten van de test weergegeven, samen met eventuele foutcondities die zijn aangetroffen. Errors (Fouten) Geeft de aangetroffen foutcondities en de foutcodes weer en een beschrijving van het probleem.
Register B batterij controle batterijlading, 39 energiemeter, 39 lampje, 40 opladen, 40 opslaan, 42 prestatie, 37 tweede batterij in mediacompartiment, 38 verwijderen, 41 besturingssysteem cd met besturingssysteem, 32 opnieuw installeren, 32 over Dell Diagnostics (Delldiagnostiek), 29 documentatie ergonomisch, 30 garanties, 30 gebruikshandleiding, 30 licentieovereenkomst voor eindgebruikers, 30 online, 31 productinformatiegids, 30 regelgeving, 30 veiligheid, 30 E ergonomische informatie, 30 C computer cr
Register Q QuickSet, 32 R regelgeving, 30 S servicelabel, 30 software problemen, 43 stuurprogramma's opnieuw installeren, 29 support-website, 31 T toetsenbordverlichtingslampj es, 34 V veiligheidsinstructies, 30 W Windows XP cd met besturingssysteem, 32 Help en ondersteuning, 32 opnieuw installeren, 32 48 Register
Dell™ Latitude™ ATG D620 Guide de référence rapide Modèle PP18L w w w. d e l l . c o m | s u p p o r t . d e l l .
Remarques, avis et précautions REMARQUE : Une REMARQUE indique des informations importantes qui peuvent vous aider à mieux utiliser votre ordinateur. AVIS : Un AVIS vous avertit d’un risque de dommage matériel ou de perte de données et vous indique comment éviter le problème. PRÉCAUTION : Une PRÉCAUTION indique un risque potentiel de dommage matériel ou corporel, ou de mort.
Table des matières Recherche d'informations . . . . . . . . . . . . . . . . . . . . . . . . . . . . Configuration de votre ordinateur . . . . . . . . . . . . . . . . . . . . . . . . 57 . . . . . . . . . . . . . . . . . . . . . . . . . . 58 . . . . . . . . . . . . . . . . . . . . . . . . . . . . . . . . . . . . . . . . . . . . . . . . . . . . . . . . 58 59 59 60 61 . . . . . . . . . . . . . . . . . . . . . . . . . . . . 61 À propos de votre ordinateur Vue frontale . . . . . Vue du côté gauche .
Table des matières
Recherche d'informations REMARQUE : Certaines fonctionnalités ou supports peuvent être optionnels et ne pas accompagner votre ordinateur. Certaines fonctionnalités ou supports peuvent ne pas être disponibles dans certains pays. REMARQUE : Il est possible que des informations supplémentaires soient fournies avec votre ordinateur.
Que recherchez-vous ? Cherchez ici • • • • • • Informations sur les garanties Termes et Conditions (États-Unis uniquement) Consignes de sécurité Informations sur les réglementations Informations relatives à l'ergonomie Contrat de licence pour utilisateur final Guide d'information sur le produit Dell™ • • • • Comment retirer et remplacer des pièces Caractéristiques Comment configurer les paramètres du système Comment déterminer et résoudre des problèmes Guide d'utilisation Dell Latitude™ • Numéro de
Que recherchez-vous ? Cherchez ici • Solutions — Conseils et astuces de dépannage, articles de techniciens, cours en ligne et questions fréquemment posées • Forum clients — Discussion en ligne avec d'autres clients Dell • Mises à niveau — Informations sur les mises à niveau des composants, tels que la mémoire, l'unité de disque dur et le système d'exploitation • Service clientèle — Coordonnées, appels de service et état des commandes, garantie et informations sur les réparations • Service et support — Éta
Que recherchez-vous ? Cherchez ici • Comment utiliser Windows • Comment utiliser des programmes et des fichiers • Comment personnaliser mon bureau Centre d'aide et de support de Windows 1 Cliquez sur le bouton Démarrer, puis sur Aide et support. 2 Tapez un mot ou une expression qui décrit votre problème, puis cliquez sur l'icône en forme de flèche. 3 Cliquez sur la rubrique qui décrit votre problème. 4 Suivez les instructions qui s'affichent à l'écran.
Configuration de votre ordinateur PRÉCAUTION : Avant de commencer toute procédure de cette section, consultez et respectez les consignes de sécurité du Guide d'information sur le produit. 1 Déballez la boîte d'accessoires. 2 Mettez de côté le contenu de la boîte d'accessoires ; vous en aurez besoin ultérieurement pour configurer votre ordinateur. Cette boîte contient également la documentation utilisateur et tout autre logiciel ou matériel supplémentaire (cartes PC, lecteurs, batteries, etc.
À propos de votre ordinateur REMARQUE : Pour plus d'informations sur les fonctions et l'utilisation des fonctionnalités décrites dans cette section, consultez le Guide d'utilisation en ligne de votre ordinateur.
Vue du côté gauche 1 2 3 4 5 6 7 8 9 10 1 entrées d'air 2 emplacement pour câble de sécurité 3 connecteurs audio (2) 4 capteur infrarouge 5 logement de carte à puce (avec cache) 6 commutateur sans fil 7 voyant Wi-Fi Catcher™ 8 logement de carte PC ou ExpressCard 9 unité de disque dur 10 bouton d'éjection de carte PC/ExpressCard Vue du côté droit 1 1 lecteur optique dans la baie de média 4 cache-port USB 2 2 3 loquet de fermeture du périphérique de la baie de média 4 3 c
Vue arrière PRÉCAUTION : Ne bloquez pas les entrées d'air de l'ordinateur et n'insérez pas d'objets dedans ; évitez également toute accumulation de poussière. Ne placez pas l'ordinateur dans un environnement peu aéré, tel qu'une mallette fermée, lorsque celui-ci fonctionne. Le manque de ventilation risquerait de causer un incendie ou d'endommager l'ordinateur.
Vue de dessous 1 2 3 7 4 5 6 1 cache du module de mémoire 2 indicateur de charge/jauge d'état de la batterie 3 batterie 4 loquets de fermeture de la baie de batterie (2) 5 connecteur de la station d'accueil 6 entrées d'air 7 unité de disque dur Utilisation d'une batterie Performances de la batterie REMARQUE : Pour des informations sur la garantie Dell™ relative à l'ordinateur, reportez-vous au Guide d'information sur le produit ou au document de la garantie fourni avec votre ordinateur.
Vous pouvez installer une seconde batterie en option dans la baie de média, et ce pour augmenter la durée de fonctionnement de façon significative. Pour plus d'informations sur l'utilisation de cette seconde batterie, reportez-vous à la section « Baie de média » du Guide d'utilisation en ligne de votre ordinateur. REMARQUE : L'autonomie de la batterie (la période durant laquelle la batterie reste chargée) diminue avec le temps.
Jauge de batterie Dell™ QuickSet Si Dell QuickSet est installé, appuyez sur pour afficher la jauge de batterie QuickSet. La Jauge de batterie affiche l'état, l'état de fonctionnement de la batterie, le niveau de charge et la durée nécessaire au chargement complet de la batterie de votre ordinateur. Pour plus d'informations sur QuickSet, cliquez avec le bouton droit de la souris sur l'icône barre des tâches, puis cliquez sur Aide.
Vérification du niveau de charge de la batterie Pour vérifier le niveau de charge de la batterie, appuyez sur le bouton d'état, situé sur l'indicateur de charge de la batterie et relâchez-le pour allumer les voyants de niveau de charge. Chaque voyant représente environ 20 pour cent de la charge totale de la batterie. S'il reste, par exemple, 80 pour cent de la charge de la batterie, quatre des voyants sont allumés. Si aucun voyant n'est allumé, la batterie est complètement déchargée.
Lorsque vous branchez l'ordinateur sur une prise secteur ou que vous installez une batterie pendant que l'ordinateur est branché sur une prise secteur, l'ordinateur vérifie le niveau de charge et la température de la batterie. Au besoin, l'adaptateur secteur charge alors la batterie et maintient le niveau de charge.
1 2 3 1 batterie 2 loquet de fermeture de la baie de batterie (2) 3 languette de batterie Pour remettre en place la batterie, suivez la procédure de retrait dans l'ordre inverse. Stockage de la batterie Retirez la batterie de l'ordinateur lorsque vous rangez ce dernier pendant une période prolongée. Sinon, la batterie finira par se décharger.
Un programme ne répond plus ou se bloque régulièrement REMARQUE : La documentation de tout logiciel, la disquette ou le CD qui l'accompagne incluent généralement des instructions d'installation. FIN DU PROGRAMME — 1 Appuyez simultanément sur . 2 Cliquez sur Gestionnaire des tâches. 3 Cliquez sur le programme qui ne répond plus. 4 Cliquez sur Fin de tâche. C O N S U L T E Z L A D O C U M E N T A T I O N D U L O G I C I E L — Le cas échéant, supprimez, puis réinstallez le programme.
E F F E C T U E Z U N E A N A L YS E D E L ' O R D I N A T E U R A F I N D E D É T E C T E R L A P R É S E N C E D E L O G I C I E L S E S P I O N S — Si vous observez un ralentissement des performances de votre ordinateur, si des fenêtres publicitaires s'affichent fréquemment sur votre écran ou si vous avez des problèmes pour vous connecter sur Internet, votre ordinateur peut être infecté par un logiciel espion.
L'ordinateur lance l'évaluation du système de préamorçage avec une série de diagnostics intégrés qui effectue un test préalable de la carte système, du clavier, du disque dur et de l'écran. • Répondez à toutes les questions qui s'affichent pendant l'évaluation. • Si une défaillance de composant est détectée, l'ordinateur s'arrête et émet un signal sonore.
Menu principal de Dell Diagnostics 1 Une fois Dell Diagnostics chargé et lorsque l'écran Menu principal s'affiche, cliquez sur le bouton de l'option souhaitée. Option Fonction Express Test (Test rapide) Exécute un test rapide des périphériques. Ce test dure généralement entre 10 et 20 minutes et n'exige pas d'action de votre part. Effectuez tout d'abord un Test rapide pour trouver le problème plus rapidement. Extended Test (Test approfondi) Exécute un test approfondi des périphériques.
Index A aide Centre d'aide et de support, 56 Dell Diagnostics, 68 recherche d'informations, 53 site Web du service de support de Dell, 55 B batterie chargement, 64 indicateur de charge, 63 jauge d'alimentation, 63 performances, 61 remplacement, 65 seconde batterie de la baie de média, 62 stockage, 66 voyant, 64 C cache-ports, 57, 59-60 CD Drivers and Utilities, 53 consignes de sécurité, 54 contrat de licence pour utilisateur final, 54 D à propos de, 66 Centre d'aide et de support, 56 Dell Diagnostics, 6
Index P V pilotes réinstallation, 53 voyants d'éclairage du clavier, 58 problèmes blocage de l'ordinateur, 66 blocages, 66 blocages de l'ordinateur, 67 écran bleu, 67 l'ordinateur ne répond plus, 66 logiciel, 66-67 logiciels, 67 non démarrage de l'ordinateur, 66 un programme ne répond plus, 67 un programme se bloque, 67 Q QuickSet, 56 S site Web du service de support, 55 système d'exploitation CD Operating System, 56 réinstallation, 56 U Utilitaire de Dell Support, 55 72 Index W Windows XP CD
Dell™ Latitude™ ATG D620 Schnellreferenzhandbuch Modell PP18L w w w. d e l l . c o m | s u p p o r t . d e l l .
Anmerkungen, Hinweise und Vorsichtshinweise ANMERKUNG: Eine ANMERKUNG macht auf wichtige Informationen aufmerksam, mit denen Sie den Computer besser einsetzen können. HINWEIS: Ein HINWEIS warnt vor möglichen Beschädigungen der Hardware oder vor Datenverlust und zeigt, wie diese vermieden werden können. VORSICHT: Durch VORSICHT werden Sie auf Gefahrenquellen hingewiesen, die materielle Schäden, Verletzungen oder sogar den Tod von Personen zur Folge haben können.
Inhalt Informationsquellen . . . . . . . . . . . . . . . . . . . . . . . . . . . . . . . Einrichten des Computers . . . . . . . . . . . . . . . . . . . . . . . . . . . . . . . . . . . . . . . . . . . . . . . . . . 82 . . . . . . . . . . . . . . . . . . . . . . . . . . . 82 83 83 84 85 . . . . . . . . . . . . . . . . . . . . . . . . . . . . 85 Vorderansicht . . . . . Linke Seitenansicht . . Rechte Seitenansicht . Rückansicht . . . . . . Unterseite . . . . . . . . . . . . . . . . . . . . . . . . . .
Inhalt
Informationsquellen ANMERKUNG: Einige Funktionen oder Datenträger sind möglicherweise optional und werden nicht mit Ihrem Computer geliefert. Einige Funktionen oder Datenträger sind möglicherweise in bestimmten Ländern nicht verfügbar. ANMERKUNG: Zusätzliche Informationen werden eventuell mit dem Computer geliefert.
Wonach suchen Sie? Hier finden Sie das Gesuchte: • • • • • • Dell™ Produktinformationshandbuch Garantieinformationen Verkaufs- und Lieferbedingungen (nur für die USA) Sicherheitshinweise Zulassungsinformationen Informationen zur Ergonomie Enduser-Lizenzvereinbarung • Anleitungen zum Entfernen und Austauschen von Teilen • Technische Daten • Anleitungen zum Konfigurieren der Systemeinstellungen • Fehlerbehebung und Beheben von Störungen Dell Latitude™ Benutzerhandbuch • Service-Tag-Nummer und Express-S
Wonach suchen Sie? Hier finden Sie das Gesuchte: • Lösungen – Hinweise zum Beheben von Störungen, Veröffentlichungen von Technikern, Online-Schulungen, häufig gestellte Fragen (FAQs) • Community – Online-Diskussionen mit anderen DellKunden • Aufrüstungen – Informationen zu Aufrüstungen von Komponenten, wie z. B.
Wonach suchen Sie? Hier finden Sie das Gesuchte: • Anleitungen zum Arbeiten mit Windows • So arbeiten Sie mit Programmen und Dateien • So können Sie Ihren Desktop individuell gestalten Windows Hilfe- und Supportcenter 1 Klicken Sie auf die Schaltfläche Start und auf Hilfe und Support. 2 Geben Sie ein Wort oder einen Ausdruck ein, das bzw. der Ihr Problem beschreibt, und klicken Sie anschließend auf das Pfeilsymbol. 3 Klicken Sie auf das Thema, das Ihr Problem beschreibt.
Einrichten des Computers VORSICHT: Bevor Sie Arbeiten an den in diesem Abschnitt beschriebenen Komponenten ausführen, lesen Sie erst die Sicherheitshinweise im Produktinformationshandbuch. 1 Packen Sie das Zubehör aus. 2 Legen Sie die für das Einrichten des Computers erforderlichen Zubehörteile bereit. Der Lieferumfang des Zubehörs umfasst ferner die Benutzerdokumentation sowie die Software oder zusätzliche Hardware (z. B. PC Cards, Laufwerke oder Akkus), die Sie bestellt haben.
Wissenswertes über Ihren Computer ANMERKUNG: Weitere Informationen zu den Funktionen und der Verwendung der in diesem Abschnitt aufgeführten Merkmale finden Sie im Online-Benutzerhandbuch für Ihren Computer.
Linke Seitenansicht 1 2 3 4 5 6 7 8 9 10 1 Lüftungsschlitze 2 Sicherheitskabeleinschub 3 Audioanschlüsse (2) 4 Infrarotsensor 5 Smart Card-Steckplatz (mit Platzhalterkarte) 6 Wireless-Schalter 7 Wi-Fi Catcher™Anzeigeleuchte 8 Steckplatz für PC Card oder ExpressCard 9 Festplatte 10 PC Card/ExpressCardFreigabevorrichtung Rechte Seitenansicht 1 1 optisches Laufwerk in Modulschacht 4 USB-PortAbdeckung 2 2 ModulschachtKomponentenfreigabevorrichtung 3 3 4 USB-Anschlüsse (2) S
Rückansicht VORSICHT: Achten Sie darauf, die Lüftungsschlitze nicht zu blockieren, schieben Sie keine Gegenstände hinein und halten Sie die Lüftungsschlitze staubfrei. Bewahren Sie den Computer während des Betriebs nicht in schlecht durchlüfteten Behältnissen wie einer geschlossenen Tragetasche auf. Ohne Luftzirkulation kann der Computer Schaden nehmen oder sogar ein Brand entstehen.
Unterseite 1 2 3 7 4 5 6 1 Speichermodulabdeckung 2 Akku-Ladestandanzeige/Zustandsanzeige 3 Akku 4 AkkufachFreigabevorrichtung (2) DockingGeräteanschluss 6 Lüftungsschlitze 7 Festplatte 5 Verwenden eines Akkus Akkuleistung ANMERKUNG: Informationen zur Dell™-Garantie für Ihren Computer finden Sie im Produktinformationshandbuch oder auf dem separaten Garantiedokument, das im Lieferumfang des Computers enthalten ist.
Sie können einen optionalen zweiten Akku im Modulschacht installieren und die Betriebszeit so erheblich verlängern. Zusätzliche Informationen zum Verwenden eines Zweitakkus finden Sie im Abschnitt „Modulschacht“ im Online-Benutzerhandbuch für Ihren Computer. ANMERKUNG: Die Betriebsdauer eines Akkus (die Zeit, wie lange eine Akkuladung vorhält) nimmt mit der Zeit ab.
Um weitere Informationen über die QuickSet-Anzeige zu erhalten, klicken Sie in der Symbolleiste mit der rechten Maustaste auf das Symbol und anschließend auf Hilfe. Microsoft® Windows®-Energieanzeige Die Energie- bzw. Akkuanzeige von Windows zeigt die verbleibende Akkuladung an. Um die Ladung zu überprüfen, doppelklicken Sie auf das entsprechende Symbol in der Taskleiste. Wenn der Computer an eine Steckdose angeschlossen ist, wird das Symbol angezeigt.
Prüfen des Akkuzustands ANMERKUNG: Sie können den Akkuzustand auf zwei verschiedene Weisen prüfen: entweder durch die Ladestandanzeige auf dem Akku, wie unten beschrieben, oder durch die Akkuanzeige unter Dell QuickSet. Weitere Informationen über QuickSet erhalten Sie, wenn Sie mit der rechten Maustaste in der Taskleiste auf das Symbolklicken und dann auf Hilfe klicken.
Austauschen des Akkus VORSICHT: Führen Sie die folgenden Schritte aus, bevor Sie fortfahren: Computer ausschalten, Netzkabel aus der Steckdose und dem Computer ziehen, Modem vom Wandanschluss und vom Computer trennen sowie alle externen Kabel vom Computer trennen. VORSICHT: Bei Verwendung eines ungeeigneten Akkus besteht Brand- oder Explosionsgefahr. Ersetzen Sie die Akkus nur mit einem kompatiblen Akku von Dell. Der Akku ist für den Einsatz in Ihrem Dell™-Computer vorgesehen.
Lagern eines Akkus Entfernen Sie den Akku, wenn Sie den Computer für längere Zeit lagern möchten. Akkus entladen sich während einer längeren Lagerzeit. Nach eine längeren Lagerung sollten Sie den Akku vollständig aufladen, bevor Sie ihn verwenden (siehe „Aufladen des Akkus“ auf Seite 88). Beheben von Störungen ANMERKUNG: Zusätzliche Richtlinien zum Beheben von Störungen finden Sie im Online-Benutzerhandbuch für Ihren Computer.
Ein blauer Bildschirm wird angezeigt D E N C O M P U T E R A U S S C H A L T E N – Wenn der Computer nicht mehr reagiert und auch nicht durch Drücken einer Taste auf der Tastatur bzw. Bewegen der Maus aktiviert werden kann, halten Sie den Netzschalter mindestens acht bis zehn Sekunden lang gedrückt, bis der Computer ausgeschaltet wird. Starten Sie anschließend den Computer neu.
Dell Diagnostics von der Festplatte starten Dell Diagnostics befindet sich auf der Festplatte auf einer verborgenen Partition. ANMERKUNG: Wenn Ihr Computer kein Bildschirmbild anzeigen kann, nehmen Sie mit Dell Kontakt auf („Kontaktaufnahme mit Dell“ in Ihrem Online-Benutzerhandbuch). 1 Fahren Sie den Computer herunter. 2 Falls der Computer mit einem Docking-Gerät verbunden ist, trennen Sie die Verbindung. Weitere Anweisungen hierzu finden Sie in der Dokumentation zum Docking-Gerät.
Falls so lange gewartet wurde, bis das Windows-Logo eingeblendet wird, warten sei weiter, bis der Windows-Desktop angezeigt wird. Fahren Sie danach den Computer herunter und starten Sie ihn erneut. ANMERKUNG: Durch die nächsten Schritte wird die Startreihenfolge einmalig geändert. Beim nächsten Systemstart startet der Computer entsprechend den im System-Setup-Programm angegebenen Geräten.
3 Klicken Sie beim Ausführen eines Tests im benutzerdefinierten Test oder mit der Option Symptom Tree (Problemübersicht) auf das in der folgenden Tabelle beschriebene zutreffende Register, um weitere Informationen zu erhalten. Registerkarte Funktion Results (Ergebnisse) Es werden die Testergebnisse und möglicherweise gefundene Probleme angezeigt. Errors (Fehler) Es werden die gefundenen Fehler, die Fehlercodes und eine Beschreibung des Problems angezeigt.
Stichwortverzeichnis A Abdeckung der Anschlüsse, 81, 83-84 Akku Anzeigeleuchte, 88 Aufladen, 88 Energieanzeige, 87 Entfernen, 89 Ladestandanzeige, 87 lagern, 90 Leistung, 85 Zweitakku im Modulschacht, 86 Aufkleber Microsoft Windows, 78 Service-Tag-Nummer, 78 B Beheben von Störungen Dell Diagnostics, 91 Hilfe- und Supportcenter, 80 Info, 90 Siehe auch Probleme Benutzerhandbuch, 78 Betriebssystem Betriebssystem-CD, 80 neu installieren, 80 9-Zellen-Akku, 88 Info, 88 stürzt ab, 90-91 Computer reagiert nicht
Stichwortverzeichnis Computer startet nicht, 90 Computer stürzt ab, 90-91 Programm reagiert nicht mehr, 90 Programm stürzt ab, 90 Software, 90 problems software, 91 Produktinformationshandbuc h, 78 Q QuickSet Hilfe, 80 S Service-Tag-Nummer, 78 Sicherheitshinweise, 78 software problems, 91 Support-Website, 79 T Tastaturbeleuchtung, 82 Treiber neu installieren, 77 W Windows XP Betriebssystem-CD, 80 Hilfe- und Supportcenter, 80 neu installieren, 80 96 Stichwortverzeichnis Z Zulassungsinformationen,
Dell™ Latitude™ ATG D620 Guida di consultazione rapida Modello PP18L w w w. d e l l . c o m | s u p p o r t . d e l l .
N.B., Avvisi e Attenzione N.B. Un N.B. (Nota Bene) indica informazioni importanti che contribuiscono a migliorare l'utilizzo del computer. AVVISO: Un AVVISO indica un danno potenziale all'hardware o perdita di dati e spiega come evitare il problema. ATTENZIONE: Un messaggio di ATTENZIONE indica un rischio di danni materiali, lesioni personali o morte.
Sommario Ricerca di informazioni . . . . . . . . . . . . . . . . . . . . . . . . . . . . 101 Installazione del computer . . . . . . . . . . . . . . . . . . . . . . . . . . 105 Informazioni sul computer . . . . . . . . . . . . . . . . . . . . . . . . . . . 106 . . . . . . . . . . . . . . . . . . . . . . . . . . . . . . . . . . . . . . . . . . . . . . . . . . . . . . 106 107 107 108 109 . . . . . . . . . . . . . . . . . . . . . . . . . . . . . . . 109 Vista anteriore . . .
Sommario
Ricerca di informazioni N.B. Alcune funzioni o supporti possono essere opzionali e possono non essere spediti assieme al computer. Alcune funzioni o supporti potrebbero non essere disponibili in alcuni Paesi. N.B. Informazioni supplementari potrebbero essere fornite assieme al computer. Cosa si ricerca? Si trova qui • • • • CD Drivers and Utilities (noto anche come ResourceCD) N.B. Il CD Drivers and Utilities può essere opzionale e potrebbe non essere spedito col computer.
Cosa si ricerca? Si trova qui • • • • • • Informazioni sulla garanzia Termini e condizioni (solo per gli Stati Uniti) Istruzioni di sicurezza Informazioni sulle normative Informazioni sull'ergonomia Contratto di licenza con l'utente finale Guida alle informazioni sul prodotto Dell™ • • • • Come rimuovere e sostituire i componenti Specifiche Come configurare le impostazioni del sistema Come individuare e risolvere i problemi Guida dell'utente di Dell Latitude™ • Numero di servizio e codice di servizi
Cosa si ricerca? Si trova qui • Soluzioni — suggerimenti per la risoluzione dei problemi, articoli di tecnici, corsi in linea, domande frequenti • Forum clienti — discussione in linea con altri clienti Dell • Aggiornamenti — informazioni di aggiornamento per componenti, quali ad esempio la memoria, il disco rigido e il sistema operativo • Servizio clienti — informazioni di contatto, sullo stato dell'ordine e della richiesta di assistenza, sulla garanzia e sulle riparazioni • Servizio e supporto — stato de
Cosa si ricerca? Si trova qui • Come usare Windows • Come gestire programmi e file • Come personalizzare il desktop Guida in linea e supporto tecnico di Windows 1 Fare clic sul pulsante Start, quindi scegliere Guida in linea e supporto tecnico. 2 Digitare una parola o una frase che descriva il problema e fare clic sull'icona a forma di freccia. 3 Fare clic sull'argomento che descrive il problema. 4 Seguire le istruzioni visualizzate.
Installazione del computer ATTENZIONE: Prima di cominciare le procedure descritte in questa sezione, seguire le istruzioni di sicurezza situate nella Guida alle informazioni sul prodotto. 1 Disimballare la scatola degli accessori. 2 Mettere da parte il contenuto della scatola degli accessori, che sarà necessario per completare l'installazione del computer.
Informazioni sul computer N.B. Per informazioni supplementari sulle funzioni e sull'uso delle funzioni identificati in questa sezione, consultare la Guida dell'utente in linea del computer. Vista anteriore 1 2 15 3 14 13 12 4 11 5 10 9 7 8 dispositivo di chiusura dello schermo 4 indicatori di stato della periferica 7 lettore di impronte digitali (opzionale) 10 track stick 1 13 sensore di luminosità ambientale N.B. Premere e il tasto freccia SINISTRA per attivare il sensore.
Vista laterale sinistra 1 2 3 4 5 6 7 8 9 10 1 prese d'aria 2 slot per cavo di sicurezza 3 connettori audio (2) 4 sensore a infrarossi 5 slot per smart card (con protezione) 6 switch della modalità senza fili 7 indicatore Wi-Fi Catcher™ 8 slot per scheda PC o ExpressCard 9 disco rigido 10 chiusura a scatto della scheda PC/ExpressCard Vista laterale destra 1 1 unità ottica nell'alloggiamento per supporti multimediali 4 coperchio della porta USB 2 2 3 chiusura a scatto dell
Vista posteriore ATTENZIONE: Non ostruire le prese d'aria, non introdurvi oggetti ed evitare l'accumulo di polvere. Non riporre il computer in un ambiente con insufficiente aerazione, ad esempio una valigetta chiusa, durante il funzionamento, in quanto ciò potrebbe provocare incendi o il danneggiamento del computer. 1 2 3 4 5 6 7 8 108 1 connettore di rete (RJ-45) 2 connettore del modem (RJ-11) 3 connettori USB (2) 4 connettore seriale 5 connettore video 6 connettore dell'adattatore c.
Vista inferiore 1 2 3 7 4 5 6 1 coperchio dei moduli di memoria 2 indicatore del livello di carica/della capacità di carica della batteria 3 batteria 4 chiusure a scatto dell'alloggiamento della batteria (2) 5 connettore della periferica di alloggiamento 6 prese d'aria 7 disco rigido Uso della batteria Rendimento della batteria N.B.
È possibile installare una batteria secondaria opzionale nell'alloggiamento per supporti multimediali per aumentare notevolmente l'autonomia. Per informazioni supplementari sull'uso di una batteria secondaria, consultare "Alloggiamento per supporti multimediali" nella Guida dell'utente in linea del computer. N.B. L'autonomia della batteria (il tempo in cui la batteria si mantiene carica) diminuisce con il passare del tempo.
Battery Meter (Misuratore alimentazione) di Dell™ QuickSet Se Dell QuickSet è installato, premere per visualizzare il Battery Meter (Misuratore alimentazione) di QuickSet. Il Battery Meter (Misuratore alimentazione) visualizza lo stato, la condizione della batteria, il livello di carica e il tempo di completamento della carica per la batteria installata nel computer.
Controllo del livello di carica della batteria Per controllare il livello di carica della batteria, premere rilasciandolo il pulsante dello stato sull'indicatore del livello di carica della batteria per accendere gli indicatori che indicano il livello di carica. Ciascun indicatore rappresenta circa il 20 percento del livello di carica totale della batteria. Se, ad esempio, il livello di carica della batteria è pari all'80 percento, vi sono quattro indicatori accesi.
Quando si collega il computer a una presa elettrica oppure si installa una batteria in un computer collegato a una presa elettrica, viene automaticamente eseguito il controllo del livello di carica e della temperatura della batteria. Se necessario, l'adattatore c.a. carica la batteria e la mantiene carica. Se la temperatura della batteria è elevata a causa dell'utilizzo o perché si trova in un ambiente caldo, la ricarica potrebbe non avere luogo quando si collega il computer ad una presa elettrica.
1 2 3 1 batteria 2 chiusura a scatto dell'alloggiamento della batteria (2) 3 linguetta della batteria Per reinstallare la batteria, seguire le procedure di rimozione nell'ordine inverso. Conservazione di una batteria Se non si intende usare il computer per un certo periodo di tempo, rimuovere la batteria.
Un programma smette di rispondere o si blocca ripetutamente N.B. In genere insieme a un programma vengono fornite le istruzioni di installazione nella relativa documentazione o su un disco floppy o CD. CHIUDERE IL PROGRAMMA — 1 Premere simultaneamente . 2 Fare clic su Task Manager. 3 Fare clic sul programma che non risponde più. 4 Fare clic su Termina operazione.
E S E G U I R E L A S C A N S I O N E D E L C O M P U T E R P E R R I L E V A R E I L S O F T W A R E S P I A — Se si sta sperimentando un'esecuzione lenta del computer, o se si ricevono continuamente annunci pubblicitari popup, o se si hanno problemi di connessione a Internet, il computer potrebbe contenere software spia.
N.B. Se viene visualizzato un messaggio che indica che la partizione dell'utilità di diagnostica non è stata trovata, eseguire il programma Dell Diagnostics dal CD Drivers and Utilities opzionale. Verrà eseguito il ciclo di verifica del sistema preavvio, ovvero una serie di prove iniziali della scheda di sistema, della tastiera, del disco rigido e dello schermo. • Durante il ciclo di verifica, rispondere alle domande visualizzate.
Main Menu (Menu principale) di Dell Diagnostics 1 Dopo il caricamento del programma Dell Diagnostics e la visualizzazione della schermata Main Menu (Menu principale), fare clic sul pulsante relativo all'opzione desiderata. Opzione Funzione Express Test (Prova veloce) Esegue una prova rapida delle periferiche. L'esecuzione di questa prova richiede in genere da 10 a 20 minuti e non richiede interazione da parte dell'utente.
Indice analitico B batteria batteria secondaria nell'alloggiamento per supporti multimediali, 110 conservazione, 114 indicatore, 112 indicatore del livello di carica, 111 misuratore alimentazione, 111 rendimento, 109 ricarica, 112 rimozione, 113 C documentazione Contratto di licenza con l'utente finale, 102 ergonomica, 102 garanzia, 102 Guida alle informazioni sul prodotto, 102 Guida dell'utente, 102 in linea, 103 normativa, 102 sicurezza, 102 driver reinstallazione, 101 E CD Drivers and Utilities, 101
Indice analitico il programma smette di rispondere, 115 schermata blu, 115 software, 114-115 Q QuickSet, 104 R risoluzione dei problemi Dell Diagnostics, 116 Guida in linea e supporto tecnico, 104 informazioni su, 114 Vedere anche problemi S sistema operativo CD Sistema operativo, 104 reinstallazione, 104 sito Web del supporto tecnico, 103 software problemi, 115 U Utilità Dell Support, 103 120 Indice analitico W Windows XP CD Sistema operativo, 104 Guida in linea e supporto tecnico, 104 reinsta
Dell™ Latitude™ ATG D620 Guia de referência rápida Modelo PP18L w w w. d e l l . c o m | s u p p o r t . d e l l .
Notas, Avisos e Advertências NOTA: NOTA indica informações importantes para utilizar melhor o computador. AVISO: AVISO indica riscos para o hardware ou de perda de dados e como evitar o problema. ADVERTÊNCIA: ADVERTÊNCIA indica um potencial de danos do equipamento, de lesões corporais ou mesmo de morte.
Índice Encontrar informação . . . . . . . . . . . . . . . . . . . . . . . . . . . . . Configurar o computador Sobre o computador . . . . . . . . . . . . . . . . . . . . . . . . . . . 130 . . . . . . . . . . . . . . . . . . . . . . . . . . . . . . 131 . . . . . . . . . . . . . . . . . . . . . . . . . . 131 132 132 133 134 . . . . . . . . . . . . . . . . . . . . . . . . . . . . . . 134 Vista frontal . . . . . . Vista lateral esquerda Vista lateral direita . . Vista traseira . . . . .
Índice
Encontrar informação NOTA: Algumas características ou o compartimento de meios podem ser opcionais, não sendo fornecidos com o seu computador. Algumas características ou o compartimento de meios podem não estar disponíveis em determinados países. NOTA: Informações adicionais são fornecidas com o seu computador.
O que procura? Encontre aqui • • • • • • Informações sobre a garantia Termos e condições (apenas E.U.A.
O que procura? Encontre aqui • Soluções — Sugestões e conselhos para resolução de problemas, artigos de técnicos, cursos online, perguntas frequentes • Comunidade — Discussões online com outros clientes da Dell • Actualizações — Informação sobre actualizações de componentes como, por exemplo, memórias, disco rígido e sistemas operativos • Assistência ao Cliente — Informação de contactos, chamadas de serviço e estado de encomenda, garantia e informações de reparação • Serviço e assistência — Estado das cha
O que procura? Encontre aqui • Sugestões para actualização e resolução de problemas relacionados com o software — Perguntas frequentes, tópicos e saúde geral do ambiente do computador Utilitário de apoio Dell • Como utilizar o Windows • Trabalhar com programas e ficheiros • Personalizar a minha área de trabalho • Informação sobre a actividade da rede, o assistente de gestão de alimentação, teclas de atalho e outros itens controlados pelo Dell QuickSet O utilitário de apoio Dell é uma actualização auto
Guia de referência rápida 129
Configurar o computador ADVERTÊNCIA: Antes de iniciar qualquer procedimento desta secção, siga as instruções de segurança do Guia de informações do produto. 1 Abra a caixa de acessórios. 2 Separe os itens da caixa de acessórios necessários para a configuração do computador. A caixa de acessórios contém também a documentação do utilizador e o software ou hardware adicional (como placas PC, unidades ou baterias) que adquiriu.
Sobre o computador NOTA: Para informações adicionais sobre as funções e utilização das características identificadas nesta secção, consulte o Guia do utilizador online do seu computador.
Vista lateral esquerda 1 2 3 4 5 6 7 8 9 10 1 aberturas de ventilação 2 encaixe do cabo de segurança 3 entradas de áudio (2) 4 sensor de infravermelhos 5 ranhura smart card (em branco) 6 comutador sem fios 7 luz Wi-Fi Catcher™ 8 ranhura placa PC ou ExpressCard 9 disco rígido 10 desbloqueador da lingueta da placa PC/ExpressCard Vista lateral direita 1 132 1 unidade óptica do compartimento de meios 4 tampa da porta USB Guia de referência rápida 2 3 2 desbloqueador da lin
Vista traseira ADVERTÊNCIA: Não bloqueie, não introduza objectos, nem permita a acumulação de poeira nas aberturas de ventilação. Não guarde o seu computador num ambiente com pouco fluxo de ar, como numa mala fechada, enquanto este está em funcionamento. Isso pode danificar o computador ou causar incêndio.
Vista inferior 1 2 3 7 4 5 6 1 tampa do módulo de memória 2 indicador de carga da bateria/indicador de longevidade 3 bateria 4 desbloqueador da lingueta do compartimento da bateria (2) 5 ficha do dispositivo de ancoragem 6 aberturas de ventilação 7 disco rígido Utilizar uma bateria Capacidade da bateria NOTA: Para obter mais informações sobre a garantia Dell™ do seu computador, consulte o Guia de informações do produto ou o documento de garantia em separado fornecidos juntamente com o s
Pode instalar uma segunda bateria opcional no compartimento de meios de forma a aumentar significativamente o tempo de funcionamento. Para informações adicionais sobre a utilização de uma segunda bateria, consulte “Compartimento de meios” no Guia do utilizador online do seu computador. NOTA: O tempo de funcionamento da bateria (o tempo de duração da carga) diminui ao longo do tempo.
Medidor de bateria Dell™ QuickSet Se estiver instalado o Dell QuickSet, pressione para ver o medidor de bateria QuickSet. O medidor de bateria apresenta o estado, a longevidade, o nível de carga e o tempo de carga da bateria do seu computador. Para mais informações sobre o QuickSet, clique com o botão direito no ícone clique em Ajuda. na barra de tarefas e Medidor de energia Microsoft® Windows® O medidor de energia Windows indica a restante carga da bateria.
Verificar a carga da bateria Para verificar a carga da bateria, pressione e solte o botão de estado no indicador de carga da bateria para iluminar as luzes do nível de carga. Cada luz apresenta aproximadamente 20 % da carga total da bateria. Por exemplo, se a batera ainda tiver 80 % da sua carga, encontrará quatro luzes acesas. Se não estiverem luzes acesas, a bateria está vazia.
Se ligar o computador a uma tomada eléctrica ou instalar uma bateria enquanto o computador estiver ligado a uma tomada eléctrica, o computador verifica a carga da bateria e a temperatura. Se for necessário, o adaptador CA carrega a bateria, mantendo a sua carga. Se a bateria estiver quente devido à utilização no seu computador ou a um ambiente quente, não é carregada quando o computador estiver ligado a uma tomada eléctrica.
1 2 3 1 bateria 2 desbloqueador da lingueta do compartimento da bateria (2) aba da bateria 3 Para substituir a bateria, siga o procedimento de remoção na ordem inversa. Armazenar uma bateria Retire a bateria no caso de armazenamento do computador durante um período longo. A bateria descarrega-se durante um armazenamento prolongado. Após um período de armazenamento prolongado, carregue a bateria completamente antes de voltar a utilizá-la (consultar "Carregar a bateria" na página 137).
D E S L I G U E O C O M P U T A D O R — Se, ao pressionar uma tecla do teclado ou movendo o rato não obtiver resposta, pressione sem soltar o botão de alimentação durante pelo menos 8 a 10 segundos até o computador se desligar. De seguida, reinicie o computador. Um programa deixa de responder ou tem repetidamente um crash NOTA: Na documentação do software, num CD ou numa disquete estão sempre incluídas instruções de instalação.
FAÇA IMEDIATAMENTE CÓPIAS DE SEGURANÇA DOS SEUS FICHEIROS. UTILIZE UM PROGRAMA ANTIVÍRUS PARA FAZER UM SCAN AO DISCO RÍGIDO, ÀS DISQUETES OU CDS. GUARDE E FECHE TODOS OS FICHEIROS OU PROGRAMAS ABERTOS E DESLIGUE O SEU COMPUTADOR ATRAVÉS DO M E N U I N I C I A R.
4 Podem ser executados diagnósticos num destes dois modos: • Ligue o computador. Quando o logótipo DELL™ aparecer, pressione imediatamente. Seleccionar Diagnósticos no menu de arranque e pressionar . NOTA: Se esperar demasiado e o logótipo do sistema operativo aparecer, continue a aguardar até que a área de trabalho do Microsoft® Windows® seja apresentada. Em seguida, desligue o computador e tente novamente. • Pressione sem soltar a tecla enquanto liga o computador.
6 Seleccione Executar o Dell Diagnostics de 32 bits na lista numerada. Se houver várias versões na lista, seleccione a versão adequada para a sua plataforma. 7 Quando o Main Menu (Menu principal) do Dell Diagnostics aparecer, seleccione o teste a ser executado. Main Menu (Menu principal) do Dell Diagnostics 1 Após o Dell Diagnostics ser carregado e o ecrã Main Menu (Menu principal) aparecer, clique no botão da opção desejada. Opção Função Express Test (Teste Executa um teste rápido aos dispositivos.
Separador Função Configuration (Configuração) Apresenta a configuração de hardware do dispositivo seleccionado. Parameters (Parâmetros) Permite alterar as configurações de teste para personalizá-lo. O Dell Diagnostics obtém informação de configuração para todos os dispositivos a partir do programa de configuração do sistema, memória e vários testes internos, e apresenta a informação na lista de dispositivos no painel esquerdo do ecrã.
Índice remissivo A D G ajuda centro de ajuda e suporte, 128 Dell Diagnostics, 141 Dell Support website, 127 encontrar informação, 125 Dell Support Utility, 128 Guia de informações do produto, 126 B bateria armazenar, 139 capacidade, 134 carregar, 137 indicador de carga, 136 luz, 137 medidor de energia, 136 remover, 138 segunda bateria no compartimento de meios, 135 C CD de Controladores e utilitários, 125 computador crash, 139-140 não responde, 139 Contrato de licença do utilizador final, 126 control
Índice remissivo Q QuickSet, 128 R resolução de problemas acerca, 139 centro de ajuda e suporte, 128 Consulte também problemas Dell Diagnostics, 141 S sistema operativo CD do sistema operativo, 128 reinstalação, 128 software problemas, 140 support website, 127 T tampas da porta, 130, 132-133 W Windows XP CD do sistema operativo, 128 centro de ajuda e suporte, 128 reinstalação, 128 146 Índice remissivo
Dell™ Latitude™ ATG D620 Guía de referencia rápida Modelo PP18L w w w. d e l l . c o m | s u p p o r t . d e l l .
Notas, avisos y precauciones NOTA: Una NOTA indica información importante que le ayuda a hacer un mejor uso del ordenador. AVISO: Un AVISO indica la posibilidad de daños en el hardware o pérdida de datos, y le explica cómo evitar el problema. PRECAUCIÓN: Una PRECAUCIÓN indica un posible daño material, lesión corporal o muerte.
Contenido Localización de información . . . . . . . . . . . . . . . . . . . . . . . . . 151 Configuración del ordenador . . . . . . . . . . . . . . . . . . . . . . . . . 155 . . . . . . . . . . . . . . . . . . . . . . . . . . . 156 Acerca de su ordenador . . . . . . . . . . . . . . . . . . . . . . . . . . . 156 157 157 158 159 . . . . . . . . . . . . . . . . . . . . . . . . . . . . . . . 159 Vista anterior . . . . . Vista lateral izquierda . Vista lateral derecha . Vista posterior. . . . .
Contenido
Localización de información NOTA: Algunas funciones o medios son opcionales y pueden no incluirse en su ordenador. Es posible que algunas funciones o medios no estén disponibles en determinados países. NOTA: Su ordenador puede incluir información adicional.
¿Qué busca? Aquí lo encontrará • • • • • • Información sobre la garantía Términos y condiciones (sólo en EE.UU.
¿Qué busca? Aquí lo encontrará • Soluciones: consejos y orientación para la solución de problemas, artículos de técnicos y cursos en línea, preguntas frecuentes. • Comunidad: debates en línea con otros clientes de Dell. • Actualizaciones: información de actualización para componentes como, por ejemplo, la memoria, la unidad de disco duro y el sistema operativo. • Atención al cliente: información de contacto, llamada de servicio y estado de los pedidos, garantía e información de reparación.
¿Qué busca? Aquí lo encontrará • Actualizaciones de software y sugerencias para la solución de problemas: preguntas más frecuentes, temas candentes y estado general del entorno de su ordenador Utilidad Dell Support • Cómo utilizar Windows • Cómo trabajar con programas y archivos • Cómo personalizar mi escritorio • Información sobre la actividad de la red, el Power Management Wizard (Asistente para la administración de energía), teclas de acceso rápido y otros elementos controlados por Dell QuickSet La
Configuración del ordenador PRECAUCIÓN: Antes de comenzar cualquiera de los procedimientos de esta sección, siga las instrucciones de seguridad que se encuentran en la Guía de información del producto. 1 Desempaquete la caja de accesorios. 2 Saque el contenido de la caja de accesorios, que necesitará para completar la configuración del ordenador.
Acerca de su ordenador NOTA: Para obtener información adicional sobre las funciones identificadas en esta sección, consulte la Guía del usuario del ordenador.
Vista lateral izquierda 1 2 3 4 5 6 7 8 9 10 1 Rejillas de ventilación 2 Ranura para cable de seguridad 3 Conectores de audio (2) 4 Sensor de infrarrojos 5 Ranura de tarjeta smart (con blank) 6 Conmutador inalámbrico 7 Indicador de Wi-Fi Catcher™ 8 Ranura de tarjeta PC o Express 9 Unidad de disco duro 10 Seguro de liberación de la tarjeta PC/ExpressCard Vista lateral derecha 1 1 Unidad óptica en compartimento de medios 4 Cubiertas del puerto USB 2 3 2 Seguro de liberación
Vista posterior PRECAUCIÓN: No introduzca objetos ni permita que el polvo se acumule en las rejillas de ventilación ni las bloquee. No almacene el ordenador en un entorno con poca ventilación, como un maletín cerrado, mientras esté en funcionamiento. La circulación restringida de aire podría dañar el ordenador o provocar un incendio.
Vista inferior 1 2 3 7 4 5 6 1 Cubierta del módulo de memoria 2 Medidor de estado/carga de la batería 3 Batería 4 Pasador de liberación del compartimento de baterías (2) 5 Conector del dispositivo de acoplamiento 6 Rejillas de ventilación 7 Unidad de disco duro Uso de la batería Rendimiento de la batería NOTA: Para obtener información acerca de la garantía Dell™ para su ordenador, consulte la Guía de información del producto o el documento separado de garantía que se envía junto con el
Puede instalar una segunda batería opcional en el compartimento de medios para aumentar el tiempo de funcionamiento de manera significativa. Para obtener información adicional sobre el uso de una segunda batería, consulte el apartado “Compartimento de medios” en la Guía del usuario en línea de su ordenador. NOTA: El tiempo de funcionamiento de la batería (el tiempo que la batería puede mantener una carga) disminuye con el tiempo.
Medidor de batería Dell™ QuickSet Si Dell QuickSet está instalado, presione para ver el Medidor de batería Dell QuickSet. El medidor de batería muestra el estado, el estado de consumo de la batería, el nivel y el tiempo total de carga de la batería del ordenador. Para obtener más información sobre QuickSet, pulse el botón derecho del ratón sobre el icono barra de tareas y seleccione Ayuda.
Comprobación de la carga de la batería Para comprobar la carga de la batería, pulse y suelte el botón de estado del medidor de carga de la batería para encender los indicadores de nivel de carga. Cada luz representa aproximadamente un 20 % de la carga total de la batería. Por ejemplo, si la batería tiene un 80 % de carga restante, habrá cuatro luces encendidas. Si no hay ninguna luz encendida, entonces la batería está descargada.
Cuando conecte el ordenador a una toma de alimentación eléctrica o instale una batería mientras está conectado a una toma de alimentación eléctrica, comprobará la carga y la temperatura de la batería. Si es necesario, el adaptador de CA cargará la batería y mantendrá la carga.
1 2 3 1 Batería 2 Pasador de liberación del compartimento de baterías (2) 3 Lengüeta de la batería Para volver a colocar la batería, siga el procedimiento de extracción en orden inverso. Almacenamiento de una batería Extraiga la batería cuando vaya a guardar el ordenador durante un período largo. Las baterías se descargan durante los almacenamientos prolongados.
El ordenador no responde AVISO: Es posible que se pierdan datos si no puede apagar el sistema operativo. A P A G U E E L O R D E N A D O R — Si no puede conseguir que responda pulsando una tecla o moviendo el ratón, pulse el botón de alimentación durante unos 8 ó 10 segundos como mínimo hasta que se apague el ordenador. A continuación, reinicie el ordenador.
REALICE INMEDIATAMENTE UNA COPIA DE SEGURIDAD DE LOS ARCHIVOS. UTILICE UN PROGRAMA DE BÚSQUEDA DE VIRUS PARA COMPROBAR LA UNIDAD DE DISCO DURO, LOS DISCOS CD. FLEXIBLES O LOS GUARDE Y CIERRE LOS ARCHIVOS O PROGRAMAS ABIERTOS Y APAGUE EL ORDENADOR MEDIANTE EL MENÚ INICIO.
4 Los diagnósticos se pueden invocar de uno de los dos modos siguientes: • Encienda el ordenador. Cuando aparezca el logotipo de DELL™, pulse inmediatamente. Seleccione Diagnostics (Diagnósticos) del menú de inicio y pulse . NOTA: Si espera demasiado y aparece el logotipo del sistema operativo, siga esperando hasta que aparezca el escritorio de Microsoft® Windows®. Entonces, apague el ordenador y vuelva a intentarlo.
5 Escriba 1 para iniciar el menú y pulse para continuar. 6 Seleccione Run the 32 Bit Dell Diagnostics (Ejecutar los Dell Diagnostics de 32 bits) de la lista numerada. Si se muestran varias versiones, seleccione la apropiada para su ordenador. 7 Cuando aparezca el Main Menu (Menú principal) de Dell Diagnostics, seleccione la prueba que desea ejecutar.
4 Ficha Función Configuration (Configuración) Muestra la configuración de hardware del dispositivo seleccionado. Parameters (Parámetros) Permite personalizar la prueba cambiando su configuración. Los Dell Diagnostics obtienen la información de configuración de todos los dispositivos a partir del programa Configuración del sistema, la memoria y varias pruebas internas, y la muestran en la lista de dispositivos del panel izquierdo de la pantalla.
Guía de referencia rápida
Índice A ayuda Dell Diagnostics, 166 localización de información, 151 sitio web Dell Support, 153 B batería almacenar, 164 cargar, 162 extracción, 163 indicador, 162 medidor de carga, 161 medidor de energía, 161 rendimiento, 159 segunda batería en el compartimento de medios, 160 C CD Drivers and Utilities (Controladores y utilidades), 151 Centro de ayuda y soporte técnico, 154 Contrato de licencia del usuario final, 152 controladores reinstalación, 151 cubiertas del puerto, 155, 157-158 G D Guía del u
Índice el ordenador no responde, 165 el ordenador no se inicia, 164 el ordenador se bloquea, 165 el programa no responde, 165 el programa se bloquea, 165 pantalla azul, 165 software, 164-165 Q QuickSet, 154 S sistema operativo CD del sistema operativo, 154 volver a instalar, 154 sitio web de asistencia, 153 software problemas, 165 solución de problemas acerca de, 164 Centro de ayuda y soporte técnico, 154 Consulte también problemas Dell Diagnostics, 166 U Utilidad Dell Support, 154 W Windows XP CD