
Replacement Procedure


PowerConnect B-DCX-4S Vertical Cable Management Fingers Replacement Procedure 3
53-1001795-01
In this guide
•Installing the PowerConnect B-DCX-4S Vertical Cable Management Fingers 3
•Time required . . . . . . . . . . . . . . . . . . . . . . . . . . . . . . . . . . . . . . . . . . . . . . . . . . 3
•Items required . . . . . . . . . . . . . . . . . . . . . . . . . . . . . . . . . . . . . . . . . . . . . . . . . 3
•Removing the cable management finger assembly. . . . . . . . . . . . . . . . . . . . 3
•Replacing the cables management finger assemblies . . . . . . . . . . . . . . . . . 4
Installing the PowerConnect B-DCX-4S Vertical Cable Management
Fingers
The PowerConnect B-DCX-4S comes equipped with two vertical cable management finger assemblies. It can
continue to operate during the replacement of the cable management fingers. Due to the horizontal orientation of
the blades in the DCX-4S, the finger assemblies are attached to the uprights of the mounting rack.
Time required
The replacement procedure for the cable management fingers takes less than five minutes.
Items required
• One or two DCX-4S vertical cable management finger assemblies.
• A #1 Phillips screwdriver.
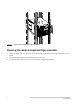
Removing the cable management finger assembly
1. Rearrange the cables around one of the cable management finger assemblies.
2. Unscrew and save the three (3) screws holding the finger assembly to the rack upright (Figure 1). Support the
assembly to prevent it from falling.
3. Remove the cable management finger assembly.
4. If necessary, repeat steps 1-3 for the other finger assembly.