
Replacement Procedure
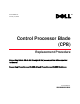


Control Processor Blade (CP8) Replacement Procedure 7
53-1001806-01
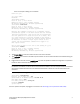
FIGURE 2 Control processor blade (CP8) in a DCX-4S chassis
Replacing a control processor blade (CP8)
ATTENTION
The instructions below refer to the top and bottom of each blade in the vertical orientation as used in the
PowerConnect B-DCX. For the PowerConnect B-DCX-4S, because the blades are horizontally oriented, top should be
read as left and bottom should be read as right.
ATTENTION
Follow ESD precautions (see “ESD Precautions” in your chassis’ hardware reference manual).
CAUTION
Use the same version of Fabric OS on both CP blades. Using different versions is not supported and
might cause malfunctioning. If the replacement CP blade has a different version of Fabric OS, bring both
blades to the same firmware version.
1. Open the ejector handles to approximately 45 degrees. For the DCX, orient the CP blade so that the handles are
toward you and the flat metal side is on your left. For the DCX-4S, the flat metal side should be on the bottom.
2. Align the flat metal side of the CP blade inside the lower and upper blade guides in the slot. Slide the CP blade
into the slot until it is firmly seated.
3. Tighten the thumb screw inside each handle using the Phillips screwdriver.
4. Turn the CP blade on by sliding the ON/OFF switch in the top handle up, to cover the thumb screw.
5. Verify that the power LED is green. If not, ensure that the CP blade has power and is firmly seated and that the
ejectors are in the locked position.
6. Connect the cables to the new CP blade.