Dell™ Backup and Recovery Manager V1.2 Users Guide www.dell.com | support.dell.com Dell™ Backup and Recovery Manager V1.
Notes and Cautions NOTE: A NOTE indicates important information that helps you make better use of your computer and software. CAUTION: A CAUTION indicates potential damage to hardware or loss of data if instructions are not followed. Information in this document is subject to change without notice. © 2010 Dell Inc. All rights reserved. Reproduction of these materials in any manner whatsoever without the written permission of Dell Inc. is strictly forbidden.
Table of Contents 1 Dell™ Backup and Recovery Manager V1.2 Overview ........................... 4 2 Overview Screen ................................................................................................... 5 2.1 If you have created a system backup ................................................... 6 2.2 If you have not created a system backup ........................................... 6 3 File Backup and Restore ............................................................................
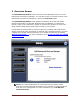
1 Dell™ Backup and Recovery Manager V1.2 Overview Dell™ Backup and Recovery Manager V1.2 is a basic and easy to use tool that helps you create and manage your file and system backups, and recover your computer and data in the event of a failure. Using the program, you will also be able to: 1. Create a bootable Recovery DVD or external storage device that includes the Windows Recovery Environment and can include your Dell Factory Image (user choice).
2 Overview Screen The System Backup Status screen is the first screen displayed when you launch Dell Backup and Recovery Manager. You can also access it from other screens in the Dell Backup and Recovery Manager by clicking the Overview button. The System Backup Status screen displays information about the last system backup image made.
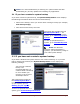
NOTE: It is recommended that you backup your system before and after downloading any security updates and installing any applications. 2.1 If you have created a system backup If you have created a system backup, the System Backup Status screen displays the following information about the last successful backup: Name of the backup, which you choose when creating a backup (for example, Dell Factory Image) Date and time the backup occurred The screen also provides the link Backup System Now ….
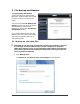
3 File Backup and Restore The File Backup and Restore screen provides links that execute Microsoft® Windows data backup and recovery functions for specific file types. You can access the File Backup and Restore screen from other screens in the Dell Backup and Recovery Manager by clicking the File Backup and Restore button. If you need additional help with the following screens, refer to Microsoft’s Help system regarding backing up and restoring files. 3.
2. Specify the location where you want to save the backup file. You can save the backup to a hard drive, CD, DVD, or network location. 3. Click Next. The Which disks do you want to include in the backup? screen appears, displaying a list of disks. 4. Select all of the disks you want to back up by selecting the check box beside each disk. NOTE: The disk on which the Windows operating system is installed is always automatically included in the backup.
The How often do you want to create a backup? screen appears. 8. Using the drop-down menus, select the time increment, day of the week, and the time of day you want to run the backup. 9. Click Save settings and start backup to begin the backup process. A progress bar displays as Windows creates the backup. When the backup is complete, Windows displays a balloon message above the system tray indicating the backup was successful. 3.
1. Click Restore files.... 2. Select the backup from which you want to restore files: Files from the latest backup, or Files from an older backup. 3. Click Next. The Select the files and folders to restore screen appears. 4. Select files and folders to restore: a. To add individual files, click the Add files... button, browse to the location of each file, and then select the file to add it to the list. Repeat for each file you want to restore. b. To add folders and their contents, click the Add folders...
4 Backing up your system CAUTION: If you are using a notebook computer for backup or recovery, it is strongly recommended that you run computer on AC power rather than battery power to avoid the potential interruption to the backup and recovery process. Interrupting a backup and recovery process can result in potential data loss. NOTE: To use the Dell Backup and Recovery Manager, you must have Administrator log-in rights or be listed in the Windows® Administrators Group.
If you select a DVD RW device from the drop-down menu and a blank disk was found in the device, the Start button will be enabled. Otherwise you will be asked to insert a blank DVD in the drive. Click Refresh after the drive spins up to enable the Start > button. Click Start >. If you select DVD or insert a small USB flash drive, the backup will automatically be made bootable and you will go straight to the Confirm screen shown in step 4.
The Confirm screen appears. CAUTION: The following step starts the process of creating the backup. When you start the process, your system automatically reboots into the Windows Recovery Environment to create the backup. When the process is complete, your system automatically reboots the Windows operating system, after which you may resume your normal activities. To avoid potential data loss, close any open files and applications before proceeding to the next step. 5. Click Start.
If the backup image size exceeds the size of a single DVD, the image file will be split up so it can span multiple DVDs. The message Splitting the image file … will be displayed above the progress bar until this part of the process completes. Once complete, the message Writing data to your drive … will be displayed. Dell Backup and Recovery Manager will tell you how many disks you will need for your backup set.
5 Restoring your system 5.1 Restoring from within Windows NOTE: To use Dell Backup and Recovery Manager, you must have Administrator log-in rights or be listed in the Windows® Administrators Group. From the Restore System screen, you can restore your system using a saved backup file. You can access the Restore System screen from other screens in the Dell Backup and Recovery Manager by clicking the Restore System button.
1. Click Restore System. 2. Select the backup file (also called "backup image") you want to use to restore your system from the drop-down menu. NOTE: The drop-down menu retains the names of previously created backup images even though they may not be currently available on your system. This is normal. If their names were not retained, you would not be able to restore from a backup image that resides on DVD or an external storage device that may not be presently attached to your system.
6. The congratulatory screen appears when the process completes. Click Finish. 5.2 Restoring from a bootable backup CAUTION: It is strongly recommended that you review the NOTE and CAUTIONS in the preceding section before continuing in this section. 1. You may boot from either DVD or an external storage device, depending on which media you used to make your system backup. Insert DVD #1 of your set into your DVD drive or attach your external storage device, and boot your system.
4. The Choose a recovery tool screen appears listing all the available tools you can use to recover your system. These options are provided to allow you to troubleshoot and repair your operating system on your primary hard drive. To restore your system from a system backup created using Dell Backup and Recovery Manager, click Dell Backup and Recovery Manager at the bottom of the menu. 5.
7. When the restoration process completes, a Congratulations screen will appear. Click Finish. 5.3 Restoring your system from the Windows Recovery Environment 1. In Microsoft Windows Vista or Windows 7, initiate a reboot of your system and press F8 during the boot to bring up the Advanced Boot Options screen. 2. The first highlighted menu item is Repair Your Computer. Press Enter to select it. This launches the Windows Recovery Environment. 3.
6 Managing your system backups 6.1 Exporting a system backup 1. From the Backup System screen, click Manage backups …. 2. Select the backup you want to export from the drop-down menu, and then click Export. NOTE: You cannot export an image to DVD that is larger than the capacity of a single DVD. Nor can you export an image from a DVD that spans more than one DVD. A Windows Save As dialog box appears. Select the location where you want to save the exported image if other than the default DBRM folder. 3.
A progress bar appears at the bottom of the Export Backup screen. When this function completes, the Manage Backups screen appears. 6.2 Deleting a system backup 1. From the Backup System screen, click Manage backups …. 2. Select the backup you want to delete from the drop-down menu, and then click Delete. The Delete Backup screen appears, displaying in red the name of the file you want to delete. 3. To confirm deletion, select the check box by Yes, I want to delete the above system backup.
6.3 Renaming a system backup 1. From the Backup System screen, click Manage backups …. 2. Select the backup you want to rename from the dropdown menu, and then click Rename. The Rename Backup screen appears, displaying in red the name of the file you want to rename. 3. Type a new name for the backup. 4. Click Save. When this function completes, the Manage Backups screen appears. NOTE: Your original Dell Factory Image stored on the Recovery partition cannot be renamed.
7 Dell Recovery Tools NOTE: To use the Dell Backup and Recovery Manager, you must have Administrator log-in rights or be listed in the Windows® Administrators Group. The Dell Recovery Tools provides the following recovery tools for creating bootable media: Dell Recovery Media (Microsoft Windows Vista and Windows 7 only): Use this tool to create a bootable recovery DVD or External Storage Device that includes the Windows Recovery Environment, and can include your Dell factoryinstalled image.
and recovery process. Interrupting a backup and recovery process can result in potential data loss. 1. Click Create a recovery disk or device.... The Choose Media screen appears. 2. Select the type of media (DVD or External Storage Device) where you want to save your backup. Options for using a factory image appear on the screen. 3. Select whether you want to include the factory image (recommended). 4. Click Next >. The Specify Details screen appears. 5. If you selected DVD in step 2: a.
d. Click Finish. Label your DVD and store it in a safe place. NOTE: The Dell Factory Image stored on your Recovery DVD will be automatically named Dell Factory Image DVD for Microsoft Windows Vista systems, or Recovery DVD – xxxxxxxxxxxxxx for Windows 7 systems where a date and time code will be substituted for “xxxx …”. 6. If you selected an External Storage Device in step 2: a. Select the External Storage Device you want to use from the drop-down menu.
b. Click Next >. The Progress screen appears, displaying a progress bar. When the recording is complete, a message appears indicating that your recovery media has been created. c. Click Finish. NOTE: The Dell Factory Image stored on your External Storage Device will be automatically named Dell Factory Image Ext for Microsoft Windows Vista systems, or Recovery External – xxxxxxxxxxxxxx for Windows 7 systems where a date and time code will be substituted for “xxx …”. 7.
NOTE: Windows XP is only able to create OS Media on DVD. Only Microsoft Windows Vista and Windows 7 are able create OS Media on an external storage device If you selected DVD, place a blank DVD in the drive selected. 3. Click Create your OS Media… The Create Image screen appears. A Progress bar is displayed along the bottom of the screen. Dell™ Backup and Recovery Manager V1.
When the recording is complete, a message appears indicating that your OS media has been created. 4. Click Finish. Label your OS Media and store it in a safe place. NOTE: The operating system on the OS Media disk is the backup copy of your original licensed Microsoft operating system. It will not automatically install your Dell system drivers.
8 Windows Recovery Environment Microsoft Windows Vista and Windows 7 operating systems include a Recovery Environment to assist users in troubleshooting their system. A user can access the Windows Recovery Environment by pressing function key F8 during boot. F8 will display the Advanced Boot Options screen. This is a different screen than the Boot Options screen where you select the desired boot device after pressing F12. The Advanced Boot Options screen displays a list of available troubleshooting options.
Although Windows XP does not have a Windows Recovery Environment, you may still restore your Windows XP system using one or more of the following steps: 1. Restore from a bootable system backup created using Dell Backup and Recovery Manager (this restores only your operating system partition, including Dell Backup and Recovery Manager and your files that you stored on that partition. Skip step 2 but you will need to perform step 3. 2.
9 Operating Systems Supported Windows® 7 Ultimate 32-bit/64-bit Windows 7 Professional 32-bit/64-bit Windows 7 Home Premium 32-bit/64-bit Windows 7 Home Basic 32-bit/64-bit Windows 7 Starter 32-bit Microsoft® Windows Vista® Ultimate 32-bit/64-bit with SP1/SP2 (Service Packs 1 or 2) Windows Vista Business 32-bit/64-bit with SP1/SP2 Windows Vista Home Premium 32-bit/64-bit with SP1/SP2 Windows Vista Home Basic 32-bit with SP1/SP2 Windows XP Professional 32-bit with SP3 (
10 Supported Optical Media Single-layer DVD media for creating system backup images (dual-layer media is not supported for this operation) Single and dual-layer DVD media for creating OS Media disk NOTE: Most Windows 32-bit operating system images can be created on singlelayer DVD media except some images containing multiple language sets. Depending on the image, the program may ask for dual-layer media to be inserted.
11 Other information you need to know 1. When using Dell Recovery Tools to create a recovery disk, the close window icon (red button with white ×) in the upper right corner is disabled. This is intentional to prevent a user from inadvertently closing the window while performing a task and avoids potential data corruption. To exit, click the Cancel button. 2. The date and time stamp on the backup.WIM file differs from the actual time the backup was made.
10. A Windows XP system with Dell Backup and Recovery Manager installed will not have the Windows Recovery Environment containing your Dell Factory Image, or the Dell Recovery Media option on the Dell Recovery Tools screen. Go to 8 Windows Recovery Environment for the restore options available for a Windows XP system. 11. When you restore a backup image from within Windows, you may notice that the names of previous backups are retained in the drop-down menu of backups available to restore.
12 Major differences between the versions Dell Backup and Recovery Manager V1.2.1: Web-post versions of V1.2 - Allows existing factory-installed versions to be updated or upgraded via Windows Installer. For example, a customer will be able to upgrade their system from V1.1 to V1.2.1. The Windows 7 version can be installed on systems that did not have Dell Backup and Recovery Manager previously factory-installed.
13 Why do I need to back up? Important files can be unexpectedly lost by accidentally erasing or replacing them. You can also be victimized by a virus or worm attack, or a software or hardware failure including a complete hard disk failure. While these events may be rare, they are unpredictable because they can occur anytime and usually at the worst time. That is why you need to make regular and frequent backups of your files, programs, system settings, etc.
14 Backup Options Summary What do you want to backup? Personal files, e.g. pictures, music, and documents from any hard drive partition Operating System Partition only including all programs and data stored there. Entire computer including all hard disk partitions What do I use? 1. DBRM File Backup and Restore 2. Windows XP Backup, or Microsoft Windows Vista or Windows 7 Back Up Files wizard 1. DBRM Backup System 2.
15 Restore Options Summary How do get back to these states? What do I use? Notes: Dell Factory Image including OS, and all drivers and applications installed when your system was built in the Dell factory (Microsoft Windows Vista and Windows 7 only) 1. DBRM Restore System to restore Dell Factory Image 2. DBRM Recovery Disk to restore Dell Factory Image 3. DBRM WinRE to restore Dell Factory Image Does not include any applications or data you may have added since your system was received from Dell.