
User's Manual

Dell™ Backup and Recovery Manager V1.2 Page 16
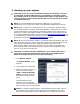
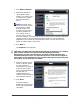
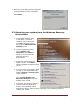
1. Click Restore System.
2. Select the backup file
(also called "backup
image") you want to use
to restore your system
from the drop-down
menu.
NOTE: The drop-down
menu retains the names
of previously created
backup images even
though they may not be
currently available on
your system. This is
normal. If their names
were not retained, you would not be able to restore from a backup image that
resides on DVD or an external storage device that may not be presently
attached to your system. By retaining their names, you will not lose your
ability to restore them in the future.
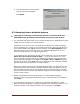
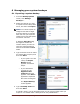
3. Click Next >.
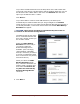
The Confirm screen appears.
CAUTION: The following step starts the process of restoring your system.
This process reboots your system into the Windows Recovery
Environment, erases your hard drive, and then installs data from the
selected backup file. Once you start this process, it cannot be stopped or
interrupted. If you attempt to interrupt the restore process by turning off
the system, the system will not reboot.
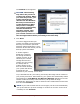
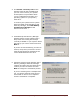
4. Read the Caution on the
screen, and then select
the check boxes to
confirm that you want to
overwrite your system
with the selected backup
file and that you
understand that the
restore process cannot be
interrupted or undone.
5. Click Start.
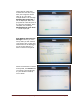
A window appears
displaying a progress bar
as the restore operation
completes.