
Administrator's Guide


Fabric Watch Administrator’s Guide 25
53-1002752-01
Interfaces for activating Fabric Watch
4
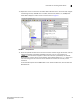
In Figure 5, the MIB browser populated the left side of the screen with a MIB tree that you can
navigate.
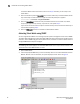
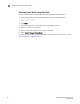
3. Open Web Tools and select Tasks > Manage > Switch Admin.
4. Click Show Advanced Mode.
5. On the SNMP tab, enter the IP address of the trap receiver and the severity level, and click
Apply.
NOTE
The severity level must be informational (4) in order to forward threshold alerts.
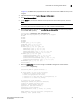
6. Start a Telnet session, and enter the snmpConfig --set mibcapability command at the prompt to
set the SNMP MIB capability.
switch:admin> snmpConfig --set mibcapability
The SNMP Mib/Trap Capability has been set to support
FE-MIB
SW-MIB
FA-MIB
SW-TRAP
FA-TRAP
FA-MIB (yes, y, no, n): [yes]
FICON-MIB (yes, y, no, n): [no]
HA-MIB (yes, y, no, n): [no]
SW-TRAP (yes, y, no, n): [yes] yes
swFCPortScn (yes, y, no, n): [no]
swEventTrap (yes, y, no, n): [no]
swFabricWatchTrap (yes, y, no, n): [no] yes
swTrackChangesTrap (yes, y, no, n): [no]
FA-TRAP (yes, y, no, n): [yes]
connUnitStatusChange (yes, y, no, n): [no]
connUnitEventTrap (yes, y, no, n): [no]
connUnitSensorStatusChange (yes, y, no, n): [no]
connUnitPortStatusChange (yes, y, no, n): [no]
SW-EXTTRAP (yes, y, no, n): [no]
switch:admin>
7. Ente r t he snmpConfig command to configure the SNMP management host IP address.
switch:admin> snmpConfig
Customizing MIB-II system variables ...
At each prompt, do one of the following:
o <Return> to accept current value,
o enter the appropriate new value,
o <Control-D> to skip the rest of configuration, or
o <Control-C> to cancel any change.
To correct any input mistake:
<Backspace> erases the previous character,
<Control-U> erases the whole line,
sysDescr: [Fibre Channel Switch.]
sysLocation: [End User Premise.]
sysContact: [Field Support.]
authTrapsEnabled (true, t, false, f): [false]
SNMP community and trap recipient configuration:
Community (rw): [Secret C0de]