
Administrator Guide


Web Tools Administrator’s Guide 135
53-1002756-01
Configuring an EX-Port
10
• Enable or disable trunking
• Configure router port cost
ATTENTION
During EX-Port configuration, the port is automatically disabled, and then re-enabled when the
changes are applied. Be sure that you do not physically connect a port to a remote fabric before
configuring it as an EX-Port; otherwise, the two fabrics merge and you lose the benefit of Fibre
Channel Routing.
You can enable or disable multiple ports at one time. Use Shift-click and Ctrl-click to select multiple
ports in the table, and then click one of the enable or disable tasks in the task bar.
You can select multiple ports in the table, but you can select only one port at a time in the tree.
Configuring an EX-Port
NOTE
With Fabric OS v7.0.1, Web Tools supports interoperability between a Fabric OS fabric and a Brocade
Network OS fabric through an FC router. You can select this interoperability mode in the FC Port
Configuration Wizard.
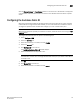
To configure an EX-Port, perform the following steps.
1. Select Configure > FCR.
2. Select the EX-Ports tab.
3. Click New in the task bar to configure one or more EX-Ports.
This launches the port configuration wizard, which guides you through the port configuration
process.
You must specify the Fabric ID and, if configuring an FC port, the speed and long distance
mode. You can select any unique fabric ID as long as it is consistent for all EX-Ports that
connect to the same edge fabric.
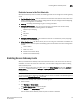
Editing the configuration of an EX-Port
To edit the configuration of an EX-Port, perform the following steps.
1. Select Configure > FCR.
2. Select the EX-Ports tab.
3. Select a port to configure, by clicking the row.
4. Click Edit Configuration in the task bar. This launches the port configuration wizard, which
guides you through the port configuration process. The current configuration values are
displayed in the wizard steps.