
Administrator Guide


Web Tools Administrator’s Guide 181
53-1002756-01
SNMP configuration
15
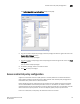
1. Open the Switch Administration window as described in “Opening the Switch Administration
window” on page 31.
2. Select the SNMP tab.
3. Select a trap level for a recipient from the corresponding Trap Level menu in the SNMPv1 and
SNMPv3 sections.
The level you select identifies the minimum event level that prompts a trap.
NOTE
Adding or editing the user name can be done only through the CLI and by selecting a user
name from the User Name menu in the SNMPv3 section.
4. Click Apply.
Changing the systemGroup configuration parameters
To change the systemGroup configuration parameters, perform the following steps.
1. Open the Switch Administration window as described in “Opening the Switch Administration
window” on page 31.
2. Select the SNMP tab.
3. Enter a contact name, description, and location in the SNMP Information section.
4. Optional: Select the Enable Authentication Trap check box to allow authentication traps to be
sent to the reception IP address.
5. Click Apply.
Setting SNMPv1 configuration parameters
To set SNMPv1 configuration parameters, perform the following steps.
1. Open the Switch Administration window as described in “Opening the Switch Administration
window” on page 31.
2. Select the SNMP tab.
3. Double-click a community string in the SNMPv1 section and enter a new community string.
4. Double-click a recipient IP address in the SNMPv1 section and enter a new IP address.
5. Click Apply.
Setting SNMPv3 configuration parameters
NOTE
The port number is not included.
To set SNMPv3 configuration parameters, perform the following steps.
1. Open the Switch Administration window as described in “Opening the Switch Administration
window” on page 31.
2. Select the SNMP tab.