User Guide CACStar™ for Dell C3765dnf Network protection for CAC/PIV enabled Multifunction Devices or Printers CACStar™ User Guide Rev A03 Copyright 2014 Digital Imaging Technology Page 1
Table of Contents Introduction .................................................................................................................................................. 3 Initial Setup ................................................................................................................................................... 4 Admin Login ..................................................................................................................................................
Introduction CACStar™ provides a solution to HSPD‐12 requirements for CAC/PIV based protection of network data to and from printers or Multifunction Devices (MFD’s). You can configure it to require an authenticated CAC card to control Scan to Folder, Scan to Email, SNMP, FTP, or printing. Configurable authentication methods include Basic X.509 certificate on the card, PIN validation, expiration, OCSP, root certificate, LDAP, and Kerberos.
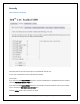
Initial Setup 1. Using the MFD/printer operator panel, set the MFD IP address to 172.19.10.2 and the Subnet Mask to 255.255.255.0 and the Gateway to 172.19.10.1. 2. After Initialization is complete, the Card Reader display will say Waiting For Card. 3. Using the card reader keypad, enter the IP address to be used to access both the CACStar and the MFD/printer. See Figure 1 below. a. Press the F key; the display will say Information. b. Press the F key again; the display will say Configuration. c.
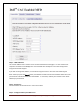
Admin Login Configuration of the CACStar will be done from the administrator’s PC by connecting over the LAN using the IP Address you entered on the card reader keypad. This must be done in secure mode on port 8443. For example: https://192.168.1.23:8443 The browser will require an ID and password. The default ID is “admin”. The default password is “password”. After initial login, you can change the password to one of your choice by going to the Administrator tab.
Step 1 – MFD IP Address This is the IP address that is used for access to these administrator web pages. It is also used for host computer connection to the MFD/printer. This IP address was already set in the initial setup process using the card reader keypad. If you wish to change this address, it can be done using this screen or from the card reader keypad.
Note: A DNS Server is required for OCSP support. It is not necessary to configure a DNS server if you are not using OCSP. Step 4 – Press Update Local Side Configuration These settings define the IP addresses used for Local communication between the CACStar and the MFD/printer. The defaults are likely to be acceptable. Usually there is no need to enter any IP addresses on this configuration page. Make sure these values were entered into the MFD using the MFD/printer operator panel.
Security MFD Function Enabling Check the boxes for Functions that require a validated CAC Card for use. If a box is un‐checked the Function will always be allowed. For example: If you want the MFD Scan-to-Folder Function to only be available when a validated CAC Card is installed, check the CAC Enable Scan-To-Folder box. If you want the MFD Scan-to-Folder Function to be available all the time whether a CAC card is inserted or not, uncheck the CAC Enable Scan-To-Folder box.
Hold Print If enabled, Print jobs will be held in the CACStar until the user is authenticated at the printer by inserting their CAC card. After authentication, the user’s jobs will be printed. CAC Print Server Set this to the IP address of the Secure Print server. Server Print Only If enabled, print jobs will only be allowed from the configured CAC Print Server. If not, jobs will be allowed from any IP address.
If you have elected to control MFD generated email with your CAC cards, you will need to configure the item shown in the screen below. SMTP Address or Server Name Set the IP address or Server Name of the SMTP server. SMTP Port Number Set the TCP port number for SMTP communications. User Email Address From Select the source location for the “From” email address. Emailed scans can be from either the user’s own email address on his CAC card, or from the user’s email address on the LDAP server.
Authentication Method CACStar™ User Guide Rev A03 Copyright 2014 Digital Imaging Technology Page 11
Basic This includes PIN validation, card expiration check, and X.509 card certificate validation. If an NTP server is not configured on the LAN Side Configuration page, the expiration check is bypassed. The Basic level of authentication is always included and cannot be removed from the configuration. In some installations, this is sufficient authentication and is the only one activated. OCSP Check this box to enable OCSP (Online Certificate Status Protocol) verification of CAC Cards.
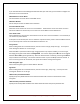
Kerberos If LDAP is enabled, you may choose to use Kerberos authentication for the LDAP server. KDC Server IP: KDC Server Port: KDC Realm: KDC Principal: IP address of the Kerberos server Port number of the Kerberos server. The default is 88. Kerberos Realm User Name. This can be either the CN or the EDI‐PI, or San Principal. PKINIT Win2K The setting affects the "Public Key Cryptography for Initial Authentication" in Kerberos.
%E ‐ expands to the user's Email %e ‐ expands to the user's EDI‐PI %I ‐ expands to the user's PIC‐Identification %u ‐ expands to LDAP Attribute value SMB Folder LDAP Attribute If a Folder Name is configured using %u, the LDAP Attribute defined here will be used to retrieve the path value for the %u field. Care should be taken when using "\" characters before or after the %u ‐ based on whether the LDAP Attribute value includes "\" character(s) at the beginning or end.
User Logging User Logging provides a means to create, view or delete a user log file to track user activity. If this is enabled, it will log the date, user name, and other information. The log can be downloaded in a csv file format for viewing. Upload Certificate Use this page to load Issuer and Root Certificate Authority Certificates into CACStar.
PKCS7, X509, PEM and DER formats are supported. Use the Browse button to select the Certificate file on your PC; then click the Upload Certificate button. If your certificates are in a .txt file format, please send them to us, and we will convert them to a supported format. If desired, we can preload them into new units. The Create Certificates Summary will create a text file listing all certificates stored in the CACStar.
Administrator Change Password Use this feature to change the password for the administrator. When the Change Password button is clicked, the next internal web page access will require this new password. Administrator Access These settings allow the admin to provide additional security by limiting CACStar admin access to specified IP addresses. If the Allow all IPs box is checked, an admin can access the CACStar configuration items from a PC at any IP address if he knows the ID and password.
Allow Telnet If this is enabled CACStar will allow a Telnet session to occur. The Telnet session will happen over Port 23. Telnet use with CACStar is intended for diagnostics by the developers. Allow Non‐Secure Port 8080 If this is enabled, CACStar will use Port 8080 and HTTP for HTML. Otherwise, Port 8443 and HTTPS will be used for HTML. Changing this setting requires a reboot of CACStar.
Firmware Update Firmware is stored in flash memory and can be updated as necessary for addition of new features. The CACStar.cfg file may also be uploaded. It is a text file that contains the CACStar configuration items. Create and Export Current Configuration Create Config File will create a configuration file containing all current settings except LAN IP Address, LAN Mask, and LAN Gateway. Thus, the Config file can be used to configure other CACStars.
Technical Support For help obtaining the correct firmware or documentation, contact Dell’s ProSupport Help Desk by calling 1‐866‐516‐3115, or by sending email to Imaging_Solutions_Support_CAC@dell.com This page is used to obtain Log Files and Capture Files to help diagnose network and configuration concerns. Use of these features is normally in conjunction with technical support from your vendor.
Setup Test CACStar™ User Guide Rev A03 Copyright 2014 Digital Imaging Technology Page 21
Date Time This is used to set the system date and time in CACStar memory and in the hardware Real Time Clock option if installed. The time from the hardware RTC is used until a time is received from a configured time server. This allows a date and time to exist in the absence of an NTP server. The CACStar internal system clock in memory will be overwritten by the date/time from an NTP server.
Hold Print Files Hold Print Files Hold Print files will be stored encrypted in CACStar and can be printed with CAC authentication at the printer. Hold Print files expire after the set number of days. When the expiration date is reached, the file will be deleted without being printed. Remaining storage and total storage are displayed so the user will know if held print files are reaching the maximum storage capacity.
%e ‐ the user's EDI‐PI %I ‐ the user's PIC‐Identification %S ‐ the user's SAM Account Name (from LDAP) A number may be used between the '%' and the keyword to specify a maximum number of characters. For example: '%5L' would indicate a maximum of 5 characters of the user's last name.
Status The Status pages offer three views of information about the current operations of CACStar. Number of successful card validations, number of unsuccessful card validations, network operations, date/time, and firmware version are all displayed.
Network CACStar™ User Guide Rev A03 Copyright 2014 Digital Imaging Technology Page 26
About CACStar™ User Guide Rev A03 Copyright 2014 Digital Imaging Technology Page 27