Dell™ C5765dn CACStar™ Smart Card Reader Installation and Configuration Guide Document protection for CAC/PIV enabled Multifunction Devices
Information in this document is subject to change without notice. © 2015 Dell Inc. All rights reserved. This publication could include technical inaccuracies or typographical errors. Changes are periodically made to the information herein; these changes will be incorporated in later editions. Improvements or changes in the products or the programs described may be made at any time. Note: For Dell technical support and downloads, visit dell.
Table of Contents Introduction . . . . . . . . . . . . . . . . . . . . . . . . . . . . . . . . . . . . . . . . . . . . . . . . 3 Hardware Installation . . . . . . . . . . . . . . . . . . . . . . . . . . . . . . . . . . . . . . . . 4 Converting a Dell C5765dn to a CACStar Enabled Machine . . . . . . . . 8 Configuring CACStar™ Security . . . . . . . . . . . . . . . . . . . . . . . . . . .
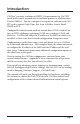
Introduction CACStar™ provides a solution to HSPD-12 requirements for CAC/PIV based protection of network data to and from printers or Multifunction Devices (MFDs). You can configure it to require an authenticated CAC/ PIV card to control Copy, Print, Fax, Scan to Folder, Scan to Email, SNMP, or FTP. Configurable authentication methods include Basic X.509 certificate on the card, PIN validation, expiration, OCSP, root certificate, LDAP, and Kerberos.
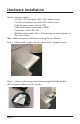
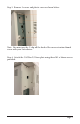
Hardware Installation The kit contents includes: CACStar™ I/O base plate with 3 M3 x 16mm screws CACStar assembly/cover with 6 M3 x 6mm screws Cable for connection to power USB Cable for Ethernet connection to MFD Card reader with USB cable Shelf for reader (with 2 M3 x 16 mounting screws/lockwashers) This User Guide Note: Make sure power is off before starting this installation. Step 1: Mount shelf to right side of scanner with 2 supplied screws.
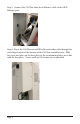
Step 3: Remove 3 screws and plastic cover as shown below: Note: You must pry the C-clip off the back of the cover retention thumb screw with your screwdriver.
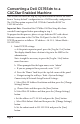
Step 5: Connect the CACStar short local Ethernet cable to the MFD Ethernet port. Step 6: Route the CACStar microUSB cable and reader cable through the oval shaped cutout at the bottom of the CACStar assembly/cover. Slide the cover into place on the base plate so the six mounting holes are in line with the base plate. Secure with six M3 x 6mm screws provided.
Step 7: Connect the CACStar USB cable to the MFD USB port as shown above. Step 8: CACStar hardware installation is now completed. The administrator can now turn on the MFD and proceed to “ Converting a Dell C5765dn to a CACStar Enabled Machine”.
Converting a Dell C5765dn to a CACStar Enabled Machine This section will cover the step-by-step instructions to convert the MFD from a “factory default” configuration to a CACStar ready configuration. The CACStar option requires Dell C5765dn Controller ROM Ver. 2.205.100 or later. Important Note: Download the C5765dn CACStar Setup files from www.dell.com/support before proceeding to step 1. To prepare for this process, please set up a dedicated PC with a direct Ethernet connection to the CACStar LAN port.
l. Select IPv4-Gateway Address and then press the [Change Settings] button. m. Set the Gateway address to 172.19.10.1 and press the [Save] button. n. Press the [Close] button twice. o. When prompted, press the [Reboot Now] button. 2. Open your Web browser, enter http://10.5.9.11 in the Address or Location field, and press the [Enter] key. Note: If a certificate error screen appears, choose to ignore the error and continue. 3.
h. Click [Apply]. It may take up to 30 seconds to complete this action and there will be no progress indicators. 7. Enable SSL/TLS: a. Navigate to Properties tab->Security->SSL / TLS Settings b. Check the “Enabled” box for “HTTP - SSL / TLS Communication”. c. Set [HTTP - SSL / TLS Communication Port Number] as necessary. d. Click [Apply]. e. When the right frame of the web browser changes to the Machine Reboot display, click [Reboot Machine]. 8.
c. Enter the CACStar IP address 10.5.9.11, administrator ID (default: “admin”) and administrator password (default: “1111”). Click the [Add] button. d. Click the [Next] button when it becomes available. e. On the next screen, select [Install] and click [Next]. f. Click [Next] again when it becomes available. g. Click [Install]. Installation of CACStar services will commence. This process can take up to two minutes. h. When the installation is completed, click [Next]. i. Click [Finish] to exit the installer.
c. Navigate to [Properties tab]->General Setup->Cloning. d. In the “Install Clone File” section, click the [Browse] button. e. Select the cloning file - “C5765-Cloning_A##.dat” f. Click the [Install] button. A confirmation screen will be shown. Click [OK]. The clone file will be installed and the printer will automatically restart. g. Wait for the printer to finish restarting. 13. Go to the MFD and log in as administrator: a. At the printer operator panel, press the [Log In / Out] button.
i. Wait for printer to restart. For the purpose of these installation instructions, the printer has completed rebooting when the “Connecting to the security appliance…” screen appears. j. Log into the MFD via the operator panel using ID = “admin”. Press [Next} and enter password = “1111”. Press [Enter]. 15. Enable LDAP address Book Lookup: a. Press the “Home” hard key at the top-left corner of the panel b.
d. A screen will be shown where you can change the home screen button assignments. The numbers in the image at the lower-left correspond to the numbers in the list of assignments: Nine settings are shown, one for each button position on a page of the Home Screen. Pressing the Down Arrow advances to the next page of the button positions. e. Press the Down Arrow until you see an entry named “Custom Service x – CACStar Connection UI”. Select this entry in the list.
f. The next screen shows the list of possible assignments for the selected button position. Press the [Up Arrow] soft key until you get to the top of the list. Choose the first entry “(Not Assigned)”. g. Select this entry and press the [Save] button. h. Press [Save] again to save change to the home screen buttons. i. Press [Close] to leave the screen/button settings screen. j. Press [Close] at the tools menu to leave the configuration screen. k.
18. Disable Sleep Mode: Note: Sleep Mode must be disabled to prevent power from being turned off to the CACStar authentication controller. You must enter “CE mode” to disable sleep mode: a. Hold down the “0” hard key on the operator panel for 15 seconds. b. While still holding down the “0” key, press the [Start] key. c. At the “CE Type Passcode” prompt, use the numeric keypad to enter “6789”. d. Press the [Confirm] soft key. e. Press the “Home” hard key at the top-left corner of the panel. f.
Configuring CACStar™ Security Establishing the Connection There are two choices for TCP/IP configuration: • DHCP: The IP address parameters are acquired automatically from the DHCP server when the printer is turned on. Depending on the configuration of your DHCP server, it may be possible for the printer’s IP address to change. • Manual: You can choose a fixed IP address, subnet mask, and gateway address to ensure that the printer will always be at a known IP address.
Upon tapping the link, you will see a limited configuration screen where some of the CACStar parameters can be set: • To use DHCP to acquire the IP address, make sure that the “Use DHCP” checkbox is checked, then press the [Update] button. • To set a manual (static) IP address, clear the “Use DHCP” checkbox, and enter the appropriate values for “IP Address”, “Subnet Mask”, and “Gateway” settings, then press [Update]. Note: Your network administrator should supply the appropriate values.
Accessing the MFD/Printer Web Site If you wish to access the MFD/printer web site, go to the IP address assigned above. For example: http://192.168.1.23 or https://192.168.1.23. Admin Login Login to CACStar as the Administrator by pointing your browser to the CACStar using a secure connection on port 8443 at the IP address you assigned in the steps above. For example: https://192.168.1.23:8443 or https://10.5.9.11:8443 You are likely to get an Invalid Certificate Warning from the browser.
Connectivity LAN Address Configuration Step 1 – MFD LAN IP Address This is the same IP address that can also be configured from the operator panel as described in “Establishing the Connection” on Page 6. It does not need to be configured here if it was done using the operator panel. It is used for host computer connection to the MFD/printer, and is also used for connection to these CACStar configuration web pages using the IP address followed by “:8443”. For example: https://192.168.1.23:8443.
Step 2 – NTP Server: Set this to the Network Time Protocol Server IP address or Server Name. This will allow the CACStar to validate certificates by date. If DHCP is in use, you may check the “NTP From DHCP” box to force retrieval of the NTP Server address from the DHCP server in which case the address field is not used and may be left blank. Step 3 – Configure Gateway and DNS Server Note: A DNS Server is required for OCSP support. It is not necessary to configure a DNS server if you are not using OCSP.
Local Side Configuration These settings define the IP addresses used for Local communication between CACStar and the MFD/printer. The defaults are likely to be acceptable. Normally there is no need to enter any IP addresses on this configuration page.
Security MFD Function Enabling Check the boxes for Functions that require a validated CAC Card for use. If a box is un-checked the Function will always be allowed. For example: If you want the MFD Scan-to-Folder Function to only be available when a validated CAC Card is installed, check the CAC Enable Scan-To-Folder box. If you want the MFD Scan-to-Folder Function to be available all the time whether a CAC card is inserted or not, uncheck the CAC Enable ScanTo-Folder box.
CAC Print Server Set this to the IP address of the Secure Print server. Server Print Only If enabled, print jobs will only be allowed from the configured CAC Print Server. If not, jobs will be allowed from any IP address. For this to operate, “CAC Enable Printing” must be selected in the “Security/MFD Function Enabling” menu. Email Setup If you have elected to control MFD generated email with your CAC cards, you will need to configure the item shown in the screen below.
SMTP Port Number Set the TCP port number for SMTP communications. User Email Address From Select the source location for the “From” email address. Emailed scans can be from either the user’s own email address on his CAC card, or from the user’s email address on the LDAP server. Force Email to Self Choose whether you want to force all emailed scans to the user’s own email address. If not checked, he can send to any email address.
LDAP Secondary Certificate Attribute Specify the secondary LDAP attribute name which should be used if the primary attribute fails. Authentication Method Basic This includes PIN validation, card expiration check, and X.509 card certificate validation.
If an NTP server is not configured on the LAN Side Configuration page, the expiration check is bypassed. The Basic level of authentication is always included and cannot be removed from the configuration. In some installations, this is sufficient authentication and is the only one activated. OCSP Check this box to enable OCSP (Online Certificate Status Protocol) verification of CAC Cards. If enabled the OCSP server will be used to validate the current status of the CAC card PKI certificate.
LDAP Query Password: Password for the LDAP service account login. LDAP Search Base: Defines the location in the directory where a search will start. Example: OU=Users, DC=Itek, DC=com LDAP Search String: The Search String is used by the LDAP server to find users. In conjunction with User ID options below, this field helps create the query to the LDAP server to find users by name. Any data can go in this field, but there are certain keys that will be expanded to create the query.
KDC Server: IP address or name of the Kerberos server KDC Server Port: Port number of the Kerberos server. The default is 88. KDC Realm: Kerberos Realm KDC Principal: User Name. This can be either the CN or the EDI-PI, or San Principal. PKINIT Win2K The setting affects the “Public Key Cryptography for Initial Authentication” in Kerberos. Check this box if you are using a Windows 2000 KDC Server and/or need to use the older Kerberos PKINIT command/reply set.
Default SMB Server Address The IP address or server name for the default SMB server. This address will be used if the SMB server address cannot be obtained from the printer. Default SMB Service Name The Service Name for the default SMB server, e.g. myshare$. This name will be used as the principal for Kerberos authentication if the Service Name cannot be obtained from the printer. Default SMB User Name The User name for the default SMB server.
SMB Folder LDAP Attribute If a Folder Name is configured using %u, the LDAP Attribute defined here will be used to retrieve the path value for the %u field. Care should be taken when using “\” characters before or after the %u - based on whether the LDAP Attribute value includes “\” character(s) at the beginning or end. SSL CA Certificate Checking If enabled, the host SSL certificate will be verified against the CA certificate. Therefore, the applicable CA certificate must be loaded into the CACStar.
Upload Certificate Use this page to load Issuer and Root Certificate Authority Certificates into CACStar. PKCS7, X509, PEM and DER formats are supported. Use the Browse button to select the Certificate file on your PC; then click the Upload Certificate button. If your certificates are in a .txt file format, please send them to us, and we will convert them to a supported format. If desired, we can preload them into new units.
Administrator Change Password Use this feature to change the password for the administrator. When the Change Password button is clicked, the next internal web page access will require this new password. Administrator Access These settings allow the admin to provide additional security by limiting CACStar admin access to specified IP addresses.
a PC at any IP address if he knows the ID and password. If it is not checked, the admin must access the CACStar configuration pages from the IP addresses specified for Administrator #1 or #2. These addresses must be on the same subnet as the CACStar. Allow Telnet If this is enabled CACStar will allow a Telnet session to occur. The Telnet session will happen over Port 23. Telnet use with CACStar is intended for diagnostics by the developers.
is a text file that contains the CACStar configuration items. For more details about how to update the firmware, please see the separate document “Firmware Update Procedure”. Create and Export Current Configuration Create Config File will create a configuration file containing all current settings except LAN IP Address, LAN Mask, and LAN Gateway. Thus, the Config file can be used to configure other CACStars. The passwords are encrypted so they may not be edited.
For help obtaining the correct firmware or documentation, contact the Dell ProSupport Help Desk by calling 1-866-516-3115, or by sending email to Imaging_Solutions_Support_CAC@dell.com This page is used to obtain Log Files and Capture Files to help diagnose network and configuration concerns. Use of these features is normally in conjunction with technical support from your vendor. Create SysLog File A log file can be created for use by CACStar Engineering to help resolve problems that may occur.
Setup Test Date Time This is used to set the system date and time in CACStar if necessary. The time zone should be set to your local time zone.
Hold Print Files Hold Print files will be stored encrypted in CACStar and can be printed with CAC authentication at the printer. Hold Print files expire after the set number of days. When the expiration date is reached, the file will be deleted without being printed. Remaining storage and total storage are displayed so the user will know if held print files are reaching the maximum storage capacity. When storage is nearly full, a warning message will be displayed on the CAC reader LCD - MEMORY NEAR FULL.
These keywords are: %F - the user’s first name %f - the first character of the user’s first name %M - the user’s middle name %m - the first character of the user’s middle name %L - the user’s last name %l - the first character of the user’s last name %e - the user’s EDI-PI %I - the user’s PIC-Identification %S - the user’s SAM Account Name (from LDAP) A number may be used between the ‘%’ and the keyword to specify a maximum number of characters.
Status The Status pages offer three views of information about the current operations of CACStar. Number of successful card validations, number of unsuccessful card validations, network operations, date/time, and firmware version are all displayed.
Network Page 41
Other Page 42
Controlling Access to Fax and Copy The MFD has configuration settings to indicate whether authentication is required to access fax and copy. The CACStar user interface reads this configuration to determine whether to make fax and copy functions available from the login screen. To configure access: Step 1 Login to the MFD as administrator via the operator panel. Step 2 Press the Home key. Step 3 Press the [Tools] button. Step 4 Navigate to Authentication/Security Settings->Authentication>Access Control...
Step 5 Press the [Service Access] button. Step 6 Choose Fax or Copy and press the [Change Settings] button. Step 7 Choose [Unlocked] for no authentication required; or [Locked(Show Icon)] to require authentication. Step 8 Press the [Save] button. Step 9 Press [Close] two times. Step 10 Press the [Reboot Now] button when prompted.
Appendix A Setup Information Checklist • Should the MFD use DHCP to acquire an IP Address (Yes or No) ? If No, specify the following for the MFD: IP Address Subnet Mask Gateway • What is the IP address for an available NTP (Network Time Protocol) Server (or N/A if none available)? • What are the IP Addresses for the primary and secondary DNS (Domain Name System) Servers? Functions • Do you wish to use CAC/PIV control for the Scan-to-Email function (Yes or No)? Is Kerberos Authentication required for
• Do you wish to force all emails to go to the CAC/PIV Card’s email address (Yes or No)? If No, selection can be made from the Front Panel by typing in the address, or using the Network Address Book (LDAP) feature.