
Specifications


10 Installing the Hardware
WARNING: The C7008/C300 and C7004/C150 operates in either of two
voltage ranges. The different power supply configuration supported is listed in
the following table. As a safety precaution, do not install more than the
recommended maximum number of PSUs (shown below), as this causes high
leakage current. Install blank panels in all unused PSU slots.
NOTE: The higher power of power over Ethernet plus (PoE+) (30W/port) is
available only with Power Supply 1600W-AC and the PoE+ line card. When using
the PoE line card or PoE+ line card and the Power Supply 1200W-AC, only
15.4W/port power is available. The maximum power per port is listed in the
following table.
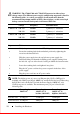
Voltage Frequency Maximum PSUs
C7004/C150 100-120 50/60Hz 5 primary + 1 redundant
200-240 50/60Hz 5 primary + 1 redundant
C7008/C300 100-120 50/60Hz 7 primary + 1 redundant
200-240 50/60Hz 7 primary + 1 redundant
Step Task
1 Verify the power switch is in the OFF (left) position.
2 Secure the retaining latch in the unlatched position by tightening the
screw into the threaded hole.
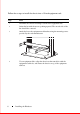
3 Slide the power supply into the top left-most power supply slot.
Dell Networking recommends installing power supplies starting from
the left side, top row of the chassis, leaving no blank slots between units.
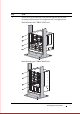
4 Lower the retaining latch, and tighten it into place.
5 Plug the AC power cord into the power receptacle in the face of the
power supply.
6 Plug the power cord into an AC power outlet.
Power Supply
1200W-AC
Power Supply
1600W-AC at
lowline (100-120V)
Power Supply
1600W-AC at
highline (200-240V)
PoE line card 15.4W/port 15.4W/port 15.4W/port
PoE+ line card 15.4W/port 30W/port 30W/port