
Personal Computer User Manual


Installing System Components 147
Processors
Use the following procedure when:
• Installing an additional processor
• Replacing a processor
Removing a Processor
CAUTION: Many repairs may only be done by a certified service technician. You
should only perform troubleshooting and simple repairs as authorized in your
product documentation, or as directed by the online or telephone service and
support team. Damage due to servicing that is not authorized is not covered by
warranty. Read and follow the safety instructions that came with the product.
1
Remove the sled from the enclosure. See "Removing a Sled" on page 133.
2
Remove the cooling shroud. See "Removing the Cooling Shroud" on
page 141.
3
Remove the heat sink. See "Removing a Heat Sink" on page 143.
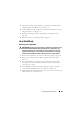
CAUTION: The processor is held in its socket under strong pressure. Be aware
that the release lever can spring up suddenly if not firmly grasped.
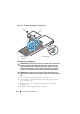
4
Position your thumb firmly over the processor hook-shaped socket-release
lever and release the lever from the locked position. Do not force the lever
up to the fully open position. See Figure 3-14.
5
Position your thumb firmly over the bent load lever and release the lever
from the locked position. Rotate the lever 90 degrees upward to lift the
processor shield. See Figure 3-14.
6
Rotate the processor shield upward and out of the way. See Figure 3-14.
7
Lift the processor out of the socket and leave the socket-release lever and
load lever up so that the socket is ready for the new processor.
See Figure 3-14.
CAUTION: The processor is held in its socket under strong pressure. Be aware
that the release and load levers can spring up suddenly if not firmly grasped.
If you are permanently removing a processor, you must install a socket
protective cap in the vacant socket to protect the pins and keep the socket
free from dust.