
Personal Computer User Manual


194 Installing System Components
4
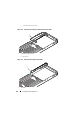
Connect the following cables to the system board.
– I2C cable. See Figure 3-43.
– System board control cable. See Figure 3-42.
– SATA cable. See Figure 3-41.
– Power cable. See Figure 3-40.
5
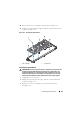
You must route the cables properly on the sled tray to prevent them from
being pinched or crimped.
6
Install the node power distribution board. See "Installing the Node Power
Distribution Board" on page 186.
7
Install the interposer extender to the new board. See "Installing the
Interposer Extender" on page 184.
8
Install the hard-drive tray. See "Installing the Hard-Drive Tray" on
page 182.
9
Install the hard-drives. See "Installing a Hard-Drive Carrier" on page 179.
10
Install the MicroSD card reader support bracket. See "Installing the
MicroSD Card Reader Support Bracket" on page 177.
11
Install the MicroSD card reader. See "Installing the MicroSD Card Reader"
on page 175.
12
Transfer the processors to the new system board. See "Removing a
Processor" on page 147 and "Installing a Processor" on page 148.
13
Remove the memory modules and transfer them to the same locations on
the new board. See "Removing Memory Modules" on page 153 and
"Installing Memory Modules" on page 154.
14
Replace the cooling shroud. See "Installing the Cooling Shroud" on
page 142.
15
If applicable, install the mezzanine card. See "Installing the Infiniband
Mezzanine Card" on page 169 or "Installing the 10 GbE Mezzanine Card"
on page 172.