
Administrator Guide


WARNING: To prevent bodily injury when mounting or servicing this unit in a rack, take special precautions to ensure that the
system remains stable. The following guidelines are provided to ensure your safety:
• If your chassis is the only unit in the rack, mount it at the bottom of the rack.
• When mounting this unit in a partially lled rack, load the rack from the bottom to the top with the heaviest component at the
bottom of the rack.
• If the rack is provided with stabilizing devices, install the stabilizers before mounting or servicing the unit in the rack.
• If the chassis is shipped with blanks, remove the blanks from each RPM, line card, fan module and PSU slot before lifting the
chassis.
1 (Optional) The C9010 chassis is designed to t into a rack enclosure with the front door closed. If you plan to use cable management
brackets (see Installing the Cable Management System ) and close the front door, re-position and fasten the front rack posts 6.5
inches (165 mm) back towards the rear of the rack to leave space for the brackets.
2 Determine the height at which you want to mount the chassis in the equipment rack.
3 Install the rack bar on the front posts just below the desired height of the bottom of the chassis. The rack bar requires 1 RU below the
chassis.
Use the rack bar as a guide to mount the chassis. It is not required to support the weight of the chassis; you can remove it when the
chassis is securely mounted in the rack.
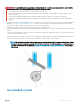
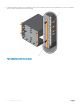
Hold the rack bar (item 1 in Figure 2) so that the smooth side faces outward and the arrows point upward. Attach the bar to the front-
rack posts using the mounting screws and washers provided with the rack bar (items 2 and 3 in Figure 2).
NOTE: The installation procedure in this section describes how to install the C9010 in a 2-post rack using the rack bar
provided in the base conguration package. For information about how to use Dell ReadyRails or a rack mount tray to
install the C9010, follow the instructions in Installing Dell ReadyRails or Installing a Rack Mount Tray. Then continue
with Step 4.
Figure 2. Installing a Rack Bar in a 2-Post Rack
Installing the Hardware
9