
User's Manual

Installing and Setting Up the CMC 43
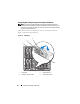
The LCD screen displays menus, icons, pictures, and messages.
A status indicator LED on the LCD panel provides an indication of the
overall health of the chassis and its components.
• Solid blue indicates good health.
• Blinking amber indicates that at least one component has a fault
condition.
• Blinking blue is an ID signal, used to identify one chassis in a group of
chassis.
Navigating in the LCD Screen
The right side of the LCD panel contains five buttons: four arrow buttons
(up, down, left, and right) and a center button.
•
To move between screens
, use the right (next) and left (previous) arrow
buttons. At any time while using the Configuration Wizard, you can
return to a previous screen.
•
To scroll through options on a screen
, use the down and up arrow buttons.
•
To select and save an item on a screen
and move to the next screen, use the
center button.
For more information about using the LCD panel see "Using the LCD Panel
Interface" on page 383.
Using the LCD Configuration Wizard
1
If you have not already done so, press the chassis power button to turn
it on.
The LCD screen displays a series of initialization screens as it powers up.
When it is ready, the
Language Setup
screen displays.
2
Select your language using the down arrow button, and then press the
center button.
The
Enclosure
screen displays with the following question: "Configure
Enclosure?"
3
Press the center button to continue to the
CMC Network Settings
screen.