
Users Guide
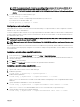
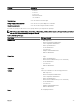

Table 13. Comparison of Privileges Between CMC Administrators, Power Users, and Guest Users
Privilege Set Administrator Permissions Power User Permissions Guest User Permissions
CMC Login User Yes Yes Yes
Chassis Configuration
Administrator
Yes No No
User Configuration
Administrator
Yes No No
Clear Logs Administrator Yes Yes No
Chassis Control Administrator
(Power commands)
Yes Yes No
Server Administrator Yes Yes No
Test Alert User Yes Yes No
Debug Command
Administrator
Yes No No
Fabric A Administrator Yes Yes No
Modifying root user administrator account settings
For added security, it is strongly recommended that you change the default password of the root (User 1) account. The root
account is the default administrative account that is shipped with CMC.
To change the default password for the root account:
1. In the left pane, click Chassis Overview, and then click User Authentication.
2. On the Users page, in the User ID column, click 1.
NOTE: The user ID 1 is the root user account that is shipped by default with CMC. This cannot be changed.
3. On the User Configuration page, select the Change Password option.
4. Type the new password in the Password field, and then type the same password in Confirm Password.
5. Click Apply. The password is changed for the 1 user ID.
Configuring local users
You can configure up to 16 local users in CMC with specific access privileges. Before you create a CMC local user, verify if any
current users exist. You can set user names, passwords, and roles with the privileges for these users. The user names and
passwords can be changed using any of the CMC–secured interfaces such as, web interface, RACADM, and WS-MAN.
Configuring local users using CMC web interface
NOTE: You must have Configure Users permission to create a CMC user.
To add and configure local CMC users:
1. In the left pane, click Chassis Overview, and then click User Authentication.
2. On the Local Users page, in the User ID column, click a user ID number. The User Configuration page is displayed.
NOTE: User ID 1 is the root user account that is shipped by default with a CMC. This cannot be changed.
3. Enable the user ID and specify the user name, password, and access privileges for the user. For more information about the
options, see the
Online Help.
4. Click Apply. The user is created with appropriate privileges.
100