
Users Guide
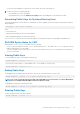

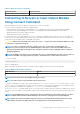

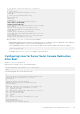


Table Of Contents
- Dell Chassis Management Controller Version 3.3 for Dell EMC PowerEdge VRTX User's Guide
- Overview
- What is new in this release
- Key Features
- Chassis Overview
- Minimum CMC Version
- Supported Remote Access Connections
- Supported Platforms
- Supported web browsers
- Managing Licenses
- Viewing Localized Versions of the CMC Web Interface
- Supported Management Console Applications
- How to use this Guide
- Other Documents You May Need
- Accessing documents from the Dell EMC support site
- Installing and Setting Up CMC
- Before You Begin
- Installing CMC Hardware
- Installing Remote Access Software on a Management Station
- Configuring a Web Browser
- Setting Up Initial Access to CMC
- Interfaces and Protocols to Access CMC
- Downloading and Updating CMC Firmware
- Setting Chassis Physical Location and Chassis Name
- Setting Date and Time on CMC
- Configuring LEDs to Identify Components on the Chassis
- Configuring CMC Properties
- Configuring iDRAC Launch Method Using CMC Web Interface
- Configuring iDRAC Launch Method Using RACADM
- Configuring Login Lockout Policy Attributes Using CMC Web Interface
- Configuring Login Lockout Policy Attributes Using RACADM
- Understanding Redundant CMC Environment
- Configuring Front Panel
- Logging in to CMC
- Accessing CMC Web Interface
- Logging in to CMC as a Local User, Active Directory User, or LDAP User
- Logging in to CMC Using a Smart Card
- Logging in to CMC Using Single Sign-on
- Logging In To CMC Using Serial, Telnet, Or SSH Console
- Accessing CMC Using RACADM
- Logging in to CMC Using Public Key Authentication
- Multiple CMC Sessions
- Changing Default Login Password
- Enabling or Disabling Default Password Warning Message
- Forcing password change using web interface
- Use case scenarios
- Conversion of External Shared PERC 8 card High Availability to Non-High Availability Mode using Web Interface
- Conversion of External Shared PERC 8 card Non-High Availability to High Availability Mode using Web Interface
- Conversion of External Shared PERC 8 card High Availability to Non-High Availability Mode using RACADM
- Conversion of External Shared PERC 8 card Non-High Availability to High Availability Mode using RACADM
- Updating Firmware
- Downloading CMC Firmware
- Viewing Currently Installed Firmware Versions
- Updating the CMC Firmware
- Updating Chassis Infrastructure Firmware
- Updating Server iDRAC Firmware
- Updating Server Component Firmware
- Viewing Firmware Inventory
- Saving Chassis Inventory Report Using CMC Web Interface
- Configuring Network Share Using CMC Web Interface
- Lifecycle Controller Job Operations
- Rolling Back Server Component Firmware
- Upgrading Server Component Firmware
- Upgrading Server Component Firmware From File Using CMC Web Interface
- Server Component Single Click Update Using Network Share
- Pre-requisites for Using Network Share Update Mode
- Upgrading Server Component Firmware From Network Share Using CMC Web Interface
- Supported Firmware Versions for Server Component Update
- Deleting Scheduled Server Component Firmware Jobs
- Updating Storage Component Using CMC Web Interface
- Viewing Chassis Information and Monitoring Chassis and Component Health
- Viewing Chassis and Component Summaries
- Viewing Chassis Summary
- Viewing Chassis Controller Information and Status
- Viewing Information and Health Status of All Servers
- Viewing Health Status and Information for Individual Server
- Viewing Information and Health Status of the IOM
- Viewing Information and Health Status of Fans
- Viewing Front Panel Properties
- Viewing KVM Information and Health Status
- Viewing LCD Information and Health
- Viewing Information and Health Status of Temperature Sensors
- Viewing Storage Capacity and Status of the Storage Components
- Configuring CMC
- Viewing and Modifying CMC Network LAN Settings
- Viewing and Modifying CMC Network LAN Settings Using CMC Web Interface
- Viewing and Modifying CMC Network LAN Settings Using RACADM
- Enabling the CMC Network Interface
- Enabling or Disabling DHCP for the CMC Network Interface Address
- Enabling or Disabling DHCP for DNS IP Addresses
- Setting Static DNS IP addresses
- Configuring IPv4 and IPv6 DNS Settings
- Configuring Auto Negotiation, Duplex Mode, and Network Speed for IPv4 and IPv6
- Setting the Maximum Transmission Unit for IPv4 and IPv6
- Configuring CMC Network and Login Security Settings
- Configuring Virtual LAN Tag Properties for CMC
- Federal Information Processing Standards
- Configuring Services
- Configuring CMC Extended Storage Card
- Setting Up Chassis Group
- Adding Members To Chassis Group
- Removing a Member from the Leader
- Disbanding a Chassis Group
- Disabling an Individual Member at the Member Chassis
- Accessing the Web page of a Member Chassis or Server
- Propagating Leader Chassis Properties to Member Chassis
- Server Inventory for MCM group
- Saving Server Inventory Report
- Chassis Group Inventory and Firmware Version
- Viewing Chassis Group Inventory
- Viewing Selected Chassis Inventory Using Web Interface
- Viewing Selected Server Component Firmware Versions Using Web Interface
- Chassis Configuration Profiles
- Configuring Multiple CMCs Using RACADM
- Configuring Multiple CMCs through RACADM Using Chassis Configuration Profiles
- Viewing and Ending CMC Sessions
- Viewing and Modifying CMC Network LAN Settings
- Configuring Servers
- Configuring Slot Names
- Configuring iDRAC Network Settings
- Configuring iDRAC Virtual LAN Tag Settings
- Setting First Boot Device
- Configuring Server FlexAddress
- Configuring Remote File Share
- Configuring Profile Settings Using Server Configuration Replication
- Accessing Server Profiles Page
- Adding or Saving Profile
- Applying Profile
- Importing Profile
- Exporting Profile
- Editing Profile
- Deleting Profile
- Viewing Profile Settings
- Viewing Stored Profile Settings
- Viewing Profile Log
- Completion Status And Troubleshooting
- Quick Deploy of Profiles
- Assigning Server Profiles to Slots
- Boot Identity Profiles
- Saving Boot Identity Profiles
- Applying Boot Identity Profiles
- Clearing Boot Identity Profiles
- Viewing Stored Boot Identity Profiles
- Importing Boot Identity Profiles
- Exporting Boot Identity Profiles
- Deleting Boot Identity Profiles
- Managing Virtual MAC Address Pool
- Creating MAC Pool
- Adding MAC Addresses
- Removing MAC Addresses
- Deactivating MAC Addresses
- Launching iDRAC using Single Sign-On
- Launching Remote Console
- Configuring CMC To Send Alerts
- Configuring User Accounts and Privileges
- Types of Users
- Modifying Root User Administrator Account Settings
- Configuring Local Users
- Configuring Active Directory Users
- Supported Active Directory Authentication Mechanisms
- Standard Schema Active Directory Overview
- Configuring Standard Schema Active Directory
- Extended Schema Active Directory Overview
- Configuring Extended Schema Active Directory
- Configuring Generic LDAP Users
- Configuring CMC For Single Sign-On Or Smart Card Login
- Configuring CMC to Use Command Line Consoles
- Using FlexAddress and FlexAdress Plus
- About FlexAddress
- Configuring FlexAddress
- Viewing World Wide Name or Media Access Control Addresses
- Viewing WWN or MAC Address Information
- Viewing Basic WWN or MAC Address Information Using Web Interface
- Viewing Advanced WWN or MAC Address Information Using Web Interface
- Viewing WWN or MAC Address Information Using RACADM
- Command Messages
- FlexAddress DELL SOFTWARE LICENSE AGREEMENT
- Managing Fabrics
- Managing and Monitoring Power
- Redundancy Policies
- Dynamic Power Supply Engagement
- Default Redundancy Configuration
- Power Budgeting For Hardware Modules
- Server Slot Power Priority Settings
- Assigning Priority Levels To Servers
- Assigning Priority Levels To Servers Using CMC Web Interface
- Assigning Priority Levels To Servers Using RACADM
- Viewing Power Consumption Status
- Viewing Power Budget Status Using CMC Web Interface
- Redundancy Status and Overall Power Health
- Configuring power budget and redundancy
- Executing Power Control Operations
- Executing Power Control Operations on a Server
- Executing Power Control Operations for Multiple Servers Using CMC Web Interface
- Executing Power Control Operations on the IOM
- Managing Chassis Storage
- Viewing Status of the Storage Components
- Viewing the Storage Topology
- Viewing Fault-tolerant Troubleshooting Information of SPERC Using CMC Web Interface
- Assigning Virtual Adapters To Slots Using CMC Web Interface
- Fault-Tolerance in Storage Controllers
- Security Key Mismatch
- Viewing Controller Properties Using CMC Web Interface
- Viewing Controller Properties Using RACADM
- Importing or Clearing Foreign Configuration
- Configuring Storage Controller Settings
- Shared PERC Controllers
- Enabling or Disabling RAID Controller Using CMC Web Interface
- Enabling or Disabling RAID Controller Using RACADM
- Enabling or disabling fault tolerance of external RAID controller using RACADM
- Viewing Physical Disk Properties Using the CMC Web Interface
- Viewing Physical Disk Drives Properties Using RACADM
- Identifying Physical Disks and Virtual Disks
- Assigning Global Hot Spares Using CMC Web Interface
- Assigning Global Hot Spares Using RACADM
- Recovering Physical Disks
- Viewing Virtual Disk Properties Using CMC Web Interface
- Viewing Virtual Disk Properties Using RACADM
- Creating Virtual Disk Using CMC Web Interface
- Managing Encryption Keys
- Encrypting Virtual Disks
- Unlocking Foreign Configuration
- Cryptographic Erase
- Applying Virtual Adapter Access Policy To Virtual Disks
- Modifying Virtual Disk Properties Using CMC Web Interface
- Enclosure Management Module
- Viewing EMM Status and attributes
- Viewing Enclosure Status and Attributes
- Reporting up to two Enclosures per Connector
- Setting Asset Tag and Asset Name of the Enclosure
- Viewing Temperature Probe Status and attributes of the Enclosure
- Setting the Temperature Warning Threshold of the Enclosure
- Viewing Fan Status and attributes of the Enclosure
- Viewing Enclosure Properties Using CMC Web Interface
- Managing PCIe Slots
- Troubleshooting and Recovery
- Resetting Forgotten Administrative Password
- Gathering Configuration Information, Chassis Status, and Logs Using RACDUMP
- First Steps to Troubleshoot a Remote System
- Troubleshooting Alerts
- Viewing Event Logs
- Using Diagnostic Console
- Resetting Components
- Saving or Restoring Chassis Configuration
- Troubleshooting Network Time Protocol Errors
- Interpreting LED Colors and Blinking Patterns
- Troubleshooting Non-responsive CMC
- Troubleshooting Network Problems
- Troubleshooting Controller
- Hotplugging enclosures in fault-tolerant chassis
- Using LCD Panel Interface
- Frequently Asked Questions

# all kernel and initrd paths are relative to
/, e.g.
# root (hd0,0)
# kernel /boot/vmlinuz-version ro root=
/dev/sdal
# initrd /boot/initrd-version.img
#
#boot=/dev/sda
default=0
timeout=10
#splashimage=(hd0,2)/grub/splash.xpm.gz
serial --unit=1 --speed=57600
terminal --timeout=10 serial
title Red Hat Linux Advanced Server (2.4.9-e.3smp)
root (hd0,0)
kernel /boot/vmlinuz-2.4.9-e.3smp ro root=
/dev/sda1 hda=ide-scsi console=ttyS0 console=
ttyS1,57600
initrd /boot/initrd-2.4.9-e.3smp.img
title Red Hat Linux Advanced Server-up (2.4.9-e.3)
root (hd0,00)
kernel /boot/vmlinuz-2.4.9-e.3 ro root=/dev/sda1
initrd /boot/initrd-2.4.9-e.3.img
When you edit the /etc/grub.conf file, follow these guidelines:
• Disable GRUB's graphical interface and use the text-based interface. Else, the GRUB screen is not displayed in console redirection.
To disable the graphical interface, comment out the line starting with splashimage.
• To start multiple GRUB options to start console sessions through the serial connection, add the following line to all options:
console=ttyS1,57600
The example shows console=ttyS1,57600 added to only the first option.
Configuring Linux for Server Serial Console Redirection
After Boot
Edit the /etc/inittab file as follows:
Add a new line to configure agetty on the COM2 serial port:
co:2345:respawn:/sbin/agetty -h -L 57600 ttyS1
ansi
The following example shows the file with the new line.
#
# inittab This file describes how the INIT process
# should set up the system in a certain
# run-level.
#
# Author: Miquel van Smoorenburg
# Modified for RHS Linux by Marc Ewing and
# Donnie Barnes
#
# Default runlevel. The runlevels used by RHS are:
# 0 - halt (Do NOT set initdefault to this)
# 1 - Single user mode
# 2 - Multiuser, without NFS (The same as 3, if you
# do not have networking)
# 3 - Full multiuser mode
# 4 - unused
# 5 - X11
# 6 - reboot (Do NOT set initdefault to this)
#
id:3:initdefault:
# System initialization.
si::sysinit:/etc/rc.d/rc.sysinit
Configuring CMC to Use Command Line Consoles
145