
Users Guide


The up, down, left, and right arrow buttons change the selected menu items or icons on the screen. The selected item is shown
with a light blue background or border.
When messages displayed on the LCD screen are longer than what fits on the screen, use the left and right arrow buttons to scroll
the text left and right.
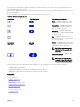
The icons described in the following table are used to navigate between LCD screens.
Table 45. LCD Panel Navigational Icons
Icon Normal Icon Highlighted Icon Name and Description
Back — Highlight and press the center
button to return to the previous screen.
Accept/Yes — Highlight and press the
center button to accept a change and
return to the previous screen.
Skip/Next — Highlight and press the
center button to skip any changes and go
to the next screen.
No — Highlight and press the center
button to answer "No" to a question and
go to the next screen.
Rotate — Highlight and press the center
button to switch between the front and
rear graphical views of the chassis.
NOTE: The amber background
indicates that the opposite view
has errors.
Component Identify — Blinks the blue
LED on a component.
NOTE: There is a blinking blue
rectangle around this icon when
Component Identify is enabled.
A status indicator LED on the LCD panel provides an indication of the overall health of the chassis and its components.
• Solid blue indicates good health.
• Blinking amber indicates that at least one component has a fault condition.
• Blinking blue is an ID signal, used to identify one chassis in a group of chassis.
Related links
Main Menu
LCD Setup Menu
Language Setup Screen
Default Screen
Graphical Server Status Screen
Graphical Module Status Screen
Enclosure Menu Screen
Module Status Screen
Enclosure Status Screen
IP Summary Screen
223