Dell Command | Cloud Repository Manager Administrator Guide v1.6 April 2021 Rev.
Notes, cautions, and warnings NOTE: A NOTE indicates important information that helps you make better use of your product. CAUTION: A CAUTION indicates either potential damage to hardware or loss of data and tells you how to avoid the problem. WARNING: A WARNING indicates a potential for property damage, personal injury, or death. © 2020 - 2021 Dell Inc. or its subsidiaries. All rights reserved.
Contents Chapter 1: Introduction................................................................................................................. 4 Process Overview................................................................................................................................................................4 Log in to the Dell Command | Cloud Repository Manager cloud-based application......................................4 Add models...........................................................
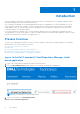
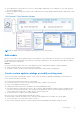
1 Introduction The Dell Command | Cloud Repository Manager is part of the Dell Client Command Suite, a set of industry-leading tools that help simplify management of Dell commercial client devices. The Cloud Repository Manager is a cloud-based application that allows IT administrators to create and manage one or more custom catalogs or repositories for updates to the Dell commercial client systems within their environment.
● The IT administrator can provide access control so that multiple IT administrators can collaborate on, view, edit, and track the custom update catalogs. ● With custom update catalogs stored in the cloud, IT administrators can easily package and download for deployment to their system fleet. NOTE: The images in this process diagram represent portions of the user interface. Add models Before you can create a custom update catalog, you must add one or more Dell models to your repository.
Benefits of Catalog Management page ● Centralized location for IT administrators to collaborate, edit, and track custom update catalogs. ● Opportunity to download a Test state and validate the updates before distributing to users. ● The Cloud Repository Manager archives Production versions so IT administrators can access past versions if needed.
2 Requirements These requirements apply to Dell Command | Cloud Repository Manager. TechDirect login credentials Log in to the Cloud Repository Manager through the TechDirect portal. For more information, see the TechDirect Help. Cloud-based application Web browser Cloud Repository Manager is best experienced on: ● Microsoft Edge Chromium ● Google Chrome NOTE: Your browser must accept cookies.
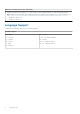
Windows Operating Systems (32- and 64-bit) ● Windows 10: Education, Enterprise, Pro v1703-v2004 (Creators Update/Redstone 2 - May 2020 Update/20H1) Note: Windows 10 v2004 (May 2020 Update/20H1) does not support 32-bit architecture. For more information, see https://docs.microsoft.com/windows-hardware/design/minimum/minimum-hardware-requirements-overview ○ Windows 10 2016 LTSB ○ Windows 10 2019 LTSC Language Support Cloud Repository Manager supports the following languages.
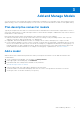
3 Add and Manage Models You can create a list of the commercial Dell device models that you manage for your enterprise. Later, when creating a custom update catalog, your list of model names displays. You can select one or more model names to include for each update catalog. Plan descriptive names for models Typically, an enterprise has more than one commercial Dell device model based on technical needs or requirements of users or user groups.
NOTE: If two models share the same ID and drivers, for example a Tower and XL Tower, those models are listed at a single button. Optionally, enter a specific model in Search, and then select from the options that display.
7. When finished, click Add Model at the bottom right. A success message displays on the Manage Models page, and the new model name is added to the list. Models do not have to be in a catalog. You may want to create one for future use or maintain one for reference. If a model is in a catalog, it must be in this list. If you try to delete the model from this list, a warning dialog displays.
NOTE: The sortable columns retain the sort order if you navigate to another page. From the bottom left, you can select which columns to display. Rename a model To rename a model: 1. Click the Available Actions icon ( ) to the left of the model name and click Rename. 2. After renaming, click OK. Delete a model To delete a model: 1. Click the Available Actions icon ( ) to the left of the model name and click Delete. 2. At the confirmation, click OK.
Add and Manage Models 13
4 Create and Manage a Catalog The Manage Catalog page allows you to create and modify one or more custom update catalogs. Before you can create an update catalog, you must add one or more Dell device models to your repository. When you create a catalog, those model names display allowing you to decide which models to include in each catalog. The Manage Catalog page also lists the catalogs that you created.
8. Click Next. 9. Review the Summary screen and click Create Catalog. The Manage Catalog page confirms that the catalog has been created, and the catalog name displays in the Name column. The Status column displays In Progress for a large catalog. When the catalog definition is complete, a Draft instance is automatically added. This is a snapshot of the catalog definition with the most up-to-date drivers and software components that were available at the time you created the catalog.
If a Create Catalog Error dialog displays, typically, the catalog is too large. The dialog prompts you to remove some models or operating systems. You may need to create two smaller catalogs. Sort catalog columns You can customize the columns for the list of catalogs. 1. From the bottom left, select which columns to display. 2. Optionally, sort these columns: ● Name ● Last Modified Date ● Last Modified Date By NOTE: The sortable columns retain the sort order if you navigate to another page.
Manage Catalog Definitions The Manage Catalogs page contains a list of the custom update catalogs you created. Each catalog definition contains the list of models and operating systems that you selected for updates. You can move each catalog definition through Draft, Test, and Production states, which are versions of the catalog definition. Catalog definitions and versions IT administrators can collaborate on viewing, editing, and tracking the custom catalogs.
Edit Test - allows you to determine which components to include or exclude. See Enable Components for a Custom Catalog. Production - You can download this catalog version to deploy Download - allows you to download the catalog to a local it. environment for testing. If you need to modify the snapshot of the catalog, select one of these options: ● Create Draft ● Edit Production Create Draft - replaces the original draft and allows you to modify a new draft if you must make updates.
NOTE: When you select Change to Test, the Draft remains. To create a new Draft, go back to the catalog definition and click Create Draft, which overwrites the original. The current Test remains. You can continue with the current Test while making necessary changes to the new Draft. NOTE: If more than one IT administrator edits the draft, you must communicate to avoid overwriting their work.
3. When complete, click Save Changes. The catalog definition is updated. 4. On the Manage Catalogs page, if you also want the Draft to contain these changes, you must select > Create Draft next to the catalog definition. Sample workflows for Draft, Test, and Production states Each catalog definition can have only one Draft, Test, and Production state at a time. Draft and Test will be overwritten. Production is moved to the archive.
1. Select a catalog definition > Draft. 2. From , select Edit Draft. 3. Select components to include or exclude for that catalog. See Enable Components for a Custom Catalog. 4. From Draft > , select Change to Test. 5. From Test > , select Download. 6. When testing is complete, select Change to Production. The Version column displays a version for this Production. 7. From Production > , select Download. Workflow when you must modify the Test state If you find an issue in the Test state, you can: 1.
1. From the Catalog Definition > , click Edit Definition. The Summary page of the wizard opens. 2. Click Model Selection, and select the new model. 3. Click Save Changes. Be aware of a difference. ● When you create a new catalog, the Draft instance is automatically added. ● When you modify an existing catalog definition, no Draft is added. You must create a Draft to propagate those changes. 4. From the catalog definition > , click Create Draft. 5. From Draft > , select Edit Draft. 6.
View Archive The archive maintains previous versions of Production catalogs for up to two years. All users with access can view archived versions of the catalog. The Available actions icon ( ) includes the following: ● Download - allows you to download a Production version. ● View - allows you to view previous Production versions of the catalog.
5 Enable Components for a Custom Catalog When you select a catalog, a page displays all drivers, BIOS, firmware, and applications that were available at the moment of that catalog creation. You can choose to have the catalog update all components or select specific components to include in the current update. By default, all check boxes are cleared. NOTE: If you modify this page and navigate away without saving the changes, a dialog prompts that changes will be discarded.
Filter by criticality On the left, select one or more Criticality options. In the Criticality column, the labels are color-coded. You can filter the list to group the options. If you want to update Critical items only, select that check box alone. Criticality options Description Recommended (yellow) Updates that are recommended for installation on the system. Optional (blue) Optional updates.
All check boxes are cleared. 2. Under Filters > Criticality, select Urgent. 3. In the table heading next to Name, select the check box to update all drivers that are Urgent. NOTE: When finished, if you clear the Urgent checkbox, all the other drivers and options display but only the Urgent ones are enabled. Scenario for enabling Video Card updates only 1. In the table heading next to Name, clear the check box. All check boxes are cleared. 2. Under Filters > Device Categories, select Video Cards. 3.
6 Download a Catalog You can download a catalog from a Test or Production version or from a Production version that has been archived. Download a Production catalog After testing is complete, download a Production version of the catalog to the location where updates can be locally installed. These steps describe downloading a Production catalog. The steps for downloading a Test or archived catalog are similar. To download a Production catalog: 1. Select for a Production catalog and click Download. 2.
Use the SHA256 hash to verify the catalog Optionally, when the download is complete, use the SHA checksum value in the Download Catalog dialog to verify the catalog. 1. Open Windows PowerShell. 2. Navigate to the folder containing the .zip file downloaded from Cloud Repository Manager. 3. To check the SHA256 hash of the file, type the following command, replacing <.zip> with the name of your .zip file, and press : Get-FileHash <.zip> 4.
Use the command line Command-line reference This table lists the arguments to use with Dell.Command.Repository.Maker.exe. Argument Description -?|-h|--help Show help information. -c|--catalog Defines the catalog file that you want to use. Example: -c "catalog.xml" -t|--target Defines the target path for the downloads. Example: -t "C:\myDirectory\" -b|--baseLocation Defines the new baseLocation in the catalog file. Example: -b "\\foo\stuff\catalogs" -f Use to specify a force-d