Dell Command | Configure Version 3.
Notes, cautions, and warnings NOTE: A NOTE indicates important information that helps you make better use of your product. CAUTION: A CAUTION indicates either potential damage to hardware or loss of data and tells you how to avoid the problem. WARNING: A WARNING indicates a potential for property damage, personal injury, or death. Copyright © 2009 - 2017 Dell Inc. or its subsidiaries. All rights reserved. Dell, EMC, and other trademarks are trademarks of Dell Inc. or its subsidiaries.
Contents 1 Introduction..................................................................................................................... 5 What’s new in this release.................................................................................................................................................. 5 Other documents you may need.........................................................................................................................................
Running Dell Command | Configure on Windows 7, Windows 8, Windows 8.1, or Windows 10 when user account control is enabled.............................................................................................................................................................. 21 Running Dell Command | Configure on Linux.....................................................................................................................21 TPM activation......................................................
1 Introduction Dell Command | Configure is a packaged software that provides configuration capability to business client systems. You can configure the client systems using a Graphical User Interface (GUI) or a Command Line Interface (CLI). For more information on CLI, see Dell Command | Configure Command Line Interface Reference Guide available at Dell.com/ DellClientCommandSuiteManuals. Dell Command | Configure supports following Windows and Linux operating systems: Windows 7, Windows 8, Windows 8.
– Configuring GPS WWAN Radio. See --gpsonwwanradio option. – Configuring System Isochronous mode. See --isochronous option. – Configuring the time-out value for the keyboard backlight when an AC adapter is plugged into the system. See -kbdbacklighttimeoutac option. – Configuring the time-out value for the keyboard backlight when the system is running only on battery power. See -kbdbacklighttimeoutbatt option. – Configuring lid switch functions. See --lidswitch option.
• The Dell Command | Configure Installation Guide provides information about installing Dell Command | Configure on supported client systems. The guide is available as part of the Dell Command | Configure download. • The Dell Command | Configure Command Line Interface Reference Guide provides information about configuring the BIOS options on supported Dell client systems. Additionally, the Release Notes file, which is available as part of the Dell Command | Configure download and at dell.
2 Dell Command | Configure graphical user interface Dell Command | Configure Graphical User Interface (Dell Command | Configure GUI) displays all BIOS configurations supported by Dell Command | Configure . Using the Dell Command | Configure GUI, you can do the following: • Create BIOS configuration for client systems. For more information, see Creating a BIOS package using GUI. • Validate the BIOS configuration against the BIOS configuration of the host system.
To access the GUI, click Start → All Programs → Dell → Dell Command | Configure Wizard or double-click Dell Command | Configure Wizard on the desktop. Creating a BIOS package using the GUI Using theDell Command | Configure GUI, you can create a BIOS package containing valid settings to apply to target client systems. To create a BIOS package: 1. Access the Configuration wizard. For more information, see Accessing Dell Command | Configure GUI.
Table 2. Configuration options Options Description View/Change Click to view or change the selected configuration and load a new configuration. When you click View/Change to load a new configuration, the configuration screen is displayed. After you have made the preferred modifications, click Save to save the changes, or click Cancel to return to the previous configuration. NOTE: If you try to load a new configuration without exporting the configured BIOS options, then a screen is displayed.
Configuring the setup, system, and hard disk drive passwords You can set or change the setup password (setuppwd) also known as BIOS password, the system password (syspwd), and the hard disk drive password (hddpwd). To edit the setup, system, or hard disk drive password: 1. In the Edit mode, click the Value to Set text box of the required option. The corresponding password screen is displayed. NOTE: To display the password as clear text, select Show Password.
NOTE: To open a saved package, click Open a Saved Package, browse to the file location, and then click Open. 2. Click Edit, or double-click the option. 3. In the autoon option row, click View/Change in the Value to set column. The auto on screen is displayed. 4. Select one of the following options from Auto On screen: • Disabled — To turn off the feature. • Weekdays — To turn on the target system automatically only on weekdays. • Every Day — To turn on the target system automatically everyday. 5.
Options Description Shortform Displays the short form of the device name. If the system has many devices of the same device type, then the short form of the device is displayed with a . notation. For example, if the system has an internal HDD, eSATA HDD, and eSATA Dock HDD, then the short forms are displayed as hdd.1, hdd.2, and hdd.3 respectively. Description Displays a short description for the device. Status Displays if the device is turned on or off.
4. Select the mode to charge the battery in the Primary Battery screen. • Standard Charge — Charges the battery over a longer period of time. • Express Charge — Charges the battery using the express charging algorithm, Dell's fast charging technology. • AC Use — Charges the battery while plugged-in. • Auto Charge — Charges the battery based on a periodic evaluation of battery usage to deliver the best balance capacity. • Custom Charge — The battery charging starts and stops based on user settings.
To configure the Peak Shift Battery charging option: 1. Click the required option: • Create Multiplatform Package • Create Local System Package • Open a Saved Package NOTE: To open a saved package, click Open a Saved Package, browse to the file location and click Open. 2. Click Edit, or double-click the option. 3. In the peakshiftcfg option row, click View/Change in the Value to set column. The Peak Shift screen is displayed. 4. Enable the peak shift settings option. 5.
NOTE: You can select only one active color for your keyboard backlight at a time. 6. Configure the Red, Green, and Blue (RGB) values if you have selected CustomColor1 or CustomColor2. To configure the RGB values for customcolor1 or customcolor2, a. Click CHANGE. b. Choose the color from the color canvas. c. Click Select. 7. Click OK. 8. To apply the modifications, export the configuration in ,ini or .exe format. See, Exporting the BIOS configuration.
BIOS option validation You can validate the options of a BIOS package against the configuration of the host system using the Validate option. You can validate the settings of a multiplatform package, local system package, or a saved package. You can validate all the options except the bootorder, syspwd, and setuppwd options. Validating a multiplatform package or saved package To validate the options of a multiplatform or saved package: On the Create Multiplatform Package screen, click Validate.
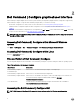
Figure 1. Password Reference Table For example, • • • • 4. If the setup password is set in the system, and you want to configure BIOS tokens/features, you need to provide setup password. If the setup and system passwords are set in the system, and you want to configure BIOS tokens/features, you need to provide setup password.
Applying a shell script on Linux 1. Copy the script to a system running the Linux operation system. 2. Run dos2unix on the system. 3. Run the script as: sh Applying a SCE file NOTE: You must have Administrator privileges. To apply SCE on a target system: Double-click the SCE, or from the command prompt, browse to the directory where SCE is located and type the name of the SCE file. For example, C:\Users\SystemName\Documents>"”. NOTE: You cannot run SCE on Windows PE systems.
• Deleting log details Viewing a log file Click Package History, on the Dell Command | Configure page. Deleting log details On the Package History page, click the Clear Log. Providing feedback on Dell Command | Configure You can provide feedback on the Dell Command | Configure using the link on Dell Command | Configure GUI. 1. Click the Give us your feedback link to launch the online survey page. 2. Provide your feedback and satisfactory ratings. 3. Submit to share it with Dell.
3 Troubleshooting Running Dell Command | Configure displays error messages If you get the error message, Required BIOS interface not found or HAPI load error. then uninstall and reinstall Hardware Application Programming Interface (HAPI) Running Dell Command | Configure on 32-bit and 64-bit Windows supported system Ensure that you are running cctk.exe based on the architecture of the system.
2. If not enabled, enable TPM. by typing the following command: cctk --tpm=on 3. Reboot the system. 4. To activate TPM, type the following command: cctk --tpmactivation=activate --valsetuppwd= 5. Reboot the system without interruption till the operating system loads. 6. To check the status of TPM. type: cctk --tpmactivation The status is displayed as activate.