Dell Command | Warranty Benutzerhandbuch October 2020 Rev.
Hinweise, Vorsichtshinweise und Warnungen ANMERKUNG: Eine ANMERKUNG macht auf wichtige Informationen aufmerksam, mit denen Sie Ihr Produkt besser einsetzen können. VORSICHT: Ein VORSICHTSHINWEIS warnt vor möglichen Beschädigungen der Hardware oder vor Datenverlust und zeigt, wie diese vermieden werden können. WARNUNG: Mit WARNUNG wird auf eine potenziell gefährliche Situation hingewiesen, die zu Sachschäden, Verletzungen oder zum Tod führen kann. © 2020 Dell Inc. oder ihre Tochtergesellschaften.
Inhaltsverzeichnis Kapitel 1: Dell Command | Warranty.................................................................................................. 4 Unterstützte Betriebssysteme.............................................................................................................................................4 Unterstützte Client-Betriebssysteme...........................................................................................................................
1 Dell Command | Warranty Dell Command | Warranty kann als eigenständige Anwendung oder als Teil von Dell Command | Integration Suite for System Center auf Systemen installiert werden, auf denen Microsoft System Center 2012 Configuration Manager, System Center 2012 SP1 Configuration Manager, System Center 2012 R2 Configuration Manager und Microsoft System Center Current Branch ausgeführt wird.
2 Installieren von Dell Command | Warranty Dell Command | Garantie kann als eigenständige Anwendung oder als Teil von Dell Command | Integration Suite for System Center auf Systemen installiert werden, auf denen Microsoft System Center 2012 Configuration Manager läuft. ANMERKUNG: Sie müssen als Systemadministrator angemeldet sein, um Dell Command | Warranty zu installieren.
3 Starten von Dell Command | Warranty Starten von Dell Command | Warranty mit Verwendung eines Befehlszeilentools. 1. Öffnen Sie eine Eingabeaufforderung. 2. Gehen Sie zum Ordner, in dem Sie die Dell Command | Warranty Dateien abgelegt haben. Geben Sie beispielsweise ein: cd C:\Program Files\Dell\Command . . . 3. Geben Sie den Namen der ausführbaren Datei ein. Geben Sie beispielsweise ein: DellWarranty-CLI.
4 Konfigurieren von Dell Command | Warranty Vor der Verwendung von Dell Command | Warranty gehen Sie wie folgt vor: 1. Starten Sie Dell Command | Warranty. Weitere Informationen finden Sie unter Starten von Dell Command | Warranty. 2. Geben Sie DellWarranty-CLI.exe /H zum Anzeigen der Nutzung ein. ANMERKUNG: Damit Dell Command | Warranty funktioniert, müssen Sie einen /InputFile- oder /InputCfgMgrConnectionStringParameter eingeben. Siehe CLI-Optionen.
5 Garantieinformationen abrufen 1. Wenn das System, das auf dem Dell Command | Warranty installiert ist, Zugriff auf den Configuration Manager hat und in der Lage ist, eine Internetverbindung aufzubauen (einschließlich durch Proxy): a. Starten Sie Dell Command | Warranty. Weitere Informationen finden Sie unter Starten von Dell Command | Warranty. b. Konfigurieren von Dell Command | Warranty. Weitere Informationen finden Sie unter Konfigurieren von Dell Command | Warranty. c.
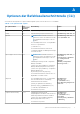
A Optionen der Befehlszeilenschnittstelle (CLI) Verwenden Sie die folgenden CLI-Optionen und die folgende Syntax, wenn Sie das Service-Tool einbinden. Tabelle 1. CLI-Optionen und -Syntax CLI-Optionenname CLIOptionenab kürzung Beschreibung Syntax /Help /H Zeigt die Nutzung an (diese Informationen). DellWarranty-CLI.exe /H /Usage /U Zeigt die Nutzung an (diese Informationen). DellWarranty-CLI.
Tabelle 1. CLI-Optionen und -Syntax (fortgesetzt) CLI-Optionenname CLIOptionenab kürzung Beschreibung Syntax dbname];Integrated Der /Ocs-Befehl erstellt eine Datenbank mit Security=true;" dem gleichen Namen wie oben. Der Speicherort der Datenbank ist %USERPROFILE%\[Warranty dbname].mdf, während es bei der Protokolldatei %USERPROFILE%\[Waranty dbname]_log.ldf ist. Die Variable %USERPROFILE% ist auf einem Windows 10-System typischerweise C:\Users\ [username]\.
Tabelle 1. CLI-Optionen und -Syntax (fortgesetzt) CLI-Optionenname CLIOptionenab kürzung Beschreibung Syntax Der Parameter ist optional. /Wait /W Warten Sie auf Benutzereingaben vor der Terminierung – am besten während des Debuggen verwenden DellWarrantyCLI.exe /I= C:\FileName.csv /W (/W) Der Parameter ist optional.
B Datenbankschema der Garantieleistung Das folgende Datenwörterbuch wird erstellt, wenn Sie den /Ocs-Switch benutzen. Beispiel eines Befehls: DellWarranty-CLI.exe /I=C:\Users\[username]\Documents\FileName.csv /Ocs="Data Source=(localdb)\MSSQLLocalDB;Database=[dbname];Integrated Security=true;" ANMERKUNG: Geben Sie die Variable [dbname] innerhalb der /Ocs-Switch-Parameter an, wie oben abgebildet. Tabelle 2.
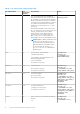
Tabelle 2.