Dell Command | Warranty 用户指南 October 2020 Rev.
注意、小心和警告 注: “注意”表示帮助您更好地使用该产品的重要信息。 小心: “小心”表示可能会损坏硬件或导致数据丢失,并告诉您如何避免此类问题。 警告: “警告”表示可能会导致财产损失、人身伤害甚至死亡。 © 2020 Dell Inc. 或其子公司。保留所有权利。Dell、EMC 和其他商标均是 Dell Inc.
目录 章 1: Dell Command | Warranty......................................................................................................... 4 支持的操作系统.................................................................................................................................................................... 4 支持的客户端操作系统.................................................................................................................................................. 4 支持的服务器操作系统..............................
1 Dell Command | Warranty Dell Command | Warranty 可作为独立应用程序安装,或作为运行 Microsoft System Center 2012 Configuration Manager、System Center 2012 SP1 Configuration Manager、System Center 2012 R2 Configuration Manager 和 Microsoft System Center Current Branch 的 系统上 Dell Command | Integration Suite for System Center 的一部分安装。Dell Command | Warranty 帮助您检索存储在 Configuration Manager 的数据库或文件中的客户端系统列表的保修信息。客户端系统由其服务标签指定。 主题: • 支持的操作系统 支持的操作系统 以下列出了通过此应用程序支持的操作系统的类型和特定版本。 支持的客户端操作系统 ● ● ● ● ● ● ● ● ● ● ● ● ● ● ● ● ● ● ● ●
2 安装 Dell Command | Warranty Dell Command | Warranty 可作为独立应用程序安装,或作为运行 Microsoft System Center 2012 Configuration Manager 的系统上的 Dell Command | Integration Suite for System Center 的一部分安装。 注: 您必须以系统管理员的身份登录才能安装 Dell Command | Warranty。 主题: • • 将 Dell Command | Warranty 作为 Dell Command | Integration Suite For System Center 的一部分安装 作为独立应用程序安装 Dell Command | Warranty 将 Dell Command | Warranty 作为 Dell Command | Integration Suite For System Center 的一部分安装 1. 下载 Dell Command | Integration Suite for System Center .
3 启动 Dell Command | Warranty 使用命令行工具启动 Dell Command | Warranty。 1. 打开命令提示符。 2. 转至您放置 Dell Command | Warranty 文件的文件夹。 例如,键入:cd C:\Program Files\Dell\Command . . . 3. 键入可执行文件的名称。 例如,键入:DellWarranty-CLI.
4 配置 Dell Command | Warranty 在使用 Dell Command | Warranty 之前,请执行以下操作: 1. 启动 Dell Command | Warranty。 有关更多信息,请参阅启动 Dell Command | Warranty。 2. 输入 DellWarranty-CLI.
5 检索保修信息 1. 如果安装 Dell Command | Warranty 的系统能够访问“配置管理器”并且连接到互联网(包括通过代理连接): a. 启动 Dell Command | Warranty。 有关更多信息,请参阅启动 Dell Command | Warranty。 b. 配置 Dell Command | Warranty。 有关更多信息,请参阅配置 Dell Command | Warranty。 c. 要通过 Configuration Manager 数据库检索保修信息: ● 使用命令:DellWarranty-CLI.
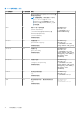
A 命令行界面 (CLI) 选项 使用保修工具时,请利用以下 CLI 选项和语法。 表. 1: CLI 选项和语法 CLI 选项名称 CLI 选项缩写 说明 /Help /H 显示用法(此信息)。 DellWarranty-CLI.exe /H /Usage /U 显示用法(此信息)。 DellWarranty-CLI.exe /U /InputFile /I 注: 要使保修工具正常工作,您必须至少提 供一个输入标志(共两个):/I 或 /Ics。 语法 DellWarranty-CLI.exe / I=C:\FileName.csv 服务编号的输入 CSV 文件的完整路径 (C:\FileName.
表. 1: CLI 选项和语法 (续) CLI 选项名称 CLI 选项缩写 说明 语法 的/InputFile 或/InputCfgMgrConnectionString 服 务标签中进行填充。 注: 创建数据库后,您可以使用 SQL 命令 alter database 或 SQL Server Management Studio 更改您的 [Warranty dbname].mdf 和 [Warranty dbname]_log.ldf 文件的位置。 /Filter /F 保修 API 和 DB 的筛选器 (Default: AnyWarranty) (ActiveWarranty 或 ExpiredWarranty 或 WarrantyExpiringIn30Days) DellWarrantyCLI.exe /I= C:\FileName.csv / F=ActiveWarranty (/F=ActiveWarranty) 此参数是可选的。 /ProxyUrl /Ps 代理服务器 URL (proxy.domain.
B 保修输出数据库架构 当您使用/Ocs 交换机时,即会创建以下数据目录。 示例命令:DellWarranty-CLI.exe /I=C:\Users\[username]\Documents\FileName.csv /Ocs="Data Source=(localdb)\MSSQLLocalDB;Database=[dbname];Integrated Security=true;" 注: 如上所述,在 /Ocs 交换机参数内提供变量 [dbname]。 表.