OptiPlex 3080 Small Form Factor Setup and specifications guide Regulatory Model: D15S Regulatory Type: D15S002 May 2020 Rev.
Notes, cautions, and warnings NOTE: A NOTE indicates important information that helps you make better use of your product. CAUTION: A CAUTION indicates either potential damage to hardware or loss of data and tells you how to avoid the problem. WARNING: A WARNING indicates a potential for property damage, personal injury, or death. © 2020 Dell Inc. or its subsidiaries. All rights reserved. Dell, EMC, and other trademarks are trademarks of Dell Inc. or its subsidiaries.
Contents Chapter 1: Set up your computer......................................................................................................5 Chapter 2: Chassis overview...........................................................................................................10 Front view............................................................................................................................................................................. 10 Back view...................................
Intel Software Guard Extensions options....................................................................................................................31 Performance................................................................................................................................................................... 31 Power management......................................................................................................................................................
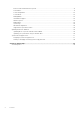
1 Set up your computer Steps 1. Connect the keyboard and mouse. 2. Connect to your network using a cable, or connect to a wireless network.
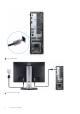
3. Connect the display. 4. Connect the power cable.
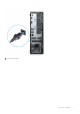
5. Press the power button.
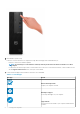
6. Finish Windows system setup. Follow the on-screen instructions to complete the setup. When setting up, Dell recommends that you: • • • Connect to a network for Windows updates. NOTE: If connecting to a secured wireless network, enter the password for the wireless network access when prompted. If connected to the internet, sign-in with or create a Microsoft account. If not connected to the internet, create an offline account. On the Support and Protection screen, enter your contact details. 7.
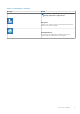
Table 1. Locate Dell apps (continued) Dell apps Details NOTE: Renew or upgrade your warranty by clicking the warranty expiry date in SupportAssist. Dell Update Updates your computer with critical fixes and important device drivers as they become available. Dell Digital Delivery Download software applications including software that is purchased but not preinstalled on your computer.
2 Chassis overview Topics: • • • Front view Back view System board Layout Front view 1. 2. 3. 4. 5. 6. 10 Power button with diagnostic LED Hard-disk drive activity light Universal audio jack port Two USB 2.0 ports Two USB 3.
Back view 1. 2. 3. 4. 5. 6. 7. 8. 9. 10. 11. 12. 13. 14. Line-out re-tasking Line-in audio port HDMI 1.4b port 3rd Video Port (VGA/DP 1.4/HDMI 2.0b) (optional) DisplayPort 1.4 Serial/PS2 slot (Optional) Two USB 3.2 Gen 1 Type-A ports Two USB 2.
System board Layout 1. 2. 3. 4. 5. 6. 7. 8. 9. 10. 11. 12. 13. 14. 15. 16. 17. 12 Video connector Intrusion switch connector (Intruder) CPU power connector (ATX_CPU) CPU fan connector Memory slots (DIMM1, DIMM2) M.2 Solid-state drive connector PWR switch connector(PWR_SW) PSU connector M.
3 Technical specifications NOTE: Offerings may vary by region. The following specifications are only those required by law to ship with your computer. For more information about the configuration of your computer, go to Help and Support in your Windows operating system and select the option to view information about your computer.
Table 3. Chipset (continued) Description Values DRAM bus width 64-bit (for single channel) Flash EPROM 32 MB PCIe bus Up to Gen 3.0 Non-volatile memory Yes BIOS Configuration Serial Peripheral Interface (SPI) 256 Mbit (32 MB) located at SPI_FLASH on chipset Trusted Platform Module (Discrete TPM Enabled) 24 KB located at TPM 2.
Table 4. Processors (continued) Processors Wattage Core count Thre Speed ad coun t Cache Integrated graphics GSP DG/CG Ready 10th Generation Intel Core i5-10400 65 W 6 12 2.9 GHz to 4.3 GHz 12 MB Intel UHD Graphics 630 Yes Yes 10th Generation Intel Core i5-10500 65 W 6 12 3.1 GHz to 4.5 GHz 14 MB Intel UHD Graphics 630 Yes Yes 10th Generation Intel Core i5-10600 65 W 6 12 3.3 GHz to 4.
Table 5. Memory specifications (continued) Description Values Speed 2666 MHz Maximum memory 64 GB Minimum memory 4 GB Memory size per slot 4 GB, 8 GB, 16 GB, 32 GB Configurations supported • • • • • • • • 4 GB, 1 x 4 GB 8 GB, 1 x 8 GB 8 GB, 2 x 4 GB 16 GB, 2 x 8 GB 16 GB, 1 x 16 GB 32 GB, 1 x 32 GB 32 GB, 2 x 16 GB 64 GB, 2 x 32 GB Intel Optane memory Intel Optane memory functions only as a storage accelerator. It neither replaces nor adds to the memory (RAM) installed on your computer.
Table 7. Ports and connectors (continued) Description Values • • Two USB 2.0 ports with Smart Power On (rear) Two USB 3.2 Gen 1 Type-A ports (rear) Audio • • One Universal Audio Jack (front) One Line-in/out retasking audio port (rear) Video • • • One DisplayPort 1.4 (rear) One HDMI 1.4 port (rear) One Optional 3rd Video Port (VGA/DP 1.4/HDMI 2.0b) Memory card reader Not supported Power port 4.50 mm x 2.
Wireless module Table 9. Wireless module specifications Description Values Model number Qualcomm QCA61x4a Intel Wi-Fi 6 AX200 Intel 3165 Transfer rate Up to 867 Mbps Up to 2.4 Gbps Up to 867 Mbps Frequency bands supported 2.4 GHz/5 GHz 2.4 GHz/5 GHz 2.4 GHz/5 GHz Wireless standards 802.11ac 802.11ax (Wi-Fi 6) 802.11ac Encryption • • • • • • • • • Bluetooth 5.0 64-bit and 128-bit WEP 128-bit AES-CCMP TKIP 64-bit and 128-bit WEP 128-bit AES-CCMP TKIP 5.
Table 12. Audio and speaker specifications (continued) Description Values • One Line-out re-tasking Line-in audio port Speakers Optional Internal speaker amplifier Integrated in ALC3246(Class-D 2 W) External volume controls Keyboard shortcut controls. Speaker output average 2W Speaker output peak 2.5 W Subwoofer output Not supported Microphone Not supported Storage Your computer supports one of the following configurations: • • • • • • • One 2.5-inch hard-disk drive One 3.
Power ratings The following table lists the power rating specifications of OptiPlex 3080 Small Form Factor. Table 14. Power ratings Description Option one Option two Type 200 W (80 PLUS Bronze) 200 W (80 PLUS Platinum) Input voltage 90 VAC to 264 VAC 90 VAC to 264 VAC Input frequency 47 Hz to 63 Hz 47 Hz to 63 Hz Input current (maximum) 3.2 A 3.2 A Output current (continuous) • • • • Rated output voltage +12 VA/16.50 A +12 VB/14 A +12 VA/16.
Table 16. Physical system dimensions (continued) Feature Values Height (in/mm) 11.42 in. (290.00 mm) Width (in/mm) 3.65 in. (92.60 mm) Depth (in/mm) 11.53 in. (292.80 mm) Shipping Weight (lb/kg – includes packaging materials) 14.58 lb (6.62 kg) Packaging dimensions Height (in/mm) 19.17 in. (487.00 mm) Width (in/mm) 15.51 in. (394.00 mm) Depth (in/mm) 10.40 in. (264.00 mm) Add-in cards Table 17. Add-in cards Add-in cards USB Type-C 3.1 PCIe Card USB Type-A 3.
Data security Table 19.
Table 21. Environmental specifications (continued) Feature OptiPlex 3080 Small Form Factor ENV0424 compliant Yes NOTE: Wood‐based fiber packaging contains a minimum of 35% recycled content by total weight of wood‐based fiber. Packaging that contains without wood‐based fiber can be claimed as Not Applicable. Energy Star, EPEAT and Trusted Platform Module (TPM) Table 22. Energy Star, EPEAT and TPM Features Specifications Energy Star 8.
Table 24. Accidental damage services Accidental Damage Services 1 Year Accidental Damage Service 2 Years Accidental Damage Service 3 Years Accidental Damage Service 4 Years Accidental Damage Service 5 Years Accidental Damage Service Computer environment Airborne contaminant level: G1 as defined by ISA-S71.04-1985 Table 25.
4 Software This chapter details the supported operating systems along with instructions on how to install the drivers. Topics: • Downloading Windows drivers Downloading Windows drivers Steps 1. Turn on the notebook. 2. Go to Dell.com/support. 3. Click Product Support, enter the Service Tag of your notebook, and then click Submit. NOTE: If you do not have the Service Tag, use the auto detect feature or manually browse for your notebook model. 4. Click Drivers and Downloads. 5.
5 System setup CAUTION: Unless you are an expert computer user, do not change the settings in the BIOS Setup program. Certain changes can make your computer work incorrectly. NOTE: Before you change BIOS Setup program, it is recommended that you write down the BIOS Setup program screen information for future reference. Use the BIOS Setup program for the following purposes: • • • Get information about the hardware installed in your computer, such as the amount of RAM and the size of the hard drive.
Keys Navigation Esc Moves to the previous page until you view the main screen. Pressing Esc in the main screen displays a message that prompts you to save any unsaved changes and restarts the system. Boot Sequence Boot sequence enables you to bypass the System Setup–defined boot device order and boot directly to a specific device (for example: optical drive or hard drive).
System information Table 27. System Configuration Option Description Integrated NIC Allows you to control the onboard LAN controller. The option ‘Enable UEFI Network Stack’ is not selected by default. The options are: • • • Disabled Enabled Enabled w/PXE (default) NOTE: Depending on the computer and its installed devices, the items that are listed in this section may or may not appear. SATA Operation Allows you to configure the operating mode of the integrated hard drive controller.
Video screen options Table 28. Video Option Description Primary Display Allows you to select the primary display when multiple controllers are available in the system. • • Auto (default) Intel HD Graphics NOTE: If you do not select Auto, the on-board graphics device will be present and enabled. Security Table 29. Security Option Description Admin Password Allows you to set, change, and delete the admin password. System Password Allows you to set, change, and delete the system password.
Table 29. Security (continued) Option Description Absolute This field lets you Enable, Disable or permanently Disable the BIOS module interface of the optional Absolute Persistence Module service from Absolute Software. • • • Chassis Intrusion Enabled - This option is selected by default. Disable Permanently Disabled This field controls the chassis intrusion feature.
Table 30. Secure Boot (continued) Option Description • • • • • Replace from File- Replaces the current key with a key from a user-selected file Append from File- Adds a key to the current database from a user-selected file Delete- Deletes the selected key Reset All Keys- Resets to default setting Delete All Keys- Deletes all the keys NOTE: If you disable the Custom Mode, all the changes made will be erased and the keys will restore to default settings. Intel Software Guard Extensions options Table 31.
Table 32. Performance (continued) Option Description This option is set by default. Intel TurboBoost Allows you to enable or disable the Intel TurboBoost mode of the processor. • Enable Intel TurboBoost This option is set by default. Hyper-Thread Control Allows you to enable or disable the HyperThreading in the processor. • • Disabled Enabled—Default Power management Table 33.
Table 33. Power Management (continued) Option Description This option is Disabled by default. Block Sleep Allows you to block entering to sleep (S3 state) in OS environment. This option is disabled by default. Post behavior Table 34. POST Behavior Option Description Adapter Warnings This option lets you choose whether the system displays warning messages when you use certain power adapters. This option is enabled by default.
Virtualization support Table 35. Virtualization Support Option Description Virtualization This option specifies whether a Virtual Machine Monitor (VMM) can utilize the additional hardware capabilities provided by the Intel Virtualization technology. • Enable Intel Virtualization Technology This option is set by default.
Table 37. Maintenance (continued) Option Description This option is not set by default. BIOS Recovery BIOS Recovery from Hard Drive—This option is set by default. Allows you to recover the corrupted BIOS from a recovery file on the HDD or an external USB key. NOTE: BIOS Recovery from Hard Drive field must be enabled. Always Perform Integrity Check—Performs integrity check on every boot. First Power On Date Allows you the set Ownership date. The option Set Ownership Date is not set by default.
About this task NOTE: If BitLocker is enabled, it must be suspended prior to updating the system BIOS, and then re enabled after the BIOS update is completed. Steps 1. Restart the computer. 2. Go to Dell.com/support. • • Enter the Service Tag or Express Service Code and click Submit. Click Detect Product and follow the instructions on screen. 3. If you are unable to detect or find the Service Tag, click Choose from all products. 4. Choose the Products category from the list.
Figure 1. DOS BIOS Update Screen System and setup password Table 40. System and setup password Password type Description System password Password that you must enter to log on to your system. Setup password Password that you must enter to access and make changes to the BIOS settings of your computer. You can create a system password and a setup password to secure your computer. CAUTION: The password features provide a basic level of security for the data on your computer.
• • • The password can contain the numbers 0 through 9. Only lower case letters are valid, upper case letters are not allowed. Only the following special characters are allowed: space, (”), (+), (,), (-), (.), (/), (;), ([), (\), (]), (`). 3. Type the system password that you entered earlier in the Confirm new password field and click OK. 4. Press Esc and a message prompts you to save the changes. 5. Press Y to save the changes. The computer reboots.
6 Getting help Topics: • Contacting Dell Contacting Dell Prerequisites NOTE: If you do not have an active Internet connection, you can find contact information on your purchase invoice, packing slip, bill, or Dell product catalog. About this task Dell provides several online and telephone-based support and service options. Availability varies by country and product, and some services may not be available in your area. To contact Dell for sales, technical support, or customer service issues: Steps 1.