Dell Data Protection Configuration Guide
____________________ © 2014 Dell Inc. Registered trademarks and trademarks used in the DDP|E, DDP|ST, and DDP|CE suite of documents: Dell™ and the Dell logo, Dell Precision™, OptiPlex™, ControlVault™, Latitude™, XPS®, and KACE™ are trademarks of Dell Inc. Intel®, Pentium®, Intel Core Inside Duo®, Itanium®, and Xeon® are registered trademarks of Intel Corporation in the U.S. and other countries. Adobe®, Acrobat®, and Flash® are registered trademarks of Adobe Systems Incorporated.
Contents 1 Configure the Compatibility Server server_config.xml gkresource.xml . . . . . . . . . . . . . . . . . . . . . . . . . . . . . . . . . . . . . . . . . . . . . . . . . . . . . . . . . . . . . . . . . . . . . . . . . . . . . . . . . . . . . . . . . . . . . . . . . 2 . . . . . . . . . . . . . . . . . . . . . . . . . . . . . . . . . . . . . . . . . . . . . . . . 12 Configure the Core Server . . . . . . . . . . . . . . . . . . . . . . . . . . . . . . . . . . . . . . Disable Web Services 13 .
Forced Poll . . . . . . . . . . . . . . . . . . . . . . . . . . . . . . . . . . . . . . . . . . . . . . . . . . . Inventory Options . . . . . . . . . . . . . . . . . . . . . . . . . . . . . . . . . . . . . . . . . . . . . . . . Non-Domain Activations . 6 . . . . . . . . . . . . . . . . . . . . . . . . . . . . . . . . . . . . . . . . . . . Configure Components for Kerberos Authentication/Authorization Configure Components for Kerberos Authentication/Authorization . Windows Service Instructions .
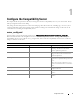
1 Configure the Compatibility Server This chapter details the parameters that may be changed to tune the Compatibility Server to your environment. Always back up configuration files before editing. Only change documented parameters in these file. Changing other data in these file, including tags, can cause system corruption and failure. Dell cannot guarantee that problems resulting from unauthorized changes to these file can be solved without re-installing the Compatibility Server. server_config.
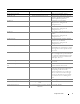
server_config.xml Parameter Default rmi.recovery.host Description To use Multi-Server EMS Recovery: default.gatekeeper.group.remote CMGREMOTE The default name of the Group that all Policy Proxies belong by default.
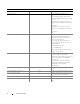
server_config.xml Parameter triage.execute.time Default Description 0 0 0/6 * * Triage is the process of reconciling the users and groups that the Server already knows about. The default setting is 0 0 0/6 * * ?, which means we do triage every 6 hours starting at midnight (midnight, 6 AM, noon, 6 PM, midnight...) gatekeeper.service.max.sessions 5 Maximum number of Policy Proxy sessions. gatekeeper.service.max.session.timeout 5 Timeout for maximum number of Policy Proxy sessions. security.
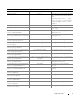
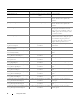
server_config.xml Parameter Default security.authorization.method.IAdministrat iveService.findLdapGroups SystemAdmin,SecAdmin Roles required to find LDAP groups. security.authorization.method.IAdministrat iveService.findLdapUsers SystemAdmin,SecAdmin Roles required to find LDAP users. security.authorization.method.IAdministrat iveService.addUsers SystemAdmin,SecAdmin Roles required to add users. security.authorization.method.IAdministrat iveService.
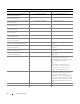
server_config.xml Parameter Default db.schema.version.patch dao.db.driver.dir Description Patch version of database schema. $dell.home$/lib/mssql-microsoft dao.db.host Default location of the database driver. If you change this file from the default location, update this parameter. Your database server hostname. This parameter is changed in the Configuration Tool. dao.db.name The name of your database. This parameter is changed in the Configuration Tool. dao.db.
server_config.xml Parameter vfs.file.handler.event gatekeeper.resource gatekeeper.config Default Description com.credant.guardian.server.vfs.EventFileH Event file handler. andler $dell.home$/conf/gkresource.xml If you move the Gatekeeper resource file from the default location, update this parameter. $dell.home$/conf/gkconfig.xml If you move the Gatekeeper resource file from the default location, update this parameter. rmi.server.registry.
server_config.xml Parameter Default Description security.authorization.method.IReportingSe AcctAdmin,HelpDeskAdmin,SystemAdmin Roles required to view the user detail report. rvice.getUserDetail ,SecAdmin security.authorization.method.IReportingSe AcctAdmin,HelpDeskAdmin,SystemAdmin Roles required to view the group detail rvice.getGroupDetail ,SecAdmin report. security.authorization.method.IReportingSe AcctAdmin,HelpDeskAdmin,SystemAdmin Roles required to view the list of domains rvice.
run-service.conf You may change some of the following parameters in \conf\run-service.conf. These parameters are automatically set at installation. To customize or make configuration changes to any Service: 1 Stop the Service. 2 Remove the Service. 3 Edit and save the run-service.conf file. We recommend that you track your changes in comments at the beginning of the file. 4 Re-install the Service. 5 Start the Service. run-service.
2 Configure the Core Server This chapter details the parameters that may be changed to tune the Core Server to your environment. Only change documented parameters in these file. Changing other data in these file, including tags, can cause system corruption and failure. Dell cannot guarantee that problems resulting from unauthorized changes to these file can be solved without re-installing the Core Server. Change the Policy Arbitration from Most Secure to Least Secure PolicyService.
Credant.Server2.WindowsService.exe.Config Remove the following section: Spring.config Remove the following: Remove all the definitions under AOP Advice, Web Service Target Definition, and Web Service Host Definition headings.
Add Compatibility Server’s Folder Location to Core Server Config File The Core Server, being a .Net application, can sometimes be blocked from accessing registry information, due to permissions. The issue is that the Core Server, to read the secretkeystore (the database encryption key), needs to access the Compatibility Server's registry configuration information for the location of the secretkeystore. If the registry permissions block this access, then the Core Server fails to authenticate Console users.
Configuration Guide
3 Configure the Device Server This chapter details the parameters that may be changed to tune the Device Server to your environment. Only change documented parameters in these file. Changing other data in these file, including tags, can cause system corruption and failure. Dell cannot guarantee that problems resulting from unauthorized changes to these file can be solved without re-installing the Device Server. eserver.
eserver.properties Parameter Default eserver.ciphers Description Sets the list of encryption ciphers. Each cipher should be separated by a comma. If left empty, the socket will allow any available cipher supported by Tomcat. Uncomment the example below to set the list of encryption ciphers. Separate each cipher with a comma. Refer to Sun’s JSSE reference guide for the list of valid cipher suite names. #eserver.
4 Configure the Security Server This chapter details the parameters that may be changed to tune the Security Server to your environment. Only change documented parameters in these files. Changing other data in these files, including tags, can cause system corruption and failure. Dell cannot guarantee that problems resulting from unauthorized changes to these files can be solved without re-installing the Security Server. context.
Configuration Guide
5 Configure Encryption Features This section explains how to independently control encryption features. Prevent Temporary File Deletion By default, all temporary files in the c:\windows\temp directory are automatically deleted during DDPE installation/upgrade. Deletion of temporary files speeds initial encryption and occurs before the initial encryption sweep.
Slotted Activation is enabled and configured through the Shield installer or through the Shield workstation. For users requiring activation through VPN, a slotted activation configuration for the Shield may be required to delay initial activation for long enough to allow time for the VPN client software to establish a network connection. CAUTION: Configure Slotted Activation only with the assistance of Customer Support.
Depending on Shield version, the registry setting will automatically disappear or change from 1 to 0 after the poll is complete. Depending on the permission set of an Admin user, a change in permissions may be needed to create this registry setting. If problems arise when attempting to create a new DWORD, follow the steps below to make the permissions change. 1 In the Windows registry, go to HKLM\SOFTWARE\Credant\CMGShield\Notify. 2 Right-click Notify > Permissions.
Configuration Guide
6 Configure Components for Kerberos Authentication/Authorization This section explains how to configure components for use with Kerberos Authentication/Authorization. Configure Components for Kerberos Authentication/Authorization NOTE: If Kerberos Authentication/Authorization is to be used, then the server that contains the Key Server component will need to be part of the affected domain. Key Server is a Service that listens for clients to connect on a socket.
4 Go to and change "epw" to "password". Then change "" to the password of the user from Step 3. This password is re-encrypted when the Server restarts. If using "superadmin" in Step 3, and the superadmin password is not "changeit", it must be changed here. 5 Save your changes and close the file. Sample Configuration File:
Remote Management Console Instructions 1 If needed, log on to the Remote Management Console. 2 Click Domains and click the Detail icon. 3 Click Key Server. 4 In the Key Server account list, add the user which will be performing the Admin activities. The format is Domain\username. Click Add Account. 5 Click Users in the left menu. In the search box, search for the username added in Step 4. Click Search. 6 Once the correct user is located, click the Detail icon. 7 Select Forensic Admin. Click Update.
Configuration Guide
7 Assign Forensic Administrator Role By default, Forensic Authorization is enabled on back-end servers and disabled on front-end servers. These settings are placed appropriately upon installation for both the Device Server and Security Server. Remote Management Console Instructions 1 If needed, log on to the Remote Management Console. 2 In the left pane, click Manage > Users.
Configuration Guide
8 Cron Expressions This section explains how to use cron expression formats and special characters. Introduction to Cron Expressions Cron is a UNIX tool that has been around for a long time, so its scheduling capabilities are powerful and proven. The CronTrigger class is based on the scheduling capabilities of cron. CronTrigger uses cron expressions, which are able to create firing schedules such as at 8:00am every Monday through Friday or at 1:30am every last Friday of the month.
• The / character is used to specify increments. 0/15 in the seconds field means the seconds 0, 15, 30, and 45. 5/15 in the seconds field means the seconds 5, 20, 35, and 50. Specifying * before / is equivalent to specifying 0 as the value to start with. 1/3 in the day-of-month field means fire every 3 days starting on the first day of the month. Essentially, for each field in the expression, there is a set of numbers that can be turned on or off. For seconds and minutes, the numbers range from 0 to 59.
Examples Expression Meaning 0 0 12 * * ? Fire at 12pm (noon) every day 0 15 10 ? * * Fire at 10:15am every day 0 15 10 * * ? Fire at 10:15am every day 0 15 10 * * ? * Fire at 10:15am every day 0 15 10 * * ? 2005 Fire at 10:15am every day during the year 2005 0 * 14 * * ? Fire every minute starting at 2pm and ending at 2:59pm, every day 0 0/5 14 * * ? Fire every 5 minutes starting at 2pm and ending at 2:55pm, every day 0 0/5 14,18 * * ? Fire every 5 minutes starting at 2pm and ending at 2:55
Configuration Guide
Create a Self-Signed Certificate Using Keytool and Generate a Certificate Signing Request 9 NOTE: This section details the steps to create a self-signed certificate for the Java-based components. This process cannot be used to create a self-signed certificate for .NET-based components. We recommend a self-signed certificate only in a non-production environment.
• Organization: Enter the appropriate value (example, Dell). • City or locality: Enter the appropriate value (example, Austin). • State or province: Enter the unabbreviated state or province name (example, Texas). • Two-letter country code: United States = US Canada = CA Switzerland = CH Germany = DE Spain = ES France = FR Great Britain = GB Ireland = IE Italy = IT Netherlands = NL • The utility prompts for confirmation that the information is correct. If so, type yes. If not, type no.
Figure 9-1. Example .CSR File 2 Follow your organizational process for acquiring an SSL server certificate from a Certificate Authority. Send the contents of the for signing. NOTE: There are several methods to request a valid certificate. An example method is shown in Example Method to Request a Certificate. 3 When the signed certificate is received, store it in a file. 4 As a best practice, back up this certificate in case an error occurs during the import process.
2 Select Request a certificate and click Next >. Figure 9-2. Microsoft Certificate Services 3 Select Advanced Request and click Next >. Figure 9-3.
4 Select the option to Submit a certificate request using a base64 encode PKCS #10 file and click Next >. Figure 9-4. Advanced Certificate Request 5 Paste in the contents of the CSR request in the text box. Select a certificate template of Web Server and click Submit >. Figure 9-5.
6 Save the certificate. Select DER encoded and click Download CA certificate. Figure 9-6. Download CA Certificate 7 Save the certificate. Select DER encoded and click Download CA certification path. Figure 9-7.
8 Import the converted signing authority certificate. Return to the DOS window. Type: keytool -import -trustcacerts -file -keystore cacerts 9 Now that the signing authority certificate has been imported, the server certificate can be imported (the chain of trust can be established). Type: keytool -import -alias dell -file -keystore cacerts Use the alias of the self-signed certificate to pair the CSR request with the server certificate.
Configuration Guide
0XXXXXA0X