Dell Data Protection | Enterprise Edition Enterprise Server Installation and Migration Guide
© 2014 Dell Inc. Registered trademarks and trademarks used in the DDP|E, DDP|ST, and DDP|CE suite of documents: Dell™ and the Dell logo, Dell Precision™, OptiPlex™, ControlVault™, Latitude™, XPS®, and KACE™ are trademarks of Dell Inc. Intel®, Pentium®, Intel Core Inside Duo®, Itanium®, and Xeon® are registered trademarks of Intel Corporation in the U.S. and other countries. Adobe®, Acrobat®, and Flash® are registered trademarks of Adobe Systems Incorporated.
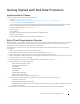
Contents 1 Getting Started with Dell Data Protection . Implementation Phases . . . . . . . . . . . . . . . . . . . . . . . . . . . . . . . . . . . . . . . . . . . . Kick-off and Requirements Review . . . . . . . . . . . . . . . . . . . . . . . . . . . . . . . . . . . . . . Preparation Checklist - Initial Implementation . Preparation Checklist - Upgrade/Migration 2 Introduction 5 5 . . . . . . . . . . . . . . . . . . . . . . . . . . . . . . . 7 . . . . . . . . . . . . . . . . . . . . . . . . . . . .
Main Server(s) . . . . . . . . . . . . . . . . . . . . . . . . . . . . . . . . . . . . . . . . . . . . . . 37 . . . . . . . . . . . . . . . . . . . . . . . . . . . . . . . . . . . . . . . . . . . 39 Front End Server(s) 6 Post-Installation Configuration . . . . . . . . . . . . . . . . . . . . . . . . . . . . . . . . EAS Management Installation and Configuration . . . . . . . . . . . . . . . . . . . . . . . . . . . . . 41 Dell Security Server in DMZ Mode Configuration . . . . . . . . . . . . . . .
Getting Started with Dell Data Protection Implementation Phases The basic implementation process includes these phases: • • • Perform Kick-off and Requirements Review Complete Preparation Checklist - Initial Implementation or Preparation Checklist - Upgrade/Migration Install or Upgrade/Migrate Dell Enterprise Server For instructions about client requirements and software installation, see Enterprise Edition Administrator Guide, Personal Edition Installation Guide, Security Tools Installation Guide, or Ente
10 What user applications may contain sensitive information? What are the application file types? 11 How many domains do you have in your environment? How many are in-scope for encryption? 12 What Operating Systems and OS versions are targeted for encryption? For a list of Operating Systems supported with Dell Data Protection | Encryption, see Enterprise Edition Administrator Guide, Personal Edition Installation Guide, Security Tools Installation Guide, or Enterprise Edition for Mac Administrator Guide
Preparation Checklist - Initial Implementation Use the following checklist to ensure you’ve met all prerequisites before beginning to install Dell Data Protection | Encryption (DDP|E). Proof of Concept environment cleanup is complete (If Applicable)? The Proof of Concept database and application have been backed up and uninstalled (if using the same server) before the installation engagement with Dell.
Database is created? A new database is created on a supported server - see Requirements and Architecture. The target database user has been given “db_owner” rights. DNS alias created for Dell Enterprise Server and/or Policy Proxies? It is recommended that you create DNS Aliases, for scalability. This will allow you to add additional servers later or separate components of the application without requiring client update. DNS aliases are created, if desired.
Preparation Checklist - Upgrade/Migration Use the following checklist to ensure you’ve met all prerequisites before beginning to upgrade Dell Data Protection | Encryption (DDP|E). Servers meet required software specifications? Windows Server 2008/2012 64-bit R2 (Standard or Enterprise) is installed. .NET Framework 3.5 SP1 is installed. .NET Framework 4.0 (4.5 for Windows Server 2012) is installed. Windows Identity Foundation is installed.
Change Control requirements identified and communicated to Dell? Submit any specific Change Control requirements for the installation of DDP|E to Dell Client Services prior to the installation engagement. These requirements may include changes to the application server(s), database, and client workstations. Test Hardware prepared? Prepare at least three computers with your corporate computer image to be used for testing. Dell recommends that you not use live systems for testing.
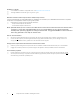
Example Customer Notification Email After you purchase Dell Data Protection, you will receive an email from DellDataProtectionEncryption@Dell.com. Below is an example of the email, which will include your CFT credentials and License Key information.
Enterprise Server Installation and Migration Guide
1 Introduction About Dell Enterprise Server The Enterprise Server is the security administration piece of Dell's solution. The Remote Management Console allows administrators to monitor the state of endpoints, policy enforcement, and protection across the enterprise.
Enterprise Server Installation and Migration Guide
2 Requirements and Architecture This section details hardware and software requirements and architecture design recommendations for Dell Data Protection | Encryption implementation. Requirements The Dell Enterprise Server components have hardware and software requirements in addition to the software provided on the Dell installation media. Ensure that the installation environment meets the requirements before continuing with installation or upgrade/migration tasks.
Dell Enterprise Server Hardware The following table details the minimum hardware requirements for Dell Enterprise Server. See Architecture Design for additional information about scaling based on the size of your organization. NOTE: Registry locations for Dell Policy Proxy (if installed): 32-bit: HKLM\Software\CREDANT 64-bit: HKLM\Software\Wow6432Node\CREDANT NOTE: When Enterprise Server is running on a 32-bit operating system, to access more than 4 GB physical memory, enable Physical Address Extension.
• Windows Server 2008 SP2 64-bit • Windows Server 2008 R2 SP0-SP1 64-bit - Standard Edition - Standard Edition - Enterprise Edition - Enterprise Edition • Windows Server 2012 R2 • Windows Server 2008 SP2 32-bit - Standard - Standard Edition - Enterprise Edition • Windows Server 2008 SP2 64-bit - Standard Edition - Enterprise Edition • Windows Server 2012 R2 - Standard Exchange ActiveSync Servers If you intend to use Dell Data Protection | Mobile Edition, the following Exchange ActiveSync Servers a
Architecture Design The Dell Data Protection | Encryption solution is a highly scalable product, scaled on the size of your organization and the number of endpoints targeted for encryption. This section provides a set of guidelines for scaling the architecture for 5,000 to 60,000 endpoints. NOTE: If the organization has more than 50,000 endpoints, please contact Dell Client Services for assistance.
5,000 - 20,000 Endpoints This architecture accommodates environments ranging between 5,000 and 20,000 endpoints. A front-end server is added to distribute the additional load and is designed to handle approximately 15,000 - 20,000 endpoints. Optionally, a front-end server can be placed in the DMZ for publishing policies and/or activating endpoints over the Internet.
,000 - 40,000 Endpoints This architecture accommodates environments ranging between 20,000 and 40,000 endpoints. An additional front-end server is added to distribute the additional load. Each front-end server is designed to handle approximately 15,000 - 20,000 endpoints. Optionally, a front-end server can be placed in the DMZ for activating endpoints and/or publishing policies to endpoints over the Internet.
40,000 - 60,000 Endpoints This architecture accommodates environments ranging between 40,000 and 60,000 endpoints. An additional front-end server is added to distribute the additional load. Each front-end server is designed to handle approximately 15,000 - 20,000 endpoints. Optionally, a front-end server can be placed in the DMZ for activating endpoints and/or publishing policies to endpoints over the Internet.
High Availability Considerations This architecture depicts a highly available architecture supporting up to 60,000 endpoints. There are two Dell Enterprise Servers set up in an active/passive configuration. To failover to the second Dell Enterprise Server, stop the services on the primary node and point the DNS Alias (CNAME) to the second node. Start the services on the second node and launch the console to ensure the application is working properly.
Virtualization Dell Data Protection Application Servers Disk speed on the hardware that hosts the virtual server, RAM allocation to the guest, and storage configuration may cause significant performance impact. The impact is most noticeable during activation, policy and inventory processing, and triage. Dell recommends reserving as much RAM as possible for the virtual host, and giving the virtual host priority in resource allocation.
Enterprise Server Installation and Migration Guide
3 Pre-Installation Configuration Before you begin, read the Release Notes for any current workarounds or known issues related to Dell Enterprise Server. The pre-installation configuration of the server(s) where you intend to install the Dell Enterprise Server is very important. Pay special attention to this section to ensure a smooth installation of the Dell Enterprise Server. Configuration 1 If enabled, turn off User Access Control (UAC) and Internet Explorer Enhanced Security Configuration (ESC).
Dell Security Server: HTTPS/8443 NOTE: If your Enterprise Edition clients will be entitled from the factory or you purchase licenses from the factory, set the GPO on the domain controller to enable entitlements (this may not be the server running Enterprise Edition). Ensure that outbound port 443 is available to communicate with the Server. If port 443 is blocked for any reason, the entitlement functionality will not work. For more information, see Enterprise Edition Administrator Guide.
Install Microsoft Visual C++ 2010 Redistributable Package 5 If not already installed, install Microsoft Visual C++ Redistributable Package. If desired, you can allow the Dell Enterprise Server installer to install this component. Windows Server 2003, Windows Server 2008, and Windows Server 2008 R2 – http://www.microsoft.com/download/en/details.aspx?displaylang=en&id=5555 Install Windows Server 2003 Support Tools 6 If using Windows Server 2003, install Windows Server 2003 Support Tools.
Add Web Server (IIS) Role and ASP.NET Role Service This only needs to be completed if you intend to use the web browser version of the Silverlight Console. 10 Add Web Server (IIS) Role and ASP.NET Role Service [ASP.NET Role Service is a component of the Web Server (IIS) Role]. Windows Server 2003 – http://www.microsoft.com/TechNet/prodtechnol/WindowsServer2003/Library/IIS/750d3137-462c-491d-b6c7-5f370d7f26cd.m spx?mfr=true Windows Server 2008 and Windows Server 2008 R2 – http://learn.iis.net/page.
Install Windows Identity Foundation 11 Install Windows Identity Foundation. Windows Server 2003 – http://www.microsoft.com/downloads/en/details.aspx?FamilyID= be4db6a0-b76d-446d-810c-ea3c25b3969a&displaylang=en Windows Server 2008 and Windows Server 2008 R2 – http://www.microsoft.com/downloads/en/details.aspx?FamilyID= eb9c345f-e830-40b8-a5fe-ae7a864c4d76&displaylang=en Windows Server 2012 R2 - In Server Manager Add Roles and Features Wizard, select Features then Windows Identity Foundation 3.5.
Open IIS Manager. Drill into /Web Sites/CertSrv/. Right-click mscep and select Properties. Select the Directory Security tab and click Edit for Authentication and access control. In the bottom half of the dialog, deselect Integrated Windows authentication and click OK. From the Administrative Tools menu, open Certification Authority. Right-click your Authority and select Properties. Select the Policy Module tab and click Properties.
Close Server Manager. b Modify Registry Key as follows: HKLM\SOFTWARE\Microsoft\Cryptography\MSCEP\EnforcePassword “EnforcePassword”=dword:00000000 c Open IIS Manager. Drill into \\Sites\Default Web Site\CertSrv\mscep_admin. Open Authentication and enable Anonymous Authentication. d Click Start > Run. Type certsrv.msc and click Enter. When the certsrv window displays, right-click the server name, select Properties and click the Policy Module tab.
Enterprise Server Installation and Migration Guide
4 Install or Upgrade/Migrate The chapter details a new installation of the Dell Enterprise Server or an upgrade/migration of an older Dell Enterprise Server to a newer Dell Enterprise Server. To begin the installation/migration, select one option: • • New Installation Upgrade/Migration New Installation Before you begin, ensure that all Pre-Installation Configuration is complete.
9 Select the Setup type (without the Front End check box being selected) and click Next. If the Complete option is selected, all program features are installed. Continue to step 11. The Custom option selection allows installation of only those program features desired. Continue to step 10. 10 At the Custom Setup dialog, choose the features you want to install. For a description of each feature and what it is required for, see Dell Component Descriptions. Once the features are selected, click Next.
Front End Server(s) 1 In the Dell installation media, navigate to the Dell Enterprise Server directory. Unzip (NOT copy/paste or drag/drop) Dell Enterprise Server-x64 to the root directory of the server where you are installing Dell Data Protection | Enterprise Edition. Copying/pasting or dragging/dropping will produce errors and an unsuccessful installation. NOTE: Follow the same procedure for Dell Enterprise Server-x86 for the 32-bit installer. 2 Double-click setup.exe.
13 At the Ready to Install the Program dialog, click Install to begin installation. 14 When prompted, click Finish to complete the installation. 15 Go to \conf\ and open the application.properties file. Locate publicdns.server.host and set the name to an externally resolvable host name. Locate publicdns.server.port and set the port (the default is 8443). Do not reboot the server until Post-Installation Configuration tasks are complete.
Main Server(s) To begin the upgrade/migration: 1 If you have any pending policies: As a Dell Administrator, log in to the Dell Remote Management Console. 2 In the left menu, click Actions > Commit Policies. 3 Click Apply Changes. 4 When the commit is complete, log off the Dell Remote Management Console. 5 From the Windows Start menu, click Start > Run. Type services.msc and click OK. When Services opens, navigate to each Dell Service and click Stop the service.
19 For the Front End Security Server host name, this relates to the previous dialog’s “Works with Front End...” box. If the box was selected on the previous dialog, enter the fully qualified domain name for the Dell Security Server. If you have an external certificate that is being used with APNs, enter the fully qualified domain name specified in the certificate. If the box was not selected, then the field is not available. Verify that all other fields are populated for component.
Figure 4-1. Known Password If you do not know the password, cut and paste the section similar to the section shown in Figure 4-2 from the backed up \conf\server_config.xml file into the corresponding section in the new server_config.xml file. Figure 4-2. Unknown Password Save and close the file. NOTE: Do not attempt to change the Dell Enterprise Server password by editing the server.pass value in server_config.xml at any other time.
10 For the Security Server (in Proxy Mode), Core Server (in Proxy Mode), and Device Server (in Proxy Mode), verify that all fields are populated and correct for each component. Leave the default port value as-is unless there is a conflict with an existing port. For the back end settings used by this server area, enter the FQDNs of the Back End Servers so that the Front End Servers may communicate with them. All fields are required. Click Next.
5 Post-Installation Configuration Read the Release Notes for current workarounds or known issues related to Dell Enterprise Server configuration. Whether you are installing the Dell Enterprise Server for the first time or are upgrading an existing installation, some components of your environment must be configured. EAS Management Installation and Configuration This section needs to be completed if you intend to use Dell Data Protection | Mobile Edition.
3 Select the language for installation, then click OK. 4 Click Next when the Welcome screen displays. 5 Read the license agreement, agree to the terms, and click Next. 6 Click Next to install EAS Mailbox Manager in the default location of C:\Program Files\Dell\EAS Mailbox Manager\. 7 At the Logon Information screen, enter the credentials of the user account that will logon to use this Service. User Name: DOMAIN\Username Password: password associated with this user name Click Next.
Dell Security Server in DMZ Mode Configuration If the Dell Security Server is deployed in a DMZ and a private network, and only the DMZ server has a domain certificate from a trusted Certificate Authority (CA), some manual steps are needed to add the trusted certificate into the Java keystore of the private network Dell Security Server. If a trusted certificate is being used, omit this section and continue to APNs Enrollment.
APNs Enrollment If you intend to use Dell Data Protection | Mobile Edition with iOS devices, the APNs Enrollment wizard must be used to: • • Create a CSR Create an Apple Push Certificate • Upload a Push Certificate If you do not intend to use Dell Data Protection | Mobile Edition with iOS devices, omit this section and continue to Use Windows Authentication. The Apple Push Notification service (APNs) enables secure communication to iOS devices over-the-air.
Use Windows Authentication If you want to use Windows Authentication instead of SQL Authentication, complete the following steps before running the Dell Server Configuration Tool. If you do not intend to use Windows Authentication, continue to Use the Dell Server Configuration Tool. 1 Create a Windows domain account with privileges to serve as Dell database owner and this account will also need to be a member of the Enterprise Server’s Local Administrators Group.
1 Go to Start > Run. Type services.msc and click OK. 2 When Services opens, highlight Dell Key Server. Right-click the entry and select Properties. 3 On the Log On tab, select This account. Browse to locate the Windows domain account you set up. The format should be DomainName\AdministratorName or administrator@domainname.com. 4 Type the password for this Windows domain account and confirm it. 5 Click OK.
Configure a New Installation 1 Launch the Dell Server Configuration Tool. Go to Start > Programs > Dell > Enterprise Edition > Server Configuration Tool > Run Server Configuration Tool. 2 You may get informational messages stating that your database configuration settings do not match. These messages are for information only and are not a cause for concern. If prompted, click OK for each message. 3 Click the Information tab. This tab is for information only and cannot be edited.
b At the Initialize Enterprise Database window, a warning displays. Confirm that you have either backed up the entire database or confirm that a backup does not need to be made of your existing database. Click Next. c At the Initialize Enterprise Database window, read the information and click Next. At the Initializing Database window, informational messages display the status of the initialization. When complete, check for errors.
HKLM\System\CurrentControlSet\Services\CredMgmtAgent\Parameters\DisableSSLCertTrust (DWORD (32-bit) Value)=1 Disabling trust validation lessens security, but allows you to use a self-signed certificate for pilots, POCs, etc. For a production environment, Dell recommends public CA-signed or domain-signed certificates.
Browse to the location of the existing certificate, enter the password associated with the existing certificate, and click Next. Click Finish when complete. – Generate Self-Signed Certificate – The information from the self-signed certificate that was created when installing the Enterprise Server will be used, if available.
m Select Yes, export the private key and click Next. n Select Personal Information Exchange - PKCS #12 (.PFX) and then select the sub-options Include all certificates in the certification path if possible and Export all extended properties. Click Next. o Enter and confirm a password. This can be any password of your choosing. Choose a password that is easy for you to remember, but no one else. Click Next. p Click Browse to browse to the location of where you would like to save the file.
f 11 In the Authentication: menu, select either True or False. Finish configuration. a From the top menu, select Configuration > Save. If prompted, confirm the save. b Close the Dell Server Configuration Tool. c Click Start > Run. Type services.msc and click OK. When Services opens, navigate to each Dell Service and click Start the service. The Dell Server Configuration Tool logs to C:\Program Files\Dell\Enterprise Edition\Configuration Tool\Logs.
d At the Test Configuration window, the results of the Test Connection Settings, Compatibility Test, and the Database Migrated Test display. You may get a failed test result for the Database Migrated Test, which is correct – this database has not been migrated yet. You cannot migrate this database until the two other tests, Test Connection Settings and Compatibility Test, have a result of Passed. Click Finish. e 7 From the top menu, select Configuration > Save. If prompted, confirm the save.
– Validation of smart cards used for Preboot Authentication: • – Import the “Root Agency” signing certificate and full chain of trust into the Dell Security Server Java keystore. For more information, see Create a Self-Signed Certificate and Generate a Certificate Signing Request. The full chain of trust must be imported.
If your deployment does not include Dell Manager, continue to step 10 on page 56. Path 2 – Use Current Settings a From the top menu, select Actions > Configure Certificates. b When the Configuration Wizard launches, select Advanced and click Next. c Select Use Current Settings and click Next. d At the Compatibility Server SSL Certificate window, select Generate Self-Signed Certificate and click Next.
a Open the Microsoft Management Console. b Click File > Add/Remove Snap-in. c Click Add. d At the Add Standalone Snap-in window, select Certificates and click Add. e Select Computer Account and click Next. f At the Select Computer window, select Local computer (the computer this console is running on) and click Finish. g Click Close. h Click OK. i In the Console Root folder, expand Certificates (Local Computer). j Go to the Personal folder and locate the desired certificate.
This tab configures SMTP settings for Dell Data Protection | Cloud Edition. If SMTP settings need to be configured for other purposes outside of Dell Data Protection | Cloud Edition, see the AdminHelp topic “Enable SMTP Server for License Email Notifications”. Enter the following information: 12 a In the Host Name: field, enter the FQDN of your SMTP server, such as smtpservername.domain.com. b In the User Name: field, enter the User Name that will log in to the mail server.
Enterprise Server Installation and Migration Guide
6 Web Browser Version of Silverlight Console Configuration Complete the steps in this chapter if you intend to use the web browser version of the Silverlight Console. If not, continue to Administrative Tasks. Add MIME Types IIS 6 (Windows Server 2003) Add the following MIME types. These MIME types may have already been added to IIS at some point. If so, continue to the next section once you verify that they are all present. 1 Open IIS Manager. 2 Expand the Websites folder.
8 • In the MIME types: field, enter application/x-ms-xbap • Click OK. • In the Extension: field, enter .deploy • In the MIME types: field, enter application/octet-stream • Click OK. • In the Extension: field, enter .xps • In the MIME types: field, enter application/vnd.ms-xpsdocument • Click OK. Click OK to apply the change. IIS 7 (Windows Server 2008 and Windows Server 2008 R2) These MIME types are pre-configured in IIS 7 (Windows Server 2008 and Windows Server 2008 R2).
Enable ASP.NET 4.x IIS 6 (Windows Server 2003) 1 If needed, open IIS Manager. 2 Expand the Websites folder. 3 Right-click Default Website. 4 Select Properties. 5 Select the ASP.NET tab. 6 In the ASP.NET version field, select 4.0.. 7 Click OK. IIS 7 (Windows Server 2008 and Windows Server 2008 R2) 1 Open a command prompt from C:\Windows\Microsoft.NET\Framework (or Framework64)\v4.0.30319. 2 Type the following command: aspnet_regiis.exe -i See http://msdn.microsoft.
IIS 8.5 (Windows Server 2012 R2) 1 If needed, open IIS Manager. 2 Expand the Websites folder. 3 Expand Default Website. 4 Right-click Console; select Convert to Application. 5 In the Application Pool area, ensure that ASP.NET v4.5 is selected. 6 Click OK. 7 Close IIS Manager. Configure Web Service Extensions IIS 6 (Windows Server 2003) 1 If needed, open IIS Manager. 2 Open the Web Service Extensions folder. 3 Highlight All Unknown ISAPI Extensions and click Allow.
6 Under Common HTTP Features, select Static Content and click Next. 7 Click Install. Enable IIS Management Console IIS 6 (Windows Server 2003) No action is needed. IIS 7 (Windows Server 2008 and Windows Server 2008 R2) 1 If needed, open Server Manager. 2 Highlight Roles. 3 In the Role Service area, click Add Role Service. 4 Select Web Server IIS Support and click Next. 5 A dialog may display, asking “Add role services and features required for Web Server (IIS) support?”.
Enterprise Server Installation and Migration Guide
7 Administrative Tasks Assign Dell Administrator Role 1 In the left pane, click Protect & Manage > Domains. 2 Click the Members icon of the Domain you want to add a user to. 3 Click Add Users. 4 Enter a filter to search the User Name by Common Name, Universal Principal Name, or sAMAccountName. The wild card character is *. A Common Name, Universal Principal Name, and sAMAccountName must be defined in the enterprise directory server for every user.
2 Click Security Policies on the top menu. Highlight the policy template to apply, and click Save. 3 Click Actions > Commit Policies. 4 Click Apply Changes. Your Policy Template is now applied as specified. NOTE: You can optionally override a policy template by clicking Override. TIP: Suppose you applied a template at the Enterprise level, saved, and then committed it. As expected, the Save and Cancel buttons are now inactive.
If needed, continue to Troubleshooting, Create a Self-Signed Certificate and Generate a Certificate Signing Request, or How to Export a Certificate to .PFX Using the Certificate Management Console. Windows Authentication As of v8.1, the Data Source is pre-configured out-of -the-box. No configuration is needed. Use the steps below to change the Data Source, if needed. 1 Type the Username to log in to the Dell database. 2 Leave the password blank.
Enterprise Server Installation and Migration Guide
8 Troubleshooting Visit support.dell.com for the most up-to-date troubleshooting information. Troubleshoot Web Browser Version of Silverlight Console If the web browser version of the Silverlight Console does not display, follow the steps below. 1 Open an Internet Explorer Browser. 2 On the browser toolbar, select Tools > Internet Options. 3 From the Security tab, highlight Trusted Sites. 4 Click Sites. 5 In the Add this website to the zone: field, verify that your FQDN displays in the text box.
Another method to troubleshoot this error is to ensure that there is not a mismatch between the Dell Enterprise Server FQDN and the certificates (by configuring certificates using a DNS alias instead of the FQDN). This mismatch can happen if you installed the Dell Enterprise Server using the FQDN, but configured certificates using a DNS alias. To troubleshoot this issue, change the “web.
A Appendix A Dell Component Descriptions The following table describes each component and its function. . Name Description Required For Dell Compliance Reporter Provides an extensive view of the environment for auditing and compliance reporting. Reporting A component of the Dell Enterprise Server. Dell Key Server A Service that negotiates, authenticates, and encrypts a client connection using Kerberos APIs. Dell Admin Utilities A component of the Dell Enterprise Server.
Name Description Required For Dell Compatibility Server A Service for managing the enterprise architecture. All Dell Message Broker Service Handles communication between the services of the Dell Enterprise Server. All Dell Device Server Supports activations and password recovery. Dell Data Protection | Enterprise Edition for Mac A component of the Dell Enterprise Server. A component of the Dell Enterprise Server.
B Appendix B SQL Server Best Practices The following list explains SQL server best practices, which should be implemented when Dell Data Protection is installed if not already implemented. 1 Ensure the NTFS block size where the data file and log file reside is 64 KB. SQL Server extents (basic unit of SQL Storage) are 64 KB. For more information, search Microsoft’s TechNet articles for “Understanding Pages and Extents.” • Microsoft SQL Server 2008 - http://technet.microsoft.
Enterprise Server Installation and Migration Guide
C Appendix C Certificates Create a Self-Signed Certificate and Generate a Certificate Signing Request This section details the steps to create a self-signed certificate for the Java-based components. This process cannot be used to create a self-signed certificate for .NET-based components. We recommend a self-signed certificate only in a non-production environment.
• City or locality: Enter the appropriate value (example, Dallas). • State or province: Enter the unabbreviated state or province name (example, Texas). • Two-letter country code. • The utility prompts for confirmation that the information is correct. If so, type yes. If not, type no. The Keytool displays each value entered previously. Click Enter to accept the value or change the value and click Enter.
3 Select Advanced Request and click Next. 4 Select the option to Submit a certificate request using a base64 encode PKCS #10 file and click Next. 5 Paste in the contents of the CSR request in the text box. Select a certificate template of Web Server and click Submit. 6 Save the certificate. Select DER encoded and click Download CA certificate. 7 Save the certificate. Select DER encoded and click Download CA certification path. 8 Import the converted signing authority certificate.
A message stating that the export was successful displays. Close the MMC. How to Add a Trusted Signing Cert to the Security Server when an Untrusted Certificate was used for SSL 1 Stop the Security Server Service, if running. 2 Back up the cacerts file in \conf\. Use Keytool to complete the following: 3 Export the trusted PFX into a text file and document the Alias: keytool -list -v -keystore "C:\pfxfilename.pfx" -storetype PKCS12 >C:\pfxfilename.
0XXXXXA0X