Scripting WSMAN to Deploy OS using remote ISO image to stage and boot This Dell Technical White Paper provides information about scripting WSMAN Operating System Deployment for attaching remote ISO’s on Dell PowerEdge servers with iDRAC.
This document is for informational purposes only and may contain typographical errors and technical inaccuracies. The content is provided as is, without express or implied warranties of any kind. © 2012 Dell Inc. All rights reserved. Dell and its affiliates cannot be responsible for errors or omissions in typography or photography. Dell, the Dell logo, and PowerEdge are trademarks of Dell Inc. Intel and Xeon are registered trademarks of Intel Corporation in the U.S. and other countries.
Contents Executive summary .............................................................................. 4 Introduction....................................................................................... 4 Environmental Check Point ..................................................................... 4 Script Usage ...................................................................................... 6 Attach Network ISO image for immediate one-time boot ..................................
Executive summary This paper provides information for administrators looking to script operating system deployment to attach remote ISO images to available Dell PowerEdge servers with an iDRAC, through a secure and standards-based WSMAN service. Introduction Dell PowerEdge servers equipped with Integrated Dell Remote Access Controller (iDRAC) provides secure, simple, scriptable and standards-based remote management capability through Web Services for Management (WSMAN).
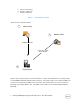
a. osd_boot_network.py b. provider_common.py c. wsman_common.py Figure 1. Environment Diagram Pictorial View of the Environment 1 Administrator 3 Network Share WSMAN over SSL TFTP / NFS / CIFS Share with ISO 2 Target System Figure 1 shows the pictorial view of the environment. It starts with administrator (1) running scripts to send WSMAN commands through an SSL connection. The target system (2) is a Dell PowerEdge 11G or later server equipped with iDRAC service processor.
The operating system booting to a network ISO provides the following capabilities: (A) Attaches Network ISO image to host OS as Emulated USB Device for immediate one-time boot. (B) Detaches Emulated USB Device from (A). (C) Retrieves the Job Status of the attached image. (D) Attaches Network ISO image to host OS as Emulated USB Device for persistent boot. (E) Detaches Emulated USB Device from (D). (F) Retrieves the status of (D).
3. Once a successful connection is established, the following main menu is returned. The main menu allows you to pick an option number, which corresponds to a needed operation on the system.
Enter share type: 0 Specify NFS required information. Enter IP address: [iDRAC IP] Enter image name (ex: iso.img): [IMAGE NAME] Enter share name (ex: /home/share): [SHARE NAME] Boot in progress. Waiting for response. Response received. A job is created. Retrieve job status in progress. Waiting for response. Response received. Job is in state "Rebooting to ISO". Select choice 3 to monitor job status. The main menu is returned at the end of the operation.
Retrieve the Job Status This capability pulls the job status of attaching the Emulated USB containing an ISO image onto the iDRAC’s host. Option 3 from the main menu, ‘Get Job Status’ allows usage of this capability. Enter option 1-9: 3 Sample output of the response: Retrieving job status in progress. Waiting for response. Response received.
detached. Option 4 from the main menu, ‘Attach Network ISO for persistent boot’ allows usage of this capabilitiy. Enter option 1-9: 4 The user will have to enter their choice of either NFS or CIFS share type. The NFS share requires the IP address, image name, and share name of the Linux’s system carrying the ISO image. The CIFS share requires the IP address, image name, share name, user name, and password of the Window’s system holding the ISO image. Sample script and user interaction: Specify share type.
Enter option 1 - 9: 7 Sample Output Detach in progress. Waiting for response. Response received. ISO image has been detached successfully. The main menu is returned at the end of operation. Retrieve the status of the attachment of Network ISO image for persistent boot This capability is used check if the connection of the network ISO image was successful. If it is successful the type of image and the location of the image that is currently connected to the iDRAC’s host system will be outputted.
The main menu is returned at the end of operation. Changing iDRAC Target The option 4 from the main menu, ‘Change iDRAC Target’ allows you to change the iDRAC target being used. You can use this option to shift to a different iDRAC. Enter option 1-5: 4 Sample output of the response: Enter iDRAC IP Address: [New iDRAC IP] Enter User Name: [USER NAME] Enter User Password: [PASSWORD] Pinging [New iDRAC IP]. Waiting for response. Response received. iDRAC IP address is set to [New iDRAC IP].
Where to Find More Information Learn more about firmware inventory as defined by the Dell CIM profile specification: http://www.delltechcenter.com/page/DCIM.Library.Profiles.DCIM+Software+Inventory+Profile+1.0 Learn more about firmware update as defined by the Dell CIM profile specification: http://www.delltechcenter.com/page/DCIM.Library.Profile.DCIM+Software+Update+Profile+1.0 Learn more about job control as defined by the Dell CIM profile specification: http://www.delltechcenter.