Dell Desktop Virtualization Solutions—Simplified 1010 Deployment Guide
Notes, Cautions, and Warnings NOTE: A NOTE indicates important information that helps you make better use of your computer. CAUTION: A CAUTION indicates either potential damage to hardware or loss of data and tells you how to avoid the problem. WARNING: A WARNING indicates a potential for property damage, personal injury, or death. © 2012 Dell Inc.
Contents Notes, Cautions, and Warnings...................................................................................................2 1 Introduction..................................................................................................................................5 System Requirements...............................................................................................................................................5 2 DVS Simplified 1010 Setup...................................
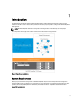
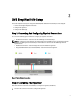
Introduction 1 The Dell Desktop Virtualization Solutions (DVS) Simplified 1010 is a Dell PowerEdge R710 system powered by Citrix XenServer and VDI-in-a-Box. This document provides the necessary steps required to configure the Dell DVS Simplified 1010 appliance. NOTE: Dell DVS Simplified 1010 must be configured and managed before virtual desktops can be deployed. The components of the single server solution architecture are illustrated in the figure below: Figure 1.
DVS Simplified 1010 Setup 2 This section explains three steps to configure the DVS Simplified 1010 before virtual desktops can be deployed. 1. Connect and Configure Physical Connections 2. Configure the Hypervisor 3. Configure the vdiManager Step 1: Connecting And Configuring Physical Connections You can use the following types of networks to configure your physical connections: • Gb1 Network Connection—Used to access the vdiManager and virtual desktops.
After the server is booted, an End User License Agreement (EULA) is displayed. 2. Click the checkbox to accept the EULA. 3. Enter the root password for the hypervisor. NOTE: Save the password to configure the vdiManager at a later stage. 4. To assign an IP address for the XenServer hypervisor: a) Select the Network and Management interface. b) Select the Configure Management interface and enter the required credentials. c) Select eth2 (Gb3 network connection) as the management interface.
NOTE: If Microsoft Active Directory is selected, the details such as IP address, Domain, User name, and Password must be provided to access the directory server. After the configuration, a pop-up window is displayed asking if vdiManager has a dedicated IP address. 13. Select Yes or No according to your requirement and click Done. Joining An Existing Grid To join an existing grid: 1. Follow steps 1– 9 to complete the first time VDI-in-a-Box setup. 2.
Licensing Information 3 NOTE: To start or create new virtual guests, you must activate your free XenServer edition within 30 days from first boot. To request and activate your free license, see the XenServer 5.6 Feature Pack 2 Installation Guide at citrix.com/mycitrix. Activating A Free XenServer Product 1. To request an activation key from Citrix using XenCenter: a) On the Tools menu, select License Manager.
7. Click OK and download the license file(s). Applying A License To VDI-in-a-Box After receiving the license from Citrix, apply the license to VDI-in-a-Box. Before applying the license, put the grid in maintenance mode. 1. 2. Go to Admin Tab → Click Grid Maintenance and click OK. On Admin page, click Grid Upgrade. The Grid Upgrade dialog box is displayed. 3. Click Choose File, browse to the upgrade or license file, and click OK. 4. Click Submit.