Dell Desktop Virtualization Solutions—Simplified 1020 Deployment Guide
Notes, Cautions, and Warnings NOTE: A NOTE indicates important information that helps you make better use of your computer. CAUTION: A CAUTION indicates either potential damage to hardware or loss of data and tells you how to avoid the problem. WARNING: A WARNING indicates a potential for property damage, personal injury, or death. © 2013 Dell Inc.
Contents 1 Introduction..................................................................................................................................5 System Requirements...............................................................................................................................................6 Contacting Technical Support..................................................................................................................................
5 Connecting Dell Wyse Thin Clients To A DVS Simplified Environment............................29 Configuring The T10 Thin Client.............................................................................................................................. 29 Configuring The T10 Thin Client Using The Wyse Zero ToolBar...................................................................... 29 Configuring The T10 Thin Client Using DHCP..............................................................................
Introduction 1 The Dell Desktop Virtualization Solutions (DVS) Simplified 1020 is a Dell PowerEdge T620 system or a PowerEdge R720 system powered by Citrix VDI-in-a-Box (VIAB) and the hypervisor of your choice: • Citrix XenServer • Microsoft Hyper-V • VMware vSphere ESXi This document provides the necessary steps required to configure the Dell DVS Simplified 1020 appliance.
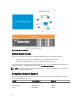
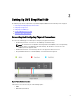
Figure 1. Single Server Architecture System Requirements Before you proceed with the configuration of Dell DVS Simplified 1020, ensure the following requirements: • The Dynamic Host Configuration Protocol (DHCP) server is available in your environment. • The appropriate Windows Volume Licensing is available for your virtual desktops.
Country Contact Numbers Extension Germany 069 9792 2064 3122046 Netherlands 0031 206 74 5914 3480158 Austria 82024058256 3122046 (German) 3480108 (English) Switzerland 0848330092 3122048 (German) 3250121 (French) Belgium 0248 28 690 3250124 (French) 3480159 (English) Luxembourg 24871036 3250127 Ireland 1850964270 3480157 Australia 1300 662 370 N/A New Zealand 800 703 355 N/A China 800-858-0612 N/A 400-886-8617 Japan 0120 912738 N/A India 1800 425 2070 N/A Singapore 18
Setting Up DVS Simplified 1020 2 The following steps must be completed to set up the DVS Simplified 1020 before virtual desktops can be deployed: 1. Connecting And Configuring Physical Connections. 2. Configuring The Hypervisor 3. Configuring The vdiManager. 4. Creating A Windows Reference VM. 5. Generating a Base Desktop Image.
• Keyboard, mouse, and monitor (not included) NOTE: You can use the mouse for systems installed with Microsoft Windows Server 2008. Configuring The Hypervisor After all the connections are established and the system is powered on, follow the steps for your hypervisor. Configuring The Hypervisor Using Citrix XenServer 1. Connect to the server console to configure the hypervisor. See the Connecting and Configuring Physical Connections section in this document.
An additional NIC is displayed as connected. This network connection corresponds to Gb3 in the Physical Network Connections diagram. NOTE: It is recommended that you configure this NIC with a static IP address and use it for managing your server. 13. In the Initial Configuration Tasks console, click the Activate Windows link and enter your product key. 14. Click Next and proceed through the activation process. 15. If required, add the host server to a domain. The system reboots to complete this request.
Determining The IP Address Using Microsoft Hyper-V 1. In the Server Manager console, expand Roles and Hyper-V→ Hyper-V Manager and select your server so that the vdiManager VM is displayed under Virtual Machines. 2. Right-click the vdiManager VM and select Start. 3. From the Action tab menu, select Console to access the VM. NOTE: A message with the IP address for the VIAB console is displayed. Determining The IP Address Using VMware ESXi 1.
17. In the Inventory view, click on the vdiManager_ESX VM and issue the Power On command indicated by a green arrow. When the vdiManager_ESX VM completes booting, the IP address appears on the Summary tab. If it does not, you can determine the address by selecting the Console tab, clicking in the console area, and pressing any key to display a message showing the IP address of the VIAB console.
Creating A New Grid Ensure the user account has domain administrator privileges. 1. In the Grid section, select Create a new VDI-in-a-Box grid radio button and click Next. 2. Select Active Directory to integrate VDI-in-a-Box desktops to the Active Directory domain or choose VDI-in-a-Box workgroup if using VIAB’s local user database instead of Active Directory. 3. Click Next.
Creating A Windows Reference VM After the vdiManager and grid are configured, the next step is to generate a base desktop image, or the first golden image, based on an existing Windows reference VM, which can be imported, converted, or created new on your hypervisor. Follow the steps to create a new Windows reference VM for your hypervisor.
Generating a Base Desktop Image Your first VIAB image must be imported from an existing Windows VM running on your hypervisor. See the section Creating A Windows Reference VM for more information. To successfully generate a base desktop image: • Ensure that there is only one DHCP server within range. • Sufficient DHCP addresses must be available. • Ensure the DHCP lease time is adjusted for short release cycles.
Enabling NIC Bonding Using Microsoft Windows Server 2008 R2 SP1 NOTE: You cannot create a team using a NIC configured for the Microsoft Hyper-V virtual network. You must first create a team using two available adapters and change the Hyper-V virtual network to use that team. Alternatively, use an available adapter that will not be part of the team you are creating. You can then create a team using the other two adapters. NOTE: This procedure is for Broadcom NICs only.
NOTE: Ensure you are using the team with HyperV Mode enabled for the Hyper-V virtual network. For example, if you enabled HyperV Mode on the “BASP Virtual Adapter #2”, set this as the external network connection for HVSwitch1. Enabling NIC Bonding Using Microsoft Windows Server 2012 To configure NIC bonding using Microsft Windows Server 2012, see the Windows Server 2012 NIC Teaming (LBFO) Deployment and Management document at microsoft.com/en-us/download/details.aspx?id=30160.
Upgrading Citrix XenServer And VDI-in-a-Box 3 Upgrading Citrix XenServer You can upgrade Citrix XenServer from XenCenter by using the Rolling Pool Upgrade wizard in automatic mode. The VDIin-a-Box does not support XenServers in a pool but the Rolling Pool Upgradewizard can be used to upgrade stand alone servers.
3. Select the hosts in your grid and click Next. The Upgrade Mode information is displayed. 4. Select Automatic Mode (recommended mode). 5. Click Run Prechecks. NOTE: If any prechecks fail, follow the on-screen instructions to resolve them. Click Resolve All for XenCenter to automatically resolve all failed prechecks. 6. Click Next. The Ready to Upgrade information is displayed. 7.
8. Click Test to verify that XenCenter can connect to the installation files. 9. Click Start Upgrade to proceed. The wizard prompts you if any actions are required during the upgrade of each host. Once completed, a summary is displayed. 10. Click Finish to exit the wizard. 11. Use XenCenter to power on all vdiManager virtual machines. 12. When all vdiManagers are running, log on to the vdiManager console and take the grid out of maintenance mode. From the Admin tab, click Grid Maintenance, and click OK.
3. Click OK. A message is displayed at the top of the screen indicating that the grid is in maintenance mode. 4. Click Grid Upgrade on the Admin page. The Grid Upgrade window is displayed. 5. Click Choose File and select the upgrade file that you had downloaded. 6. Click Submit. Follow the onscreen instructions to upgrade all the servers in the grid. A progress box displays the upload and upgrade progress. 7.
7. On the Edit Image page, make any additional edits to the image that you require, such as adding new applications, and click Next. 8. Complete the Prepare Image and Test Image pages. For instructions for these steps, see the relevant topics for your hypervisor and image operating system at support.citrix.com/proddocs/topic/vdi/vdi-landing-page-53.html. 9. On the Test Image page, click Save. 10. Click Confirm. The upgraded image is published and ready to be deployed based on your refresh policies.
Licensing Information 4 XenServer Licensing NOTE: Applying your license for VDI-in-a-Box 5.0.2 and higher automatically upgrades and licenses XenServer 6.0 and higher to Citrix XenServer for XenDesktop edition, even if you have previously activated a free XenServer license. Click Tools on the XenCenter menu and select License Manager to confirm if your XenServer license has been upgraded. Microsoft Hyper-V Licensing 1. Click the Activate Windows link on the Initial Configuration Tasks console. 2.
Applying A License To VDI-in-a-Box After receiving the license from Citrix, apply the license to VDI-in-a-Box. Before applying the license, put the grid in maintenance mode. 1. Go to Admin Tab → Click Grid Maintenance and click OK. 2. On the Admin page, click Grid Upgrade. The Grid Upgrade dialog box is displayed. 3. Click Choose File, browse to the upgrade or license file, and click OK. 4. Click Submit. When the upgrade completes, the server status changes to Success. 5.
VIAB machines every 30 days. KMS allows for unlimited number of activations, can be easily managed by a KMS host and VAMT, and usually requires no change to the golden image. VIAB 5.1 offers a new setting at the template level to reset the KMS activation timer. Leaving this unchecked implies that the image's activation clock is not rearmed during preparation. Checking the box implies that the image activation clock is rearmed during preparation, decrementing the activation count.
Connecting Dell Wyse Thin Clients To A DVS Simplified Environment 5 The Dell Wyse T10, Z50D, and Z90D7 thin clients are recommended for seamless connectivity to a DVS Simplified virtual environment. These thin clients have been tested with VDI-in-a-Box, and are certified for both Citrix Ready and Citrix HDX Ready standards. Citrix Ready is a product verification program that allows customers and users to find partner products and solutions trusted to enhance Citrix offerings.
• The Windows 2003 or Windows 2008 DHCP server is available. Configuring The T10 Thin Client Using Windows 2008 DHCP Server 1. Right-click My Computer and select Manage. 2. In the DHCP window, expand your DHCP server option, right-click on IPv4, and click Set Predefined Options. The Predefined Options and Values window is displayed. 3. Click the Add button. 4. Enter the following details in the Option Type window: 5. – Name: Enter a name for the server. For example, vdiManager.
NOTE: If you have more than one vdiManager in your grid, you can enter URL for each separated by semicolons. For example: http://172.16.0.135/dt/PNAgent/config.xml; http:// 172.16.0.136/dt/PNAgent/config.xml 11. Click OK. Your Windows 2003 DHCP server is now configured with option tag 181. 12. Configure the T10 Thin Client for DHCP and restart the device. For more information, see the Wyse ThinOS Getting Started Guide that shipped with you system. Configuring The Z50D Thin Client 1.