
Users Guide

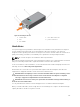
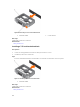
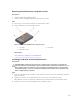

Table Of Contents
- Dell DL4300 Appliance Owner's Manual
- About your Dell DL4300 Appliance
- Documentation matrix
- Technical specifications
- Initial system setup and configuration
- Pre-operating system management applications
- Installing and removing system components
- Safety instructions
- Before working inside your system
- After working inside your system
- Recommended tools
- Front bezel (optional)
- System cover
- Inside the system
- Cooling shroud
- Hard-drive tray assembly
- Removing the hard drive tray
- Installing the hard drive tray
- Removing a hard drive blank from a hard drive carrier
- Installing a hard drive blank into a hard drive carrier
- Removing a hard drive carrier from the hard drive tray
- Installing a hard drive carrier into the hard drive tray
- Removing a hard drive from a hard drive carrier
- Removing the hard drive backplane from the hard drive tray
- Installing the hard drive backplane in the hard drive tray
- Cooling fans
- Cooling-fan assembly
- System memory
- Processors and heat sinks
- PCIe card holder
- Cable retention bracket
- Integrated storage controller card
- Expansion cards and expansion card riser
- Expansion card installation guidelines
- Removing an expansion card from expansion card riser 2 or 3
- Installing an expansion card into the expansion card riser 2 or 3
- Removing an expansion card from the expansion card riser 1
- Installing an expansion card into the expansion card riser 1
- Removing the riser 1 blank
- Installing the riser 1 blank
- Removing expansion card risers
- Installing expansion card risers
- Internal dual SD module (optional)
- Network daughter card
- System battery
- Power supply units
- Hard drives
- Removing a hot swappable hard drive
- Installing a hot swappable hard drive
- Hard drive backplane
- Control panel
- System board
- Trusted Platform Module
- Using system diagnostics
- Jumpers and connectors
- Troubleshooting your system
- Safety first — for you and your system
- Troubleshooting system startup failure
- Troubleshooting external connections
- Troubleshooting the video subsystem
- Troubleshooting a USB device
- Troubleshooting iDRAC Direct (USB XML configuration)
- Troubleshooting iDRAC Direct (Laptop connection)
- Troubleshooting a serial I/O device
- Troubleshooting a NIC
- Troubleshooting a wet system
- Troubleshooting a damaged system
- Troubleshooting the system battery
- Troubleshooting power supply units
- Troubleshooting cooling problems
- Troubleshooting cooling fans
- Troubleshooting system memory
- Troubleshooting an SD card
- Troubleshooting a hard drive
- Troubleshooting a storage controller
- Troubleshooting expansion cards
- Troubleshooting processors
- System messages
- Getting help
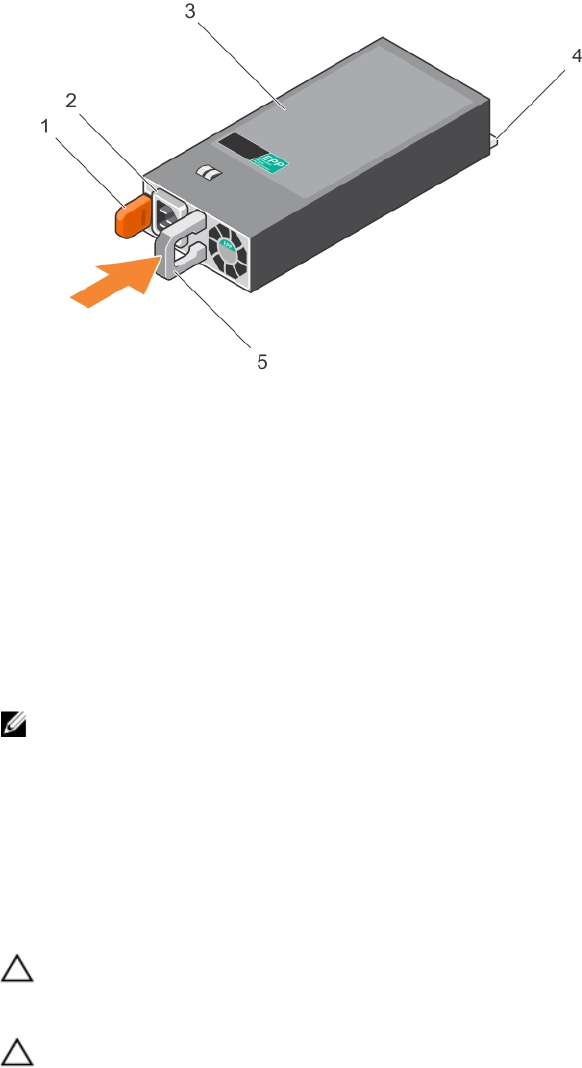
Figure 68. Installing an AC PSU
1. release latch 2. PSU cable connector
3. PSU 4. power connector
5. PSU handle
Hard drives
Your system supports entry hard drives and enterprise-class hard drives. Entry hard drives are designed
for 5x8 operating environment with less workload rating to drives and enterprise-class drives are
designed for 24x7 operating environment. Selecting the correct drive class will enable the critical areas of
quality, functionality, performance, and reliability to be optimized for the target implementation.
NOTE: Do not mix enterprise-class hard drives with entry hard drives.
Choosing the right drive type depends on the usage pattern. Improper use of entry hard drives (workload
rating exceeds 55TB/year) will lead to significant risk and increase the drives failure rate.
For more information on these hard drives, see the 512e and 4Kn Disk Formats whitepaper and 4K Sector
HDD FAQ document at Dell.com/poweredgemanuals.
All hard drives are connected to the system board through the hard drive backplane. Hard drives are
supplied in hot-swappable hard drive carriers that fit in the hard drive slots.
CAUTION: Before attempting to remove or install a hard drive while the system is running, see the
documentation for the storage controller card to ensure that the host adapter is configured
correctly to support hot-swap hard drive removal and insertion.
CAUTION: Do not turn off or restart your system while the hard drive is being formatted. Doing so
can cause a hard drive failure.
Use only hard drives that have been tested and approved for use with the hard drive backplane.
When you format a hard drive, allow enough time for the formatting to be complete. Be aware that high-
capacity hard drives can take a long time to format.
135